Overview
With ServiceTitan's Weekly Dispatch Board, you have an actionable view of your technicians' job appointments and schedules across a five-day or seven-day period. Use the Weekly Board with the Daily Dispatch Board to complete all your dispatching workflows in ServiceTitan. This eliminates the need for time-consuming external workarounds.
Who uses this feature
Administrators, dispatchers, CSRs, managers, and other office employees
Applies to all business types
Feature configuration
This feature is currently in Early Access and available for specific accounts. It is subject to change. If you want to enable this feature for your account, in the top toolbar go to Settings > Dispatch Board > New & Upcoming Features and enable the Redesigned Dispatch Board toggle.
Things to know
Use the left navigation bar to move between boards and tools. Navigation options are grouped into sections:
Boards: Navigate between:
Daily Dispatch Board
Weekly Dispatch Board
Classic Dispatch Board
Tools: Navigate to:
Crew Scheduling
Map
Dispatch Pro: If Dispatch Pro is activated for your account, you can access:
Console
Supervisor Console

To manage jobs on the Weekly Dispatch Board, click a job bubble and use the Job Details Flyout. You can also click More Actions
 on a job bubble to use the quick action menu.
The Jobs Tray on the Weekly Board includes an Assigned tab that shows job appointments that are Scheduled and Assigned.
You can expand the Jobs Tray to a full-screen view and keep it open in a separate window while you work.
Best practices
Switch between the Daily and Weekly view of the Dispatch Board as needed to complete your dispatching workflows in ServiceTitan.
Use cases
Plan ahead for additional appointments requested, multi-day jobs, install jobs, and preventative maintenance jobs.
For example, as a dispatcher or coordinator you need to assign a technician to a job appointment for a recurring maintenance job. Use the Weekly Dispatch Board to view your technicians' schedules across a five-day or seven-day period, plan ahead, and find the best available technician for the job.
View the Weekly Dispatch Board
The Weekly Dispatch Board helps you simplify job management on a weekly scale. Use it to complement the Daily Dispatch Board for compound and efficient dispatch decision-making.
To open the Weekly Dispatch Board:
Go to the navigation bar and click Dispatch > Weekly Dispatch Board.

The Weekly Dispatch Board screen opens. To switch between the Daily and Weekly Dispatch Boards, click the Day or Week tab at the top of the screen.

Note: When switching between Classic, Daily, and Weekly board views, technician, zone, business unit, and other filters are preserved automatically.
Tip: For doing small tasks each day, it's better to use the Daily Dispatch Board. For longer-term planning, like a week ahead, it's better to use the Weekly Board. For example, use the Weekly Board for multi-day jobs, longer-duration jobs, and planning and scheduling jobs further out.
At the top of the Weekly Board, you can:
Note: If you do not have the required permissions on a new daily or weekly dispatch board, a clear, actionable message will be displayed to help you proceed.
Click Day or Week to switch between the Daily and Weekly Dispatch Boards.
Click the Date and select the starting day for the period you want to view.
Note: The board displays either a five-day or seven-day period, based on the Show weekend setting in Dispatcher Preferences > Board. For more, see Configure Dispatcher Preferences on the Weekly Dispatch Board.
Click Back
 to view the previous five-day or seven-day period. Click Forward
 to view the next five-day or seven-day period.
Click Today to jump to today's date.
Click Search for team or technician name to find a specific technician on the board, which narrows your view to only the selected technician. Click Close
 in the search box to view the whole board again.
Click Filter
 to filter your view by Business Units, Teams, Skills, Technicians, or Shift Types.
At the bottom of the filter panel, you can also show only the technicians who are working. These options are off by default:Turn on Show only technicians who have a shift scheduled to hide technicians with no shift on the selected day or week.
Turn on Ignore time-off shifts so that time-off shifts don't count as a scheduled shift. This option is available only when Show only technicians who have a shift scheduled is on.
Turn on Show only technicians without non-job events with PTO timesheet code to hide technicians who have paid time off. On the Weekly Dispatch Board, a technician is hidden only when their paid time off covers every day of the week. This option isn't available for accounts that use Flexible Timekeeping.

Note: Technicians who have a job assigned stay visible, even without a shift or with PTO. You can also add these options to a saved view so they're applied each time you open it.
Use the technician statuses at the top of the board to see how many technicians are in a specific status and filter the board. You can manage which statuses appear in your dispatcher preferences. To show or hide the status filter, use Show status filter in header in Dispatcher Preferences > Board.
Look at the top of the board to see the dates and days of the week for the five-day or seven-day period you're viewing.
In the side panel toolbar, you can:
Click Dispatcher Preferences
 to personalize your board view. For more, see Configure Dispatcher Preferences on the Weekly Dispatch Board.
Click Refresh
 to see updates from other dispatchers.
Click Activity Center
 to send technicians a text message and view notifications. For more, see Notifications and messages in the Activity Center.
Tip: You can also resize the weekly view side panel by clicking the Activity Center
to see more job details or job cards based on your screen size.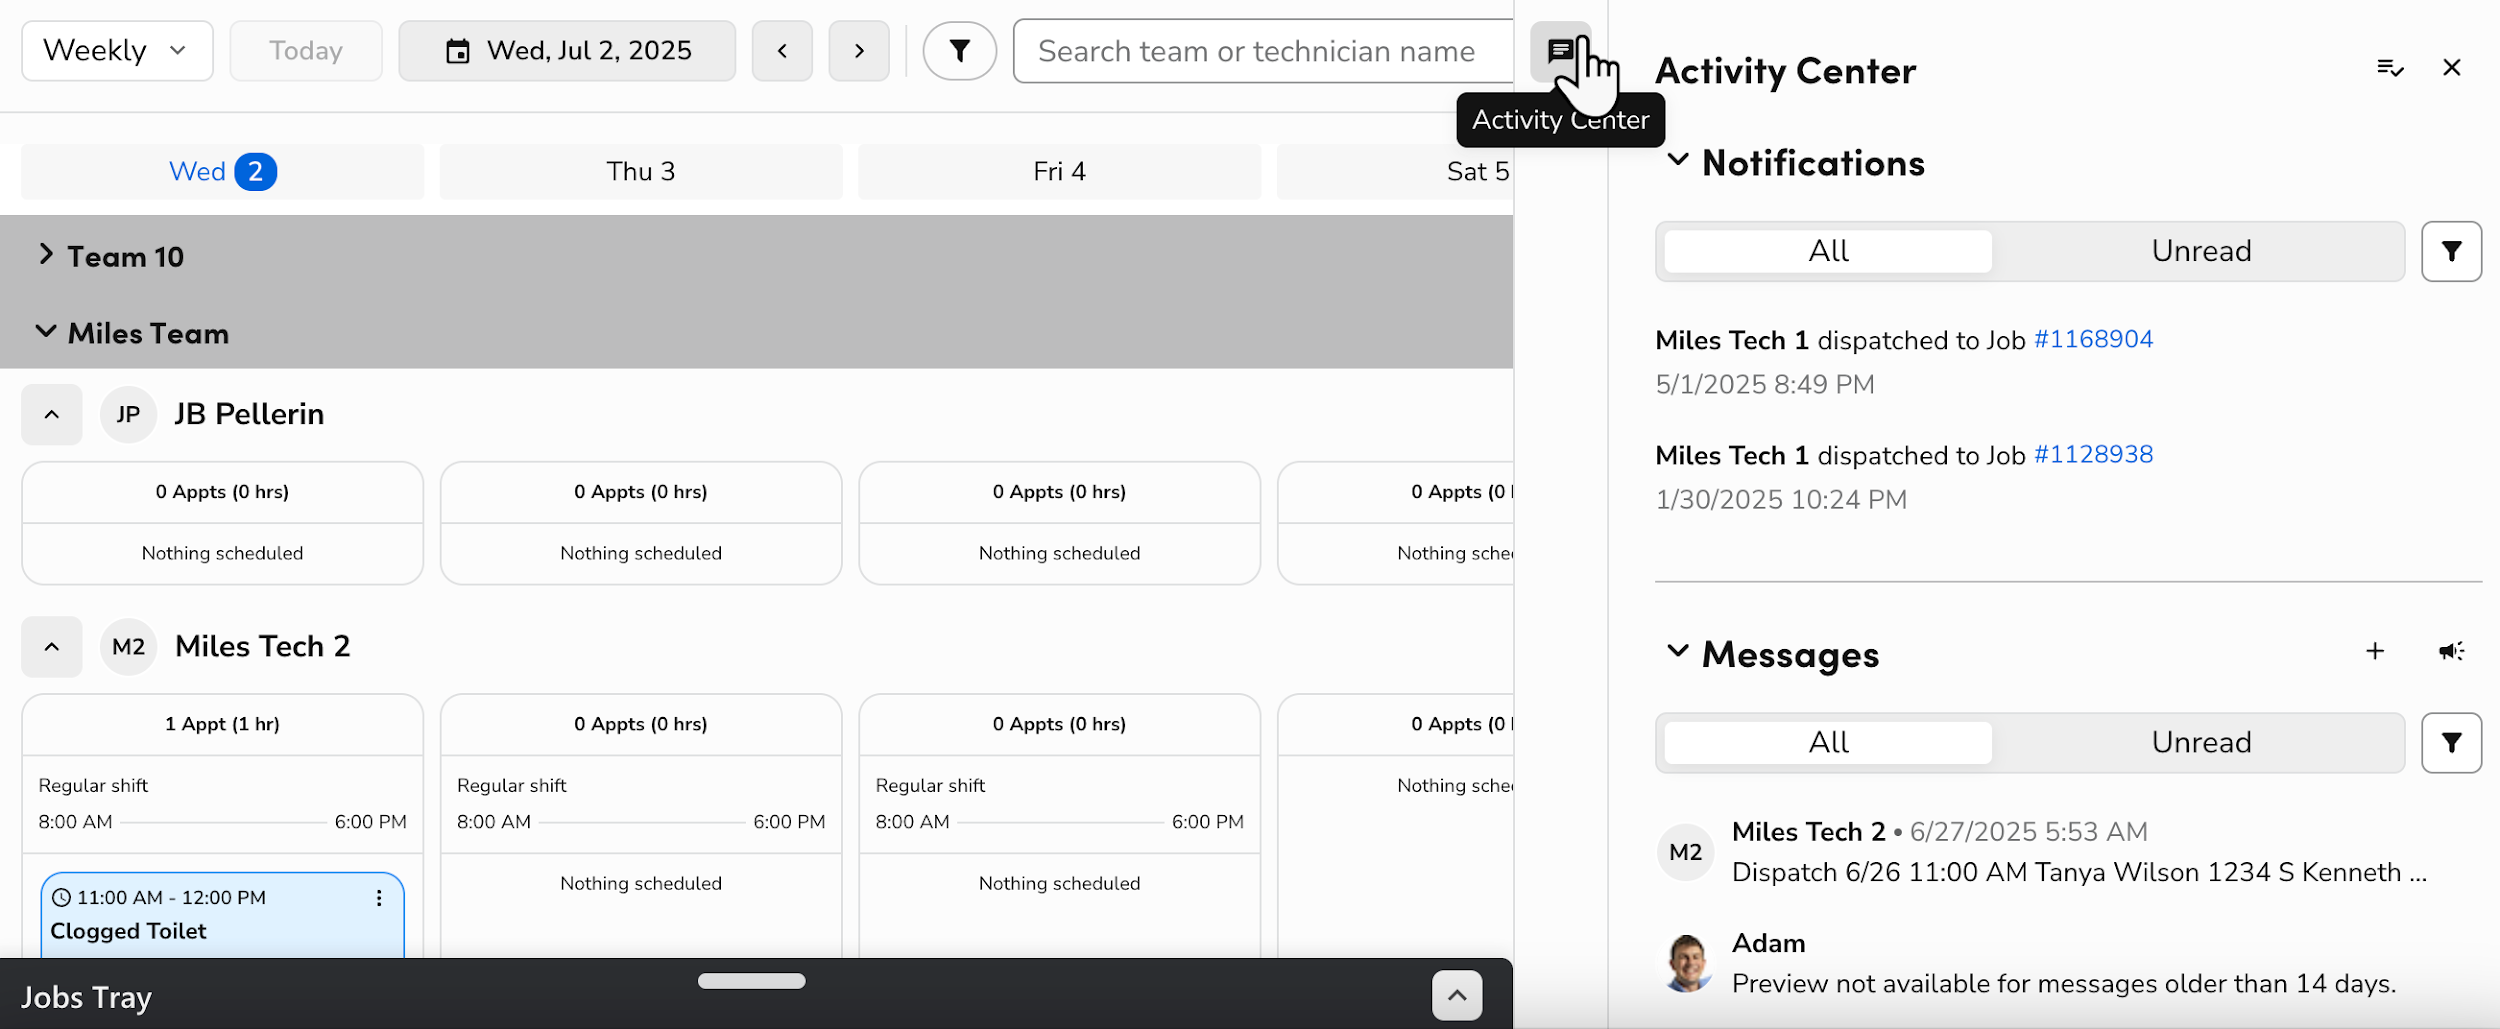
Click Mass Reschedule to reschedule multiple jobs at once. Mass Reschedule appears only if it's turned on for your account.
In the center of the Weekly Board, you can:
Collapse
 or Expand
 each technician and each team to adjust your view.
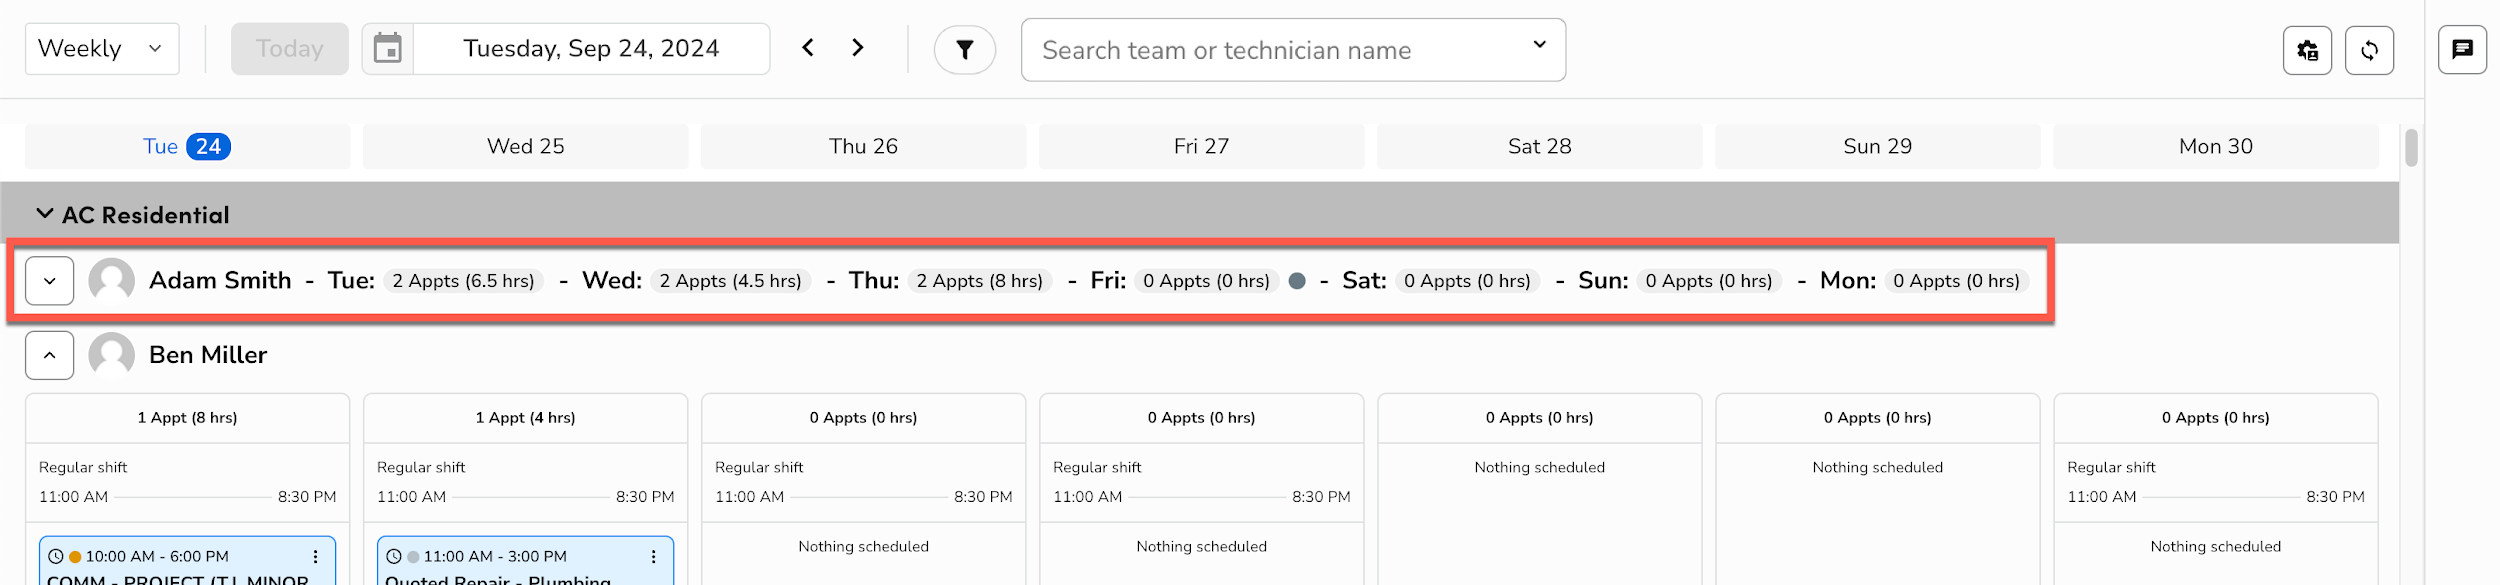
Look at each technician to see their total number of job appointments and the total duration in hours of those job appointments for each day of the selected week.
Tip: If you collapse a technician, you can still see the total number of job appointments and total duration in hours of those job appointments next to each day. A gray dot indicates the presence of a non-job event.
Look at each technician's full schedule of job appointments, Regular shifts, On-Call shifts, Time-Off shifts, and non-job events for each day of the selected week.
Note: Account configuration is required to use Non-Job Events and Technician Shifts. Please contact Technical Support for details.
View non-job event (NJE) expected duration directly on the board to see time commitments at a glance.
Click a job bubble to use the Job Details Flyout or click More Actions
to use the quick action menu.Expand the Jobs Tray and keep it open in a separate window to monitor and manage job appointments in the Unassigned, Assigned, Alert, Hold, Paused, and Canceled tabs.
View job appointments, shifts, and non-job events on the Weekly Dispatch Board
Streamline your decision-making, manage your most critical jobs, and understand your technicians' schedules at a high level on the Weekly Dispatch Board. Each technician's job appointments for every day of the selected five-day or seven-day period are shown on the Weekly Board.
Job appointments and non-job events are color-coded and include icons according to their status:
Light blue
 : Scheduled job appointments
Dark blue
 : Confirmed job appointments
Green
 : Working/Arrived/in-progress job appointments
Purple
 : Dispatched job appointments
Yellow
 : Job appointments paused by the technician
Light gray
 : Done/Closed-Out/complete job appointments, or jobs marked as Hold All Appointments
Dark gray
 : Non-job events
Red outline: Job appointments that have an alert
Note: You can change the color for each job status in Dispatcher Preferences. If your colors were changed, the color list in Dispatcher Preferences shows what each color means on your board.
Coming soon: Custom job status colors are part of the ST-83 release.
For more on dispatching icons, see Dispatching icon and alert glossary.
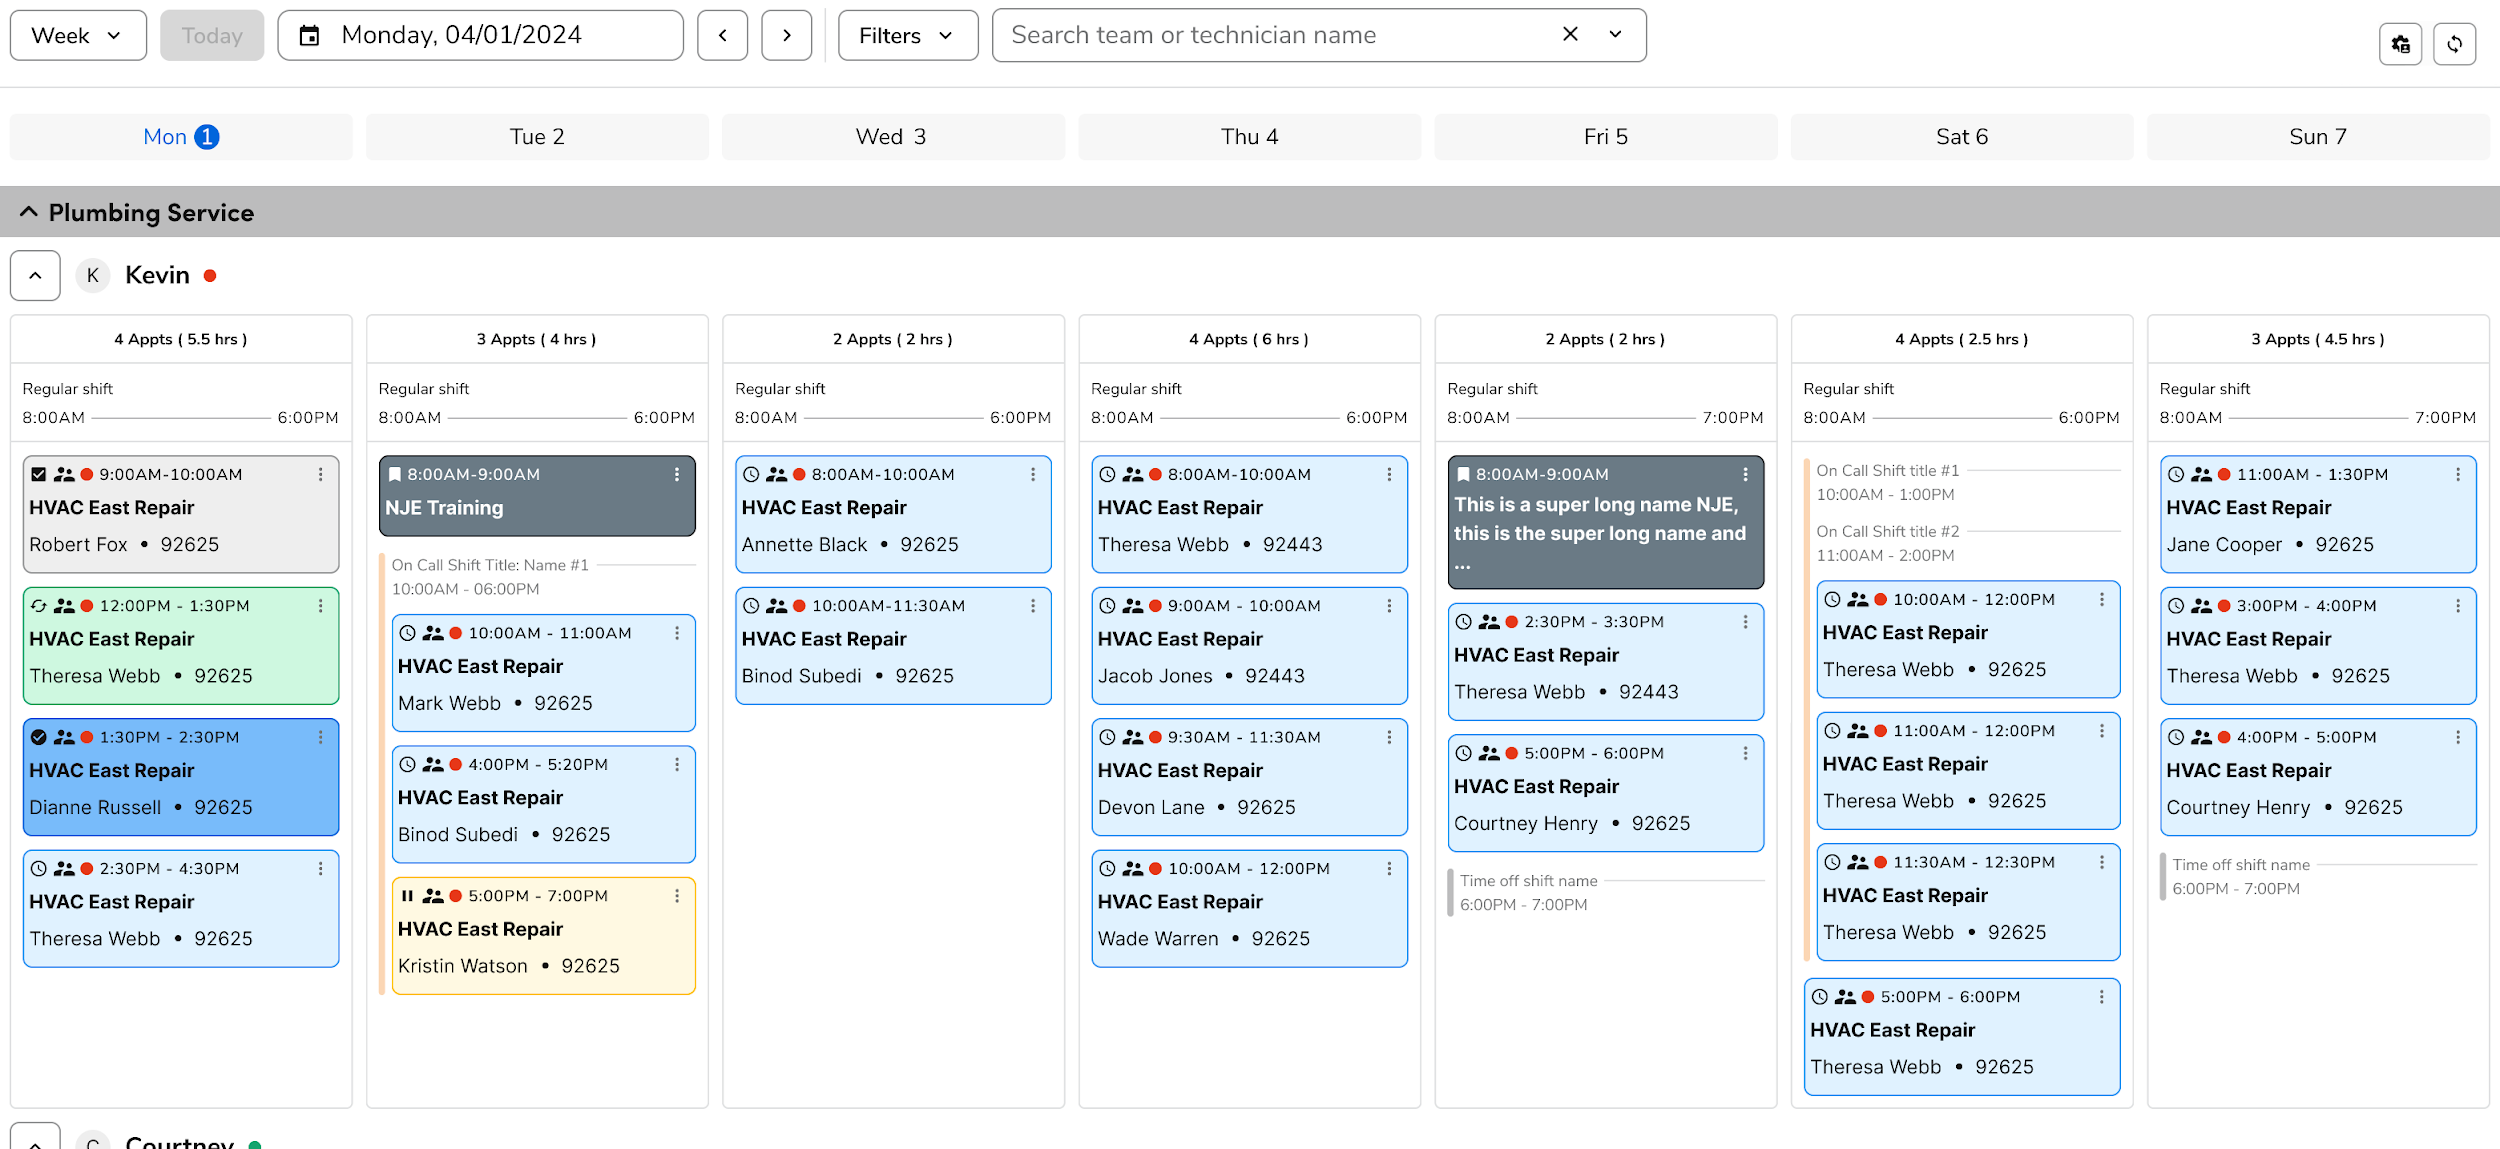
Each job bubble shows you useful, at-a-glance information about the appointment:
The start and end time of the appointment
The job type or project name in bold letters
The customer or location name
The location zip code, street address, or city
Tags assigned to the job
Note: You can choose whether to show tags on the Weekly Dispatch Board in your Dispatcher Preferences. For more, see Configure Dispatcher Preferences on the Weekly Dispatch Board. The Job bubble fields list in Dispatcher Preferences applies to the Daily Dispatch Board only. The Weekly Dispatch Board doesn't use this list.
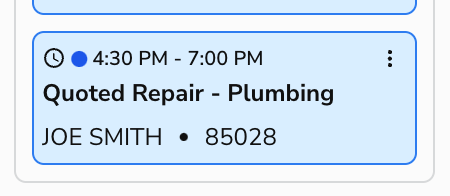
Note: Appointments with alerts also include a red outline around the job bubble.
If your company uses Technician Shifts and Non-Job Events, these are also visible on the Weekly Board:
Non-job events are shown in dark gray. You can create and edit non-job events on the Daily Dispatch Board.
Regular and Overnight shifts are shown at the top of each day. If a Regular or Overnight shift extends to the next day, you see a +1 next to it.
Time Off and On Call shifts are shown within each day, along with any non-job events or job appointments. You can create and edit shifts in Schedule
 > Technician Shifts.
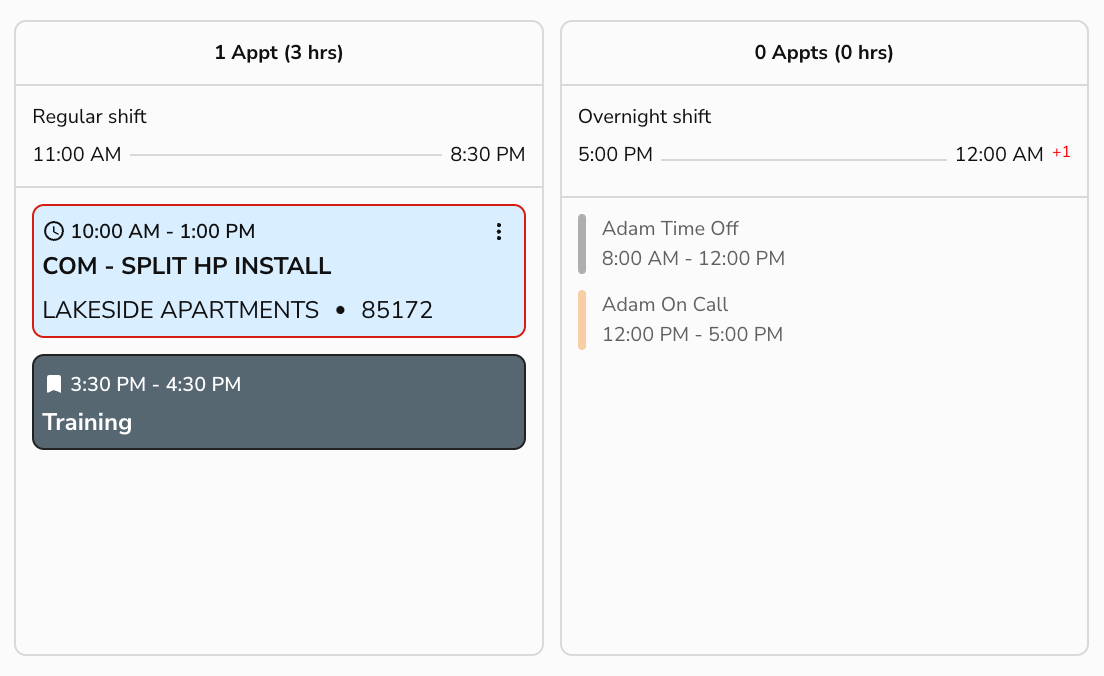
For more, see Use Technician Shifts and Schedule and manage non-job events.
Manage technicians on the Weekly Dispatch Board
If your company has set up teams, technicians are grouped by team on the Weekly Dispatch Board. If your company has set up zones, you see a dot next to each technician that indicates their zone.
To hide a technician from the board without deactivating them, go to Settings > Dispatch Board > Teams Management. In the Board Visibility column, switch the technician to Hidden. Hidden technicians don't appear on the daily and weekly dispatch boards for anyone in your company unless they're assigned to a job that day or week. Use the Visible and Hidden tabs to see which technicians are shown, and choose Make visible to show a technician again. New technicians are visible by default. You need permission to edit teams to change this setting. For more information, see Teams Management overview.

Hover over a technician's name to see their details without leaving the weekly view, including their team, main zone, all zones, phone number (if provided), memos, and skills listed in their profile.
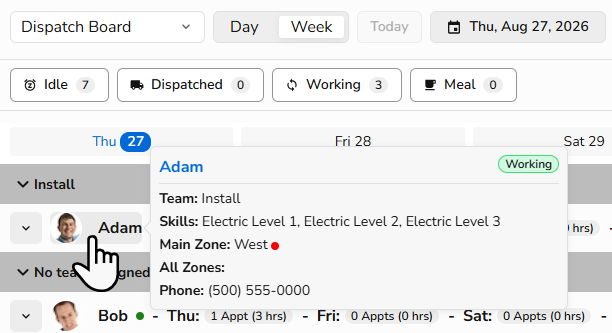
Click a technician's name to take the same quick actions available on the Daily Dispatch Board. For more, see Manage technicians on the Daily Dispatch Board.

Note: Account configuration is required to use skills, set technician zones, and see technician zones on the Dispatch Board. Please contact Technical Support for details. To set up skills, go to Settings > Operations > Skills.
Manage job appointments on the Weekly Dispatch Board
To manage jobs, click a job bubble to open and use the Job Details Flyout. For more, see Use the Job Details Flyout to view and edit job details on the Dispatch Board.

The flyout shows email addresses under the customer and location names, below the service address. Only emails with at least one notification preference turned on appear. Click an email address to send an email.
Coming soon: Customer and location email addresses in the Job Details flyout are part of the ST-83 release.
You can also click More Actions on a job bubble to:
Confirm the appointment
Assign, unassign, or reassign a technician
Dispatch a technician
Cancel Dispatch
Reschedule the appointment

Note: If a job appointment has exactly one assigned technician and that technician is available to dispatch, click Dispatch to dispatch them without choosing from a list. If that technician is already dispatched, click Cancel Dispatch to cancel in one click. You might still see a confirmation message. If two or more technicians are assigned, choose which technicians to dispatch. This works on the Daily and Weekly Dispatch Boards and in the Jobs Tray.
Coming soon: One-click Dispatch and Cancel Dispatch are part of the ST-83 release.
Note: Working, Dispatched, and Done job appointments can't be reassigned.
View the Jobs Tray on the Weekly Dispatch Board
The Jobs Tray on the Weekly Dispatch Board is similar to the Jobs Tray on the Daily Dispatch Board with a few key differences:
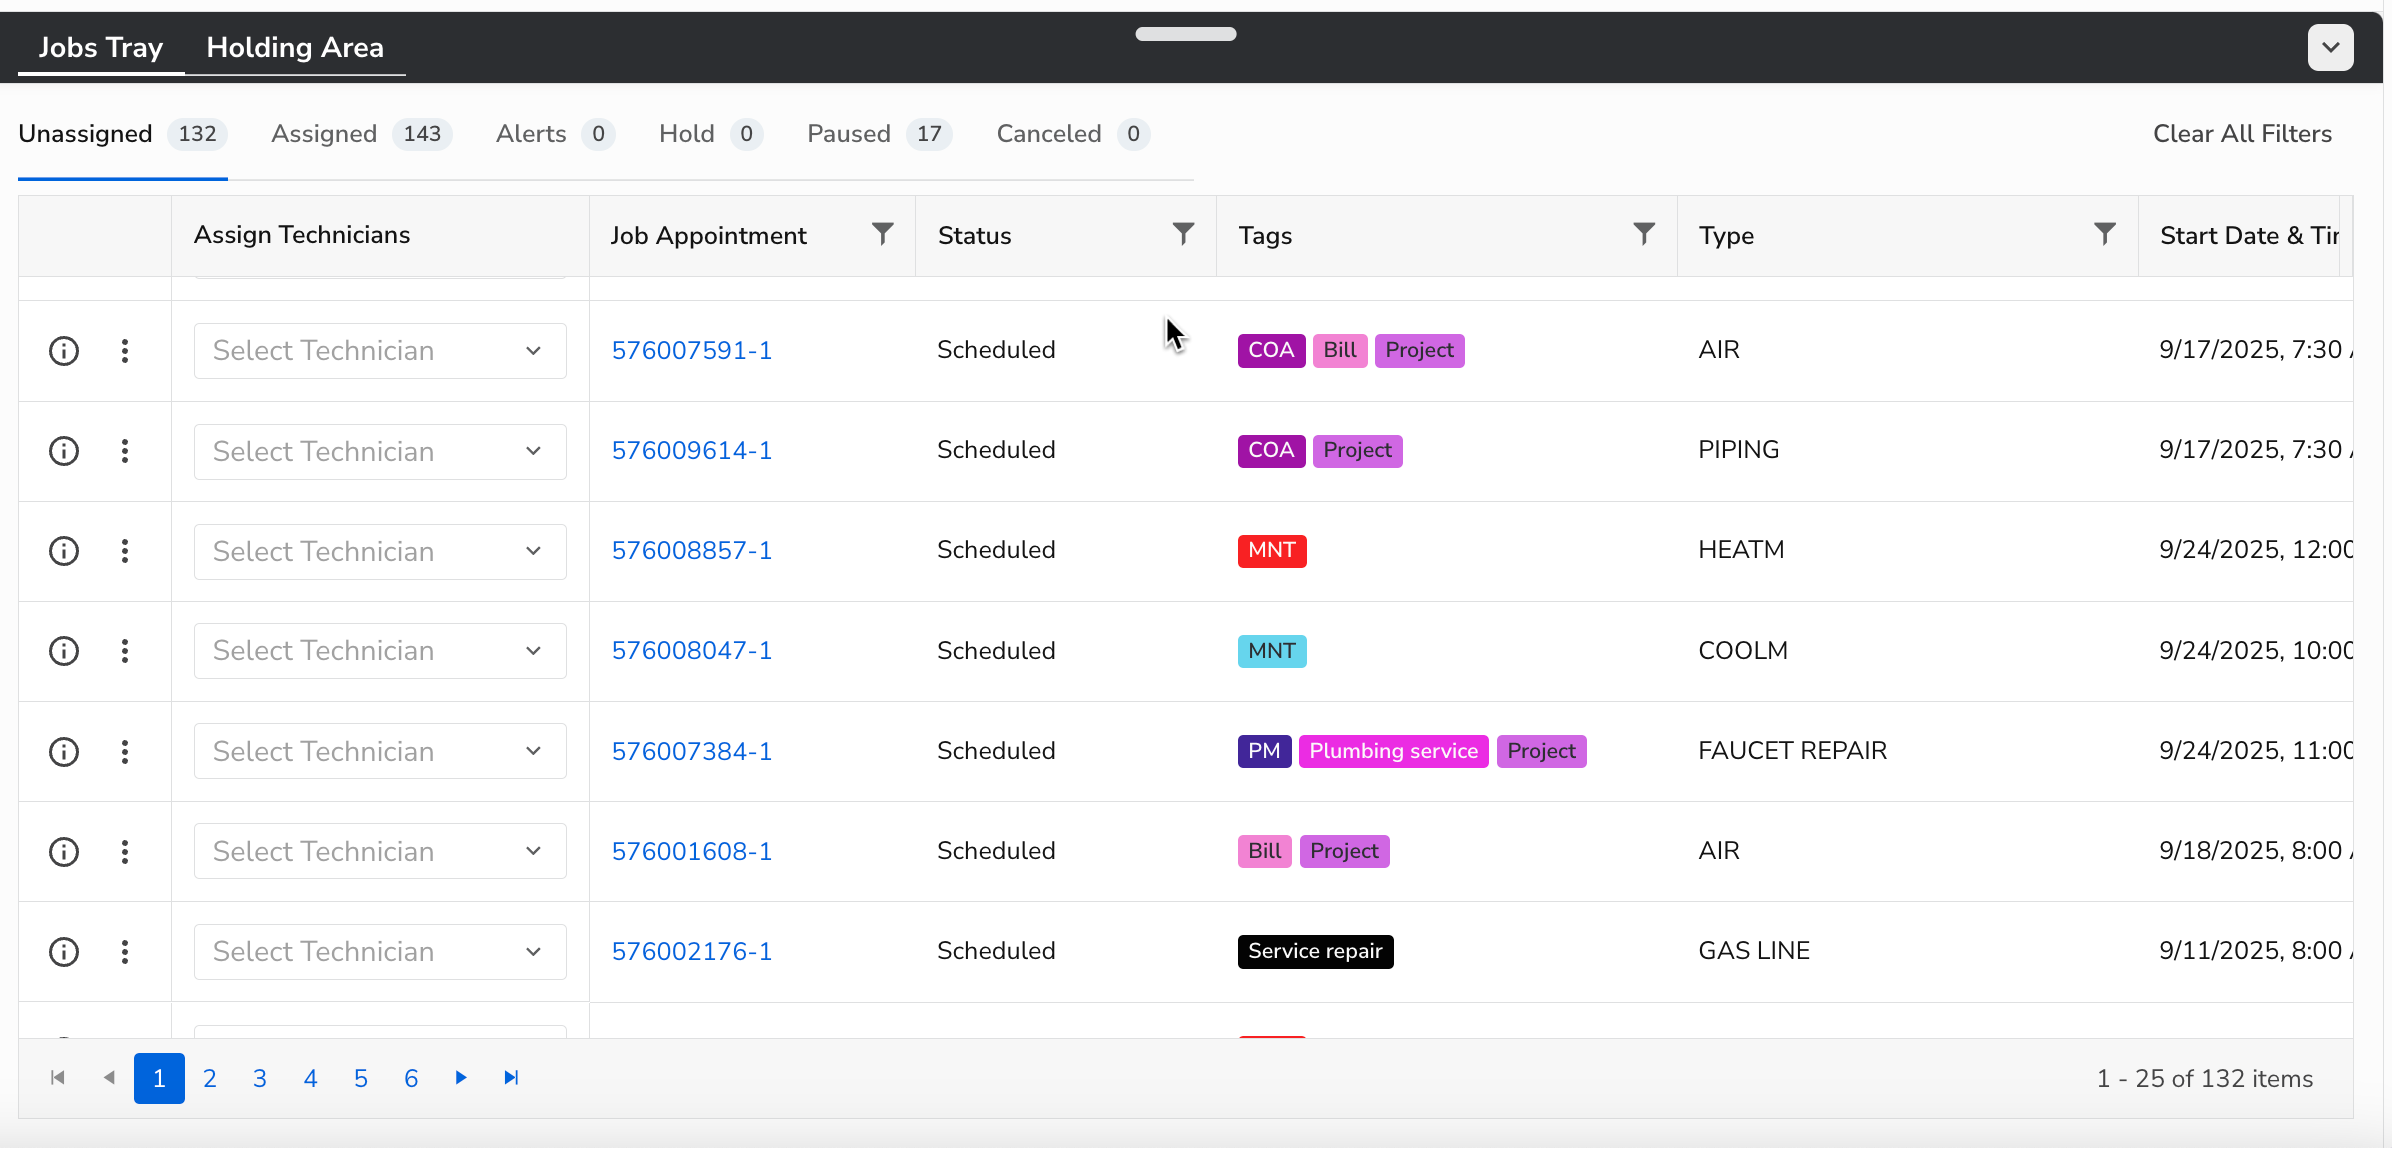
You can click, hold, and drag the Jobs Tray header to adjust your view. You can also adjust your view by clicking Collapse to view more of the Weekly Board or Expand to view more of the Jobs Tray.
You can click Info to open the Job Details Flyout or More to open the Action menu for a job appointment.
To assign technicians to appointments, use the Select Technician dropdown in the Technician column of the Unassigned tab.
Hold Reasons are now displayed on the Hold tab and can be filtered.
The Assigned tab shows job appointments that are Scheduled and Assigned.
You can click the Holding Area tab to view jobs that are not yet assigned to a technician. From here, you can drag and drop jobs onto a technician's schedule to assign them.
Note: The Holding Area makes it easier to match jobs with technicians and times, and it's a helpful replacement for using dummy technicians.

Tip: Use the Calendar, Business Unit, Job Type, or Zone filters to narrow down and find specific jobs.
Hover over a job's Job Type in the Jobs Tray, or move to it with your keyboard, to see the job's summary without leaving the tray. This works in standard and custom Jobs Tray tabs, even if Show job detail pop-over on hover is off.
Coming soon: Job details on hover in the Jobs Tray are part of the ST-83 release.

For more, see Use the Jobs Tray on the Weekly Dispatch Board.
Use the Weekly Dispatch Board with Flexible Timekeeping
If you use Flexible Timekeeping, the new daily and weekly dispatch board shows each technician's real-time timekeeping status, activity context, and non-job time directly on the board. This keeps the board in sync with your timekeeping records as the day happens, so dispatchers can see what every technician is doing without guessing or waiting for payroll to close.
Note: These capabilities appear only when your account uses Flexible Timekeeping and has the Redesigned Dispatch Board enabled. To enable Flexible Timekeeping, contact your Customer Success Manager.
Choose what displays under each technician
In Dispatcher Preferences > Board, use the Display status setting to choose what appears under each technician's name by default:
Technician status: What the technician is doing right now (for example, Working, Idle, or Meal), and how long they've been in that state.
Timesheet activity code: The technician's current timesheet entry (for example, Working, Lunch, or Personal Time), and how long they've been on that entry today.
 If you don't set a preference, the board displays Technician status by default.
See real-time status and full context
Each technician's status updates in real time as their timekeeping activity changes with no refresh needed. To see all three values at once, hover over a technician to view their status (for example, Driving), their activity code (for example, Commute), and their hours (for example, 3h 15m). If a technician has no active timekeeping activity, the standard status icon appears with no activity context.
To filter the board, use the technician statuses. With Flexible Timekeeping enabled, you can filter by four statuses: Idle, Working, Dispatched, and Meal.

For activity history and starting and completing Non-Job Events from the board, see Use the Dispatch Board with Flexible Timekeeping.
FAQ
Why are some technicians missing from the Weekly Dispatch Board?
A technician might be hidden in Settings > Dispatch Board > Teams Management, or filtered out by the shift or PTO filters. Check the technician's Board Visibility setting, and check the filters in the filter panel. Technicians with a job appointment during the period you're viewing always appear.