Overview
With ServiceTitan’s Daily Dispatch Board, you can efficiently manage your technicians’ daily schedules and job appointments. Dispatch technicians, track progress, and update job details all from one place.
The redesigned Daily Dispatch Board offers faster performance, a cleaner layout, and smarter workflows to streamline your technicians’ daily schedules and job appointments.
Note: If these instructions don't work for you, you may still be using the classic version of the Dispatch Board. See Use the Daily Dispatch Board for more information about that version.
Who uses this feature
Administrators, dispatchers, CSRs, managers, and other office employees
Applies to all business types
Feature configuration
This feature is currently in Early Access and available for specific accounts. It is subject to change. If you want to enable this feature for your account, in the top toolbar go to Settings > Dispatch Board > New & Upcoming Features and enable the Redesigned Dispatch Board toggle.
Things to know
Use the left navigation bar to move between boards and tools. Navigation options are grouped into sections:
Boards: Navigate between:
Daily Dispatch Board
Weekly Dispatch Board
Classic Dispatch Board
Tools: Navigate to:
Crew Scheduling
Map
Dispatch Pro: If Dispatch Pro is activated for your account, you can access:
Console
Supervisor Console

View the Daily Dispatch Board
The Daily and Weekly Dispatch Boards give you a visual overview of where technicians are and what job appointments are going on for the day. To open the Daily or Weekly Dispatch Board, go to the navigation bar and click Dispatch > Daily Dispatch Board or Weekly Dispatch board. The Daily Dispatch Board gives you a visual overview of where technicians are and what job appointments are going on for the day.
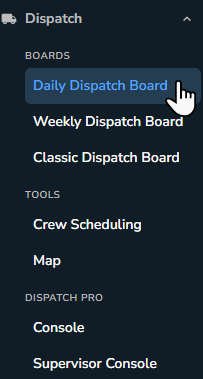
The corresponding dispatch board screen opens. You can switch between the Daily and Weekly Dispatch board by clicking Day or Week tabs at the top of the screen.

Note: When switching between Classic, Daily, and Weekly board views, technician, zone, business unit, and other filters are preserved automatically.
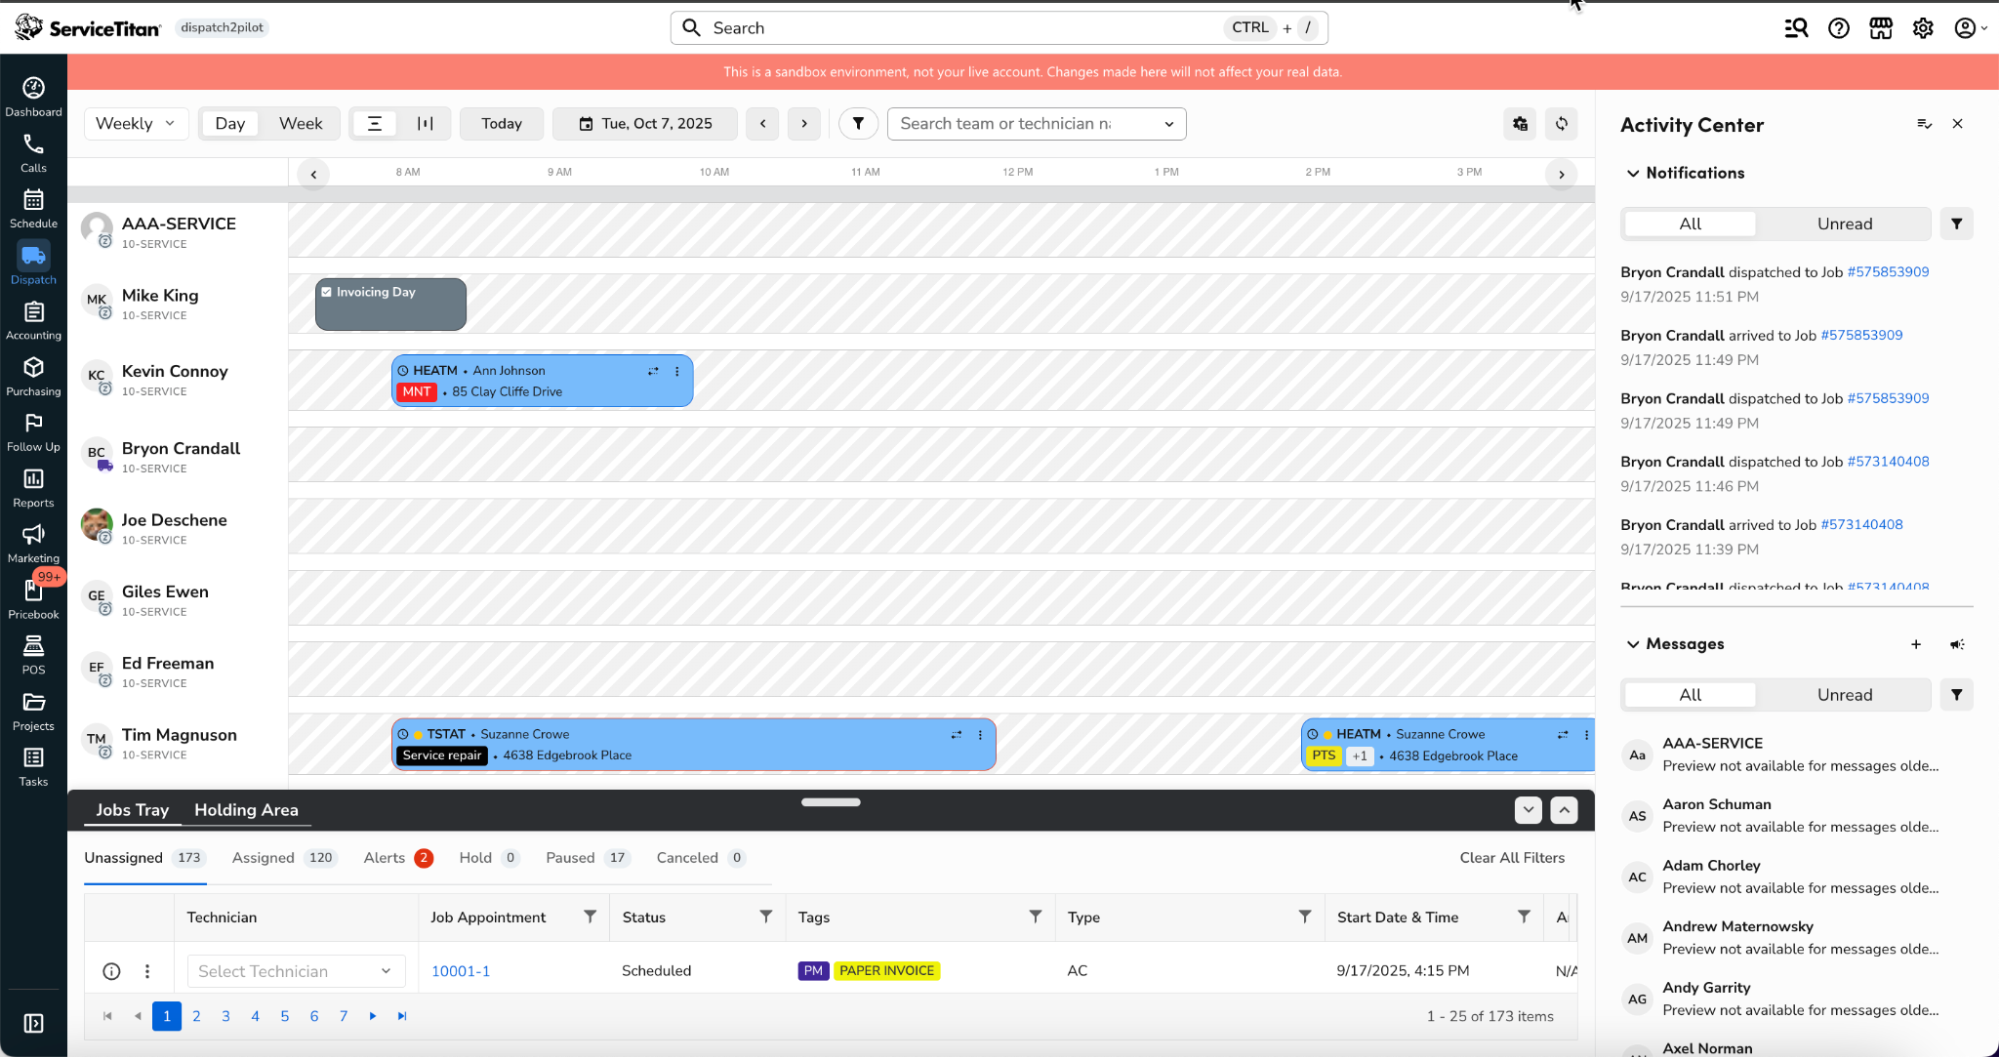
The Daily Dispatch Board screen opens. Job appointments and non-job events are color-coded and include icons according to their status:
Light blue
 : Scheduled job appointments
Dark blue
 : Confirmed job appointments
Green
 : Working/Arrived/in-progress job appointments
Purple
 : Dispatched job appointments
Yellow
 : Job appointments paused by the technician
Light gray
 : Done/Closed-Out/complete job appointments, or jobs marked as Hold All Appointments
Dark gray
 : Non-job events
Red outline: Job appointments that have an alert
Caret Indicators
 : Shift start and end times
Clock-in and clock-out markers: On the horizontal Daily Dispatch Board, markers on a technician’s row show when the technician clocked in and clocked out. Hover over a marker to see the time, for example, Clock in: 8:00 AM. A clock-out marker appears only after the technician clocks out. Markers show for today and past dates, but not on the Weekly Dispatch Board or in the vertical layout. To see them, turn on Show technician activity history in Dispatcher Preferences > Behavior.
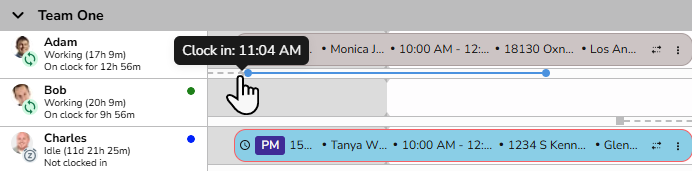
Note: Clock-in and clock-out markers appear only if Clock In and Clock Out is enabled for your account. They don’t appear for accounts that use Flexible Timekeeping.
Coming soon: Clock-in and clock-out markers on the Daily Dispatch Board are part of the ST-83 release.
Show Shift Extensions: When Dispatch Pro is configured with a maximum shift extension time, the board displays the extension period as a diagonal line pattern immediately following the technician's scheduled shift. The white area represents the technician's active shift, the gray area represents off-schedule time, and the lined pattern between them indicates the shift extension window where Dispatch Pro can still assign jobs if needed. For more, see Adjust Dispatch Pro Routing Settings.

Note: You can change the color for each job status in Dispatcher Preferences. If your colors were changed, the color list in Dispatcher Preferences shows what each color means on your board.
Coming soon: Custom job status colors are part of the ST-83 release.
For more on dispatching icons, see Dispatching icon and alert glossary.
Manage the Daily Dispatch Board
At the top of the Dispatch Board, you can:
Note: If you do not have the required permissions on a new daily or weekly dispatch board, a clear, actionable message will be displayed to help you proceed.
Click Day or Week to switch between the Daily and Weekly Dispatch Boards.
Click the Vertical
 icon to view the board in vertical layout, or click the Horizontal
 icon to view it in horizontal layout. In the vertical layout, technicians appear in one continuous row. Scroll sideways to see all technician columns; you don’t need to click through pages.
Coming soon: Continuous sideways scrolling in the vertical layout is part of the ST-83 release.
Click Today to jump to today’s date.
Click the Calendar and select the date of day you want to view.
Click Back
 to view the previous day. Click Forward
 to view the next day.
Click Search for team or technician name to find a specific technician on the board, which narrows your view to only the selected technician. Click Close
 in the search box to view the whole board again.

Click Filter
 to filter your view by Business Units, Teams, Skills, Technicians, or Shift Types.
At the bottom of the filter panel, you can also show only the technicians who are working. These options are off by default:Turn on Show only technicians who have a shift scheduled to hide technicians with no shift on the selected day or week.
Turn on Ignore time-off shifts so that time-off shifts don’t count as a scheduled shift. This option is available only when Show only technicians who have a shift scheduled is on.
Turn on Show only technicians without non-job events with PTO timesheet code to hide technicians who have paid time off. On the Weekly Dispatch Board, a technician is hidden only when their paid time off covers every day of the week. This option isn’t available for accounts that use Flexible Timekeeping.
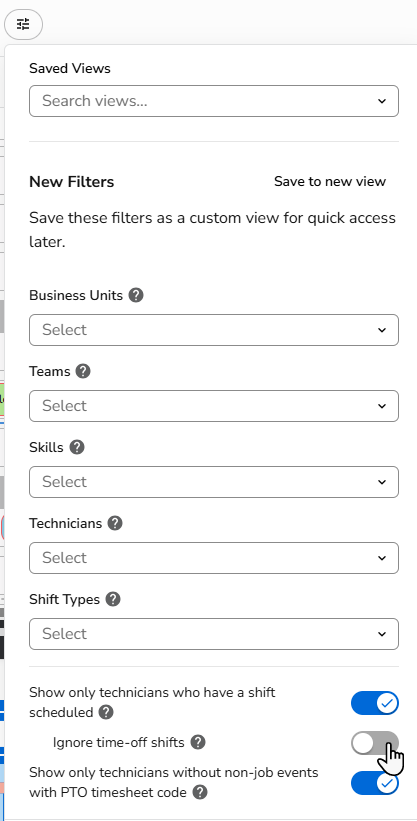
Note: Technicians who have a job assigned stay visible, even without a shift or with PTO. On the Daily Dispatch Board, the board updates automatically when a technician’s shift or PTO changes. You can also add these options to a saved view so they’re applied each time you open it.
Use the technician statuses at the top of the Dispatch Board to see how many technicians are in a specific status and filter the board. You can manage which statuses appear in your dispatcher preferences.
 To show or hide the status filter, use Show status filter in header in Dispatcher Preferences > Board.
In the side panel toolbar, you can:
Click Dispatcher Preferences  to personalize your board view.
Click Refresh
 to see updates from other dispatchers.
Click Activity Center
 to send technicians a text message and view notifications.
Click Mass Reschedule to reschedule multiple jobs at once. Mass Reschedule appears only if it’s turned on for your account.
On the board, you can also:
View non-job event (NJE) expected duration directly on the Daily or Weekly Dispatch Board horizontal and vertical views to see time commitments at a glance.

Click a job bubble to use the Job Details flyout or click More Actions
 to use the quick action menu. Click Click-to-drop
 to assign the job to another technician by dragging and dropping the job bubble. For more, see Manage appointments and non-job events on the Daily Dispatch Board.
Expand the Jobs Tray and keep it open in a separate window to monitor and manage job appointments in the Unassigned, Assigned, Alert, Hold, Paused, and Canceled tabs.
Personalize your Daily Dispatch Board view
In the side panel toolbar, click Dispatcher Preferences  to personalize your Daily Dispatch Board view. Preferences are grouped into three tabs: Job Bubble, Board, and Behavior.
Coming soon: In the ST-83 release, Dispatcher Preferences is reorganized into Job Bubble, Board, and Behavior tabs.
Note: The changes in Dispatch Preferences apply only to your individual user account and don’t affect other users. If you have the Modify Dispatch Board Behavior permission, you can switch from Your preference to Your company preference at the top of the panel to set company defaults. Changes there apply to everyone in your company who hasn’t set their own value, and they save right away. Your own settings always take priority. On each tab, click Use company default to go back to your company’s settings, or click Reset tab to return that tab to the built-in defaults. Current Time Position can’t be set as a company default.
Coming soon: Company defaults for Dispatcher Preferences are part of the ST-83 release.
Note: If you haven’t changed your preferences, the board uses these defaults: Ask me every time for jobs that move outside their arrival window, Team display mode set to Expanded, Classic colors, and on-hold jobs shown. If you already saved your own choices, they stay the same. The first time you open the board, a tip, “Change colors, team headers and board behavior here,” points you to Dispatcher Preferences.
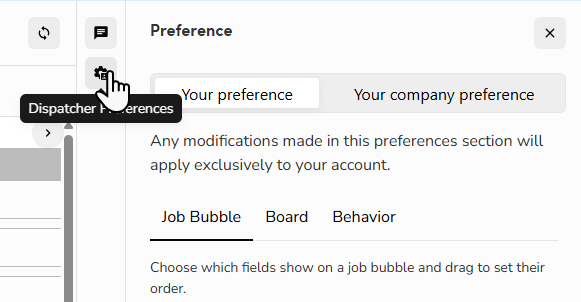
Job Bubble tab:
Job bubble fields: Choose which fields show on a job bubble and drag to set their order. Select or clear the checkbox next to a field to show or hide it. A job bubble needs at least one field, so you can’t clear the last one. Your changes appear on the board right away and stay saved the next time you open it. The Weekly Dispatch Board doesn’t use this list.
Tags: Displays the job’s tags.
Job number: Displays the job number.
Customer name: Displays the customer’s name for easy identification.
Arrival window: Displays the job’s arrival window.
Street address: Shows the full address where the job is scheduled.
City: Displays the city name for easier geographic context.
Job type: Displays the type of job.
Zip code: Displays the ZIP code for quick reference.
Project name: Shows the name of the associated project, if applicable.
Location name: Shows the specific location linked to the job, such as a site or property name.
Business unit: Displays the job’s business unit.

Note: If a project name is not available, the project number will be displayed. If no project is associated with the job, the job type will appear instead.
Coming soon: Choosing and reordering job bubble fields, including Tags, Job number and Arrival window, is part of the ST-83 release.
Job Bubble Display: Choose how many lines each job bubble shows: Single line or Two lines (Default). This setting applies to the daily boards only, and Single line has no effect in the vertical layout.
Coming soon: In the ST-83 release, Board Display Mode is renamed Job Bubble Display and moves to the Job Bubble tab.
Job bubble colors: Choose the color scheme used for job bubbles and events on the Dispatch Board:
Classic (High Contrast) (Default): Uses stronger, more distinct colors to improve visibility and make jobs and events easier to differentiate, especially in busy schedules.
Modern (Pastel): Uses softer, lighter colors for a cleaner and more modern visual style, providing a less intense visual experience while viewing the board.
Custom: Choose your own color for each status: Scheduled (unconfirmed), Scheduled (confirmed), Dispatched, Working, On hold, Paused, Done, Unused, Non-job event, and Project event. Pick a color or enter a hex code. If you choose a dark color, the text in the job bubble changes to white so it’s easy to read. To go back to standard colors, select Classic (High Contrast) or Modern (Pastel), or click Reset tab.
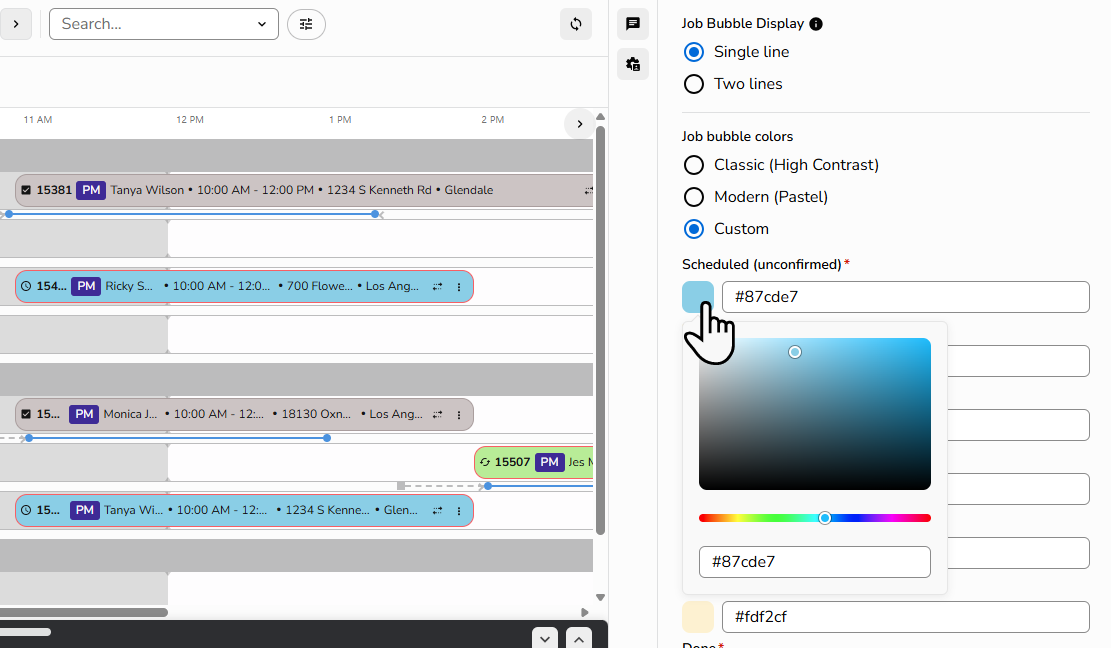
Coming soon: Custom job bubble colors are part of the ST-83 release.
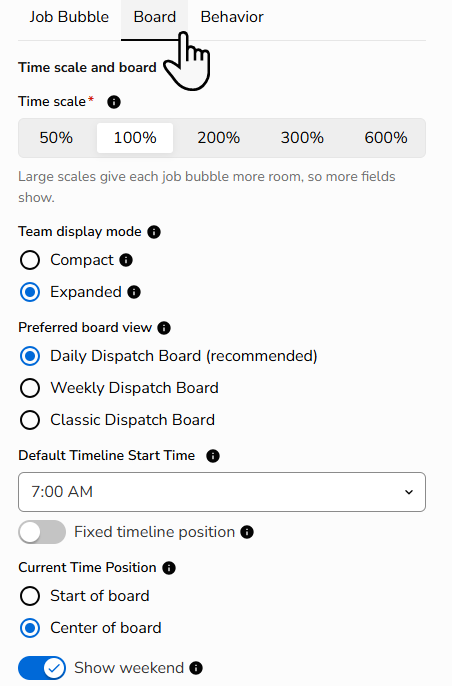
Board tab:
Time scale: Choose 50%, 100% (Default), 200%, 300%, or 600% to set how wide each hour is drawn on the daily boards. Larger scales give each job bubble more room, so more fields show.
Coming soon: The time scale option is part of the ST-83 release.
Team display mode: Choose how team information is displayed:
Compact: Shows a condensed view for easier scanning.
Expanded: Displays full details for a more comprehensive team overview.
Preferred board view: Select your default board from the following options.
Daily Dispatch Board (recommended)
Weekly Dispatch Board
Classic Dispatch Board
Note: You can switch boards at any time, but the board you select here opens by default when you go to Dispatch.
Default Timeline Start Time: Set the time the Daily Dispatch Board opens on non-current days (for example, 6:00 AM or 10:00 AM) to provide a consistent starting view of the schedule.
Note: The default timeline start time applies to all days except today. On today’s date, the board opens at the current time. To open the board at the default timeline start time on today’s date too, turn on Fixed timeline position.
Fixed timeline position: Open the Daily Dispatch Board at the Default Timeline Start Time on every day, including today. When this option is on, Current Time Position is turned off.
Current Time Position: Choose where the current time appears when you open today’s Daily Dispatch Board, in the horizontal or vertical layout:
Start of board (Default): The current time is at the start of the board.
Center of board: The current time is in the middle of the board, so you can see the work just before and after now.
Show weekend: Display weekend days on the board to plan and manage technician schedules across the full week.
Side Panel and header:
Keep side panel open: Keep the side panel visible at all times for quick access to job details, notes, and technician information.
Show side panel buttons in header: Show the side panel buttons at the top of the board.
Show status filter in header: Show the technician status filters at the top of the board.
Side Panel Width: Adjust the width of the side panel to your preference by selecting one of the following options:
Large panel (Default)
Medium panel
Technician Status Details: Choose what to display below the technician name.
Technician status: What the technician is doing right now (for example, Working, Idle, or Meal) and how long they've been in that state.
Clocked-in hours: Shows how long the tech has been on the clock today. Starts when they begin their first activity and updates in real time.
Technician status and clocked-in hours: Shows both.
Coming soon: Current Time Position is part of the ST-83 release.

Note: This option only appears if you have Clock In and Clock Out enabled for your account. If you’d like to enable this feature, please contact your Customer Success Manager.
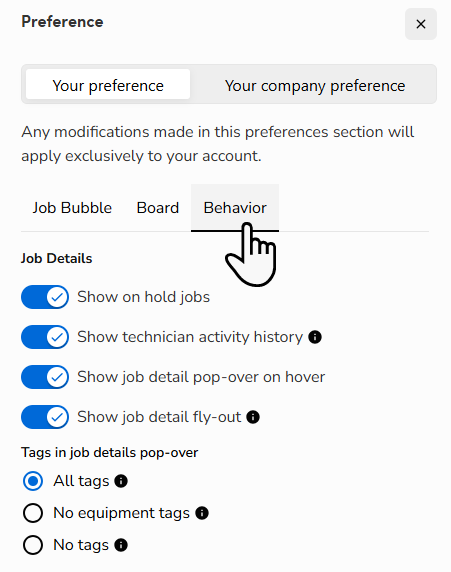
Behavior tab:
Job Details:
Show on hold jobs: Display on-hold jobs directly on the board to identify, review, and track jobs that are currently on hold. This option is on by default.
Show technician activity history: View recent technician activities, such as job status updates or schedule changes, directly from the board.
Tip: When the Show Technician Activity History option is turned on, the row appears on the board. Click the row to view job details in the flyout or go to the job screen. You can also hover over the row to highlight the job or non-job event it relates to.
Show job detail pop-over on hover: Display job details when you hover over a job.
Show job detail fly-out: Open the Job Details flyout instead of the job record.
Tags in job details pop-over: Choose which tags appear in the pop-over: All tags, No equipment tags, or No tags.
Jobs Tray: From the Tags shown before truncation dropdown, select how many tags (up to 10) you want to display for each job before truncation.
Scheduling: Under When a job moves outside its arrival window, choose what happens. These options appear only if custom arrival windows are turned on for your account.
Do nothing: The system will not make any automatic changes to the arrival window. All updates and adjustments must be handled manually.
Adjust the arrival window automatically: The system will automatically update and adjust the arrival window based on scheduling changes, technician availability, or other related factors.
Ask me every time (Default): Allows you to manually review and select the appropriate arrival window behavior.

Coming soon: The Behavior tab, including the renamed arrival window options, is part of the ST-83 release.
Manage Activity Center on the Daily Dispatch Board
To activate the Activity Center on the Dispatch board:
Go to the top toolbar and click Settings
 .
In the side menu go to Dispatch Board > New and Upcoming Features.
On the New and Upcoming Feature screen that opens, turn on the Dispatch Board Activity Center toggle.

Notifications and messages in the Activity Center
In the side panel toolbar, click Activity Center  to view and manage notifications and messages. These include text messages between technicians and the office and job updates, such as when a technician completes a job.
In the Notifications section:
Click the Unread tab to only see unread notifications, click the All tab to see all read and unread notifications.
Click the job number for a notification to open the full job record.
Click Filters
 to:
Select a Business Unit (BU), Teams, or Shift Types then click Apply to only see notifications with technicians in specific BUs or teams.
Click Clear selection
 , then Apply to clear your filters and see everything.
Click Mark all as read
 to mark all notifications as read.
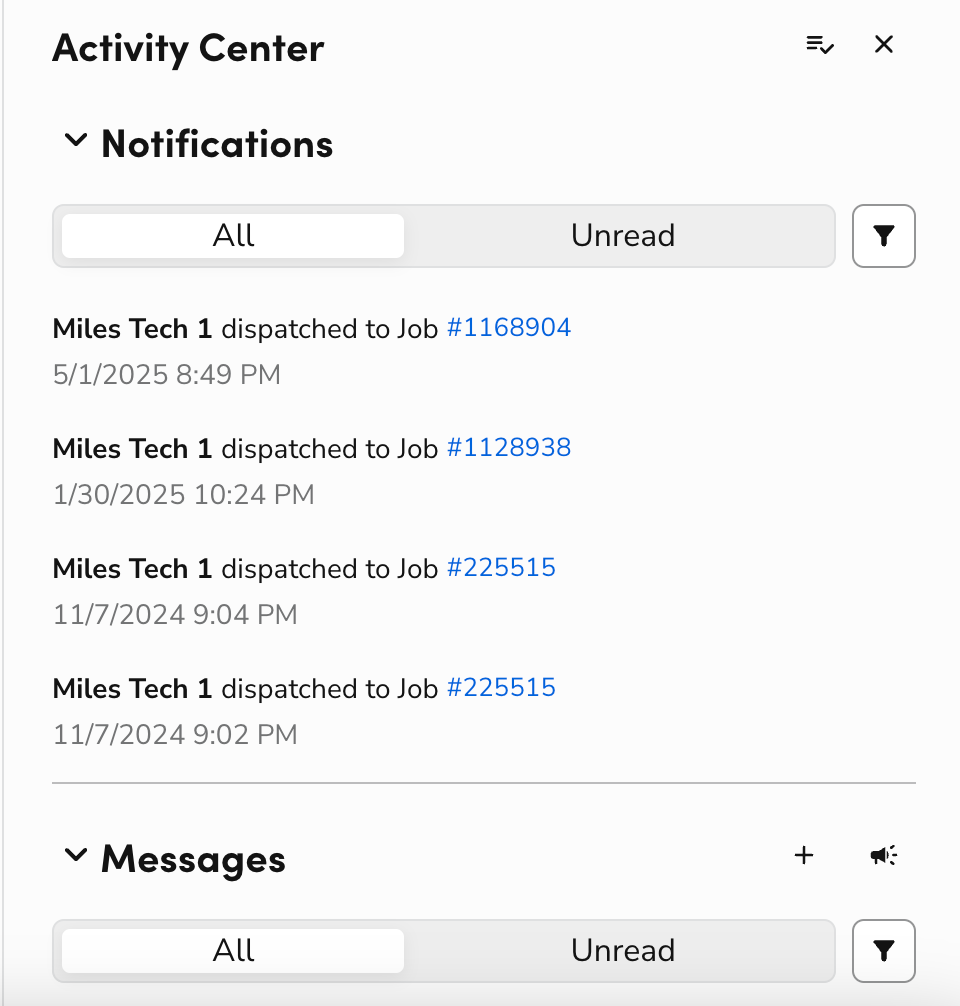
In the Messages section:
Click
 to send messages to technicians
Click Announcements
 to mass text multiple technicians.
Move the line up and down according to what you want to prioritize.

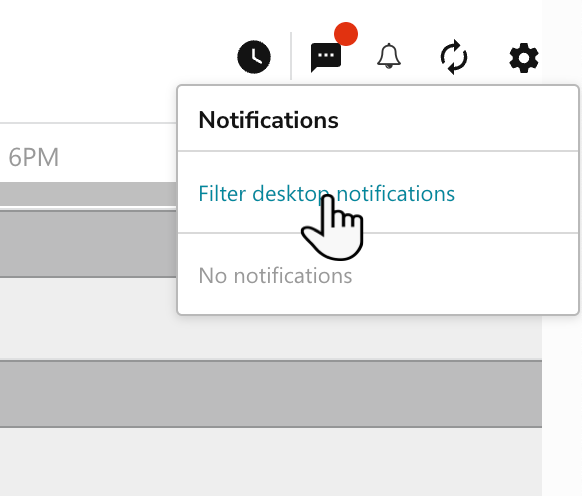
Click Notifications , then click Filter desktop notifications in the Notifications window to manage which types of notifications appear.
Manage technicians on the Daily Dispatch Board
If your company has set up teams, technicians are grouped by team on the Dispatch Board. If your company has set up Zones, you see a dot next to each technician that indicates their zone.
To hide a technician from the board without deactivating them, go to Settings > Dispatch Board > Teams Management. In the Board Visibility column, switch the technician to Hidden. Hidden technicians don’t appear on the daily and weekly dispatch boards for anyone in your company unless they’re assigned to a job that day or week. Use the Visible and Hidden tabs to see which technicians are shown, and choose Make visible to show a technician again. New technicians are visible by default. You need permission to edit teams to change this setting. For more information, see Teams Management overview.

Hover over a technician to view their team, main zone, all zones, phone number (if provided), memos, and skills listed in their profile.

Click a technician name or profile picture to:
View their route
Add or edit a memo
Start or end their personal time
Edit their timesheet
Note: If Auto-adjust job appointments to actual duration is on in Settings > Dispatch Board > Appointment Duration, correcting a technician’s arrival or completion time in their timesheet updates the job bubble on the board.
Coming soon: Timesheet corrections updating auto-adjusted job bubbles is part of the ST-83 release.
Call them
Send them a text message
Resume Dispatch Pro

Note: Account configuration is required to use skills, set technician zones, and see technician zones on the Dispatch Board. Please contact Technical Support for details. To set up skills, go to Settings > Operations > Skills.
View technician route
Click View Technician Route to see the full map of that technician’s day in Google Maps. This view shows jobs and non-job events with timesheet codes that include specified addresses along with both the start and end locations, helping you plan other visits within the context of the technician’s route.
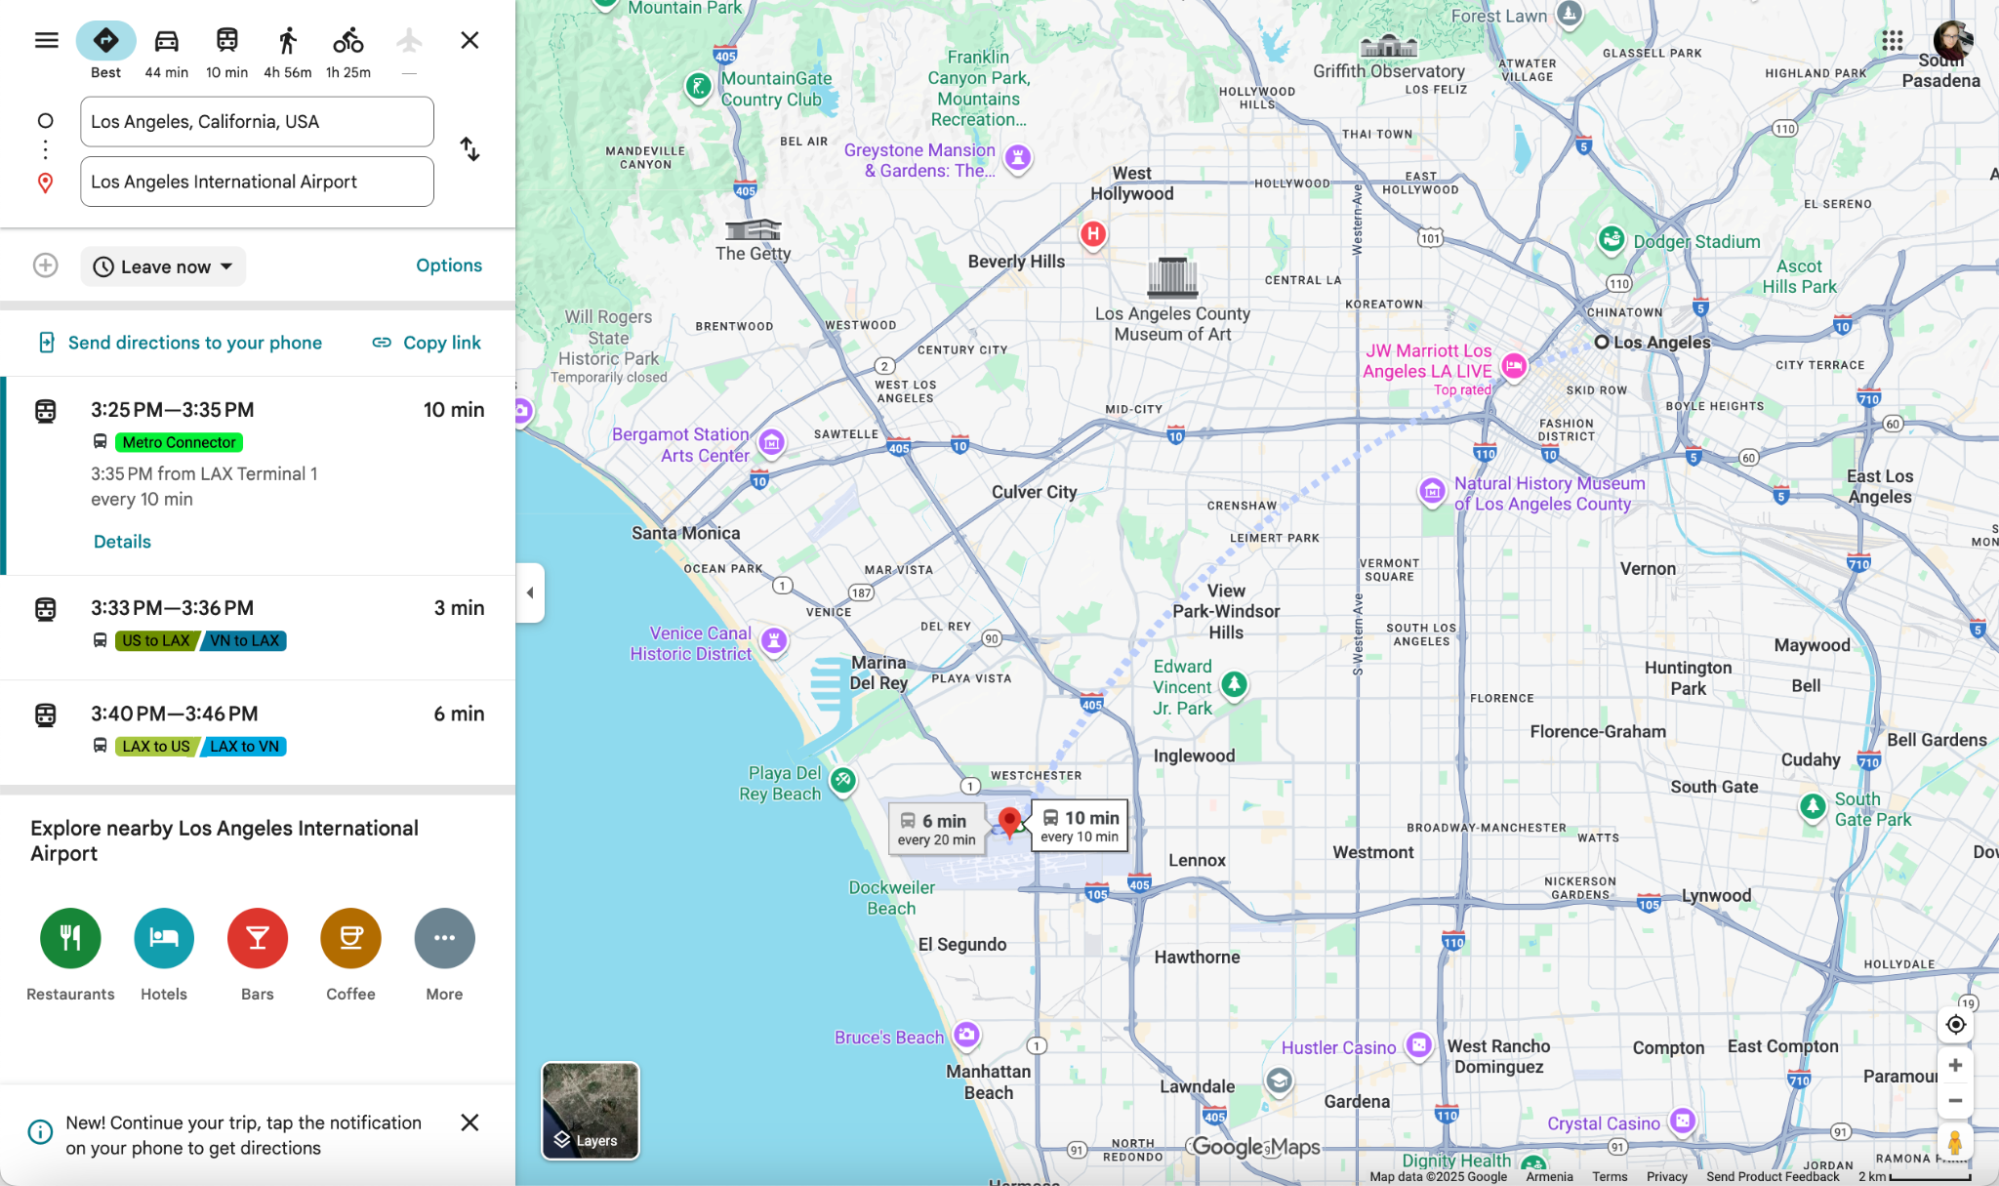
Note: The route is determined using a verified address, if available, and the entered address if not. Unverified addresses may lead to inaccurate results on the map.
For more, see Manage technicians on appointments.
Manage appointments and non-job events on the Daily Dispatch Board
If you set up alerts for the Dispatch Board, job appointments where the technician is late are outlined in red.
If a job appointment has more than one technician assigned to it, you see the Multiple Technicians  icon. When you hover over the appointment, you see how many technicians are assigned to the appointment.
Hover over a job bubble in either the horizontal or vertical view to see a pop-up with detailed job information.
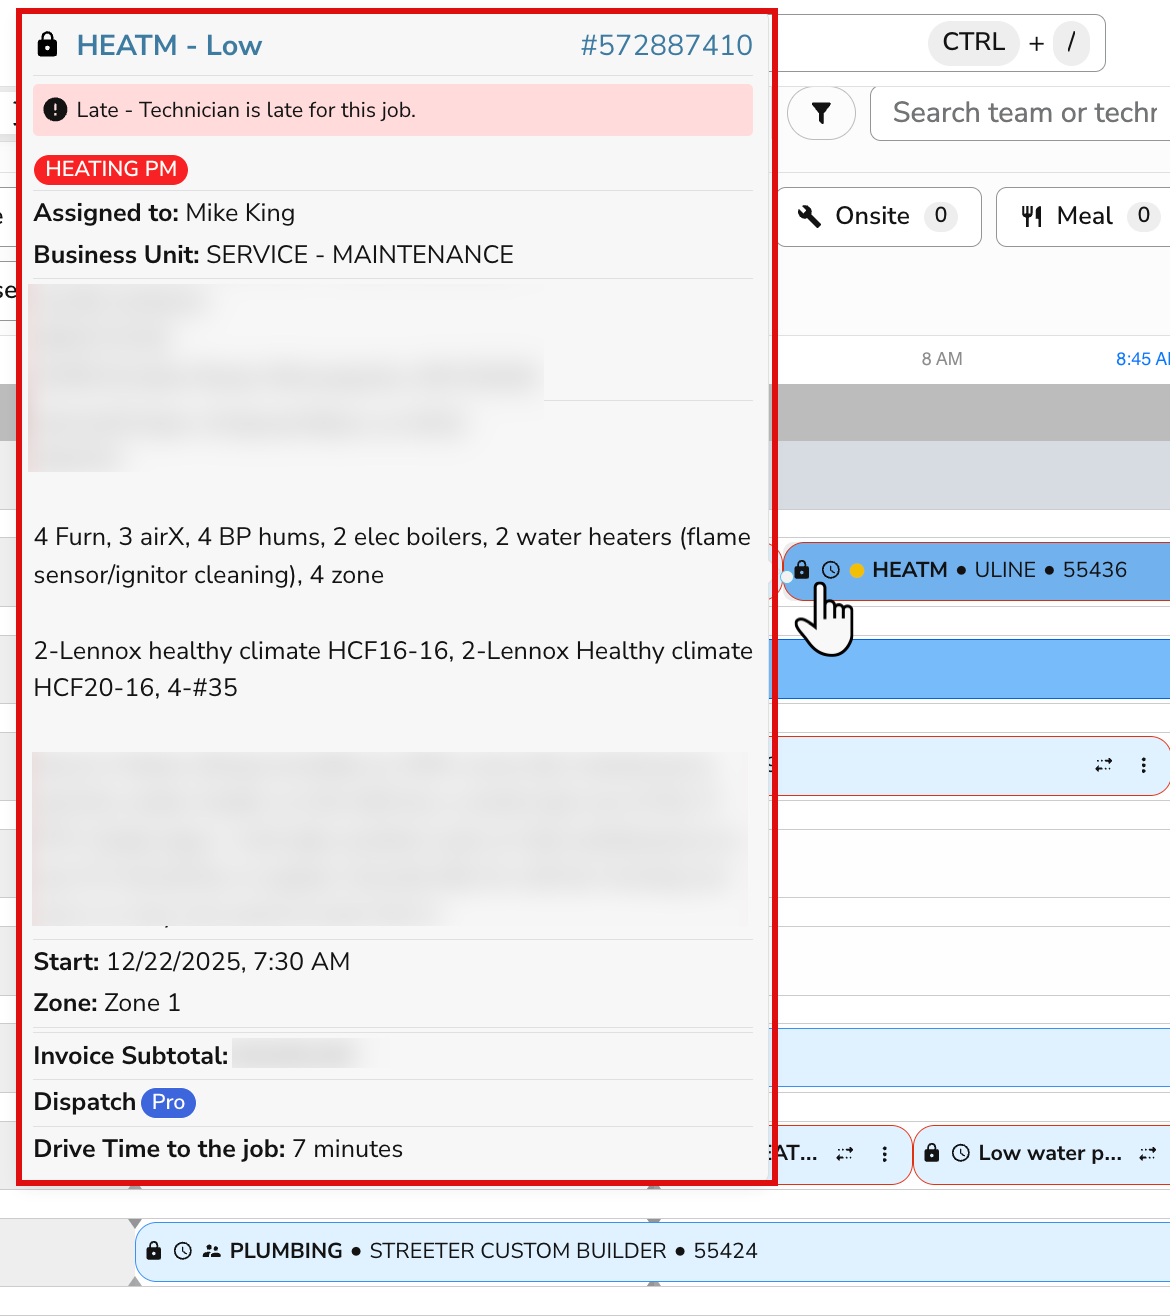
Click a job appointment to view and edit the Job Details flyout directly on the Dispatch Board, without needing to open the Job Record. For more, see View and edit job details from the Dispatch Board.
The flyout shows email addresses under the customer and location names, below the service address. Only emails with at least one notification preference turned on appear. Click an email address to send an email.
Coming soon: Customer and location email addresses in the Job Details flyout are part of the ST-83 release.

Click Actions  to quickly:
Assign, unassign, or reassign a technician
Confirm, dispatch, cancel, or reschedule the job
Note: If a job appointment has exactly one assigned technician and that technician is available to dispatch, click Dispatch to dispatch them without choosing from a list. If that technician is already dispatched, click Cancel Dispatch to cancel in one click. You might still see a confirmation message. If two or more technicians are assigned, choose which technicians to dispatch. This works on the Daily and Weekly Dispatch Boards and in the Jobs Tray.
Coming soon: One-click Dispatch and Cancel Dispatch are part of the ST-83 release.
Open the Job Record, invoice, Location Record, Customer Record
Map the address with Google Maps.
Tip: You can also perform these actions by right-clicking the job bubble.
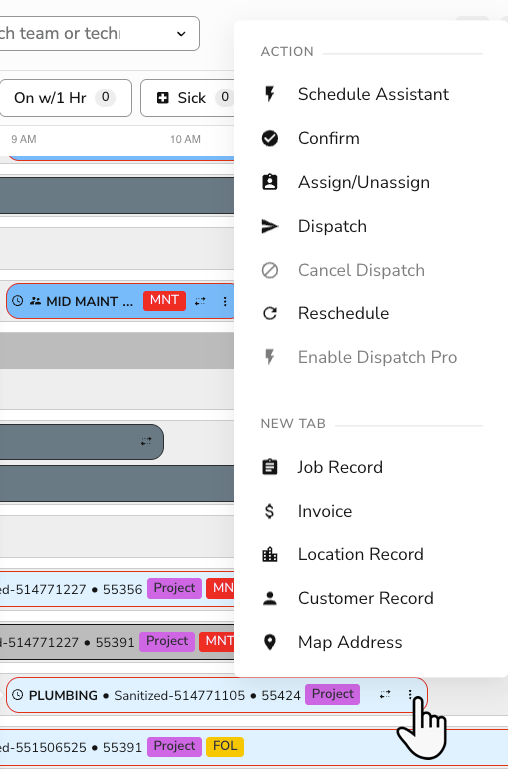
Note: Working, Dispatched, and Done job appointments can’t be reassigned.
Jobs with Dispatch Pro enabled display a Dispatch Pro icon directly on the job card, making them easily identifiable on the Dispatch Board. The icon is also visible in the job tray when viewing job details, helping users quickly recognize Dispatch Pro jobs across different views. This behavior also applies to the holding area, where unassigned jobs show relevant Dispatch Pro indicators when applicable.
To move a job to another arrival window:
Click Click-to-drop
 or drag and drop the job you want to move. The Edit Arrival Window pop-up opens.
Select one of the following options:
Move appointment without adjusting arrival window: The appointment moves to the new time but the original arrival window stays unchanged.
Move appointment and match arrival window to new time: The system automatically recalculates the arrival window to align with the new scheduled slot or creates new one if no predefined window matches.
Choose from existing arrival windows: From the Arrival Window dropdown field that appears, select the predefined arrival window for a specific time.

Tip: Select the Remember my preference option to save the selected behavior so the popup won't appear on future moves and applies the saved choice automatically. You can always reset the arrival window option in Dispatcher Preferences > Behavior, under Scheduling.
When finished, click Ok. You can also set up the arrival window board behavior by going to Dispatcher Preferences > Behavior > Scheduling. For more, see Personalize your Daily Dispatch Board view.
Coming soon: In the ST-83 release, arrival window behavior moves to the Behavior tab in Dispatcher Preferences.
View the Jobs Tray
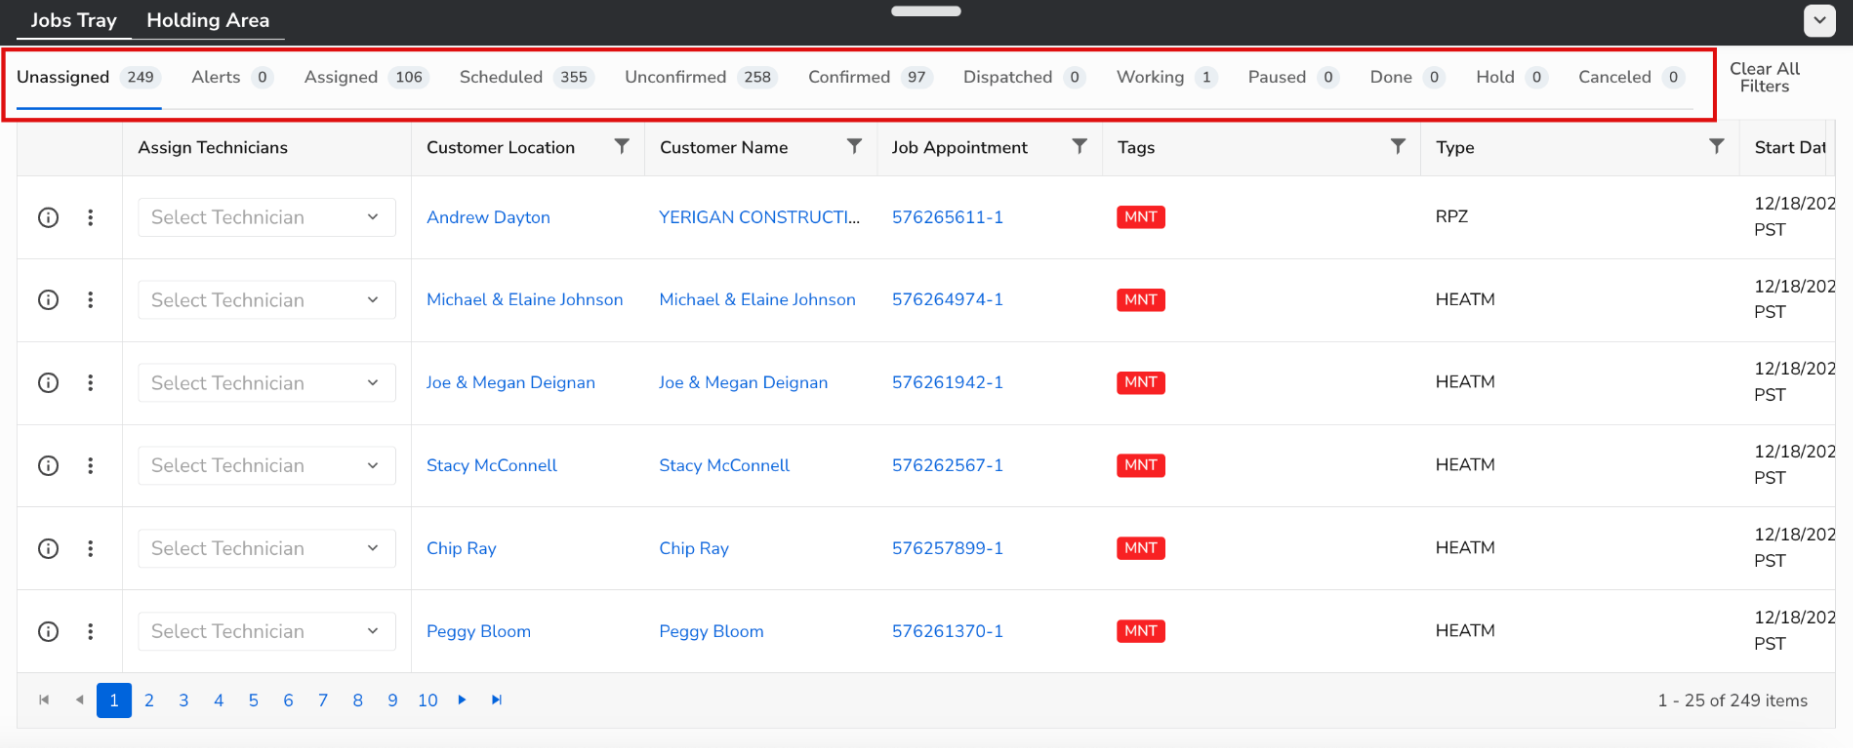
Scroll down the Dispatch Board to see the Jobs Tray. The default tab is Unassigned, which displays job appointments that do not have a technician assigned. Drag any job appointment in the Unassigned tab to a technician on the Dispatch Board to schedule and assign it to them.
The Jobs Tray also includes the following tabs:
Unassigned: Job appointments not yet assigned to a technician.
Alert: Job appointments with alerts.
Assigned: Job appointments that have a technician assigned.
Scheduled: Job appointments scheduled for a specific date and time.
Unconfirmed: Job appointments scheduled but not yet confirmed.
Confirmed: Job appointments confirmed by the customer or internal team.
Dispatched: Job appointments assigned and dispatched to a technician.
Working: Job appointments currently in progress.
Paused: Job appointments marked Paused.
Done: Job appointments that have been completed.
Hold: Job appointments marked Hold.
Canceled: Job appointments marked Canceled.
Future: Job appointments planned for a future date beyond the current scheduling period.
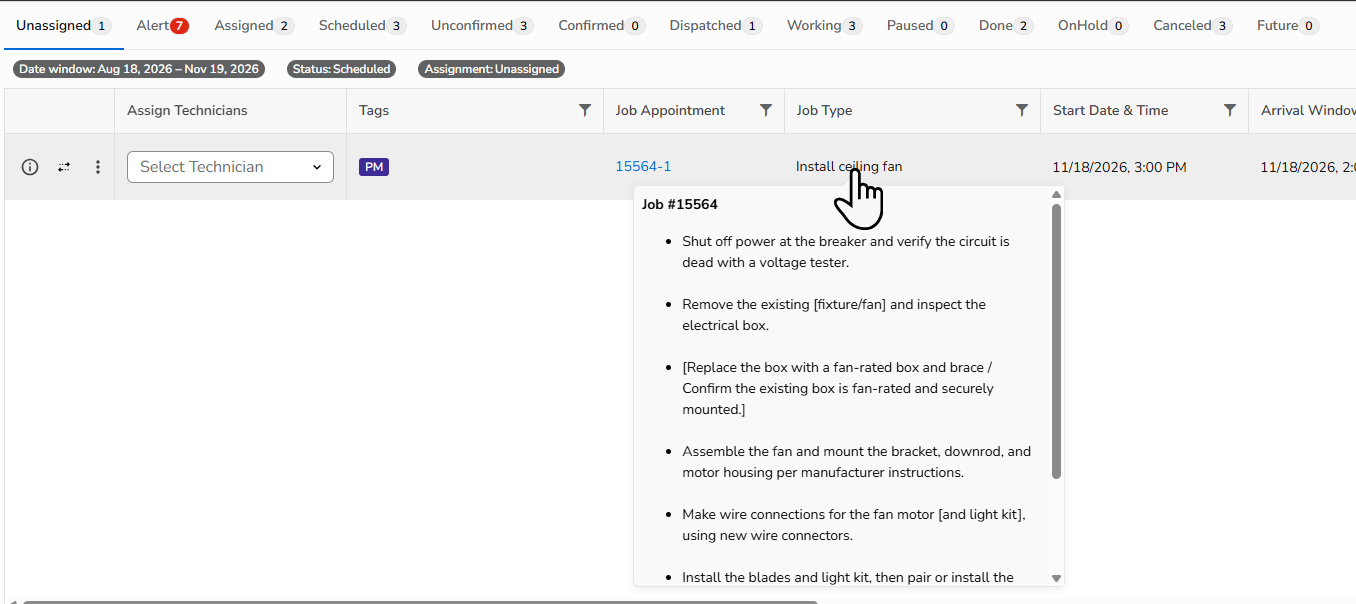
Hover over a job’s Job Type in the Jobs Tray, or move to it with your keyboard, to see the job’s summary without leaving the tray. This works in standard and custom Jobs Tray tabs, even if Show job detail pop-over on hover is off.
Coming soon: Job details on hover in the Jobs Tray are part of the ST-83 release.
For more, see Use the Job Tray and Dispatching icon and alert glossary.
View the Holding Area
Click the Holding Area tab to view jobs that are not yet assigned to a technician. From here, you can drag and drop jobs onto a technician’s schedule to assign them.
The Unassigned tab is a visual layout, while the Jobs Tray is shown in a table format. The Holding Area makes it easier to match jobs with technicians and times, and it’s a helpful replacement for using dummy technicians.
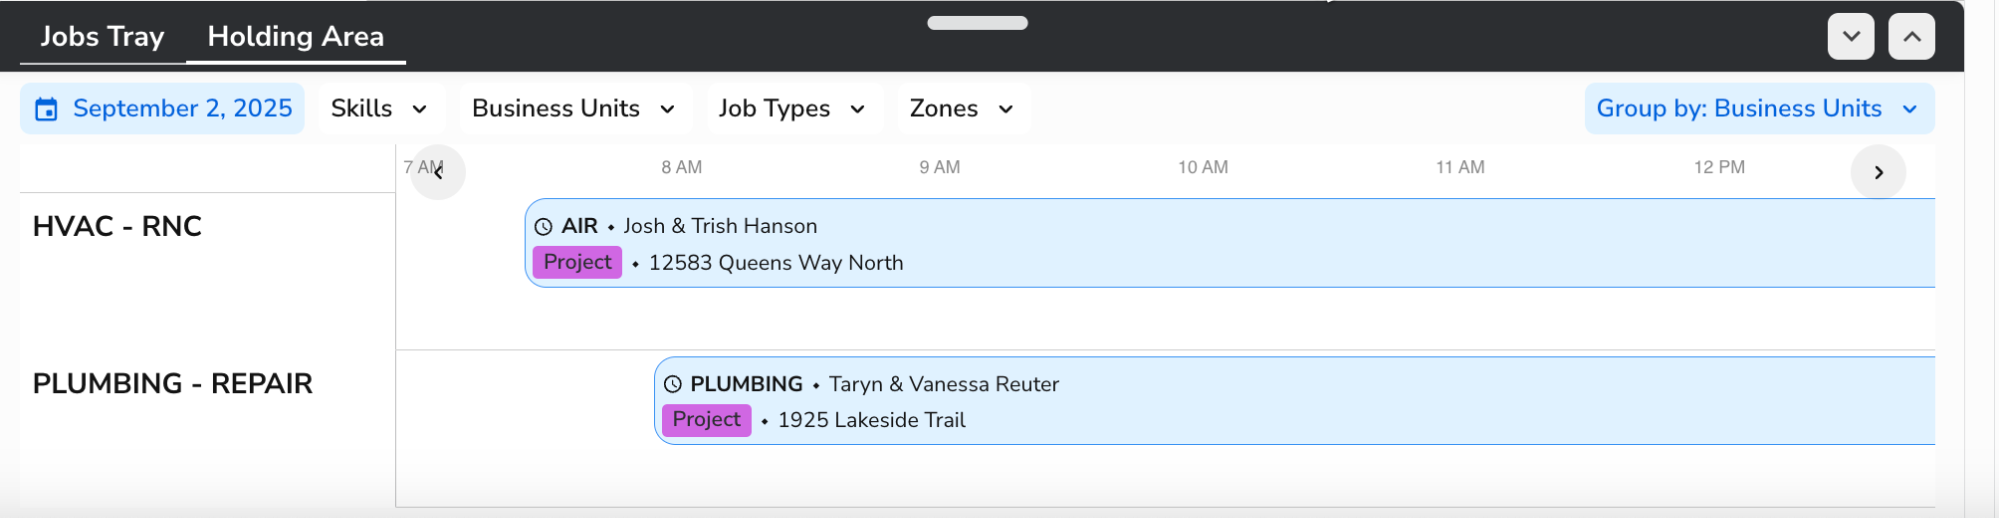
Tip: Use the Calendar, Business Unit, Job Type, or Zone filters to narrow down and find specific jobs.
Use the Dispatch Board with Flexible Timekeeping
If you use Flexible Timekeeping, the new daily and weekly dispatch board shows each technician's real-time timekeeping status, activity context, and non-job time directly on the board. This keeps the board in sync with your timekeeping records as the day happens, so dispatchers can see what every technician is doing without guessing or waiting for payroll to close.
Note: These capabilities appear only when your account uses Flexible Timekeeping and has the Redesigned Dispatch Board enabled. To enable Flexible Timekeeping, contact your Customer Success Manager.
Choose what displays under each technician
In Dispatcher Preferences > Board, use the Display status setting to choose what appears under each technician's name by default:
Technician status: What the technician is doing right now (for example, Working, Idle, or Meal), and how long they've been in that state.
Timesheet activity code: The technician's current timesheet entry (for example, Working, Lunch, or Personal Time), and how long they've been on that entry today.
 If you don't set a preference, the board displays Technician status by default.
See real-time status and full context
Each technician's status updates in real time as their timekeeping activity changes with no refresh needed. To see all three values at once, hover over a technician to view their status (for example, Driving), their activity code (for example, Commute), and their hours (for example, 3h 15m). If a technician has no active timekeeping activity, the standard status icon appears with no activity context.
To filter the board, use the technician statuses. With Flexible Timekeeping enabled, you can filter by four statuses: Idle, Working, Dispatched, and Meal.

View activity history on the board
Turn on Show technician activity history in Dispatcher Preferences > Behavior to display each technician's timekeeping activity lines beneath their row, for example, training or meal time, alongside their job activity. Meal time appears in a distinct color. Click a line to open the related details. Hover over an activity line to highlight the job or non-job event it relates to. Hovering over a job or non-job event works the same way in reverse, highlighting its activity line so it stands out from the others on the board. Turn the option off for a more compact view.
Coming soon: In the ST-83 release, these options move to the Board and Behavior tabs in Dispatcher Preferences.

Start and complete Non-Job Events from the board
When Flexible Timekeeping is enabled, you can start, complete, and track Non-Job Events (such as lunch, training, or a parts run) directly on the board:
Note: Paid Time Off and ad-hoc activities render automatically on the board, so you don't need to create placeholder events for routine non-job time. Technicians can also view, start, complete, and quick-create Non-Job Events from the Field Mobile App and the board updates live.
Click a technician's timeline at the time you want to schedule a Non-Job Event, then set the type and time and save. The event is created in a Scheduled state.

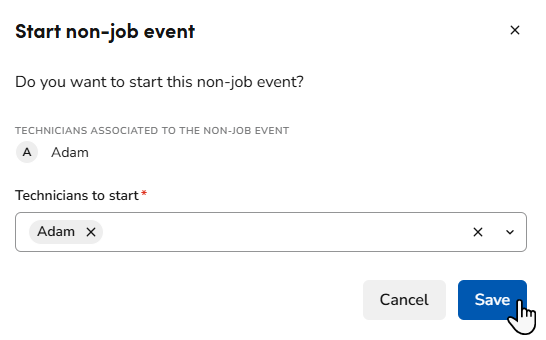
To start it, click the event and then click Start.

Select the technicians and click Save. The event moves to In Progress and updates live on the board.
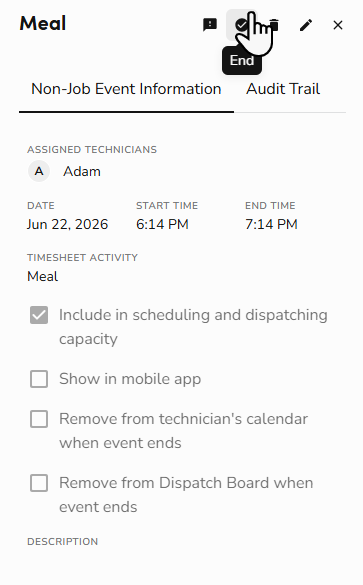
When the activity is done, click the event and click End.
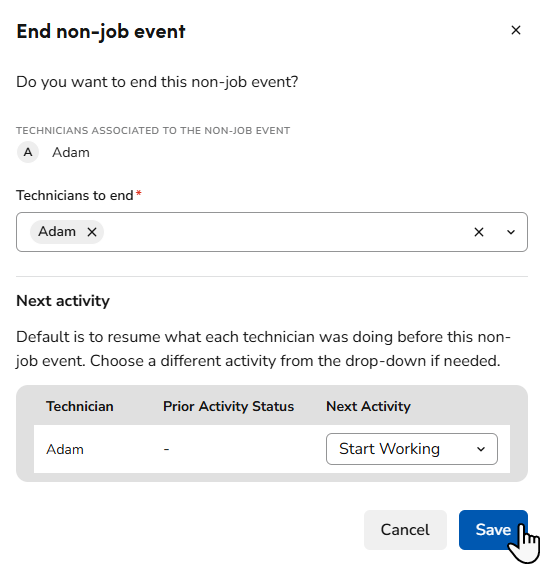
Select the technicians to end the event for.
(Optional) Select the technician's Next Activity. By default, this will be set to what the technician was doing before the non-job event.
When finished, click Save and move the event to Completed.
Note: If payroll corrects an earlier timesheet, the board updates automatically to match. There's no alert and the board stays aligned with your timekeeping records in the backend.
FAQ
Why are job appointments not showing up on the Dispatch Board?
If you aren't seeing booked job appointments on the Dispatch Board, troubleshoot using the following steps:
Check if the job is assigned to a technician. If it's unassigned, it won't show in the main view of the Dispatch Board and will instead show in the Unassigned tab of the Job Tray.
Make sure you're viewing the correct date on the Dispatch Board.
Check if the job was booked for the correct date and technician.
Make sure you have the right filters selected or clear all filters and refresh the board.
Why are some of my technicians missing from the Dispatch Board on a previous date?
To appear on the Dispatch Board for a previous date, technicians must:
Be assigned to a job
Have a scheduled non-job event
Have clock-in or clock-out timesheets
Why are some technicians missing from the Dispatch Board?
A technician might be hidden in Settings > Dispatch Board > Teams Management, or filtered out by the shift or PTO filters. Check the technician’s Board Visibility setting, and check the filters in the filter panel. Technicians with a job appointment on the date you’re viewing always appear.
Why doesn't the total cancelation number on the Dashboard match the cancelation number on the Dispatch Board?
The Dashboard shows jobs that were put in canceled status today. The Dispatch Board shows jobs scheduled for today that have been canceled.
Do all jobs appear on the Dispatch Board map?
Only jobs with validated addresses appear on the Dispatch Board map. If the address for a job isn't validated, it won't appear on the map.
Note: To validate the address for a job, open the location record and click the Help
icon next to the address. If you can't validate it, edit the address in the location record and manually set the latitude and longitude.
How often does the Dispatch Board refresh?
All new jobs and job updates are refreshed automatically when there is a change. Filters applied to the Dispatch Board don't change upon refresh. To refresh filters, open the filter dropdown and click Clear.
To refresh the board manually, click the Refresh  icon in the side panel toolbar.

Are there any options for switching back to the old design of the Dispatch Board?
No, the appearance of the Dispatch Board was updated in ST-69.1.