Overview
This guide helps you understand how to set up, manage, and track all your projects in real-time by using project management. Use the project management workflows in this guide to:
Track progress of each project and their associated phases of completion
Compare budgeted costs with actual expenses
Progressively bill for stages of completion
Report transactional information from a project to-date perspective and compare to information for a specific period of time
Who uses this feature
Any business using project management
Primarily for Residential Construction and Commercial Construction business types
Applies to all trades
Feature configuration
Account configuration is required to use this feature. Please contact Technical Support for details.
Getting started
Before you read this article, review the following resources:
Introduction to project management: Learn about some of the base concepts that make up project management at a high level. We recommend that you review this article to get a better understanding of how the feature works, as well as how you can use different components of the feature in your day-to-day workflow.
Overview of project management setups and workflows: Pick the setup and workflow best suited for your business. If you aren't sure what setup and workflow works best for your business or are new to project management, we highly recommend you set up project management for our core setup and workflow to help you avoid uncategorized transactions on the Budget vs Actual table in project management.
Core project management setup and workflow
Learn how to set up our recommended best practices for project management. Additional recommended workflows build off of this core setup and can introduce more granular cost and revenue tracking for your projects.
Phased project management setup and workflow
Recommended for any business who completes/runs their projects in phases. This workflow is typically used in the Construction Industry to track their cost types, such as labor, material, and equipment at the more granular phase level. For example, you can use Rough-in, Trim-out, Start-up project labels to get better insights into your company's performance. This workflow also supports progress billing and recording/tracking revenue by phase.
Best practices
Prevent downstream issues in your project by:
Creating separate items for cost and revenue.
Ensuring all items in your project are correctly labeled to avoid uncategorized budgeted or actual totals.
Using a separate business unit for construction projects.
Ensuring your settings are set to % of completion method in Settings.
Ensuring your technicians have hourly rates in addition to burden rates to capture costs.
Ensuring timesheets are correct to see accurate costing reflected.
Creating a job type to reflect each portion or phase of work.
When managing projects, it is important to use the correct workflows to ensure your project's financial information is accurate. For example, there are ways both intentional and unintentional where you can double count costs and revenue, inflating project financial information. Double costing is caused by counting the same costs twice.
Double costing can happen when you initiate a booking from the project's sold estimate rather than booking from the project page directly. To learn more about how to identify, navigate, and prevent this issue, see Manage double costing from booking a job from a sold estimate.
When chargeable materials are billed on an Application for Payment and also added to an invoice using Invoice Closeout, both costs and revenue are double counted in the project. To learn more about how to identify, navigate, and prevent this issue, see Manage double costing from chargeable materials.
Double counting revenue can occur when you progressively bill and add an Application for Payment in the same project. To learn more about how to identify, navigate, and prevent this issue, see Manage double counting revenue from combining progress billing with Applications for Payment.
Use cases
Use cases include, but are not limited to:
Equipment change-outs/replacement (Residential Install workflows)
Home remodels
1+ month projects
Custom homes
Multi-trade projects
Tracking home building
Commercial construction
Warranty/recall on closed projects
Manage the project record
For each project you create and work on, you can access all project information on the project screen.
Understand the project dashboard
The project dashboard displays an overview of your project, including customer, project, and contract information.
Update project name
In the dashboard header, click the project name and enter a name for the project.
Click Save
 to save the project name.
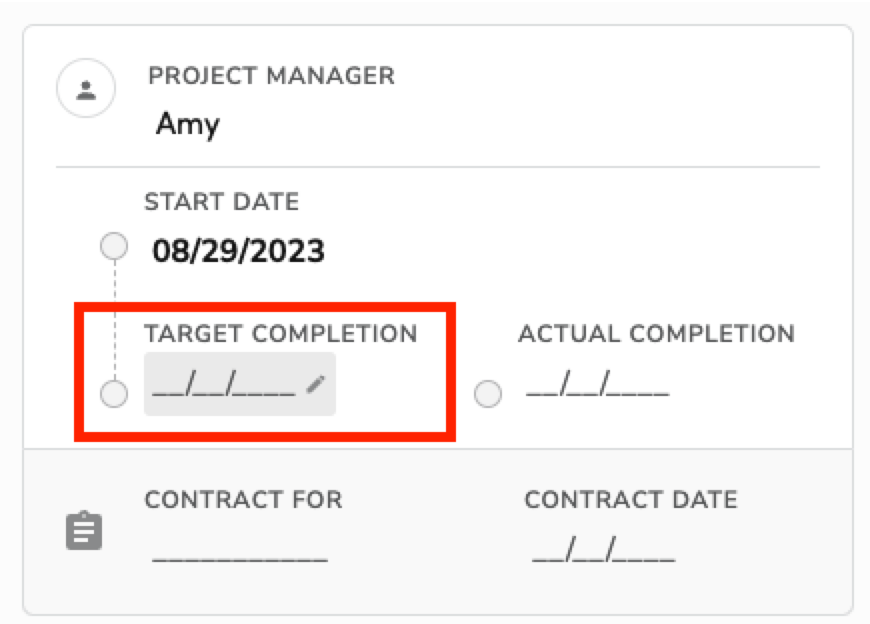
Update Start Date, Target Completion Date, and Completion Date
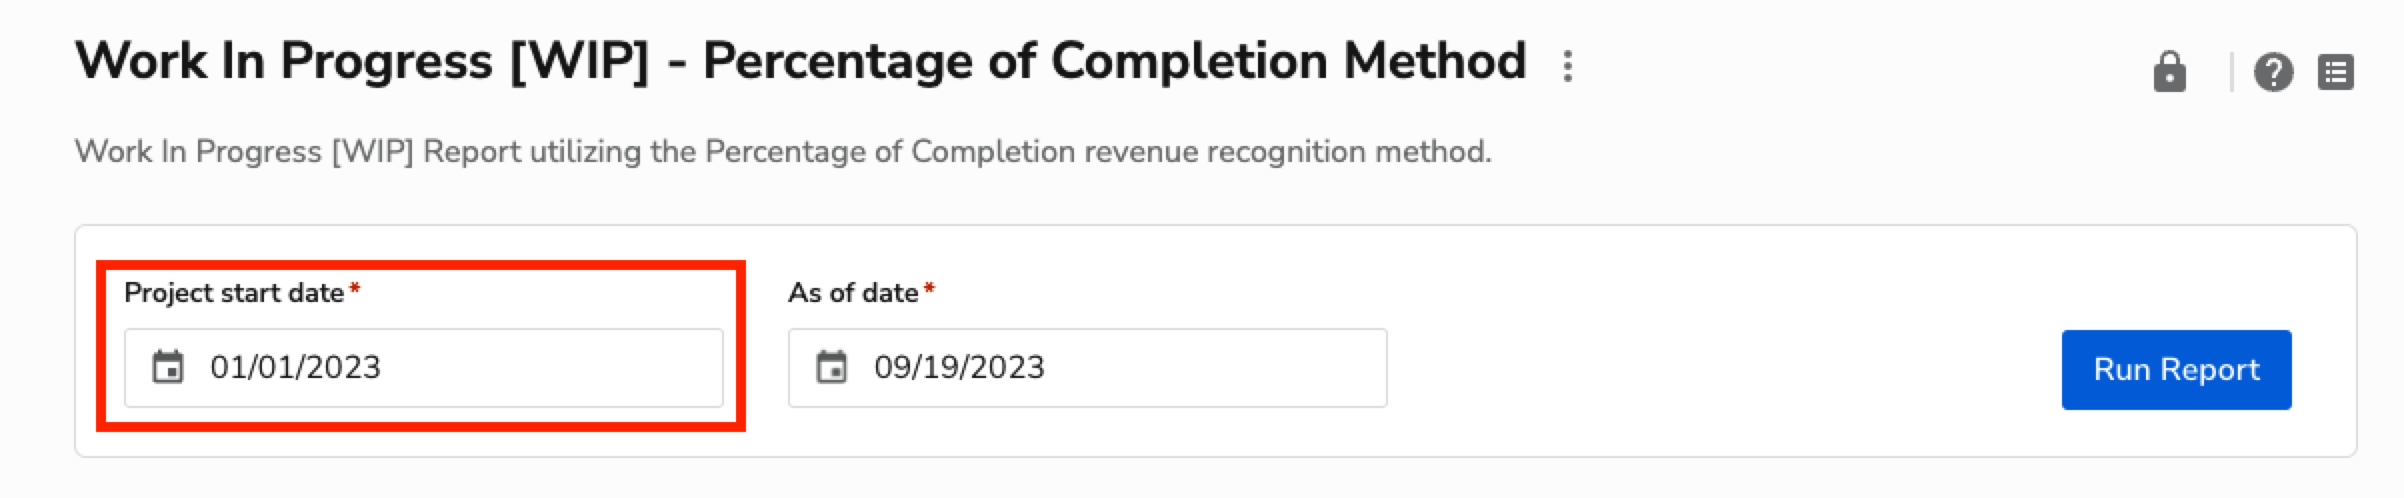
There are two ways to update your project's information including start date, target completion date, actual completion date, and more. Project information such as key dates are used in reporting in various ways.
For example, the Work In Progress [WIP] - Percentage of Completion Method report uses project start date as the filter criteria, so it is important to ensure your project's information is accurate to enable reporting insight throughout the project or after the project's completion.
From the project dashboard
Search for the project you want to edit and open the project.
On the project dashboard, click the field you want to edit and make changes to the field directly.
Click the Save
 icon to save the changes you entered.
From the project details
Search for the project you want to edit and open the project.
Click the Edit
 icon to open the Project Information panel.
After making your changes, click Save.
Add business units
You can add one or more business units to a project.
Benefits of using business units include:
Faster and easier identification of your project type to help you find your projects in reports and searches
Increased data integrity and reporting accuracy for your projects
Matching of business units associated with your project to all other transactions, including jobs, estimates, invoices, and purchase orders.
Autopopulation of your project business unit with the first sold estimate's business unit
Enabling the Automatically Set Business Unit option in Settings > Project Settings > Project Setup automatically sets the project's business unit with the first sold estimate's business unit.

Add or edit a project's business units
There are two ways to update business units associated with your project:
Option 1
Click the Select Business Unit field.

Click the checkmark next to each business unit you want to associate with the project.
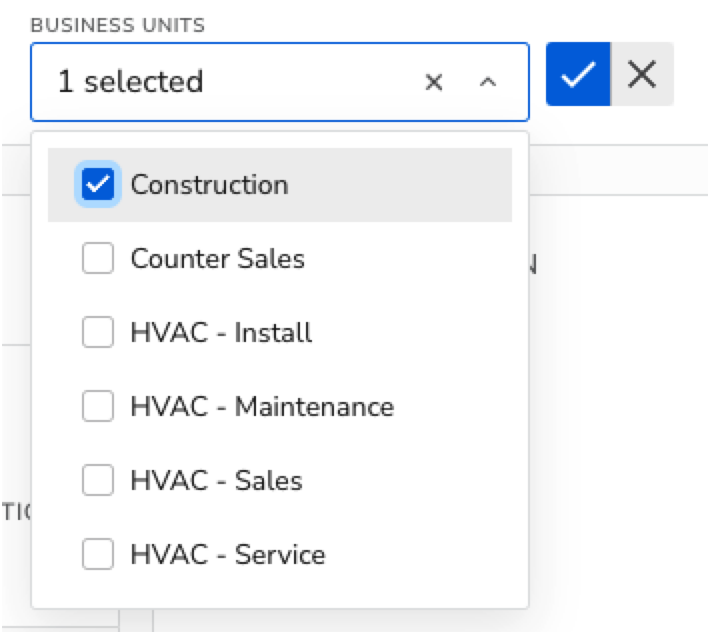
Click Save
 .
.
Note: A project can have multiple business units.
Option 2
Click the Edit icon to open the Project Information panel.

In the Edit Project section, click the business unit dropdown and click the checkmark next to each business unit you want to associate with the project.

Click Save.
Note: Editing a project's business unit requires the Edit business unit in the project's permissions.

Use project tabs
Project tabs allow you to view different aspects of your project.
Financials
From the project side menu, click Financials to see financial information about your project.

Project Summary
In the Project Summary section, you can find the following information:
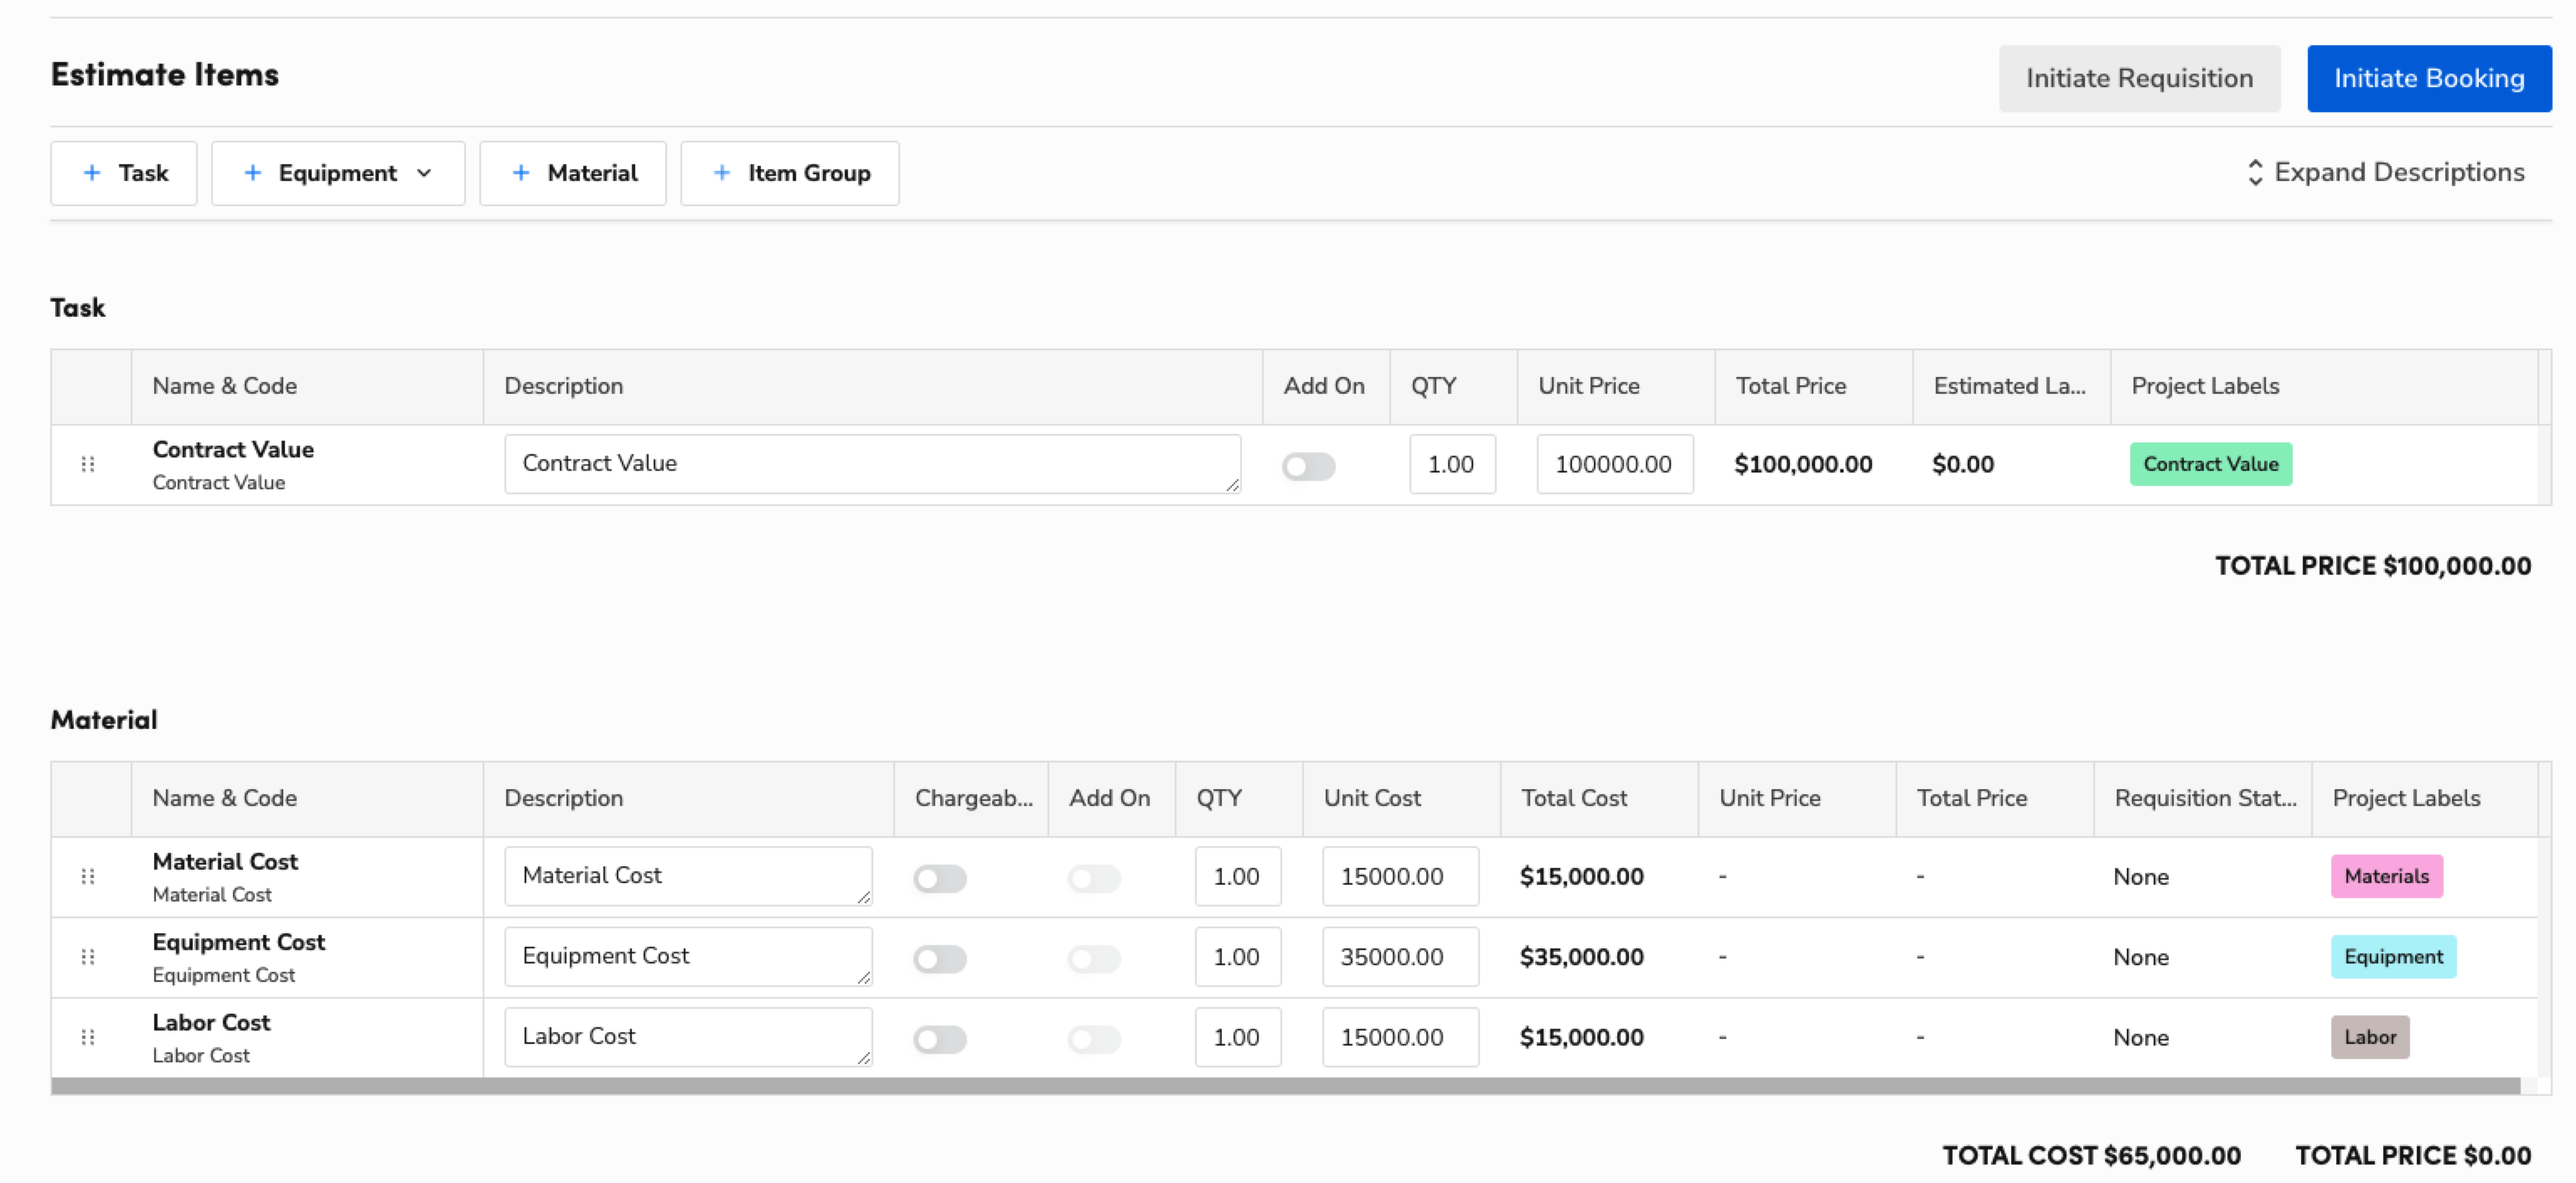
Contract Value: The total price and tax of all sold estimates, providing a clear financial baseline.
Actual Billed: The sum of income items on invoices minus retainage.
Total Budgeted Expense: Represents the sum of all estimated costs.
Cost to Complete: The remaining budget by subtracting actual expenses from the total budgeted expense.
Change Orders: The total price of sold change order estimates, reflecting modifications to the original project scope.
Cost Adjustments: The total cost of sold estimates that include only cost items, ensuring accurate tracking of non-revenue expenses.
Actual Expense: The total costs incurred on a project, providing a detailed view of spending across key cost categories.
Actual Margin: Calculated as Actual Revenue minus Actual Expense, showing the real profitability of a project.
Earned Revenue: The revenue generated based on project progress, calculated by multiplying the percent complete by the contract value.
% of Work Completed: Compares Actual Expense to Total Budgeted Expense.
Open Invoices: Shows unpaid invoices that are still outstanding, providing a clear view of amounts due.
Payments: Reflect invoices that have been partially or fully paid.
Budgeted Labor Expense: The total labor cost based on the quantities estimated for the project.
Actual Labor Expense: The total cost of labor based on the actual hours worked on the project.
Budgeted Labor Hours: The total estimated labor costs from the project's estimate.
Actual Labor Hours: Tracks the real labor costs incurred.
Invoices
The Invoices section lists all invoices that have an accounting impact with pricebook items, excluding $0 invoices, to help you manage unpaid invoices.
Note: You can see that the invoice is assigned to a job because they use the same number.
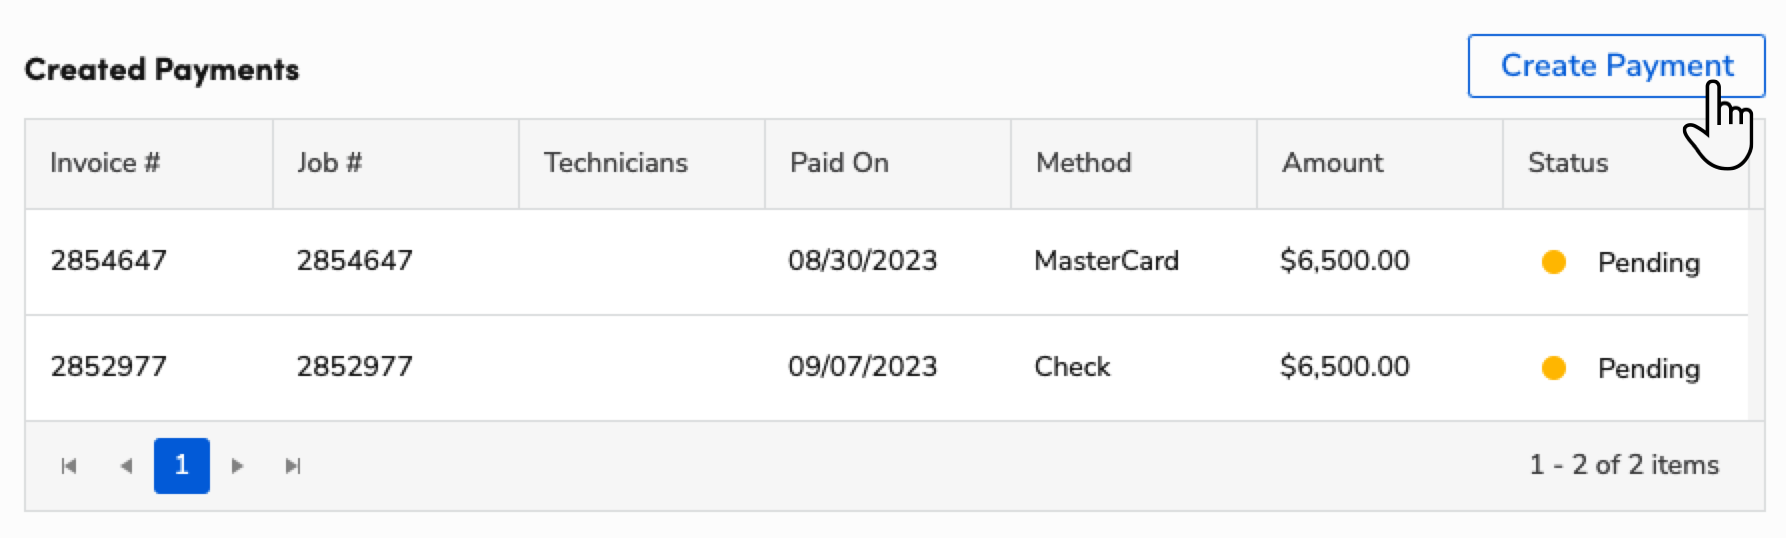
Created Payments
The Created Payments section lists all payments made to date on the project.

Application for Payment
The Application for Payment section lists all applications for payment associated with the project.

Jobs & Appointments
From the project side menu, click Jobs & Appointments to see jobs and appointments scheduled on project. The Jobs tab lists all of the jobs assigned to the project.

When booking jobs for construction projects, we recommend you book the job directly through the project instead of through a sold and converted estimate. This is important if you're using the Application for Payment feature to avoid reporting more project revenue than actually earned.
In Jobs & Appointments, you can:
Task Management
From the project side menu, click Task Management to see tasks. The Task Management tab lists all tasks associated with the project.

Estimates
From the project side menu, click Estimates to see estimates. The Estimates tab lists all sold and unsold estimates associated with the project.

Note: There is also a separate table that includes only sold and unbooked estimates.

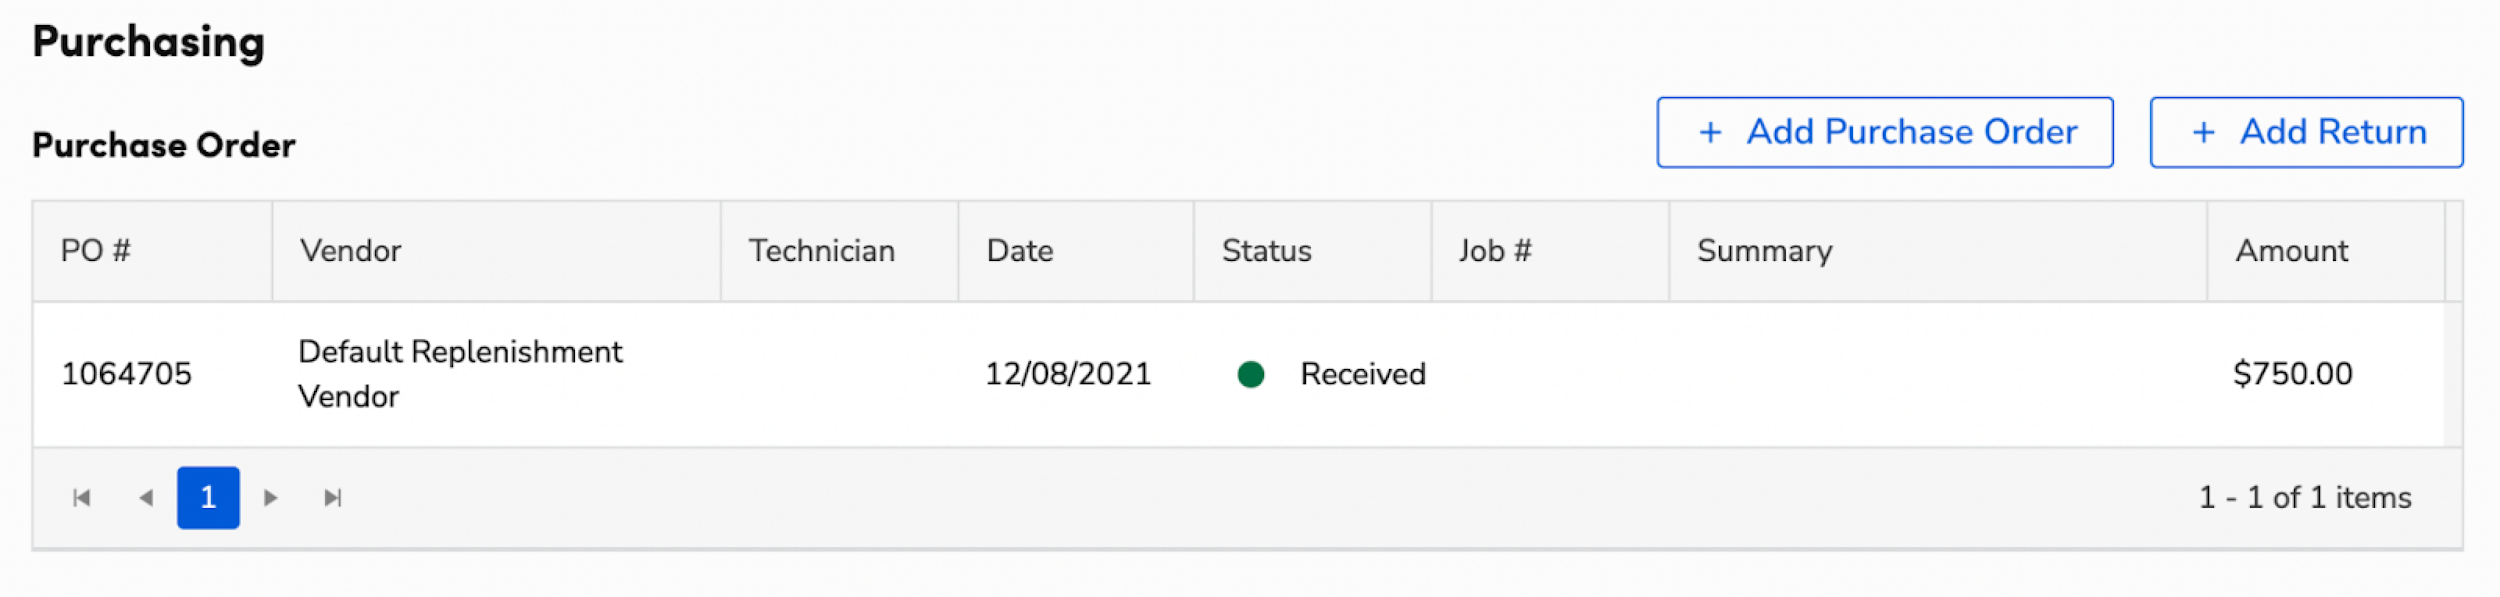
Purchase Order
From the project side menu, click Purchasing to see purchase orders. The Purchase Order tab lists all purchase orders for the project. Click a purchase order to view its details.
Requisitions
From the project side menu, click Purchasing to see requisitions. The Purchasing tab lists all requisitions associated with that project created on both the project screen and in other ServiceTitan sections. Click a requisition to view its details.

Technicians
From the project side menu, click Technicians to see technicians assigned to the project. The Technicians tab lists all technician activities related to the project.

Audit Trail
From the project side menu, click Audit Trail to see more details associated with the project. The Audit Trail tab lists all events, calls, notes, files, and emails for the project.

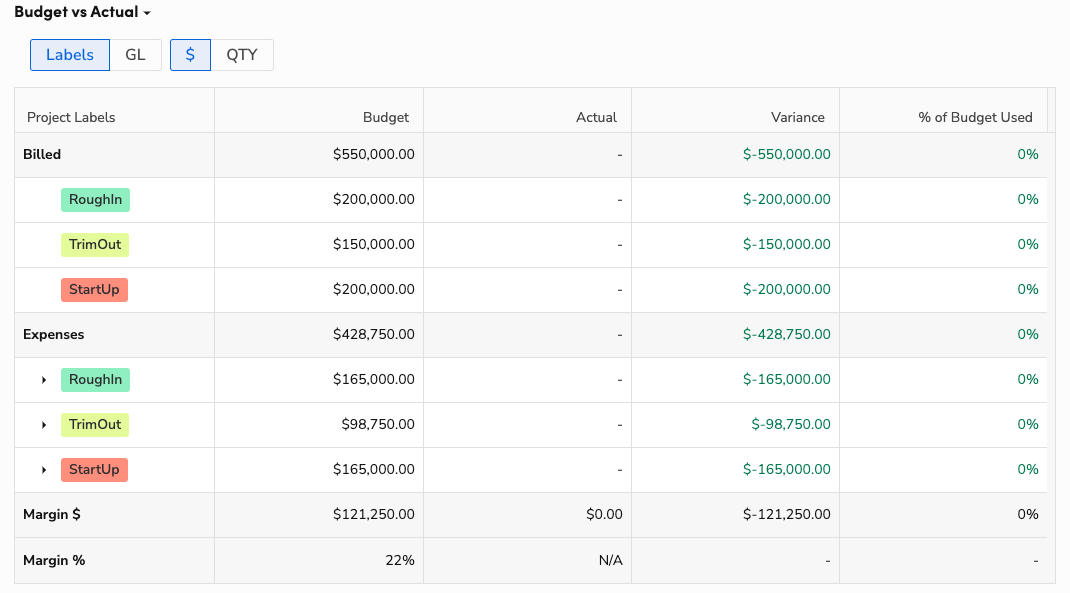
Use Budget vs Actual table
The Budget vs Actual table shows the budget-versus-actual (BvA) values for a project to date. Use the BVA table to manage your budget and track your progress as you generate actuals. The table updates in real-time after refreshing your page.

Billed: Revenue for the project. Any task in the project that represents revenue displays in the Billed section. You can use project labels to customize the categories shown in the Billed section.
Expenses: Any task that has a cost associated with it displays in the Expenses section. You can use project labels to customize the categories shown in the Expenses section.
Margin $: Dollar value comparing Billed and Expenses (doesn't include sales tax).
Margin %: Percentage comparing Billed and Expenses.
Budget column: Value for the budget comes from the estimates that you sold to your customer, including change orders. The budget is an estimate of how much you plan to spend on a particular project.
Actual column: Value for the actuals update as you accumulate labor for the project and requisition equipment and materials. Actuals start calculating when you generate an invoice, receive bills, or issue returns. This is the actual amount you spend on a project.
Note: The Actual value for technicians in the table is calculated by taking the hourly rate for the technicians and multiplying it by the paid hours worked on a job.
Variance column: Actual amount minus Budget amount.
% of Budget Used column: Actual amount divided by the Budget amount.
Uncategorized: If a task, equipment, or material doesn't have a label assigned to it, it displays as Uncategorized.
Balance to Finish: Total Budget minus Projected costs (Committed Costs plus Actual). This is how much of your budget remains.
Forecasted Cost to Complete (FCTC): The amount you expect to spend to finish the work for a segment. You enter this value in sandbox mode.
Forecasted Cost at Complete (FCAC): Projected costs plus Forecasted Cost to Complete. This is your estimated total cost when the project is complete.
Over/Under Cost: Total Budget minus Forecasted Cost at Complete. Positive values display in green. Negative values display in red.
Forecasted Margin $ and Forecasted Margin %: Displayed in the Margin summary rows. Calculated from forecasting data.
For more on forecasting, see Forecast project costs. For more on the Budget vs Actual table, see Understand Budget vs Actual.
Drill down into your Budget vs Actual itemized details
The Itemized Details section shows the specific records that generate the totals shown in the Budget vs Actual section. To open the Itemized Details screen, click the $ or QTY value under a line item's Budget or Actual column.
Itemized Details For: Shows if the Itemized Details screen is for Budget or Actuals and Billed or Expenses.
# of Items: Total amount of pricebook items in the Itemized Details list.
Total Amount: Sum dollar amount of the Budget or Actual column.
Project Label: Project labels assigned to Billed or Expenses in these items.
Name column: Name of the pricebook item.
Source column: Project transaction (for example, Invoice, Estimate, Purchase Order, etc.) that contains the item.
Budget ($) column: Budget amount for the item in dollars.
Actual ($) column: Actual amount for the item in dollars.
Quantity column: Quantity of the item on the project transaction.
Date column: Date the item was added to the project transaction.
Project Labels column: Project labels assigned to the item.
Use project statuses
After you've configured your base settings, the next step is to configure your project management-specific settings
To start, go to the navigation bar and click Settings  > Project Settings.
Project Labels Setup: Create project labels to attach to expense items to get a visual representation of your expense spending. You can color code your labels and assign labels to categories to help organize your Budget vs Actual (BvA) table. Labels can be nested under each other to form a hierarchy of labels. The BvA table totals expenses for the highest level labels in a single line item.
Project Label Default Preferences: You can set default values for project labels in ServiceTitan. This process is essential for streamlining the correct allocation of costs and revenue in the project and will reduce the amount of manual entry you need to perform to get valuable information about your business's performance.
Revenue Recognition: On the Project Settings page, you can select the default revenue recognition method for your projects. There are four methods that you can select: Sales Basis Method, Completed Contract Method, Percentage of Completion Method, and Cash Basis Method. Select the Percentage of Completion method of revenue recognition to use the Work In Progress [WIP] - Percentage of Completion Method report. The other three methods don't have reporting solutions and aren't recommended.
Retainage: Use retainage if your customer wants to retain a percentage of the whole cost of the project until it is complete. This ensures they're satisfied with the work before they pay. Your customer can pay the retained amount when you bill the last invoice for the project. The percentage that is retained is usually agreed upon when signing the contract for the job. Before you begin billing your customers with retainage, complete the required account integration setup. This only applies when using the Application for Payment workflow.
Update project bill-to
Search for the project you want to edit and open the project.
On the Project Details panel under the Contacts section, click the Edit
 icon next to the current bill-to customer to change it.
Use the search bar and type the name of the customer you want as the bill-to for the project.
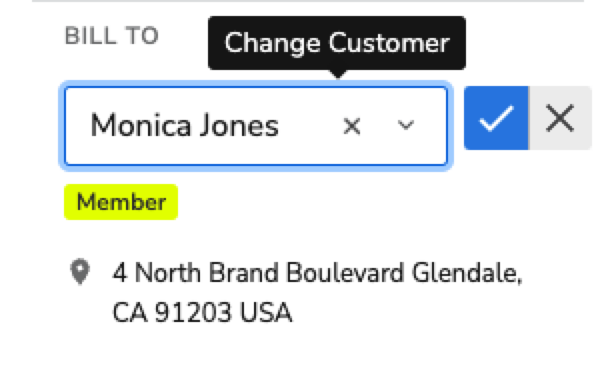
Click the Save
 icon.
icon.
Note: The bill-to on the project is also the bill-to on invoices and Applications for Payment generated throughout the project.
Create project statuses
There are default statuses for projects in Settings, but you can also add custom sub-statuses.
To add custom sub-statuses to each of the default statuses provided in Settings:
Go to the navigation bar and click Settings
 .
.Click Operations > Project Statuses. The Project Statuses page opens.
Find the status for which you want to add a sub-status.
Click Add Substatus.

Enter the name of the sub-status.

When finished, click Save.

Note: You can edit or remove sub-statuses after creating them. To remove a substatus, click the Delete
 icon.
icon.
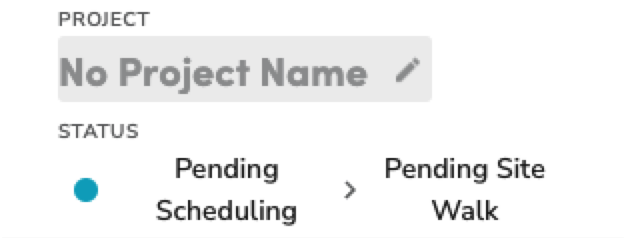
Update project statuses
To update a project status, click the Edit  icon next to the status and select the status you want. Select a project status to help you track your projects by filtering for specific projects or running reports.
For example, use project status to find projects that are completed in the past month or projects that have scheduled jobs but haven't started yet.

Tip: You can click the Arrow > icon to select the sub-status of the status if you have set it. For more information on how to set a custom sub-status, see Add custom project sub-statuses.

You can create an alert that notifies you if the project status changes. This applies to any status and substatuses. For more on alerts, see Use alerts.
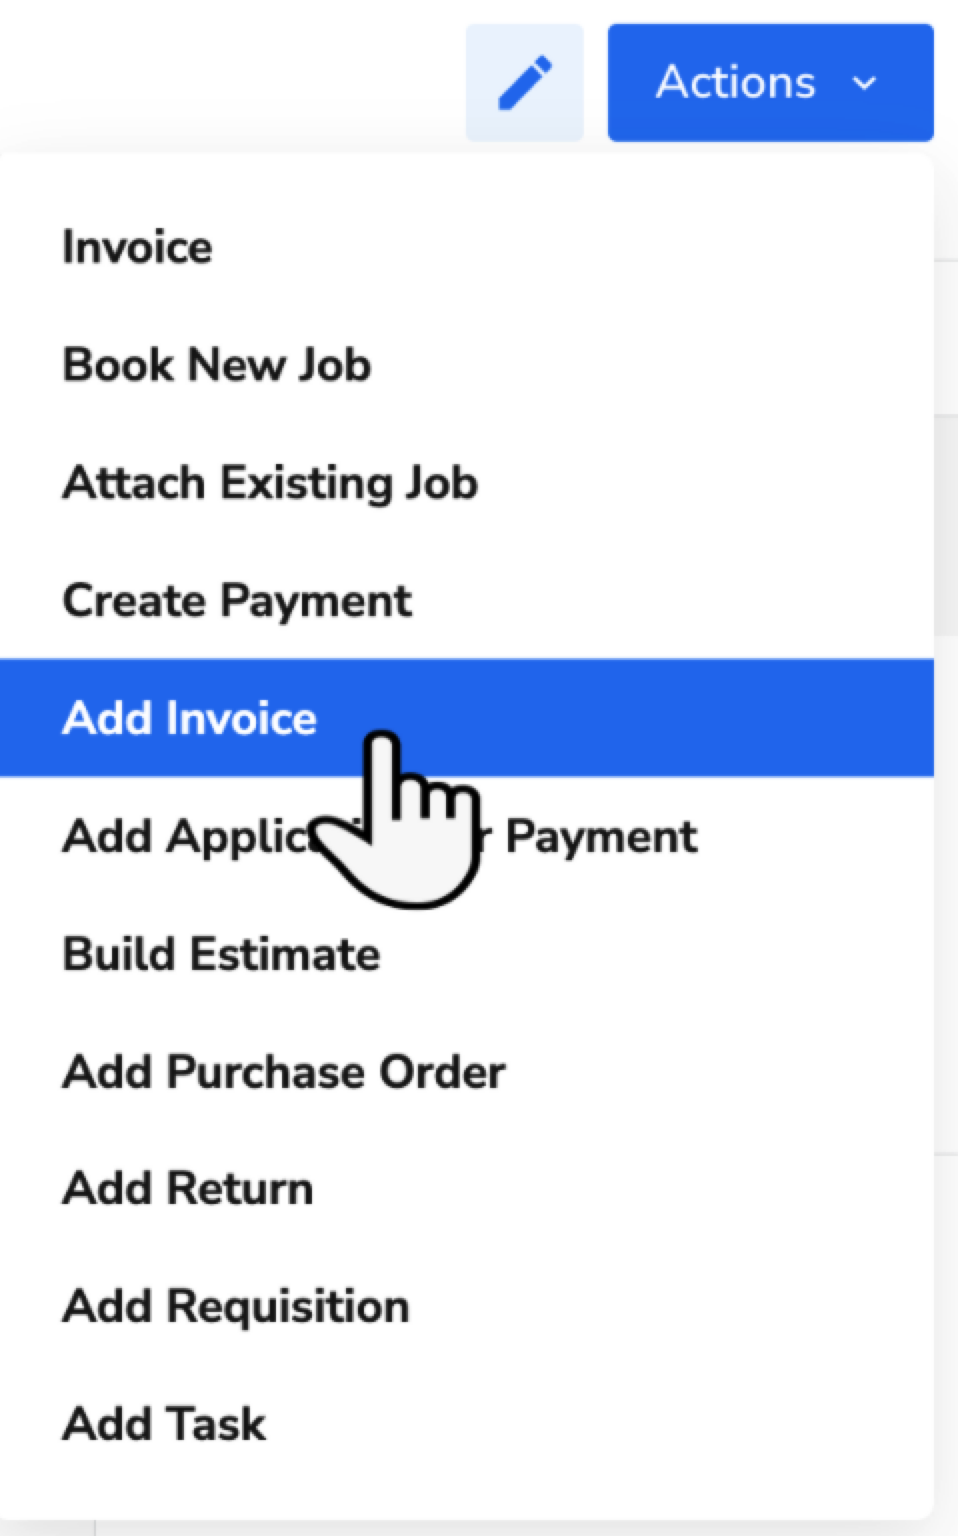
Use project actions
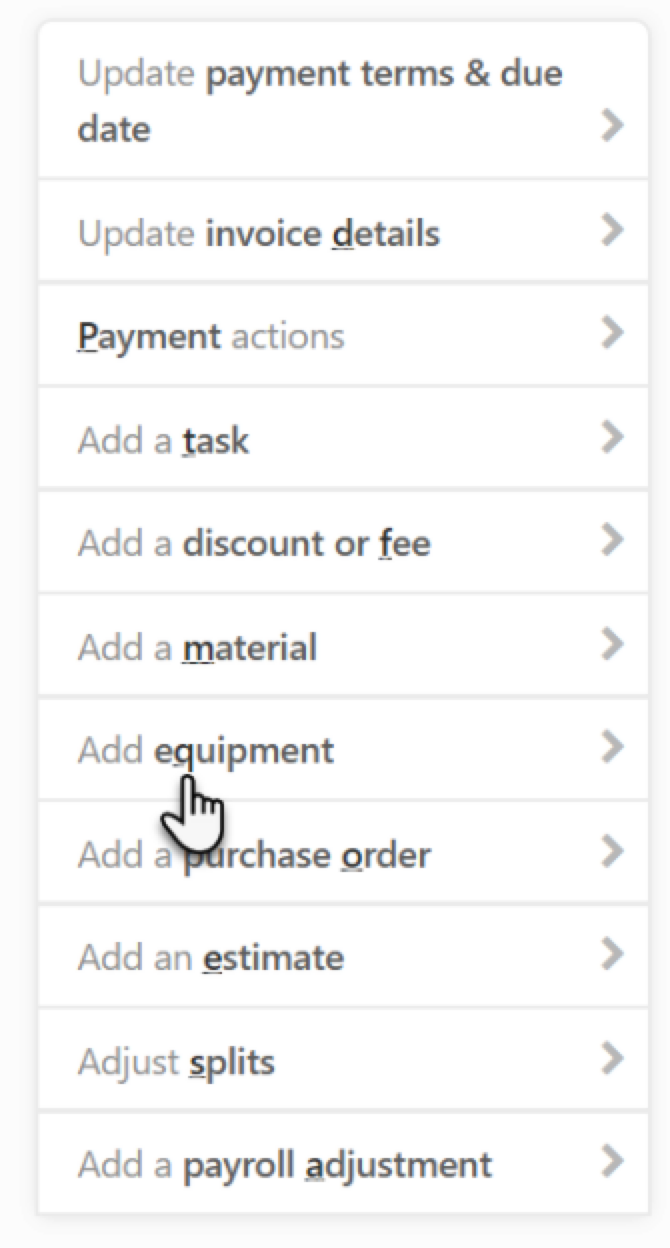
From the Actions dropdown, you can select any of the following options:
Use project labels
Project labels are used to organize expenses in the Budget vs. Actual table and to populate the schedule of values used in creating Applications for Payment. By attaching project labels to expenses, you can create a visual representation of your expense spending and also color code labels to further organize your projects. With project labels, you can view expenses by project phase and drill down to see the breakdown of spending within each phase.
Note: Your account can have as many or as few project labels required for the needs of your business.
Labels can represent anything you want to track in your business. Below are examples of different ways for which you can use labels:
Each phase of the project workflow. This allows you to view expenses for each project milestone. For example, Rough-in, Trim-out, and Start-up.
Each labor type used in a project. You can assign labor types to a single labor category and technicians can each have their own project label association. For example, Apprentice-labor, Sheet metal-labor, Subcontractor-labor.
Service, equipment, and material items. You can categorize them by item type.
If you have pricebook service items for labor, discounts, and fees, create labels for each of those items.
If you have a multi-trade business, create a separate label for each trade to track expenses separately.
Create a project label
Go to the navigation bar and click Settings

In the side panel, click Operations > Project Settings.
On the Create Project Labels screen that opens, click Add Label.

When you're done, click Save.
Enter a label name in the Project Label field.
Select a color for each new label.
Click the Color icon to assign a color to the label and click Apply.
Use your cursor to drag and drop labels in the order you want them. The Order column defines the order in which labels display in the Budget versus Actual table.
Deactivate a project label
To deactivate a label, click Deactivate next to the project label.

Note: Deactivated labels may be reactivated at any time by clicking the Deactivated tab and clicking Activate.
Use project label hierarchies
You can attach project labels to expense items to show a visual representation of a project's expenses. The Budget vs Actual (BvA) table totals expenses for the highest level labels, or parent labels, in a single line item. You can nest labels under each other to form a hierarchy of labels, allowing you to drill down into the lower levels of detail in the Budget vs. Actual table.

Using project label hierarchies allows you to easily identify incurred costs and identify where you may be overspending or where the project may be over budget. Project label hierarchies also increase efficiency throughout a project's billing by improving your project manager's visibility into expenses.
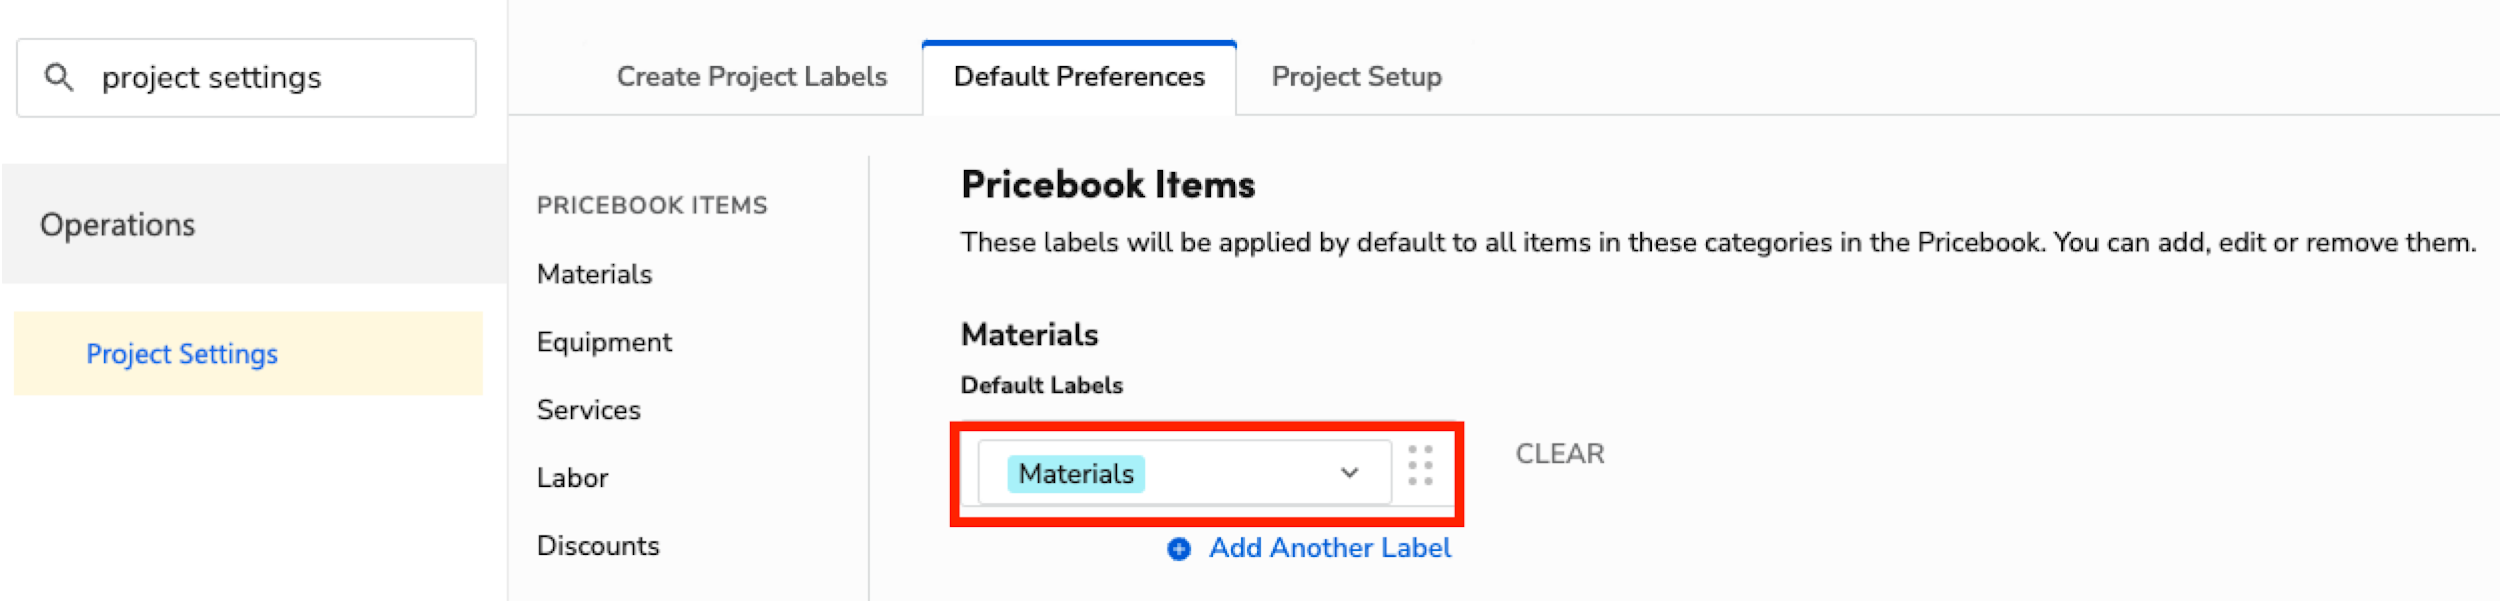
Use project label defaults
After you create project labels, assign project label defaults for your expense types. You can set default labels for pricebook item types and technician labor. You can also assign labels to specific pricebook items, job types, or technicians. The assigned label takes priority over the default label to automate how your expenses are tracked throughout a project.
When you add default project labels to an expense type, it's automatically assigned to an item when it's added to a project estimate or invoice. For example, you can set the Labor label as the default for all labor service items.
To add default labels:
Go to the navigation bar and click Settings
 .
.In the side panel, click Operations > Project Settings.

Click the Default Labels tab.
In the Pricebook Items section, click the dropdown for a pricebook item type to assign default labels.
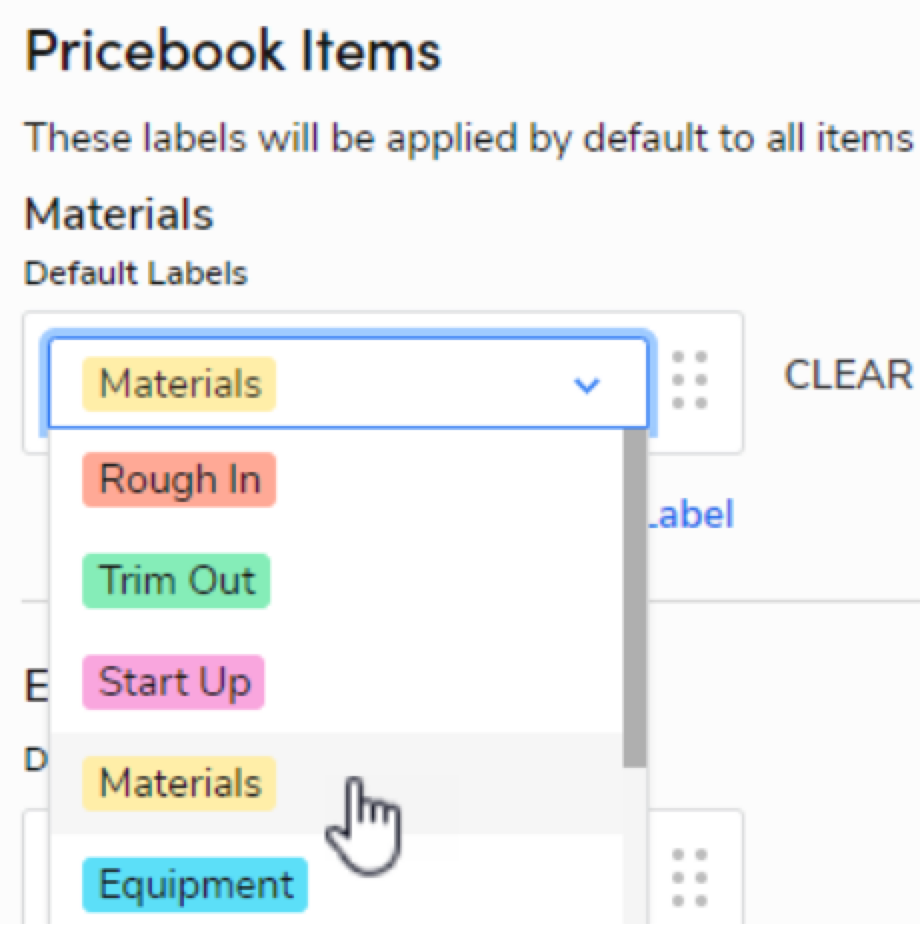
Under Technician Labor, select default labels for technician labor hours.
When finished, click Save.
You can also assign labels to individual pricebook items so that they're labeled when added to a project invoice or estimate. Remember, the assigned label takes precedence over the default label.
To apply project labels to an existing pricebook item, edit the item:
Go to the navigation bar and click Pricebook.
In the side menu, click Services, Materials, or Equipment, depending on the pricebook item you want to edit. The item table opens.
Browse the table or use the search field to find the item you want to edit. You can search by item code, name, or description.
For the item you want to edit, on the right side of the item table, click More and select View/Edit Item.
Click the Project Label dropdown and select the labels you want to assign.
When finished, click Save.
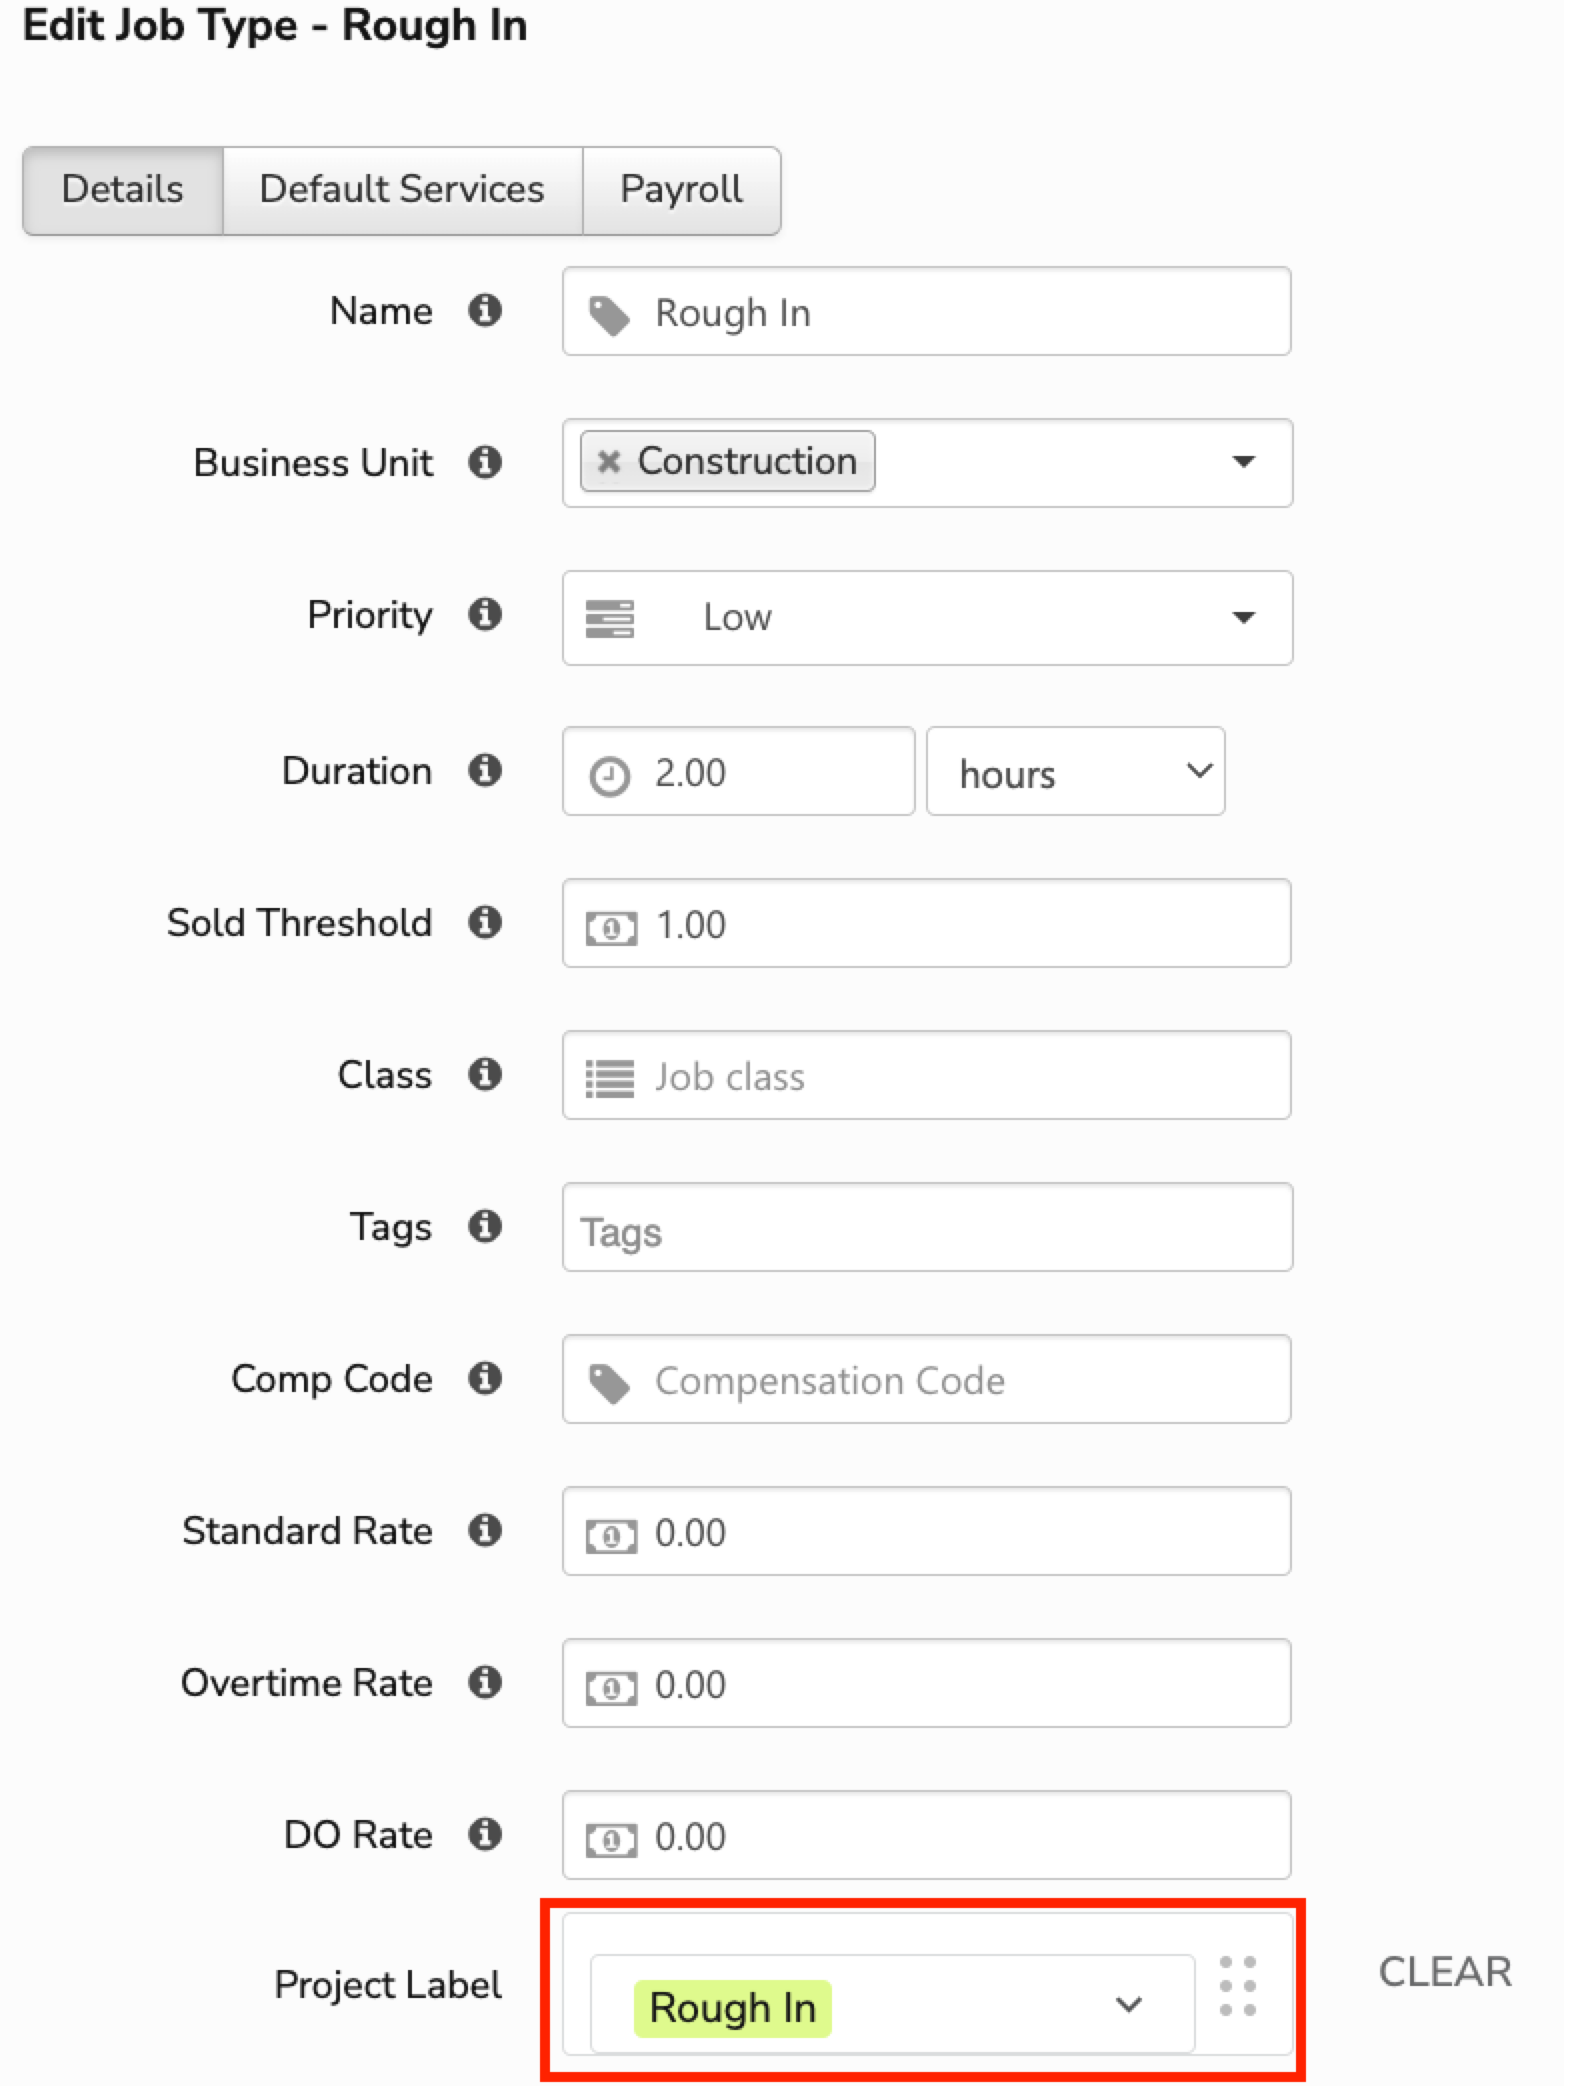
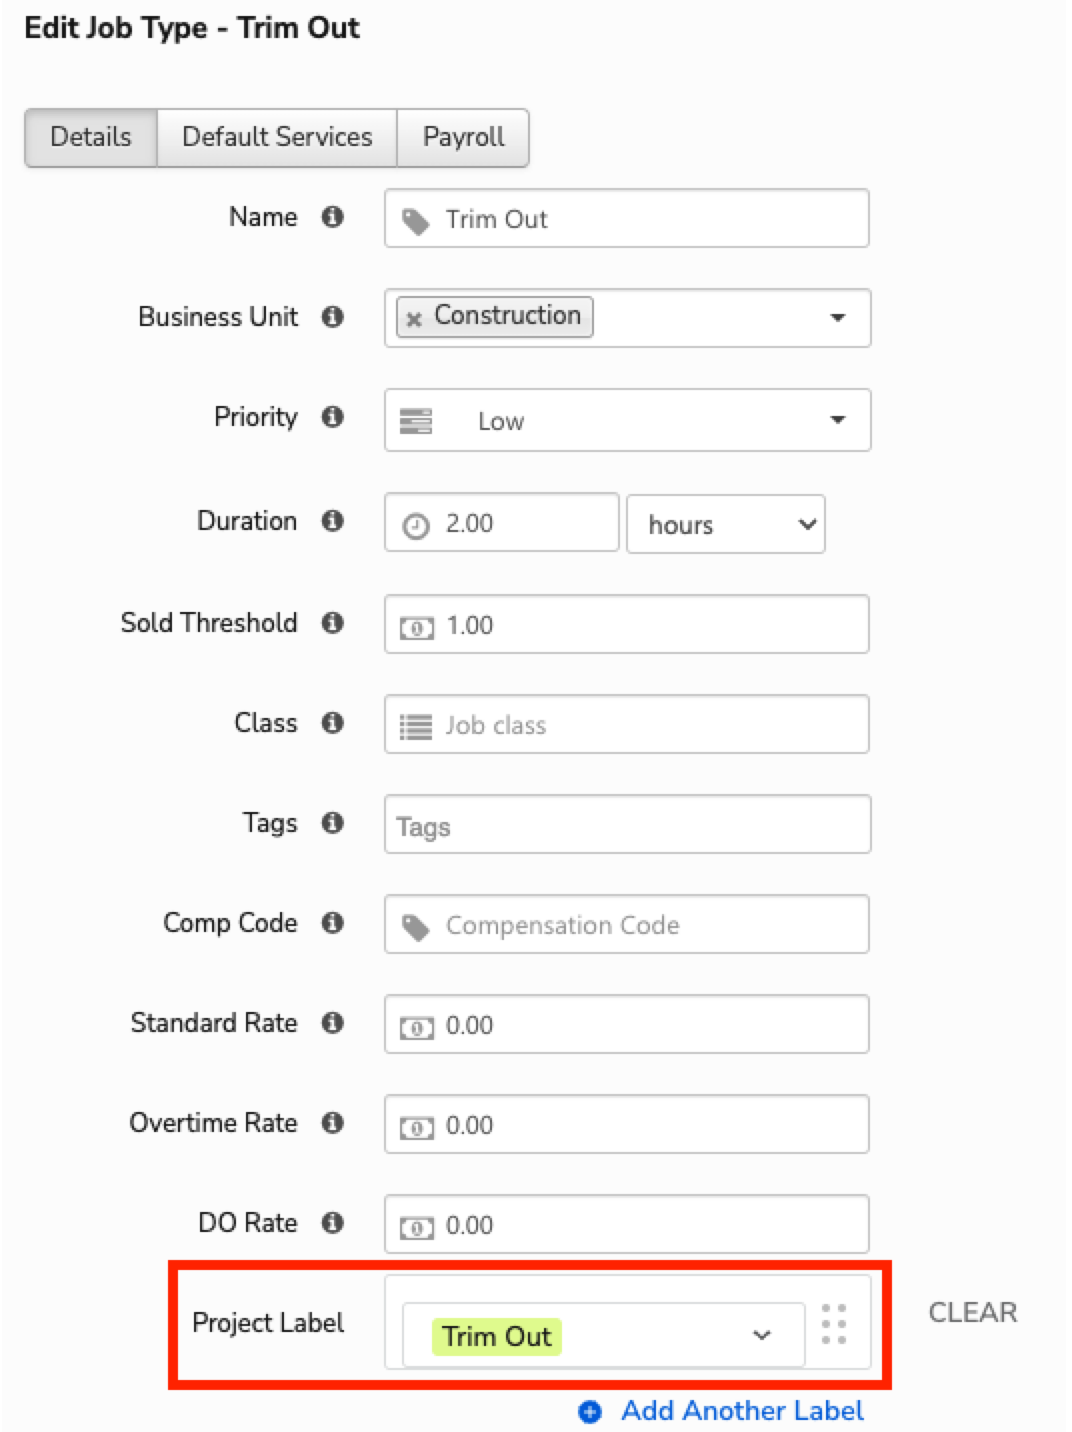
Assign labels to job types
Assign a label to a job type to automatically attribute actuals to that label. When a job of that type is booked on a project, the label applies to all paid timesheet activities and invoice items on the job.
Go to the navigation bar and click Settings
 .
.In the side panel, click Operations > Job Types.
Find the job type you want to apply a label to and click Edit.
Click the Project Label dropdown and select the label that corresponds to the appropriate project phase.
When finished, click Save.
Note: Project label defaults can be assigned in the default settings and directly to job types, technician profiles, and pricebook items. Project labels cannot be defaulted to estimates, purchase orders or purchase order types, requisitions, or non-purchase order bills.
Assign labor labels to technicians
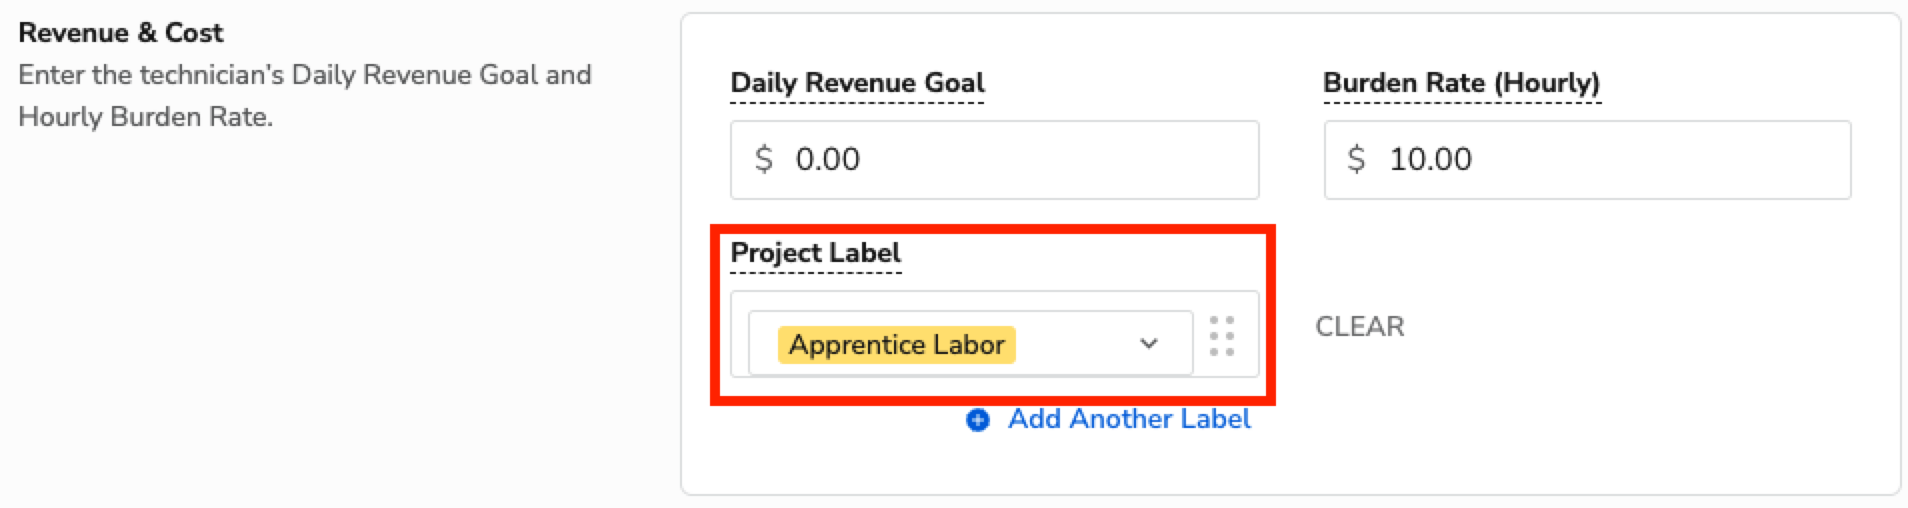
Assign labels to each technician for their labor type. For example, all apprentice technicians who work on residential new construction should have project labels under Labor > Apprentice Labor.
Note: If you don't apply labels to technicians, timesheet labor costs appear in the Uncategorized section of the Budget vs Actual table.
Go to the navigation bar and click Settings
 .
.In the side panel, click People > Technicians.
Find the technician you want to add a label to and click Edit.
Click the Project Label to assign labels.

When finished, click Save.
Connect project label defaults with project label hierarchies
Setting project label defaults on expenses types, along with setting project labels on your job types and technicians, allows you to automate how expenses are tracked during the course of your projects.
Because each job type has a corresponding label defaulted to it and each expense type has a default project label association, any expenses captured go into their corresponding hierarchies.
Top level hierarchy
Job Records: Project labels assigned to a job become the top level, or parent, label of all items associated with this record. For example, a job record has a label of Rough-in assigned, so all items on the invoice and timesheets for the job are grouped underneath the Rough-in label.
Second level hierarchy
Pricebook item records (ex: services, materials, equipment)
Purchase order records
Timesheet records
See examples of project label hierarchies on the Phase Project Management & Business Unit Management guided setup page.
Example of phase management setup and workflow hierarchy
Example of job-material hierarchy
The Trim-Out job type has the trim-out label applied to its settings.

In Project Settings, materials have a Materials default label.
When a material is added to the Trim-out job invoice, the label hierarchy is automatically applied to the item.

Example of job-timesheet hierarchy
The Trim-out job type has the Trim-out label applied to its settings.
In Technicians, the technician has the Apprentice Labor project label default applied to their profile.
As the technician works the job, the project label default applies to the invoice. You can see technician labor project labels by clicking Adjust Splits on the Invoice page.
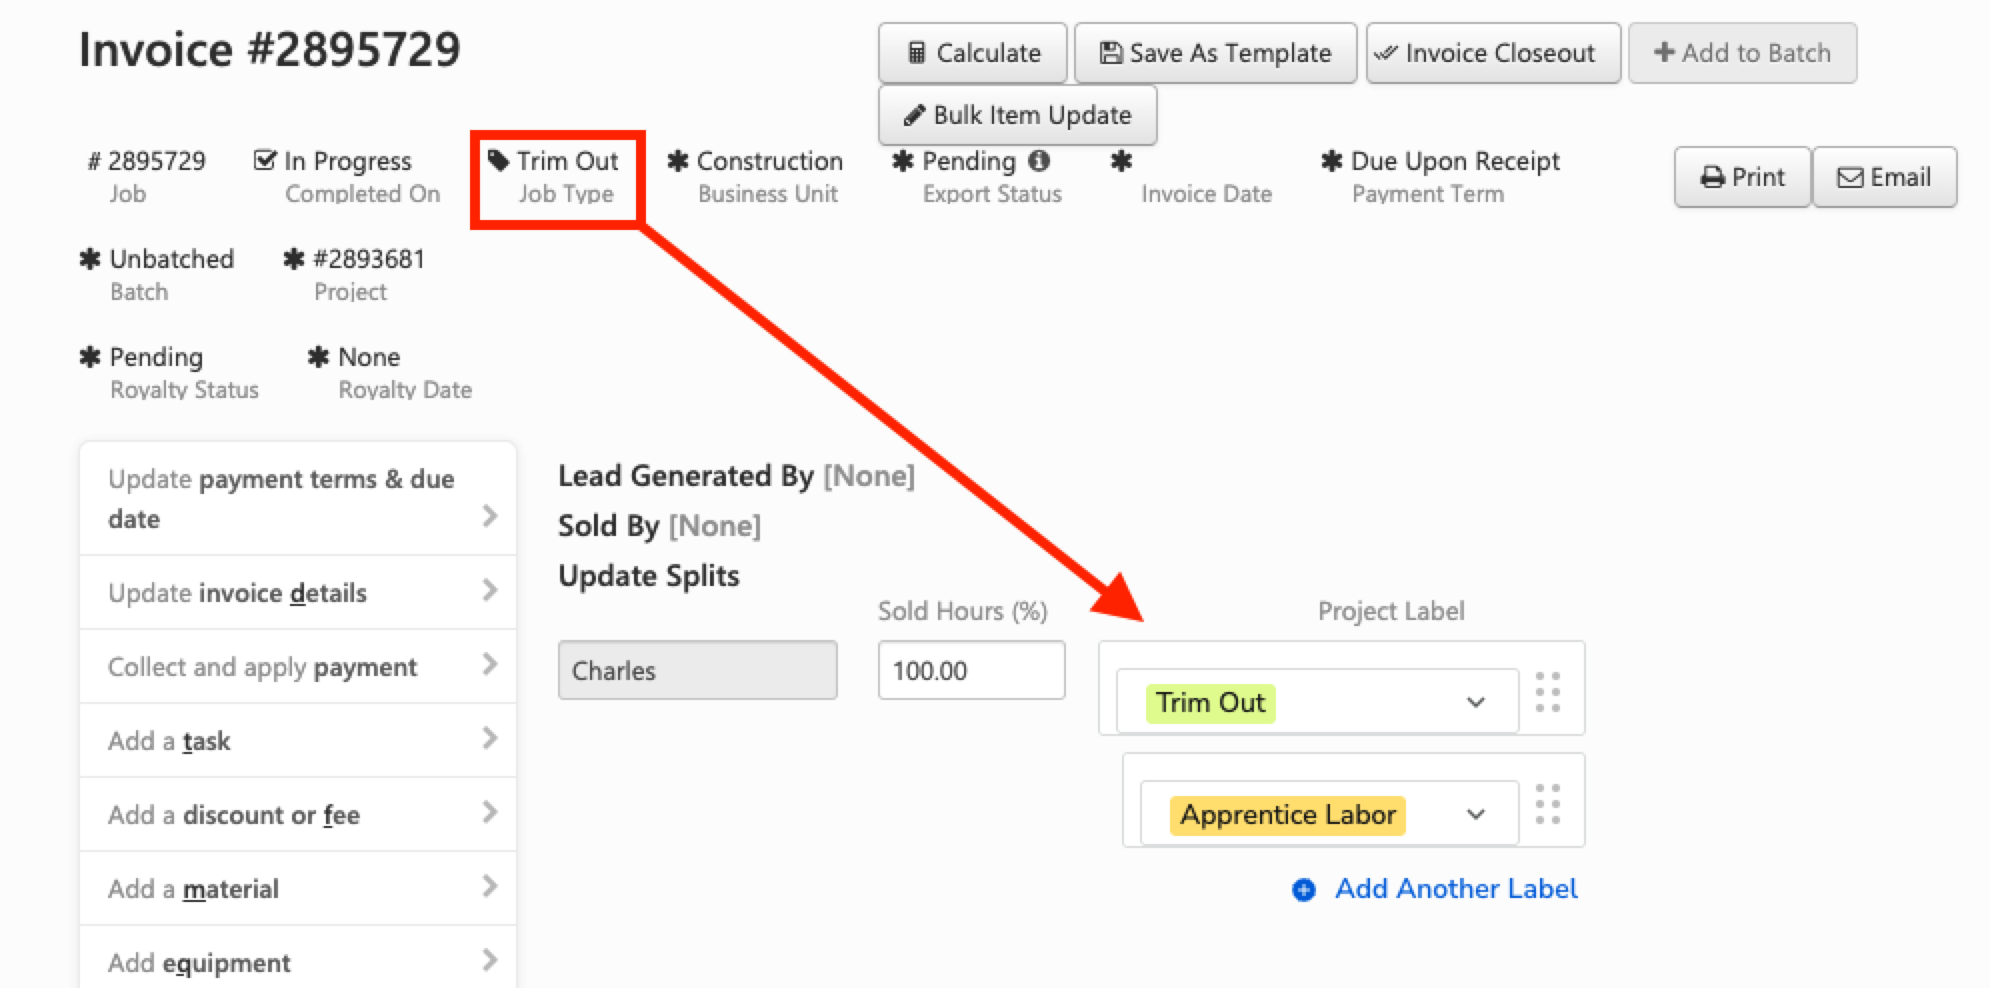
As a result, when you go into the Budget vs Actual Itemized Details, you can see that each cost was captured through the default labels.

Setting your account up efficiently and using project label defaults allow you to focus on business priorities because your expenses are automatically classified and organized on your Budget vs Actual tables.
Caution: Because each job type has a corresponding label defaulted to it and each expense type has a default project label association, any expenses captured go into their corresponding hierarchies. For example, if a material was consumed on the Trim-out phase, you'd see the expense in Trim Out > Materials.
Start an estimate from the office
If a site visit to gather measurements, photos, and other information is required, follow the steps under Site Visit Required. If the estimate is being generated from plans or from information already in your database, follow the steps under No Site Visit Required.
Site Visit Required
Schedule a Sales Job and assign it to a technician, estimator, or salesperson.
After the information is collected, open the Sales Job from the Job Actions drop-down and select Add an Estimate.

No Site Visit Required
Search and open the location record for the client.
Scroll down to the section titled Opportunities and Estimates and click Build Estimate.

Create an estimate
Note: You can use existing proposal templates, created in your pricebook, to generate your estimate. Select the ones you want to use and click Done to build the estimate with the existing template(s).
Enter estimate details in each section as needed:
Customer and Locations: Confirm that the Service Location and Billing Location details are correct.
General Details: Enter general details about the estimate.
Name: Enter a unique name that will help you identify this estimate.
Project Label: If you're adding this estimate to a project and the estimate represents a project phase or change order, select a project label. This helps ensure that your expenses are reflected accurately for the project. For more, see Create project labels.
Business Unit: The BU under which this estimate is reflected in.
Note: After the estimate is sold, the sales from the estimate report under the selected BU. For best practice, create the estimate under the Construction BU to ensure accurate reporting.
Summary (optional): Enter a summary for the estimate. This prints on the customer's view of the estimate.
Price Details: Review follow up and pricing details:
Note: The fields in the Price Details section are updated as the estimate is built so you don't need to add values when creating the estimate.
Follow Up On: Enter the date on which you plan to follow up with the customer for this opportunity. For more, see Use the Follow Up screen.
Rate Sheet: If you want to apply a rate sheet to your estimate, select a rate sheet from the dropdown. For more, see Apply client-specific pricing rate sheets on an invoice or estimate.
Subtotal: The total cost of the estimate, excluding taxes, which is calculated after items and tasks are added to the estimate.
Tax: If your tax is not automatically calculated from your taxable items, enter the dollar amount for the tax that is expected to be collected.
Total: The total cost of the estimate, which is calculated after items, tasks, and tax are added to the estimate.
Sale Information: Enter details for how the estimate is sold:
Sold By: The employee who sold the estimate.
Sold on Date: The date on which the estimate is sold.
Sold On Time: The time at which the estimate is sold.
Note: Sale Information is auto-populated when the estimate status is Sold.
When finished, click Create.
There are two main types of estimates you should consider when beginning to create estimates or bids for projects: a line item estimate or a rough project estimate.
Understand estimate workflows
There are several ways to create estimates for your projects, but there are two main ways you should consider when beginning to create estimates or bids for projects. You can create either a detailed line item estimate or use a rough estimate with summary totals.
On a line item estimate, you add the exact services you are charging for and the exact materials and equipment you will be using/installing on the estimate. For example, equipment change-outs, short-term projects, and track home building.
On a rough project estimate, you use generic tasks and revenue on the estimate to represent your contract value and costs. This process is typically used to set the budget of a bid on the project to track your actual revenue and expenses against. For example, long-term, large-scale projects or contracts or setting a budget without knowing which specific material or equipment tasks will be used.
You can build estimates using both methods together in the same account, generally in different business units. For example, residential install, service, remodel vs. commercial install, and construction.
Tip: For all estimates you create, we recommend not including chargeable material items on your project if you plan to use the AFP workflow to generate your project invoices. Instead, use service tasks to hold the revenue for the chargeable materials. This ensures your non-chargeable materials can be included on job invoices to record inventory consumption and that the service task, which does not have a cost associated, can be used in the AFP workflow.
Create a line item estimate
To use the line item estimate method, you need to:
Know what services, materials, and equipment you will be using/consuming on the project.
Have the services, materials, and equipment needed in your current pricebook.
Benefits
You can use exactly what materials or equipment you have in your pricebook to create the estimate.
If you are using the Purchasing module, you can create a purchase order directly from the estimate using the Requisitions feature and invoice closeout.
Example use cases
Equipment changeouts
Short-term projects
Track home building
Line item estimate workflow
Using this method, you create your estimate with the exact services you are selling, as well as materials and equipment that will be consumed when performing the work.
Create your estimate and then build out your estimate with the exact line items you need for the project. If you have set up your default project labels correctly, your budget will automatically populate according to your label setup.

Create a rough project estimate
To use the rough project estimate method, you need to:
Set default project labels for pricebook items, job types, and technicians to streamline the labeling of expense items in projects. Labels are used to organize expenses in the Budget vs Actual table.
Create and assign default labels and project label hierarchies to necessary pricebook items for easier creation of budgets.
Benefits
You don't know exactly what materials or equipment will be used in order to create the estimate.
You need a quick way to create a budget for a project.
More flexible for scenarios where you need a budget, but don't have all the required information to make a line item estimate.
Example use cases
Long-term, large-scale projects or contracts, setting a budget without knowing which specific material or equipment tasks will be used.
Rough project estimate workflow
Using this method, each item on the estimate is a summary task or material that represents specific costs or revenue you want to reflect on the budget of the project, such as revenue and costs.
Create your estimate and then build out your estimate with the rough summary items you created in your pricebook. If you've set up your default project labels correctly, your budget will automatically populate according to your label setup.
Generate your budget
To generate your budget, you first need to mark your estimate as Sold. The sold estimate will inform the project's contract summary. The total price and tax of items added to the sold estimate will be represented and the value includes sold change orders. Any unsold estimates won't populate onto the budget on the BvA.
Convert and sell an estimate
On the Estimate page, you can convert and sell estimates.
Click Sold / Convert.

In the pop-up window, select the technician or employee who sold the estimate from the dropdown.
Click Apply.
After the project estimate is sold, the project's Budget vs Actual table is populated and updated with the contents of the estimate.
In this example, you can see an estimate being sold and how that impacts the project's Budget vs Actual table.

In this estimate using the rough project estimate approach, the revenue and cost items are separated, making it easier to track costs throughout the project.

The project's Budget vs Actual table reflects the project label setup on the estimate.
Create project estimates using a template
You can upload estimates to use as templates through a spreadsheet application like Microsoft Excel or Google Sheets to save time and increase efficiency on the bid creation process for your projects.
Creating saved templates allows you to modify and import estimates without having to create them from scratch each time. You can also use estimate templates for new construction, ranging from model homes to standard builds.
To build an estimate template for use in your projects you first need to export an existing estimate to use as a template.
Export an estimate to use as a template
Export and modify existing estimates to create a template for future projects:
Search for and open the construction estimate you want to export.
On the Estimate page, click the Actions dropdown and select Export as Template. The estimate downloads as an XLSX file to your computer.

Open the estimate template file in a spreadsheet application like Microsoft Excel or Google Sheet.
Highlight and delete the values in Column A. ServiceTitan automatically associates identifiers to each estimate item after importing the template.
Note: Importing a template with IDs in Column A causes an error later during the import process. Save time by removing these values from your template before saving it.
Save the spreadsheet to your computer as an XLXS file.
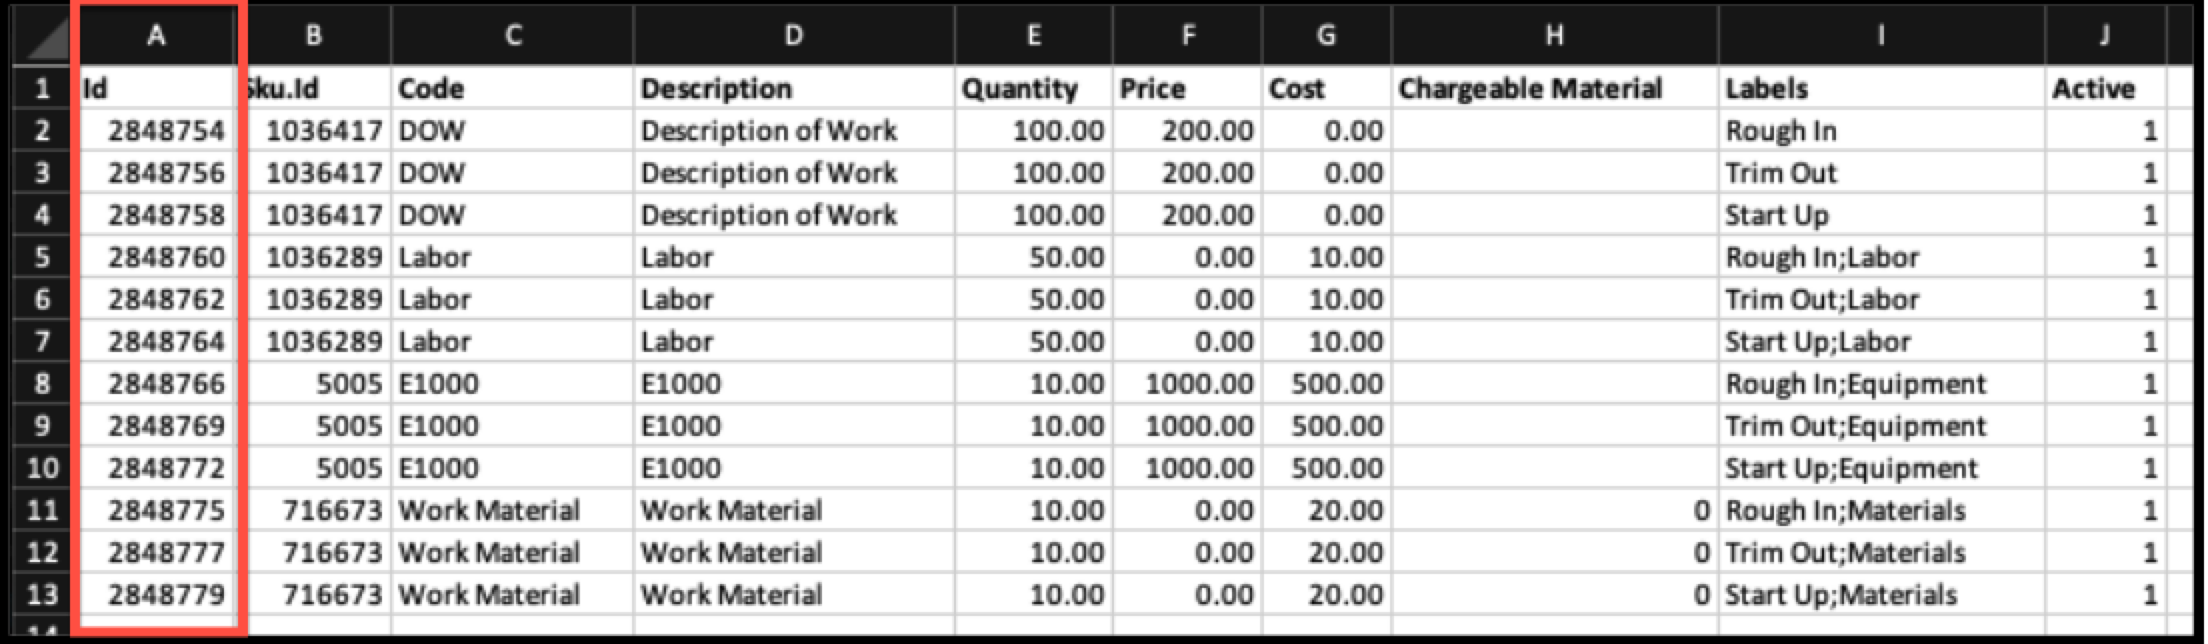
Template column descriptions include:
ID: Unique identifier of the estimate item
Sku.Id: Unique identifier of the pricebook item
Code: Code of the pricebook item
Description: Description of the pricebook item
Quantity: Quantity of the pricebook item
Price: Price of the pricebook item
Cost: Cost of the pricebook item
Chargeable Material: Shows if the material is chargeable. 1 is chargeable, 0 is non-chargeable.
Labels: Project labels associated with the pricebook item
Active: Status of the pricebook item. 1 is active, 0 is inactive.
Note: When editing an estimate template, note the following:
Project label hierarchies are added to the template by a semicolon without a space between the labels. For example, Rough In;Labor, Labor;Helper, Trenching;Equipment.
Items on estimate upload templates can't have more than two decimal places in the Price or Cost fields. For example, a cost of $3.1234 on an item causes an error. Edit the price to two decimal places ($3.12).
If you use the Application for Payment workflow to invoice for your project's revenue, you can't use chargeable materials on the project's sold estimate. Instead, use service tasks to hold the revenue. See Manage double costing from chargeable materials for more information.
Import an estimate template
After you create a template, you can upload the template on new opportunities to save time and focus on customizing the bid to the needs of your contract.
Select one of the following areas to create an estimate for your construction opportunity:
From the call booking screen
From the call booking screen on a location record
Create an estimate.
On the Estimate page, click the Actions dropdown and select Import from Template.

Upload the XLSX file from your computer. A confirmation message appears that the import has started.
Note: A notification appears if there are import errors.
Open the imported template and use it for your current contract or opportunity.
Manage change orders
If you need to make updates to a project after completion, create change orders to make modifications to your project and contract when using the Application for Payment feature.
The change order can adjust the contract value and revenue for the project. To create a change order, add a new estimate on the project to capture the changes. Use a change order project label and category so the updates are reflected accurately in the project.
Note: When creating a change order, note the following:
Change orders apply at the project level.
Projects can have multiple change orders.
An original sold estimate is required to create a change order.
Before you create a change order, make sure you have a change order project label. This allows you to track change orders in the Budget vs Actuals reporting.
Tip: Change orders allow you to retain the information in the original sold estimate and to identify and track changes to the original sold estimate. Don't update the original sold estimate for the project. Instead, create a change order.
Create a change order
Open the project you want to set up a change order for.
Click the Actions dropdown and select Build Estimate.
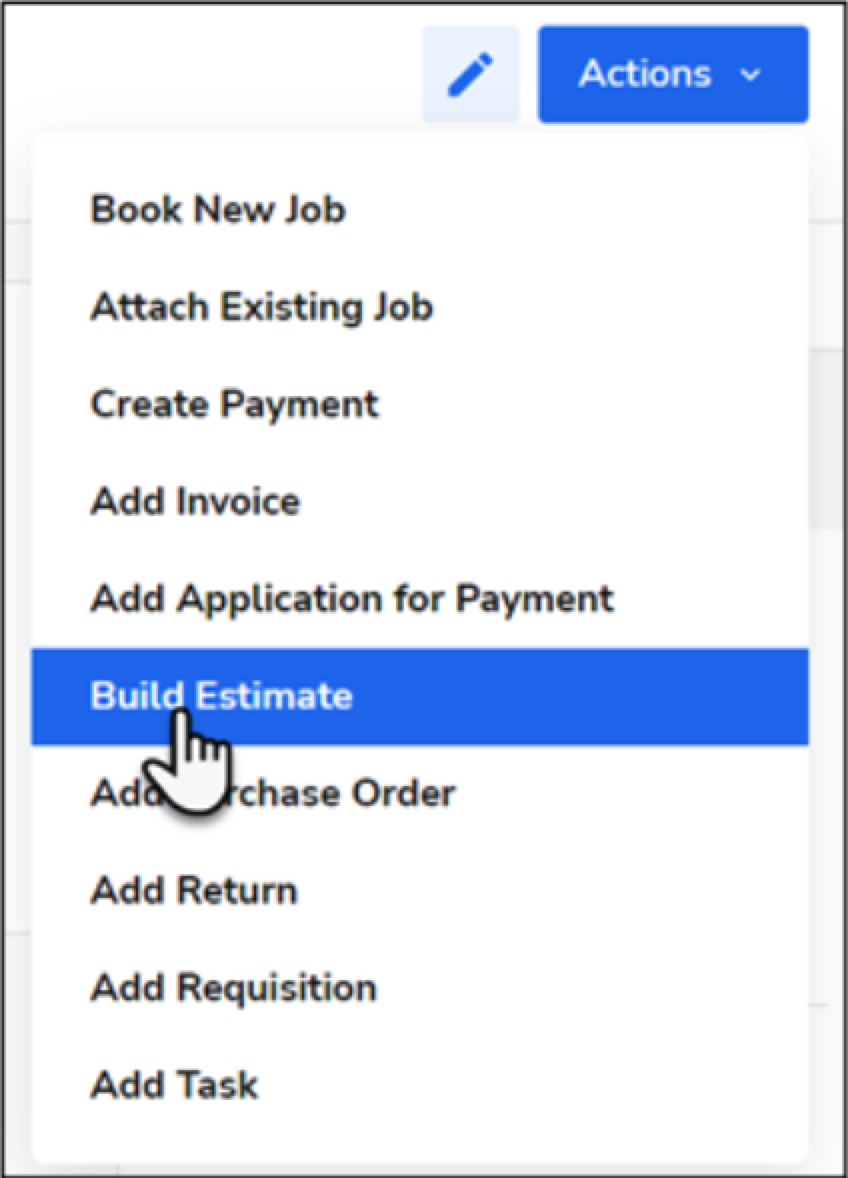
Click the Create New Opportunity tab.
Click the Business Unit dropdown and select the business unit (BU) for which you want to create an estimate.
When finished, click + Build Estimate.

Note: You can also select a template and click Done to create an estimate from an existing template.
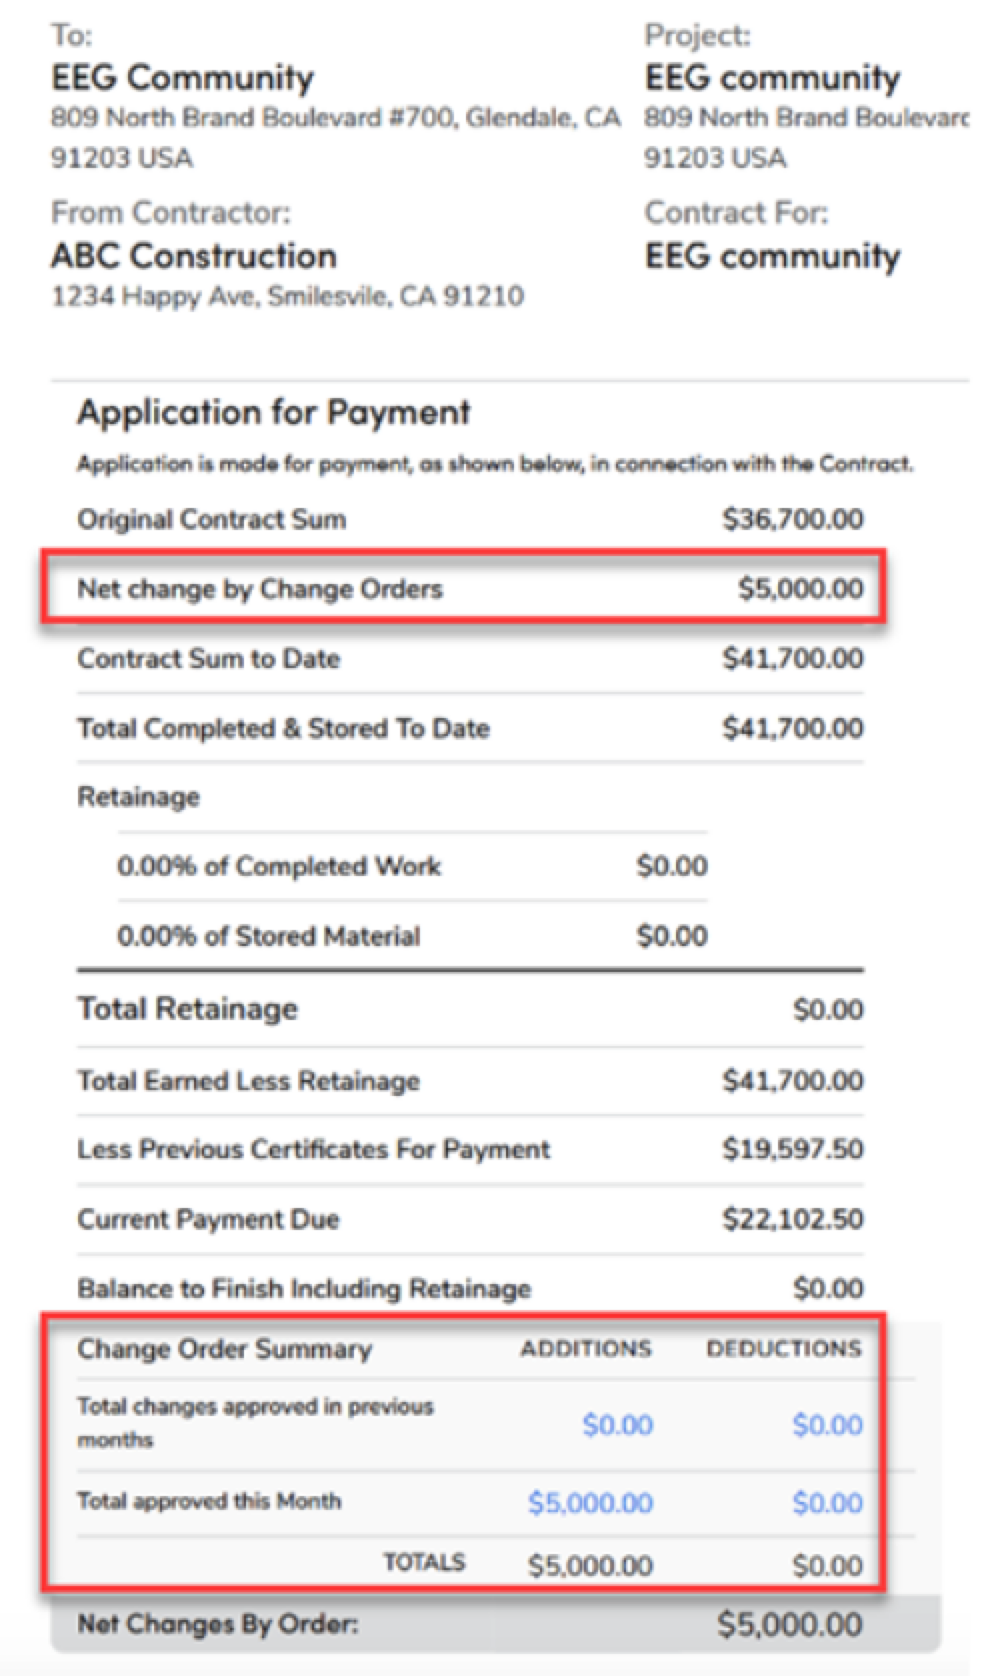
When the change order estimate status is updated to Sold, enable the Change Order option on the Estimate screen. This ensures that the change order is accounted for in the Application for Payment summary. You can find change order details in the Net change by Change Orders and Change Order Summary sections.
Build the new estimate.
If you're adding the change order to an Application for Payment, follow these best practices:
Add a project label to all the items in the change order. For more on project labels, see Create project labels.
When initiating an Application for Payment, your change order is grouped as one scheduled value named after the Name of the estimate.
This is different from the logic of how the other scheduled values are updated based on project labels assigned.
When an invoice is generated for the change order, service items are added using the same logic as the initial estimate.
Actual Billing is reported on the Budget vs Actual table based on project labels assigned using the same logic as service items from the initial estimate.
When the change order estimate status is updated to Sold, enable the Change Order option on the Estimate screen. This ensures that the change order is accounted for in the Application for Payment summary. You can find change order details in the Net change by Change Orders and Change Order Summary sections.
Make cost adjustments
While a project is in progress, there may be times where changes or modifications to the contract budget need to be represented in ServiceTitan. Cost adjustments are a form of change orders that can adjust the cost budgets for the project.
To create a cost adjustment, add a new estimate on the project to capture the changes. Use a project label to associate the additional costs to the hierarchy you determine so the updates are reflected accurately in the project.
You can follow the same steps you use to create a change order when creating a cost adjustment. Ensure the project label you apply to the estimate item reflects where you want the additional cost to reflect on the project.
For example, you might underestimate the material budget for the Rough-in phase of a project and midway through the phase, you realize that you need to reflect the added cost for materials through a cost adjustment.
By building a change order, you can add a non-chargeable material to capture the additional costs you want to add to your budget. The material, based on this example, is labeled Rough-in - Materials.
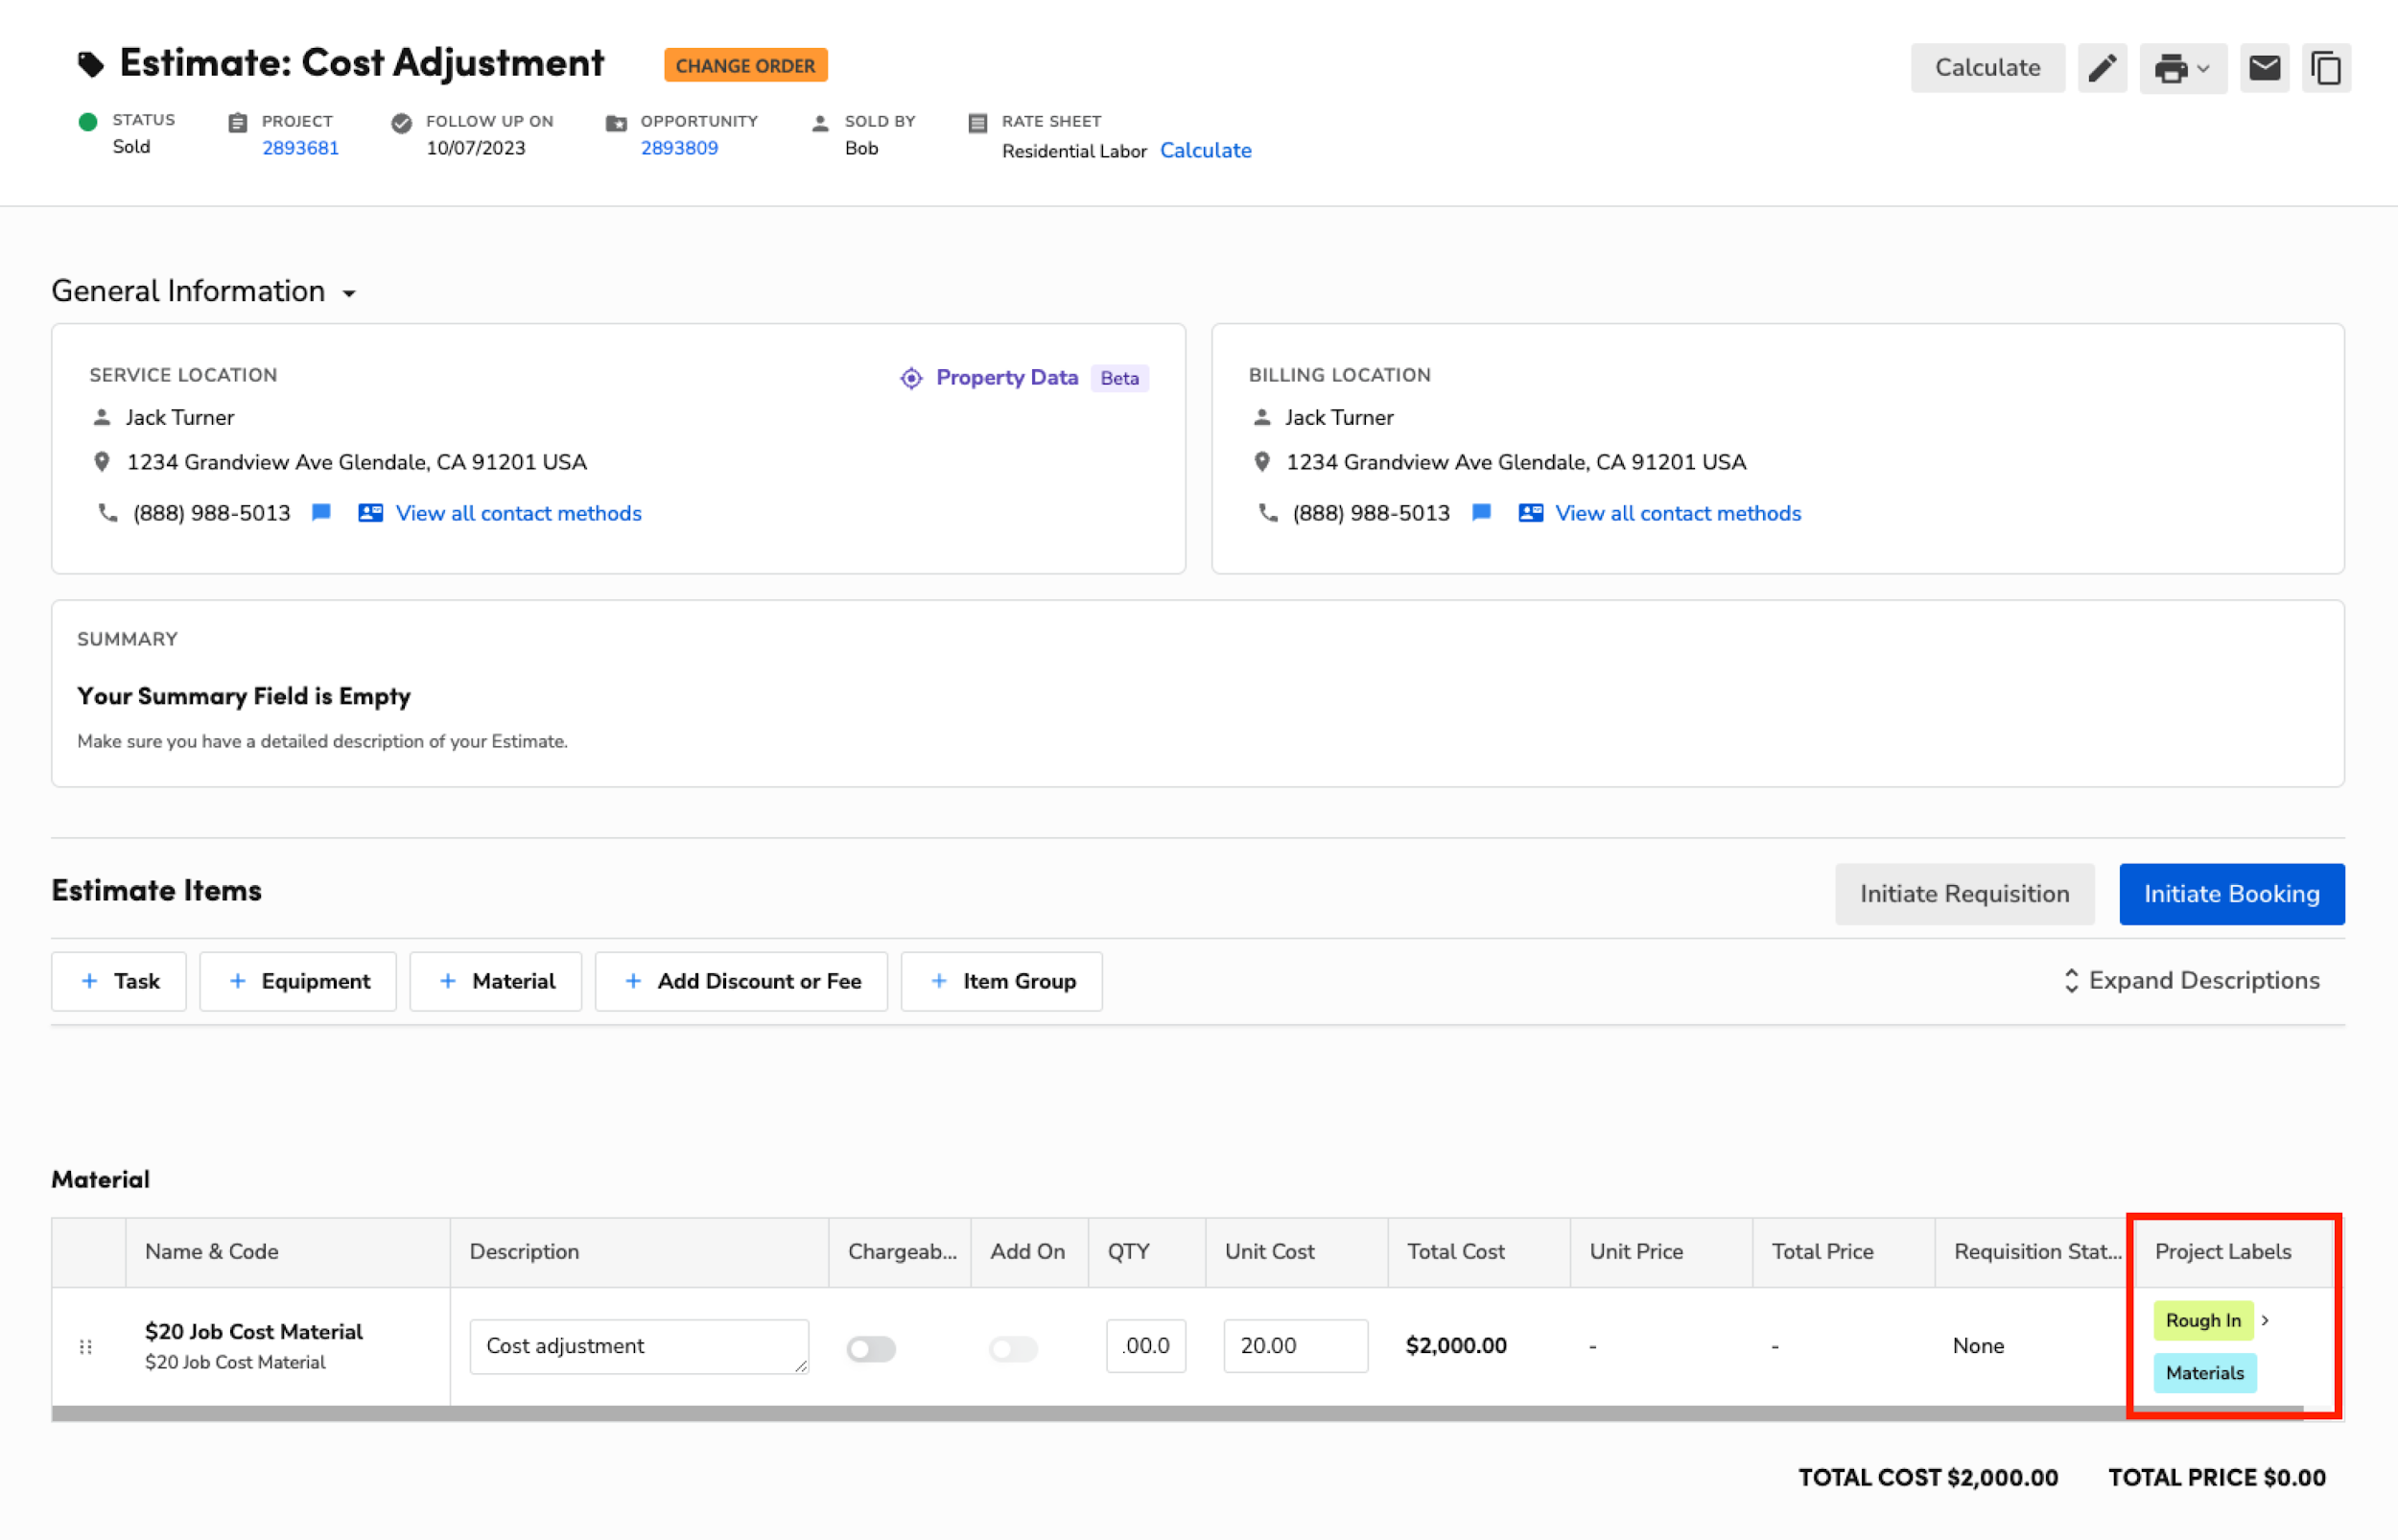
This action adds $2,000 in budgeted costs to the Rough-in - Material category on the Budget vs. Actual table. Prior to the cost adjustment, the budgeted total was $200 in costs.

The final result reflects the cost adjustment for Rough-in materials on the BvA. You can drill down into the materials to see that reflected by line item.
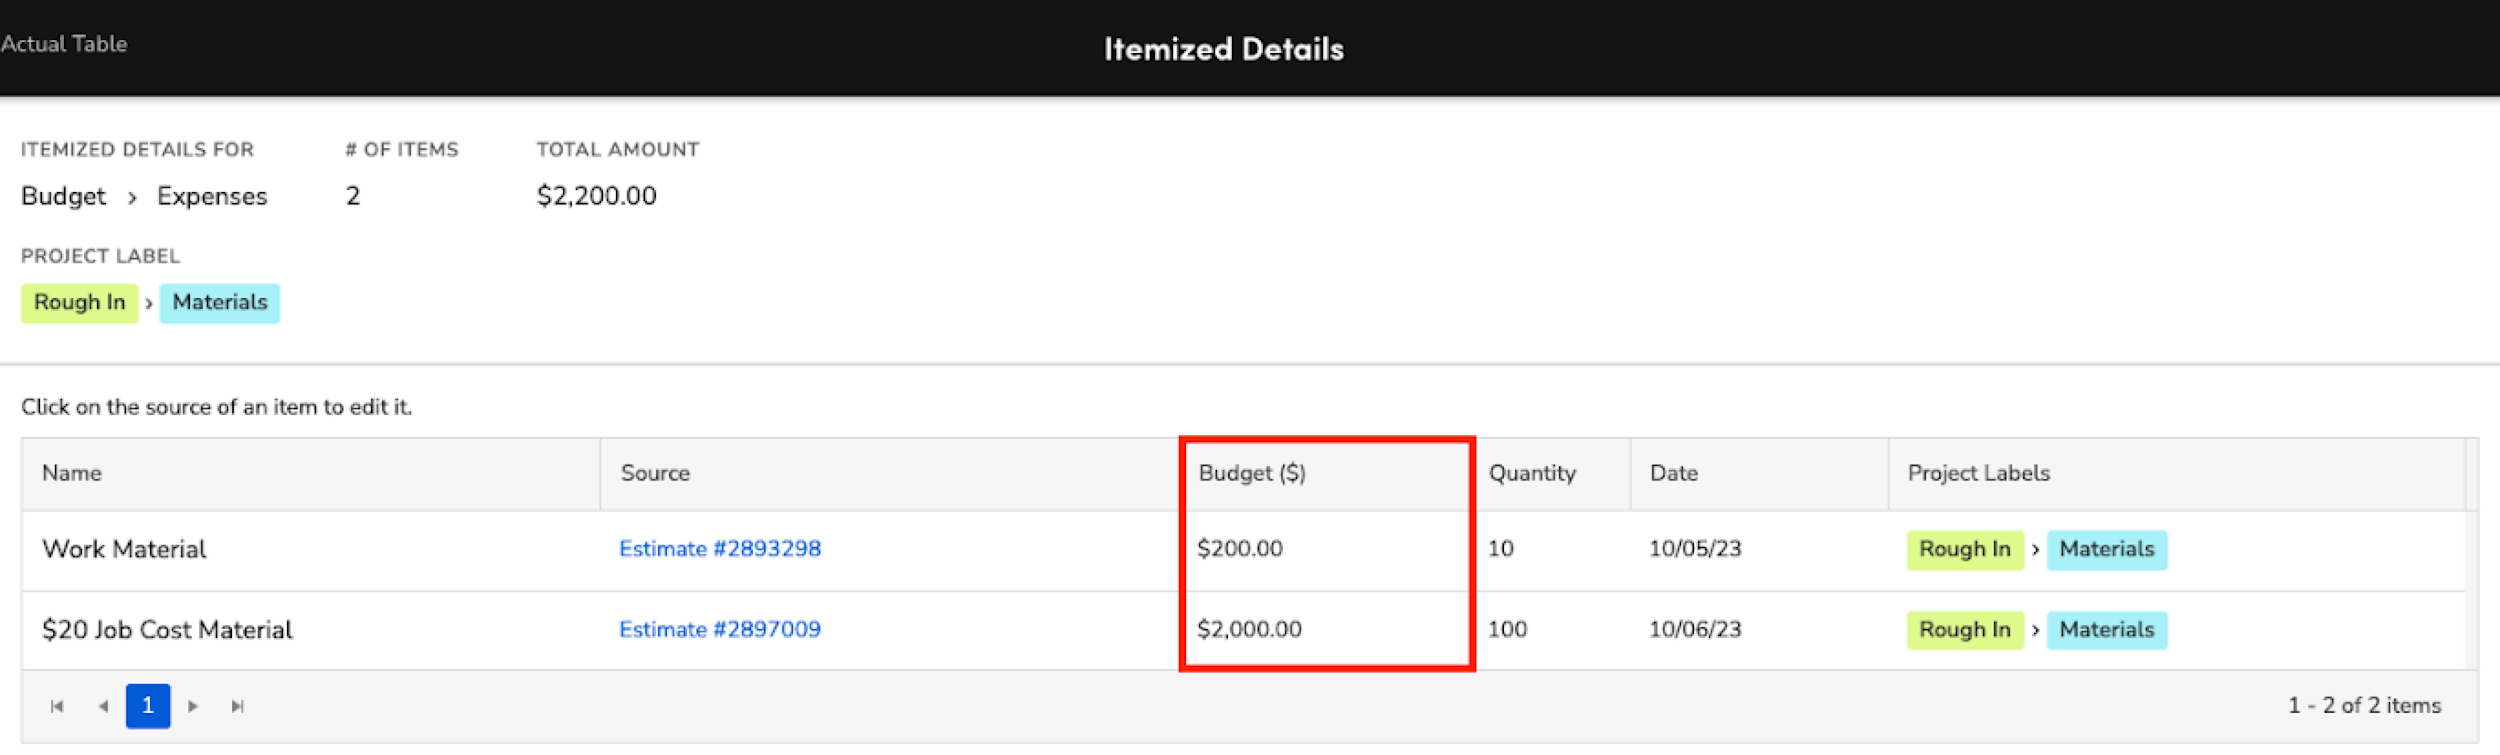
The itemized details confirm that the cost adjustment was applied the correct way to add additional budgeted costs to this project. You can see that two sold estimates, which is expected because the initial $200 in costs came from the initial sold estimate and the subsequent $2,000 in costs came from the cost adjustment.
Generate actuals
You can generate actuals from materials and equipment on projects. You can also generate labor actuals from timesheets and labor invoice items.
To generate actuals for materials and equipment, add them to an invoice with invoice closeout by creating a purchase order or manually adding them directly to the invoice.
Use purchase orders to generate and track your actual costs
Assigning a PO to a job will associate actuals to that specific job. Then, associated project label hierarchies apply to the job.
Find the project for which you want to create a PO.
In the side panel, click Jobs & Appointments.
From the Jobs table, select the job for which you want to create a PO.
From the dropdown, select Purchase Order.

In the Purchase order details fly-out menu, enter PO details.
The Qty field in the ItemsList table should reflect the amount of materials that are accumulated during the job and the cost should reflect the hourly pay for the subcontractors.
To classify subcontractor labor correctly, we recommend adding project labels to the PO in this order: Phase, Labor, Subtype of Labor.
Manage purchase orders and bill costs on a project
Purchasing and Inventory Modules enhance your efficiency by allowing you to order and procure the necessary items to complete your work.
With the Purchasing module, you can add your vendors to procure items for your inventory, as well as create purchase orders to replenish items from those same vendors.
Use the Inventory module to simplify item tracking across multiple trucks and warehouses. The Inventory module provides real-time stock quantity tracking for each location.
Note: A significant portion of your time dedicated to Inventory Management should be focused on learning how it works and ensuring that you and your team understand how to use it.
Use Inventory Requisition to automate the procurement process to help you maximize the use of your stock items so your liquidity remains high. If you're using the Inventory module, ServiceTitan first checks your existing stock in the requisition warehouse. If items you need aren't in stock, ServiceTitan selects your primary vendor as the procurement source. If you're using the Purchasing module, ServiceTitan automatically selects the primary vendor as the default procurement source for each item.
After a job is complete, use Invoice Closeout to account for items that were used to complete the work.
From the Invoice Closeout screen, you can return unused items directly to a vendor or to your inventory.
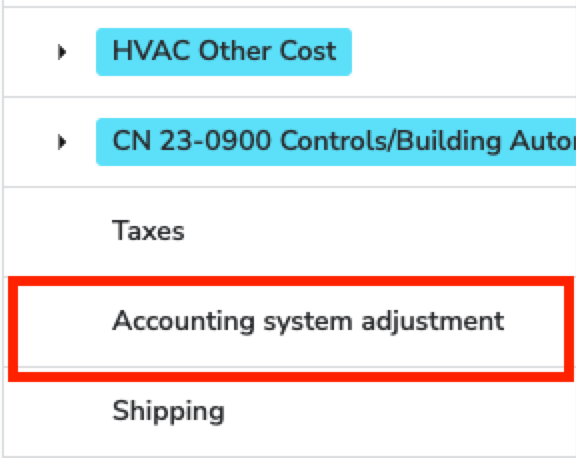
Note: For Intacct integrations: If you use an Intacct integration with ServiceTitan, you may see Accounting System Adjustments on your Budget vs Actual table after receiving bills between ServiceTitan and Intacct. The Accounting System Adjustment line item reflects differences between the bill cost in ServiceTitan and Intacct. If the bill cost is higher in Intacct, the integration sends that amount of difference back to ServiceTitan as the Accounting System Adjustment. This value is exclusive to the Intacct integration and can't be edited in ServiceTitan.

Add payments to a project and apply payments to project invoices
On the project page, click Financials to see the payments associated with the project.
To generate a payment for a project:
On the project screen, select one of the following options:
From the Actions dropdown, select Create Payment.

From the side menu click Financials, go to the Created Payments section, then click Create Payment. The Collect and Apply Payments screen opens.
Under Payment on Invoice, enter the details for the payment you want to collect:
Payment Type: Method the customer uses to pay for the invoice.
Amount: Dollar amount of the payment.
Date: Payment transaction date.
Authorization Code: Code used to authorize payment if the payment method is credit card or ACH.
Business Unit: Business unit associated with the invoice for which you're making a payment.
Memo (optional): Any additional notes attached to the paymen

Note: When you create a new payment, you can select an outstanding invoice from the Which invoice(s) should receive this credit section and the full balance of the invoice populates in the Amount field.
Apply the payment to the customer profile, or to an outstanding invoice.

Tip: You can search for a specific invoice number using the search bar when applying a payment. You can also filter the columns in the Apply to Invoice section for ease of use.
Add materials or equipment to an invoice to generate actuals
Find the project for which you want to generate actuals.
In the side panel, click Financials.
From the Invoice table, select the invoice to which you want to add materials or equipment.
Click Add a material or Add equipment.
Enter equipment or material details.
When finished, click Save.
You can repeat these steps as needed.
Generate actuals from labor
There are two ways to generate actuals to account for labor:
Generate actuals with technician timesheets
Generate actuals with subcontractor labor
Generate actuals with technician timesheets
To generate actuals with technician timesheets, technicians need to log in and out of the ServiceTitan Mobile app. After technicians log in, they can add parts and purchase orders (POs) to invoices as they use these parts.
Things to know when generating actuals with technician timesheets:
Mark an estimate as Sold but don't book your labor items into a job to ensure that labor actuals come from technician timesheets.
Technicians need to be signed in to ServiceTitan Mobile, clock in and out of the job, and mark it as Done for now.
Note: If technicians don't mark Done for now, they won't be able to see their next job.
As technicians accumulate timesheet hours, their labor actuals accumulate and attribute to the labels on the job type and the labels applied to their profile in Settings.
Note: Jobs don't need to be completed for the labor actuals to generate in the Budget vs Actual table.
When technicians add items to an invoice, the items have the job type's label added to the labels that are applied to it either on the estimate or the pricebook. It's important to add a phase label to a job type because technicians can't add or modify labels. Technicians can only add POs, materials, and equipment to the invoice.
If you use a PO on a job, it also inherits the job's labels. When you add an item with pricebook labels to a PO, these labels on the item get auto-applied to the PO as well. PO items first receive the job label, followed by the pricebook labels.
If you want to change the labels for a technician's labor, then edit the splits on an invoice. Each split allows the selection of one or more project labels. By default, any labels assigned to a technician in Settings are displayed.
Generate actuals with subcontractor labor
Use this method if your technicians don't enter information in the ServiceTitan Mobile app because labor is performed by subcontractors. You can also use this method to generate actuals if timesheets for technicians are managed in the office.
You can use materials to account for work that subcontractors perform on a project by creating a subcontractor material and applying labor labels to it.
Log labor actuals for subcontractors.
Create a material for each type of subcontractor labor that needs to be tracked in the project.
Apply the labor labels to the materials you created to account for subcontractor labor cost.
Create POs on the job and add the material that represents subcontractor labor to track the pay and hours that will be paid to subcontractors as the work is completed.
You can create a PO for each day of work or you can have a single PO for the aggregate labor costs for the entire phase:
Find the project for which you want to create a PO.
In the side panel, click Jobs & Appointments.
From the Jobs table, select the job for which you want to create a PO.
From the dropdown, select Purchase Order.

In the Purchase order details fly-out menu, enter PO details.
The Qty field in the Items List table should reflect the number of hours that are accumulated during the job and the cost should reflect the hourly pay for the subcontractors.
To classify subcontractor labor correctly, we recommend adding project labels to the PO in this order: Phase, Labor, Subtype of Labor.

Note: A label doesn't need to be applied to the PO if:
The job to which the PO is added already contains a phase label.
The materials that represent labor and the specific subtype of labor already have applicable labels applied in the pricebook.
When finished, click Create.
Manage timesheets on jobs and projects using payroll
ServiceTitan's timesheet automation can increase efficiency for your business by:
Saving 30-60 minutes a month in payroll preparation time per employee
Increasing convenience through features like payroll sign-off
Improving transparency in pay calculations with real time visibility of the current pay period
Providing the ability to break down activities between drive time, working time, idle time, and non-job events
For projects where you have helper technicians, apprentices, or non-managed technicians, you can use features such as crew management for your lead technicians to log timesheets on behalf of their crew. This includes dispatching, arriving, starting and ending meal breaks and closing out technicians in bulk. A crew is all of the technicians on an appointment with a lead technician. To make a technician a lead technician, edit their profile and add Lead technician actions under the Permissions tab.
You can edit technician timesheets from the office, which allows you to make corrections and changes. For example, if a technician forgets to tap Arrive at a job, you can manually edit their timesheet to properly account for job hours. You can edit, delete, or add timesheet entries for any job, regardless of job status. You can also edit timesheets for jobs in progress.
To edit timesheets associated with the project, edit them from the job record where the timesheets were created.
Edit a timesheet
Search for and open the job with the timesheet you want to edit.
In the Timesheets section of the job record, click View Timesheets.
On the timesheet that opens, you can:
Click Delete to delete a timesheet event.
Click Add New Record to create a new timesheet event.
Click Edit to change an existing timesheet event.

When you add or edit a timesheet event, the Edit pop-up opens. Edit the fields as needed:
If this is a new event, click the Technician dropdown to select a technician.
Use the calendar and time fields to edit the date and time for Dispatched On, Arrived On, Canceled On, and Done On. The date will autofill with today's date.
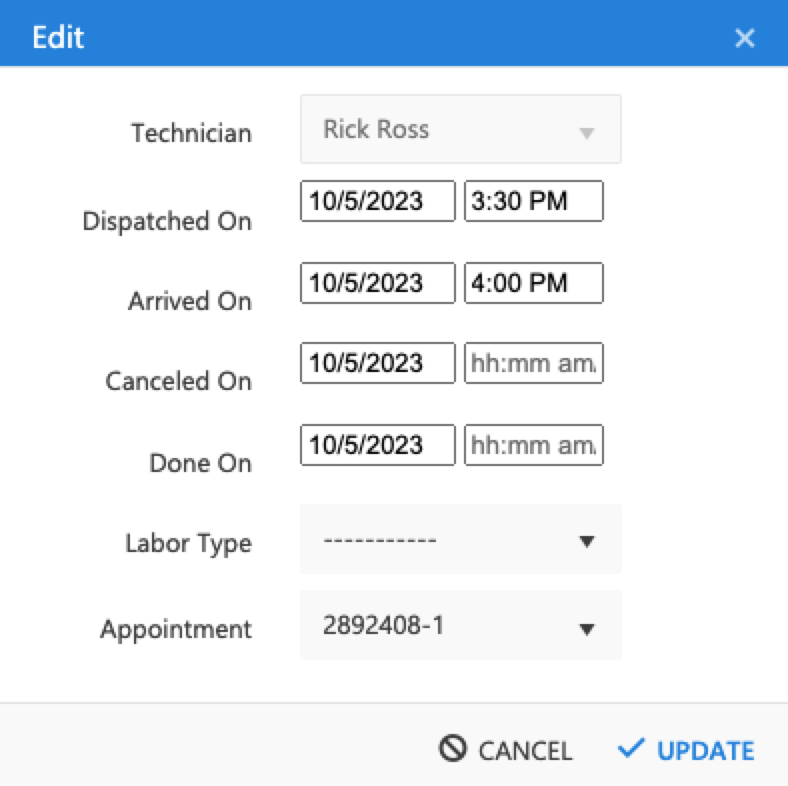
Note: If the appointment is canceled, leave the Done On fields empty. If the appointment is complete, leave the Canceled On fields empty.
Click the Appointment dropdown and select the job appointment you want to assign the event to.
When finished, click Update.
Avoid uncategorized expenses
If there is an Uncategorized expense in your Budget vs. Actual table, this means that an item doesn't have a project label associated with it. Uncategorized expenses don't show where the cost exists, making it more difficult for your project managers to identify and control rising costs.
Uncategorized budgets: An estimate item on a sold estimate is missing a project label.
Uncategorized actuals: A non-estimate record on the project is missing a project label.
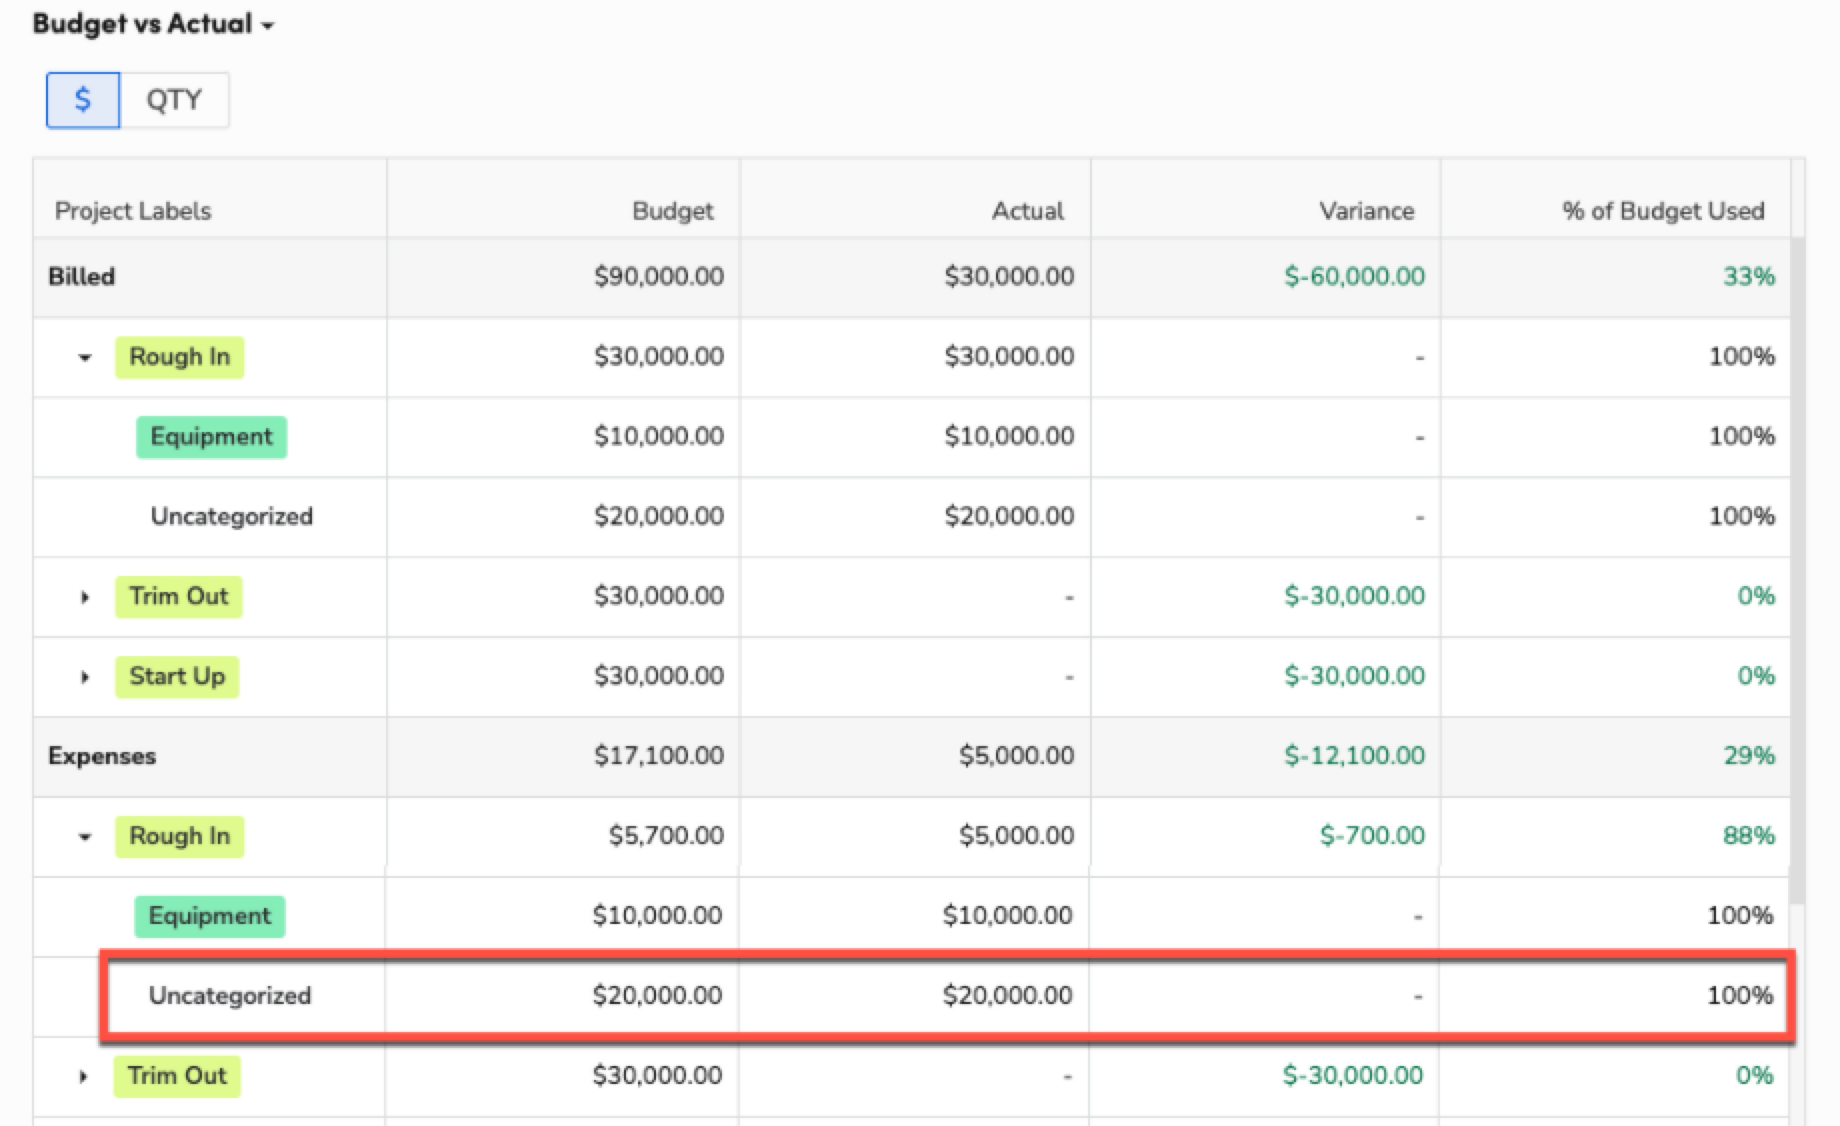
Tip: To avoid uncategorized expenses, associate all estimate and invoice items, purchase orders and bills, and labor with a project label.
If you find uncategorized expenses in your project:
Click Uncategorized in the Budget vs. Actual table to see which items don't have a project label.

The Itemized Details page opens that shows the itemized details for the uncategorized expense. Click the link in the Source column to go to the item.
For example, the Work Material on the invoice doesn't have a project label associated with it, so it is uncategorized on the project's Budget vs. Actual table.
Associate a project label to the item to classify the expense and remove it from the Uncategorized row in the Budget vs. Actual table.

When finished, click Save.
After you classify the expense, the Uncategorized line item no longer appears on the Budget vs. Actual table.

Create a project invoice
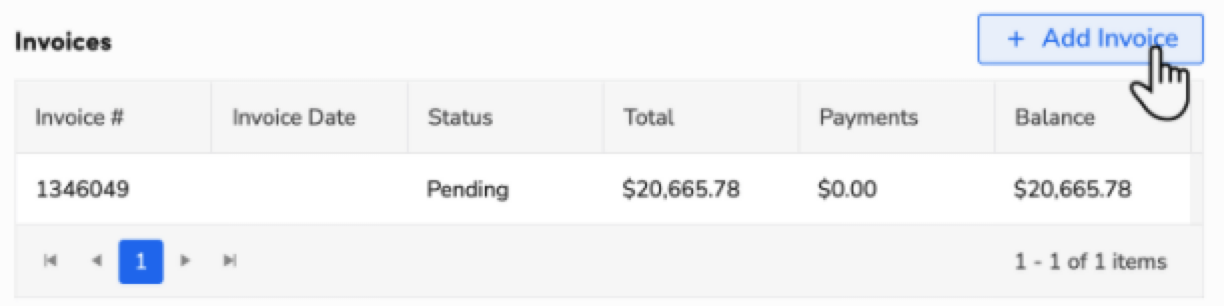
On the project record, click Financials to find the invoices associated with the project. The Invoices section excludes $0 invoices and lists all invoices that have an accounting impact with pricebook items to help you manage unpaid invoices.
To generate a project invoice for a project:
On the project page, select one of the following options:
From the Actions dropdown, select Add Invoice.

From the side menu, click Financials, go to the Invoice section, and then click Add Invoice.

On the Add Invoice pop-up window that opens, select a business unit from the Business Unit dropdown.
Click Add Invoice. A blank invoice opens and is not tied to any job, only to the project.
Note: The invoice date defaults to the date you created the invoice. If you want to update the invoice date, click Update invoice details and enter the date in the Invoice Date field.
Apply payment terms to the invoice as needed:
Click Update payments terms & due dates.
Select a payment term.
Click Save. For more on payment terms, see Set or change default payment terms.
Adding billing service items as necessary.
Note: If you want the Budget vs. Actual for Revenue broken out by billing milestones, then the revenue services on the estimate need to be broken down by billing milestones or phases by applying labels with categories that correspond to the milestones or phases. The estimate also needs a label applied corresponding to its phase.
Collect payments and apply them to the appropriate invoice.
Note: Payments don't require labels because they're only displayed in the Project Summary.
Add invoice to progressively bill without AFP
By adding an invoice directly to the project, you can progressively bill customers as you reach specific milestones in a project. Adding an invoice directly to the project enables you to create a non-job invoice and progress bill without the AIA Billing style.
Select the project you want to create an invoice for.
On the project screen that opens, do one of the following:
From the Actions dropdown, select Add Invoice.
From the side menu, click Financials, go to the Invoice section, then click Add Invoice.
From the Business Unit dropdown, select a business unit.
Click Add Invoice. A blank invoice opens and is not tied to any job, only to the project.
Note: The invoice date defaults to the date you created the invoice. If you want to update the invoice date, click Update invoice details and enter the date in the Invoice Date field.
Apply payment terms to the invoice as needed:
Click Update payments terms & due dates.
Select a payment term.
Click Save. For more on payment terms, see Payment terms.
Note: If you want the Budget vs. Actual for Revenue broken out by billing milestones, the revenue services on the estimate need to be broken down by billing milestones or phases by applying labels with categories that correspond to the milestones or phases. The estimate also needs a label applied corresponding to its phase.
Add a service task that you will use to bill the customer.
Add project labels to the service task that align with what you are billing for.
Collect payments and apply them to the appropriate invoice. Payments don't require labels because they're only displayed in the Project Summary. For more on collecting payments, see Collect a payment
Use progress billing for project revenue
Avoid using job invoices to bill for project revenue. In construction projects, job invoices capture costs and material consumption, while Applications for Payment or progress billing capture revenue.
Progressively bill through the Application for Payment workflow
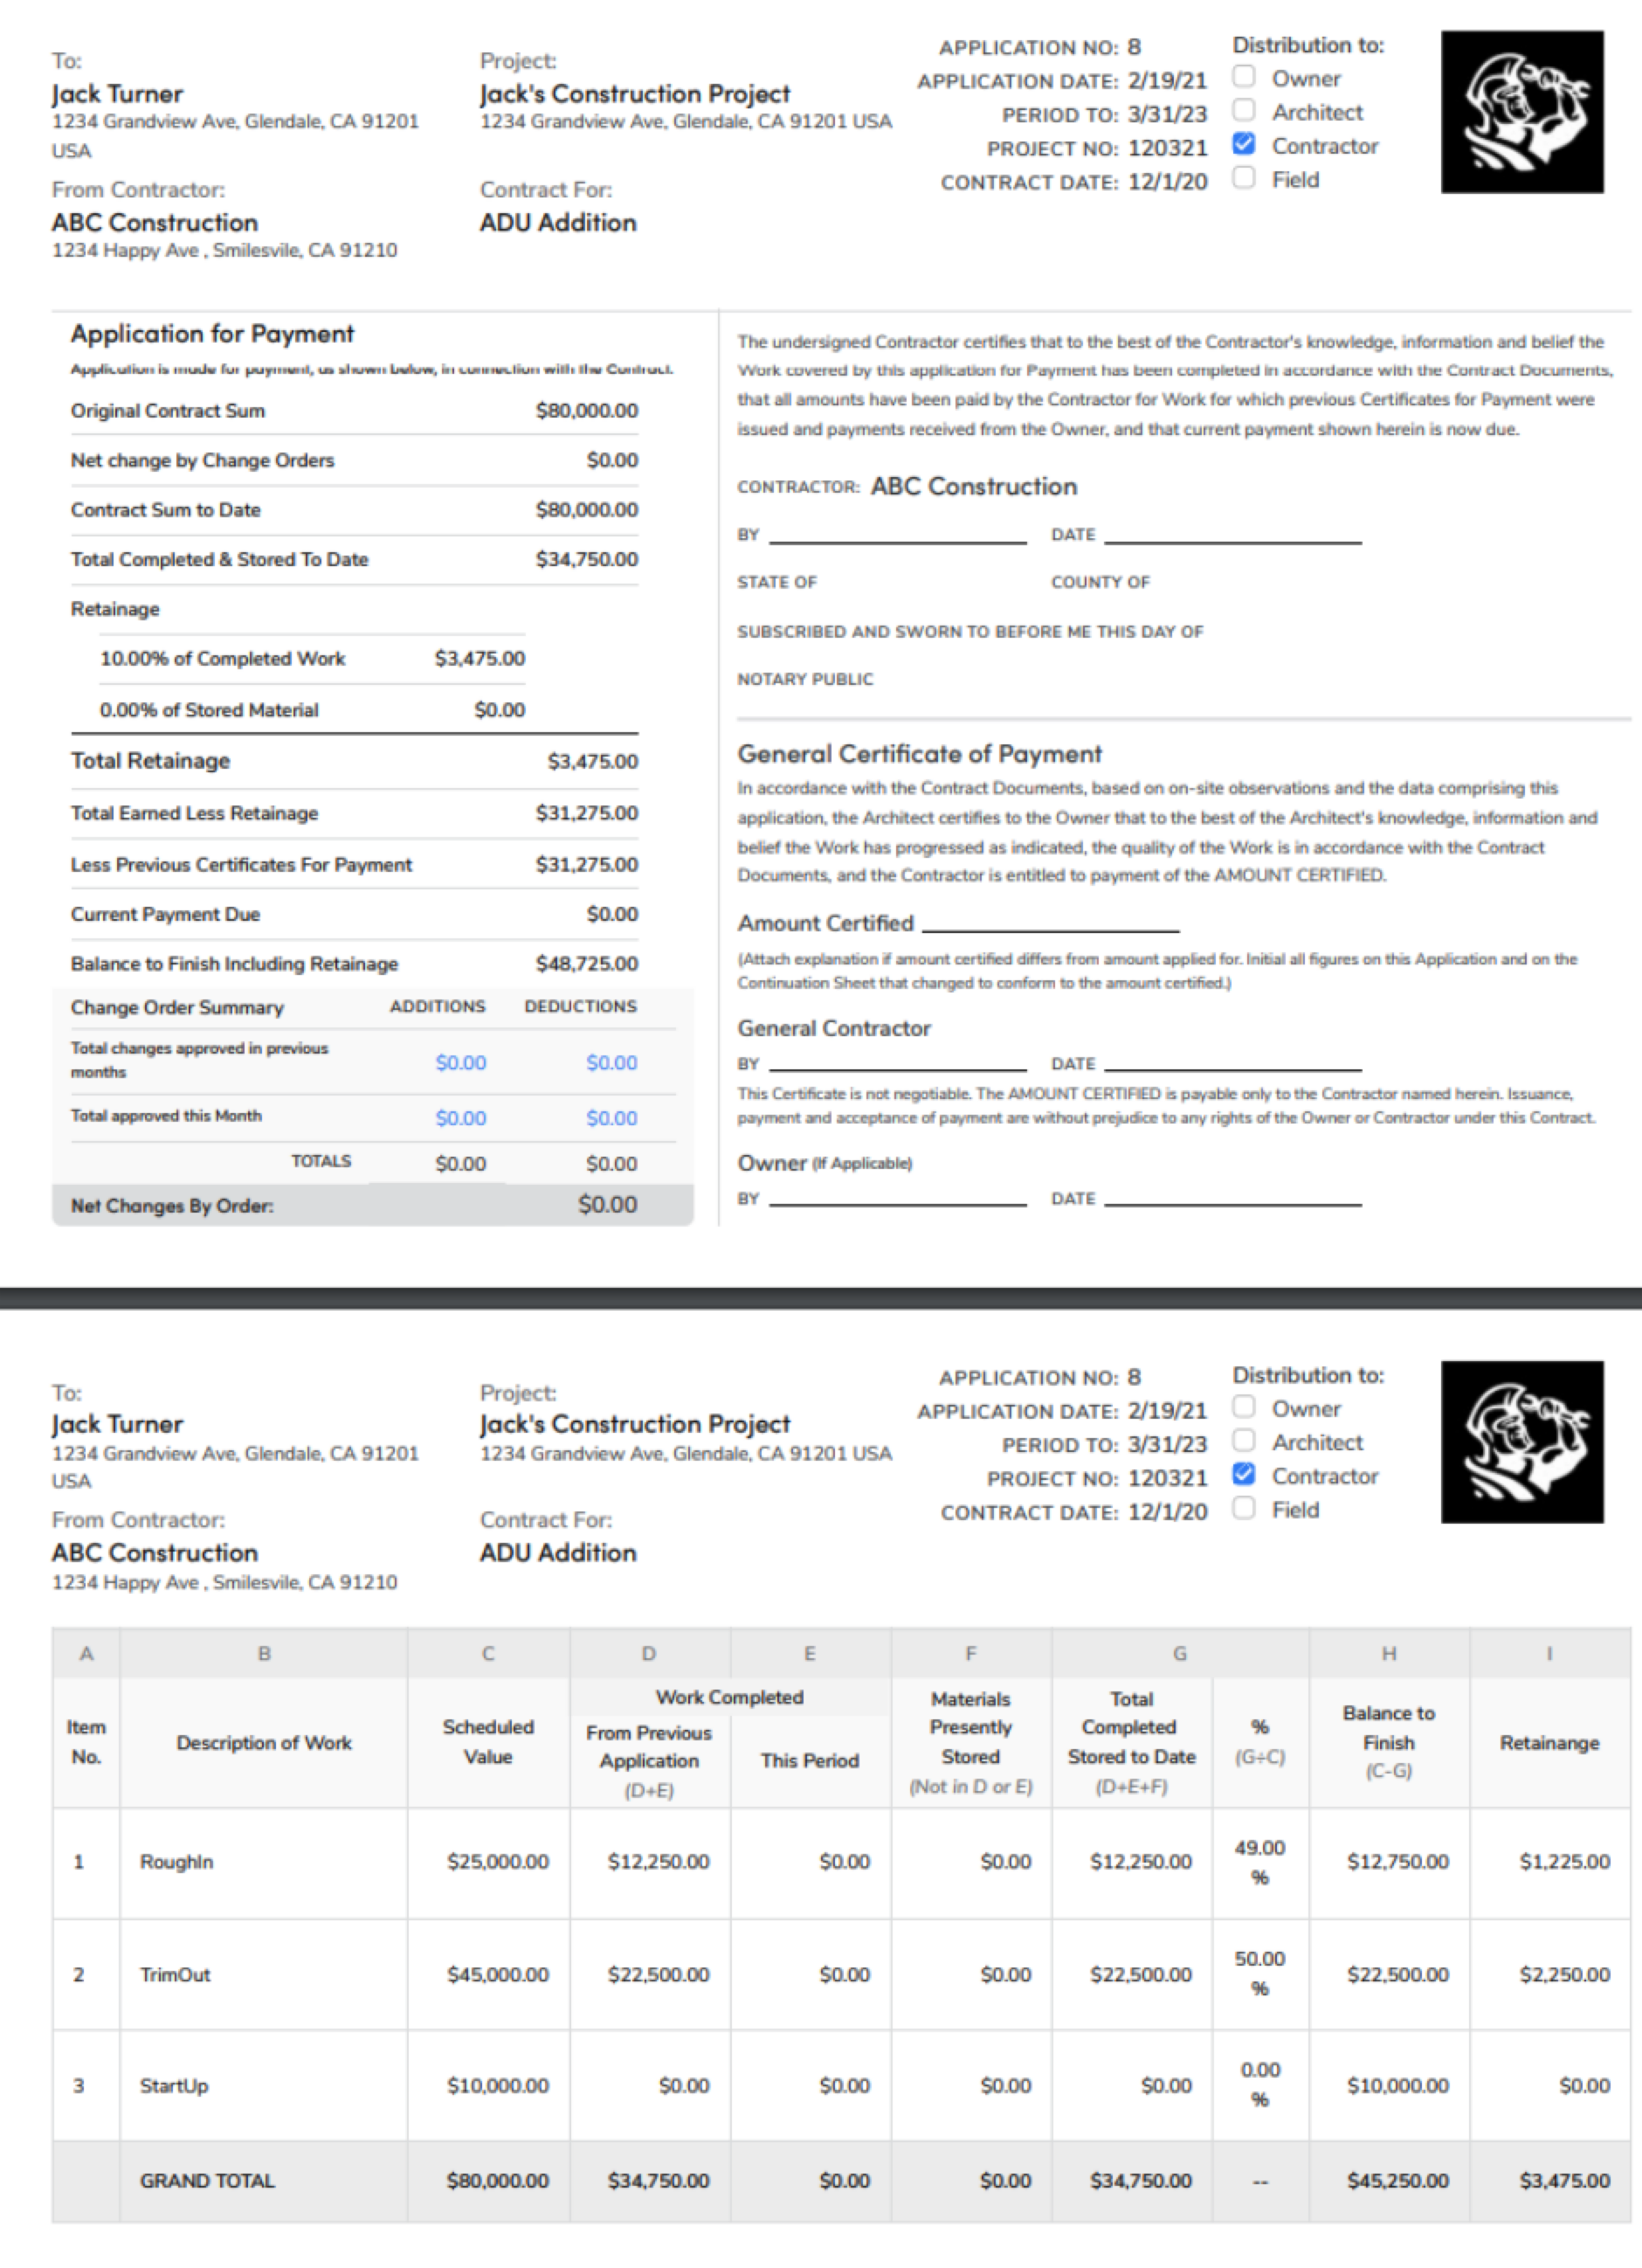
With progress billing through Application for Payment, you bill customers based on the amount of completed work and stored materials. To progressively bill, customers may require you to submit Applications for Payment and Continuation Sheets.
ServiceTitan's Application for Payment workflow automates the creation of your progress invoices while maintaining the AIA-styled approach commonly used in the construction industry. AFP saves you time and effort in your billing workflows by pulling your parent-label hierarchy directly into the Continuation Sheet to facilitate the billing needs of your contract while providing the documents necessary to collect payment for stages of completion.
Things to know about Application for Payment:
Information on a continuation sheet is used to generate an application for payment.
Both documents are created at the project level.
Both documents are created at the same time.
A customer approves an Application for Payment to indicate approval of the work reported.
Progress invoices are created after the Application for Payment is approved.
The Continuation Sheet is sometimes referred to as the schedule of values (SOV).
The AFP reflect industry standard the AIA-style document
The Application for Payment updates based on change orders sold in the project
The Application for Payment workflow supports automates retainage, or holdback, based on the settings you decide for your project
Tip: Generate your progress invoice after your Application for Payment is approved. If you generate the invoice before the Application for Payment is approved, don't post or export the invoice. Changes to the Application for Payment automatically update the corresponding invoice if the invoice is not posted or exported.
Create an Application for Payment
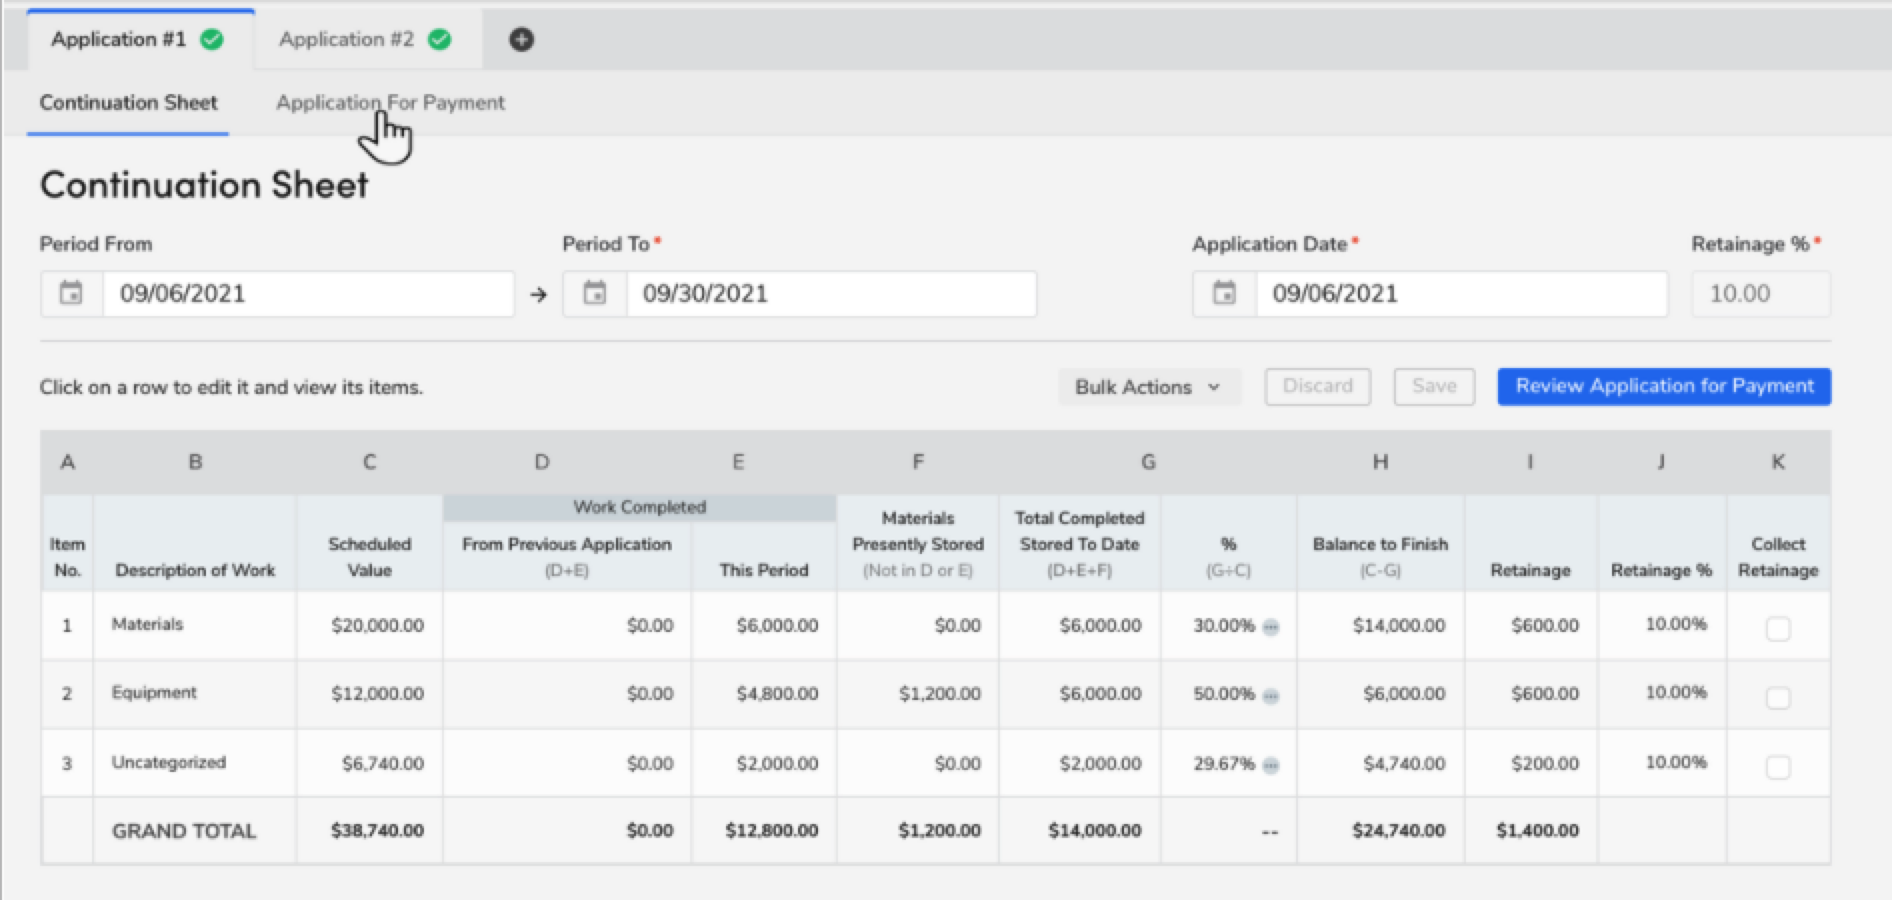
The first step in progress billing is to add an Application for Payment to the project and complete a Continuation Sheet. The Continuation Sheet is used to generate the Application for Payment. Both documents are sent to the customer for approval.
To create application for payment:
Search for and select the project to which you want to add an Application for Payment.
From the Actions dropdown, click Add Application for Payment.

The Continuation Sheet opens.
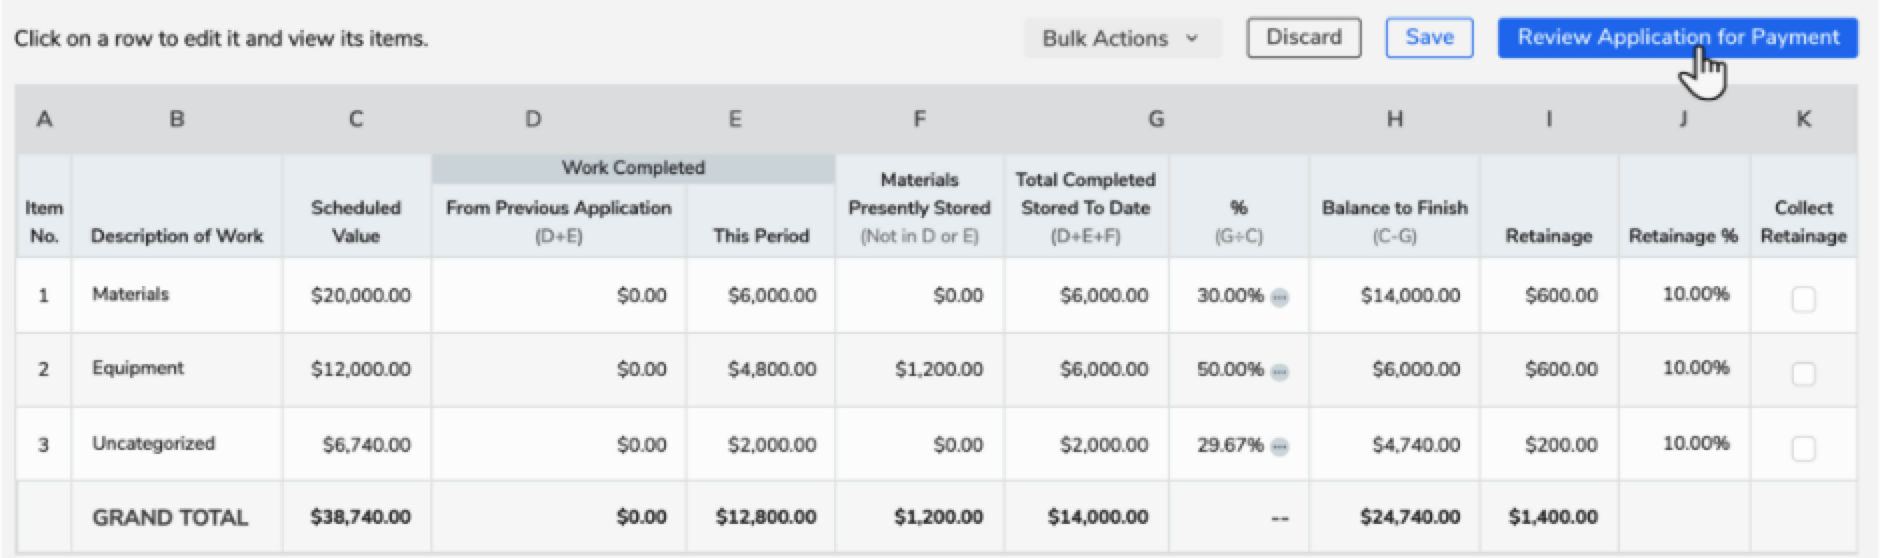
The top section shows dates covered by the Continuation Sheet, application date, and retainage percent.

Note: Period From is the contract start date on the first Application for Payment. The date is updated after the first application.
The bottom section shows project information by project labels or categories and the total project.

Note: All fields on the Continuation Sheet include calculated taxes.
Update Continuation Sheet
You can update a Continuation Sheet to reflect the correct billing period, work done, and material used for the project.

To update the Continuation Sheet:
In the Period To and Application Date fields, enter dates.
Tip: You can use the calendar to select a date.
Note: Application Date defaults to the current date.
In the Retainage % field, enter a new value, if necessary.
Note: You can set the retainage percentage at the beginning of a project. You cannot set it after the second Application for Payment is done.
To update Work Completed and Materials Presently Stored for this period:
Select the row you want to update.
Click the Edit icon. The Description of Work Items for that label or category appears.

In the This Period column of the Quantity tab, enter the value of work done in this period.
In the Materials Presently Stored column of the Quantity tab, enter the value of materials purchased and stored but not yet used.

Note: The project manager typically provides values for Work Completed This Period and Materials Presently Stored.
If you want to see prices for a label or category, go to the Price (USD) tab.

To update Work Completed and Materials Presently Stored for this period by price:
Select the Enable Edit Using Price option.

For each item you want to edit, place a checkmark in the Edit by Price box.
Note: You can't edit prices of Items with Inventory Tracking enabled.
In the This Period column of the Price (USD) tab, enter the value of work done in this period as a cash amount.
In the Materials Presently Stored column of the Price (USD) tab, enter the value of materials purchased and stored but not yet used.
Note: You can't edit prices of Items with Inventory Tracking enabled.

Click Save.
Apply percentages in bulk
To apply percentages in bulk on a Continuation Sheet, click the Bulk Actions dropdown and select an action.
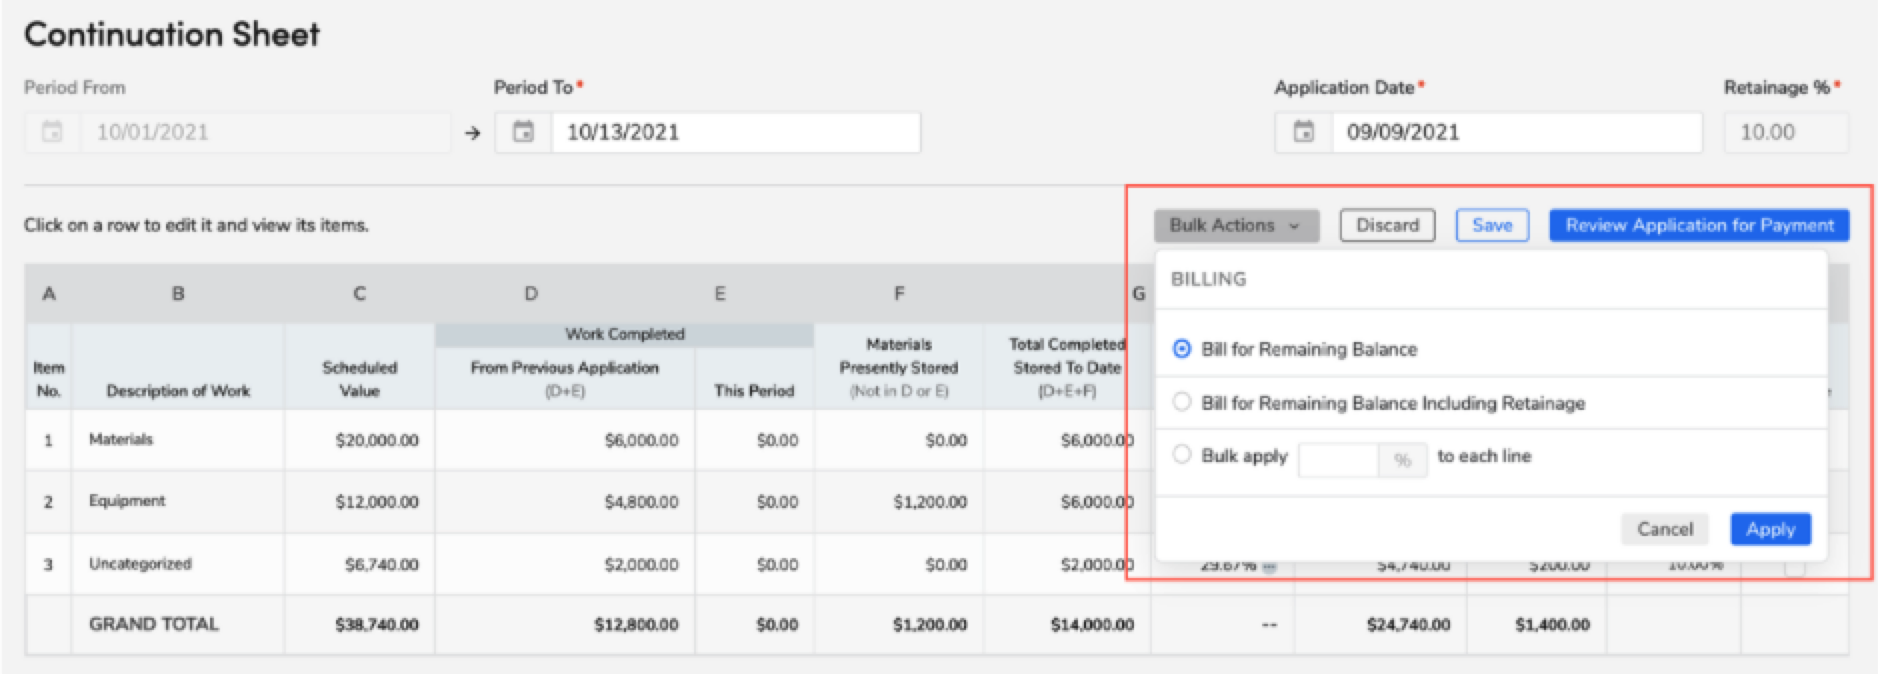
If you select Bill for Remaining Balance, it automatically fills out the Work Completed for the This Period field to get to 100 percent.
If you select Bill for Remaining Balance Including Retainage, it automatically fills out the Work Completed for This Period field to get to 100 percent and selects the retainage to be collected.
If you select Bulk Apply, you can enter the percent you want to apply to all lines. The percentage entered pre-populates the Work Completed field of the remaining items that aren't at the percentage that you entered.
Note: The % field may not always be exactly equal to the percentage applied to each line. This happens if some rows are already completed with more than the percentage entered, and the system doesn't support more than two decimal points.
To save your changes, click Apply.
To review the application for payment in a PDF form, click Review Application for Payment.
The Review Application for Payment screen opens with a preview of the Application for Payment and the Continuation Sheet.
Note: The amount in the Current Payment Due field includes tax.
In Review Application for Payment, you can:
Change the business unit by selecting the business unit you want.
Note: The Business Unit setting populates the contractor name, address, and logo for the document.

Print the documents by clicking Print
 .
.

Email the documents by clicking Email
 .
.

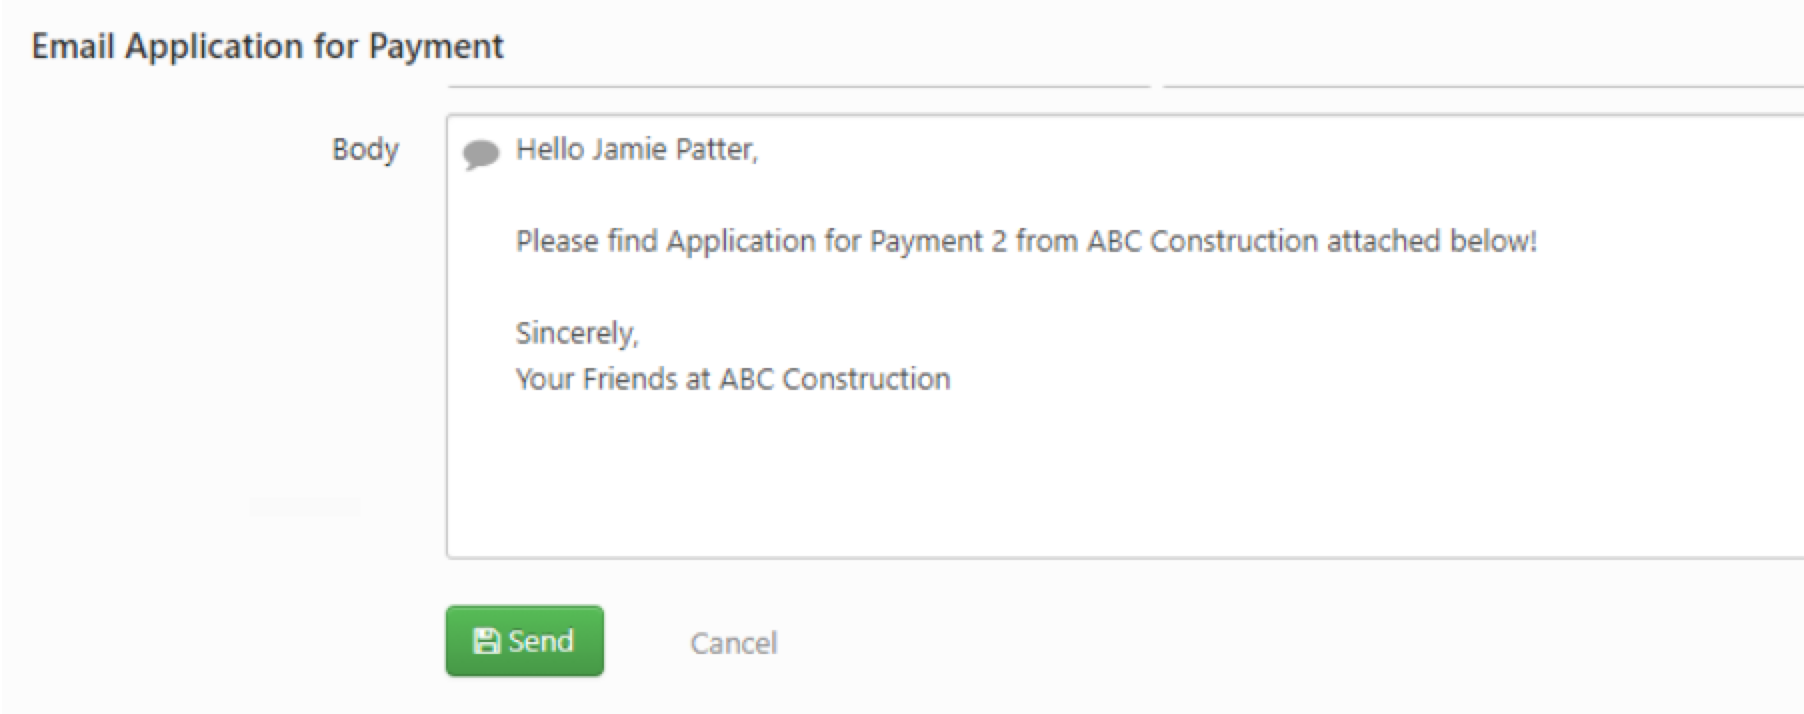
When you click Email  , the Email Application for Payment opens:
Fill in the corresponding fields.
Click Send.
Note: A copy of the Application for Payment and Continuation Sheet is attached to the email.
After you make changes, you have several options:
You can click Save to confirm changes you made.
You can click Finish and Generate Invoice to save changes after you reviewed the Application for Payment.
You can click Discard if you don't want to save changes you made.
Note: When you click Discard, it doesn't impact changes to project dates.
Set up an Application for Payment email template
Go to the navigation bar and click Settings
 .
.In the side panel, click Invoicing > Email. Email settings opens.
Click the Application for Payment tab.
Enter email template details:
From
Subject
Body

Review the Preview section and modify the message as needed.
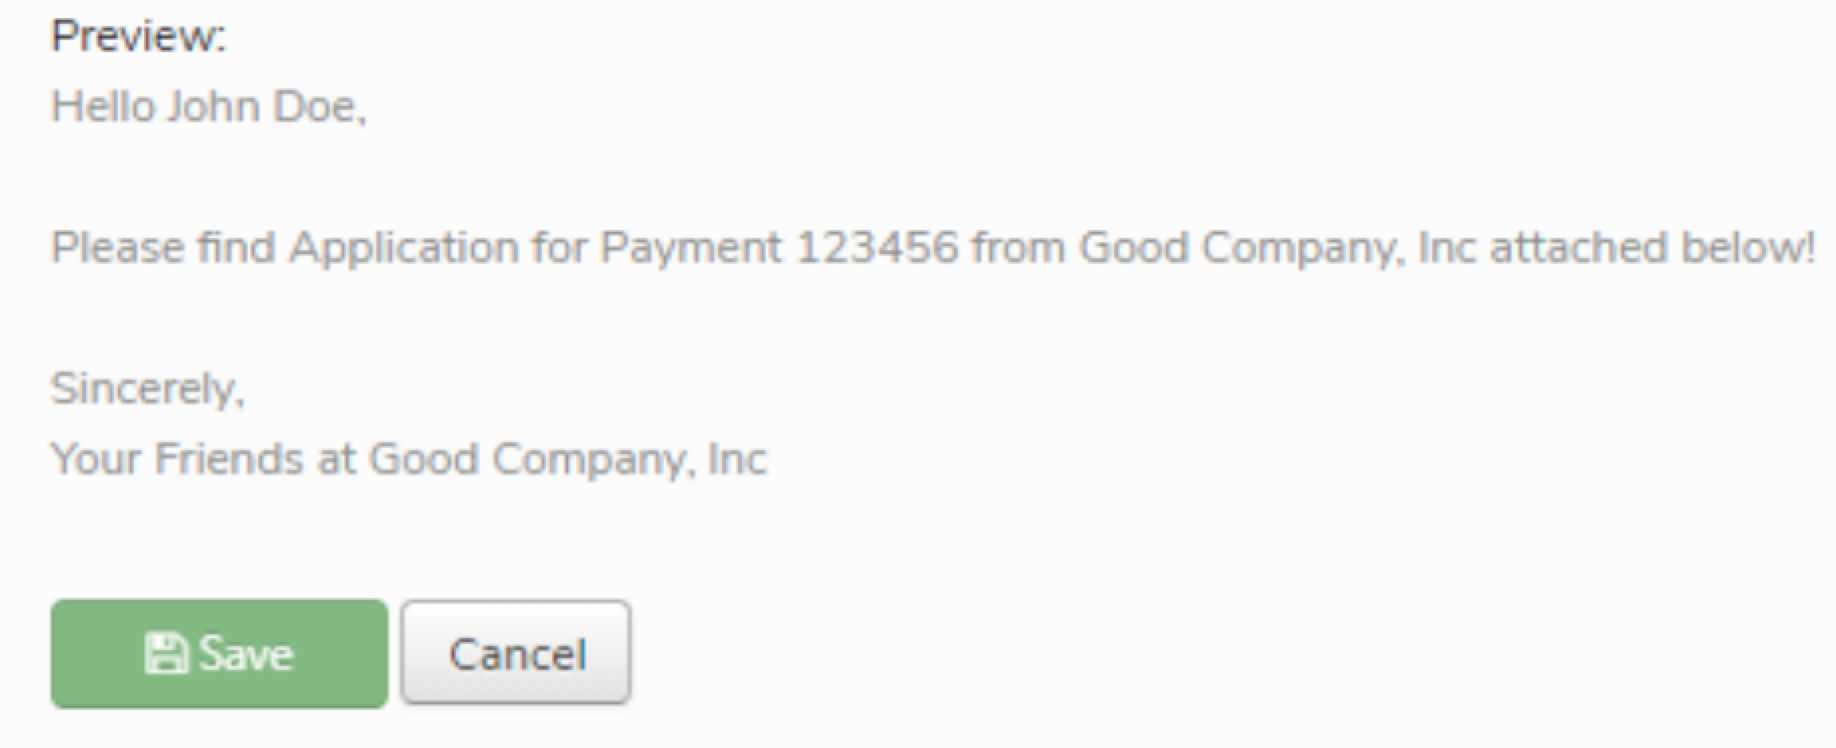
When finished, click Save.
Note: In the Body field, you can also insert placeholders for commonly used values. Make sure that you use names exactly as shown. For example, use {CustomerName} with no space between Customer and Name.
View, email, or print Applications for Payment from the project page
You can view, email, or print an Application for Payment from the project page.
Search for the project you want to view and open it.
In the Application for Payment section, click an Application #.

On the Continuation Sheet that opens, click the Application for Payment tab.
The Review Application for Payment opens. You can view, print or email the document.
Use retainage
Retainage is a percentage of invoice that is not billed until the project is complete and the customer has approved the work. Retainage gives the customer recourse if they aren't satisfied with the work done.
Invoicing for retainage allows you to bill accurately as the project progresses, track retainage amount, and collect the cost at the end of project completion.
Note: "Retainage" is also known as "holdback" in Canada.
Things to know about retainage:
Retainage on a project is optional. Customer contracts specify if retainage is required and what the retainage percentage is.
Retainage needs to be set up before creating an Application for Payment and must be set up at both the account and project levels.
Progress billing is done at the project level.
Set up retainage with Application for Payment
To deduct retainage from progress invoices, first set up retainage receivable accounts and import them into ServiceTitan. Next, set up retainage at the account level and the project level.
Set up retainage receivables accounts
If you use Intacct:
Add a new GL (general ledger) group called Retainage Receivable. See Map pricebook items to Item GL Groups.
Add a new GL account in Intacct called Retainage Receivable. See Map payment types to GL Accounts.
If you use QuickBooks:
Add a new GL account called Retainage Receivable. See Map pricebook items to a QuickBooks general ledger account.
Set up retainage at the account level
Go to the navigation bar and click Settings
 .
.In the side panel, click Operations > Application for Payment. The Application for Payment screen opens.
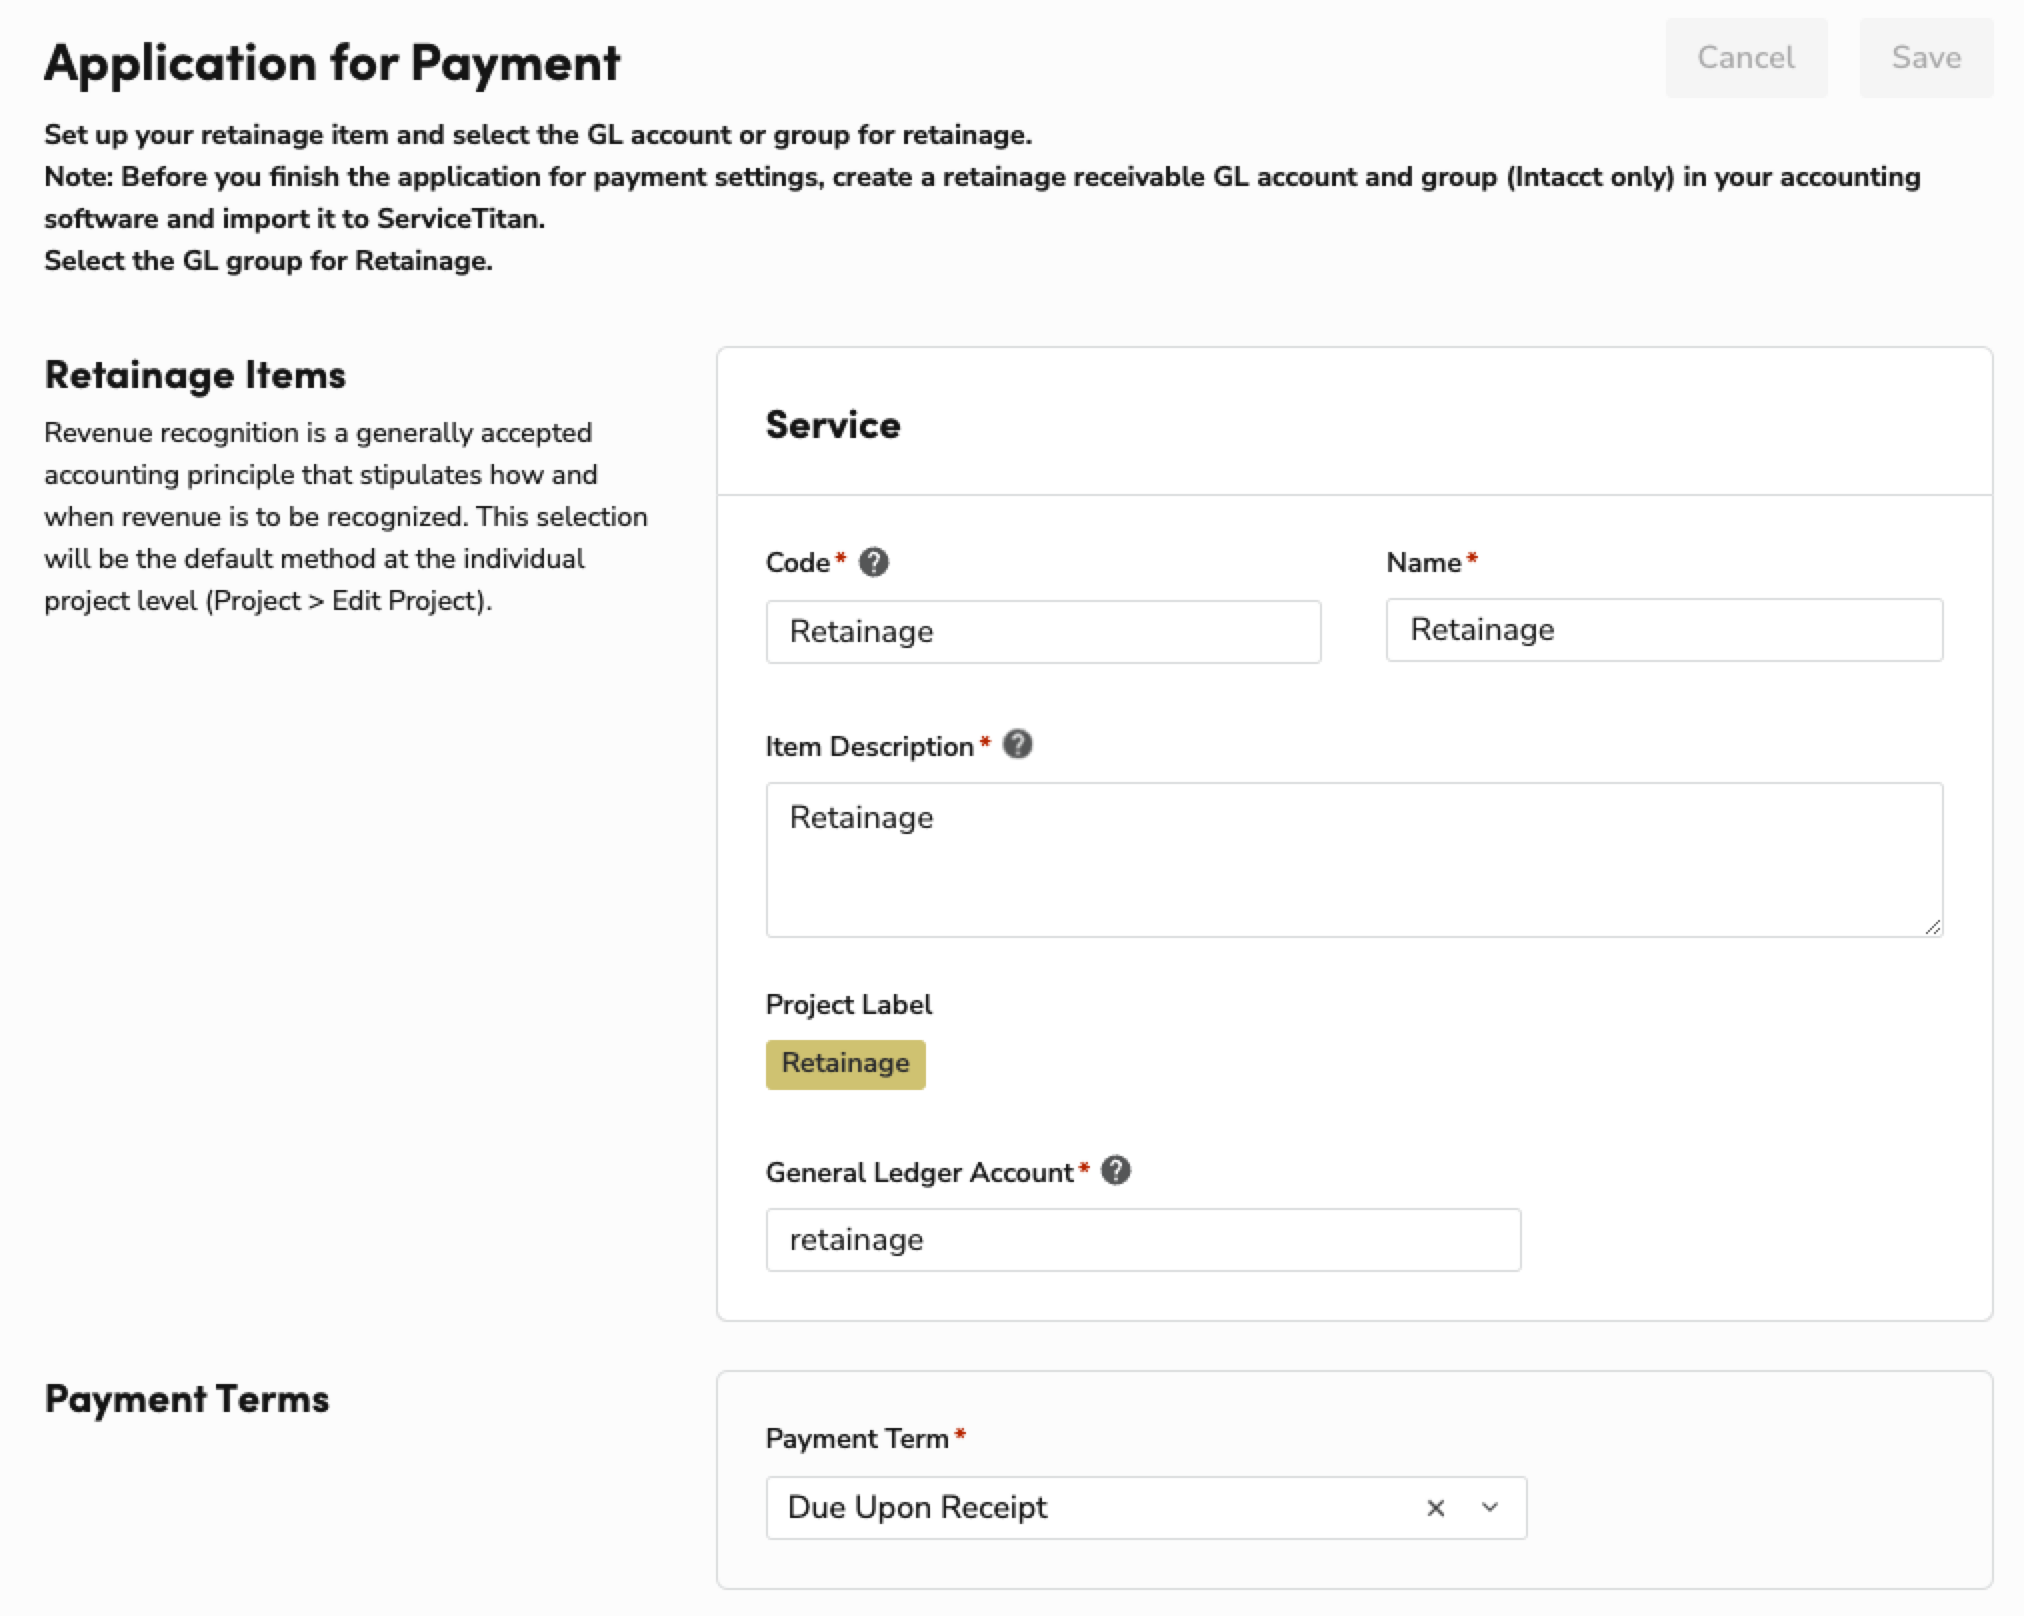
Complete the following fields:
Code: Enter the service Code you want associated with a task.
Name: Enter Retainage or another name if you prefer.
Item Description: Enter the task description you want to appear on the invoice.
General Ledger Account: Select the GL retainage receivable account from the dropdown.
Payment Term: Select a payment term from the dropdown.
On the Application for Payment screen, click Save.
Set up retainage at the project level
Search for and select the project you want to set up retainage for.
Note: Retainage can only be set at the beginning of a project. You cannot enable retainage after the second Application for Payment has been made.
Click Edit
 to edit the project. The Edit Project screen opens.
Enable the Enable Retainage option.

Note: The retainage percentage shown is project-level retainage. If you want to change the percentage for your project, enter a value in Retainage Percentage.
Click Save.
Bill for retainage based on Application for Payment
The Application for Payment and the Continuation Sheet have the information needed to bill for retainage. You need to complete those documents before you can invoice for retainage.
To bill for retainage:
Search for and select the project you want to progressively bill for.
Open the Application for Payment.
Select Collect Retainage in Column K for the Description of Work items that are 100% complete that you want to bill for.

Note: The entire Application for Payment doesn't need to be 100% complete to bill for retainage. A Description of Work row that is 100% complete can be invoiced for retainage.
Click Next at the bottom of the Continuation Sheet.
The Document Preview: Application for Payment opens.Note: Columns A through I on the Continuation Sheet are visible to your customer. Retainage Columns J and K are excluded.
Note: The Retainage section in the Application for Payment is reduced by the amount of retainage billed. The amount billed displays in the Current Payment Due section.

To print the documents, click Print in the upper corner of the screen.

To email the documents, click Email in the upper right corner of the screen.

The Email Application for Payment screen opens.Add an email recipient by entering an email address in the New email address field or selecting an email address that appears.

Use the existing template or revise the body of the email.
When finished, click Send to attach a copy of the Application for Payment and Continuation Sheet to the email.
After the Application for Payment and Continuation Sheet are approved, click Finish and Generate Invoice at the bottom of the Preview page.
Tip: Don't generate, post, or export an invoice before the Application for Payment and Continuation Sheet are approved. This is recommended to help you avoid significant rework.

The Finish and Generate Invoice popup opens.
Tip: If the Application for Payment hasn't been approved, click Save Progress. Don't generate the invoice until the application is approved.
Click Finish and Generate Invoice.
Note: If you updated the Application for Payment and click Finish and Save Invoice, a confirmation pop-up opens.
Click Finish and Save Invoice.

The Invoice screen opens.
Note: The invoice date defaults to the date you create the invoice. If you want to change the date, click Update invoice details and enter the new date in the Invoice Date field.
The warning at the top of the invoice lets you know that changes made to the invoice won't update the related Application for Payment. You need to update the Application for Payment.
The retainage balance should match the retainage amount billed from the Continuation Sheet.

You can also see the invoice on the project page.
Manage purchase orders and bill costs on a project
Purchasing and Inventory Modules enhance your efficiency by allowing you to order and procure the necessary items to complete your work.
With the Purchasing module, you can add your vendors to procure items for your inventory, as well as create purchase orders to replenish items from those same vendors.
Use the Inventory module to simplify item tracking across multiple trucks and warehouses. The Inventory module provides real-time stock quantity tracking for each location.
Note: A significant portion of your time dedicated to Inventory Management should be focused on learning how it works and ensuring that you and your team understand how to use it.
Use Inventory Requisition to automate the procurement process to help you maximize the use of your stock items so your liquidity remains high. If you're using the Inventory module, ServiceTitan first checks your existing stock in the requisition warehouse. If items you need aren't in stock, ServiceTitan selects your primary vendor as the procurement source. If you're using the Purchasing module, ServiceTitan automatically selects the primary vendor as the default procurement source for each item.
After a job is complete, use Invoice Closeout to account for items that were used to complete the work.
From the Invoice Closeout screen, you can return unused items directly to a vendor or to your inventory.
Note: For Intacct integrations: If you use an Intacct integration with ServiceTitan, you may see Accounting System Adjustments on your Budget vs Actual table after receiving bills between ServiceTitan and Intacct. The Accounting System Adjustment line item reflects differences between the bill cost in ServiceTitan and Intacct. If the bill cost is higher in Intacct, the integration sends that amount of difference back to ServiceTitan as the Accounting System Adjustment. This value is exclusive to the Intacct integration and can't be edited in ServiceTitan.
Collect project payments and deposits
Use Payment Collections to collect payment from your customers. You can save the collected payments and deposits as customer credit from a sold estimate, project, invoice, customer record, or AR Management. You can apply customer credit to outstanding invoices. Payment collections also provide access to the Deposit workflow to collect and manage deposits.
Collect a payment and deposit directly on a sold estimate
In the mobile app when a sold estimate is signed by your customer and you click Perform Work Later, the sold estimate record opens so you can collect a deposit.
Note: This is a technician workflow.
From the sold estimate, tap Pay Deposit.

From the Choose payment type dropdown, select a payment type.

Under Enter amount, select Full balance if your customer wants to pay the full balance of the estimate or select Enter different amount if your customer wants to pay an amount other than the full balance.
If the payment is by check, enter the check number in the Check number field.
Tap Charge or Pay to collect the payment.
If you're charging a credit card, collect an authorization signature from your customer and tap Accept.
When finished, tap Done.

Note: Any payment in excess of the invoice balance is shown as an overpayment.

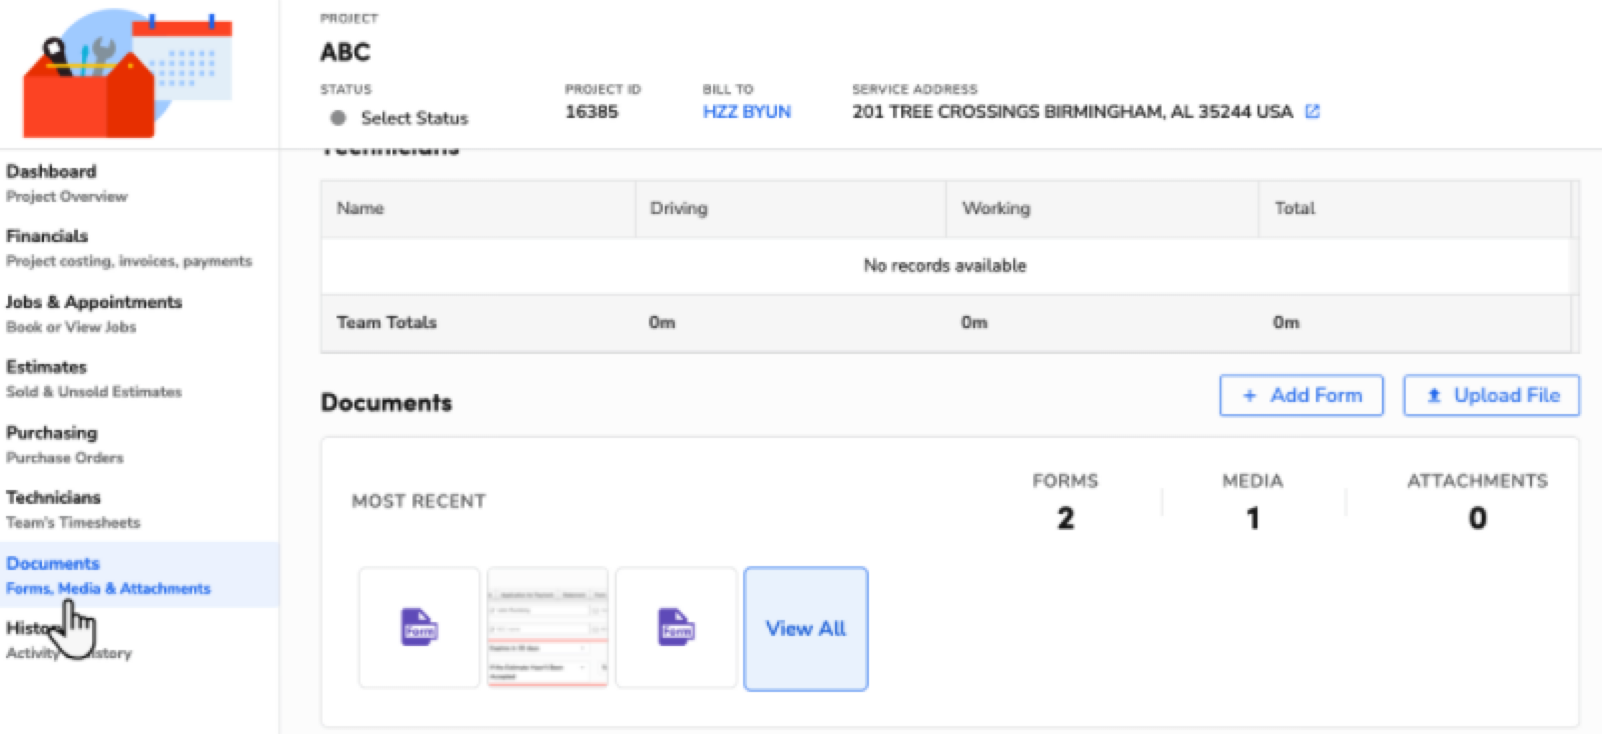
Manage documents
Documents are forms, media, and attachments that you can add to your project. On the project record, click Documents to find all documents attached to a project.
Add a form
There are two options to add a form on a project:
Option 1
In the Documents section, click + Add Form.

On the Select Form screen that opens, click Add to select a form.

On the form that opens, set up your form.

Tip: You can duplicate the form section or delete it.
When finished, click Save.
Option 2
In the Documents section, click View All.

In the Project Documents section that opens, click + Add Form.
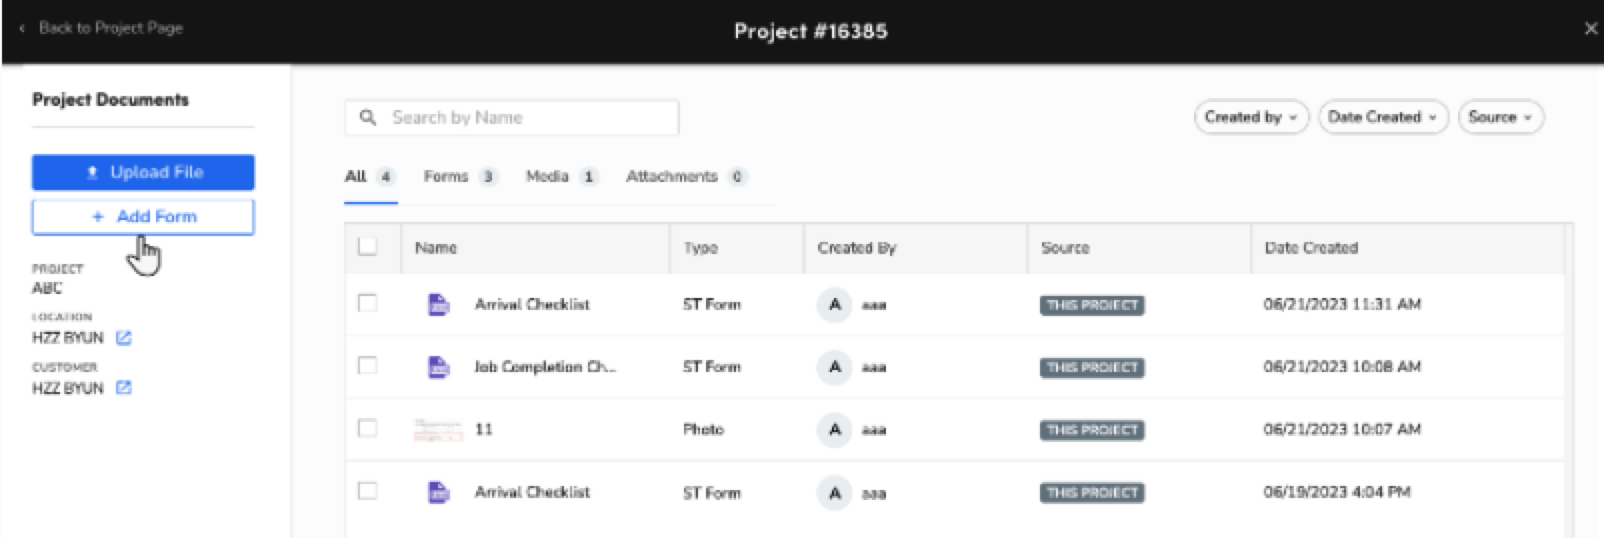
On the Select Form screen that opens, click Add to select a form.
On the form that opens, set up your form.
When finished, click Save.
Upload files
There are two options to upload a file:
Option 1
In the Documents section, click Upload File.

Upload a file from your computer.
Option 2
In the Documents section, click View All.

In the Project Documents section that opens, click Upload File.

Manage forms
Edit forms
Send forms or files by email
You can send an email to your customers and include all the necessary information, such as attachments.
Note: If you want to customize the email text when emailing project documents, go to Settings > Invoicing > Email and click the Document tab.
Download forms or files
Print forms or files
Delete forms or files
You can perform these actions using two different options.
Option 1
Select the record and view the actions you can perform.

Option 2
Select the item you want to edit and click Edit
 .
.Click the icon and print or delete the record.
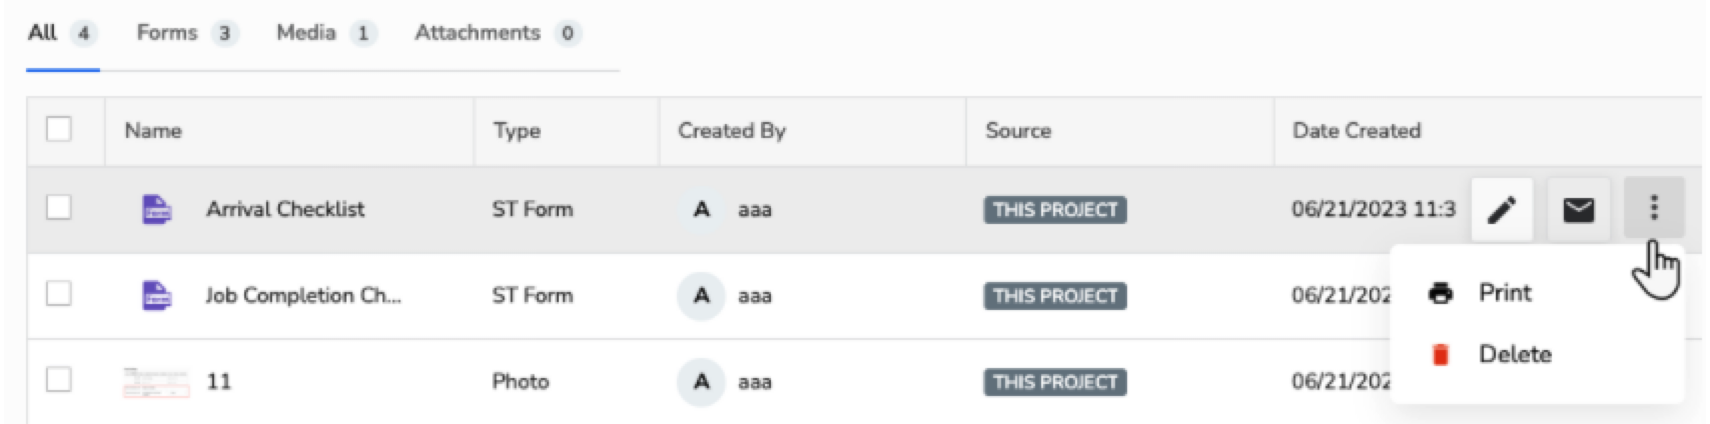
Filter documents
Use the Created by, Date Created, and Source filters to search for a document.

You can also search for a document by entering a document name and click Search  .
.
Task Management in projects
You can use Task Management in ServiceTitan to streamline operations and enhance efficiency for tasks your business performs. Task Management is a flexible solution for assigning work to team members and managing action items. You can also report on the status of tasks in their account with Task Management reporting.
Task Management can be used in a variety of ways, including:
Assigning tasks to employees with specific due dates
Ordering parts and filing permits
Reviewing and approving documentation
Resolving customer complaints or handling refunds
Note: Task Management integrates with Zapier.
Note: An administrator needs to set up Task Management and add users before office employees can use it. See Set up task management for more information.
Add a client-specific pricing rate sheet to a project
With client-specific pricing, you can use rate sheets to set unique prices for customers without having to duplicate pricebook items. It is often used in commercial service and repair when working with high-volume customers who use specialized pricing.
Client-specific pricing, or CSP, allows you to set up specific labor rates to automate and calculate labor costs on invoices. With labor automation, you assign default labor types to technicians. When a technician works a job, their labor type and timesheet hours are used with rate sheet labor rates to calculate labor costs on the invoice.
There are two ways to set a rate sheet at the project level:
Option 1
From the project's header, find the project you want to assign a rate sheet to.
Click the Edit
 icon next to the Actions dropdown.
In the Contract Info section, click the Rate Sheet dropdown and select the appropriate rate sheet for the project.

Click Save.
Option 2
From the project dashboard, find the project you want to assign a rate sheet to.
On the Project Details side panel in the Additional Information section, click the Edit icon in the Rate Sheet field and select the appropriate rate sheet for the project from the dropdown.
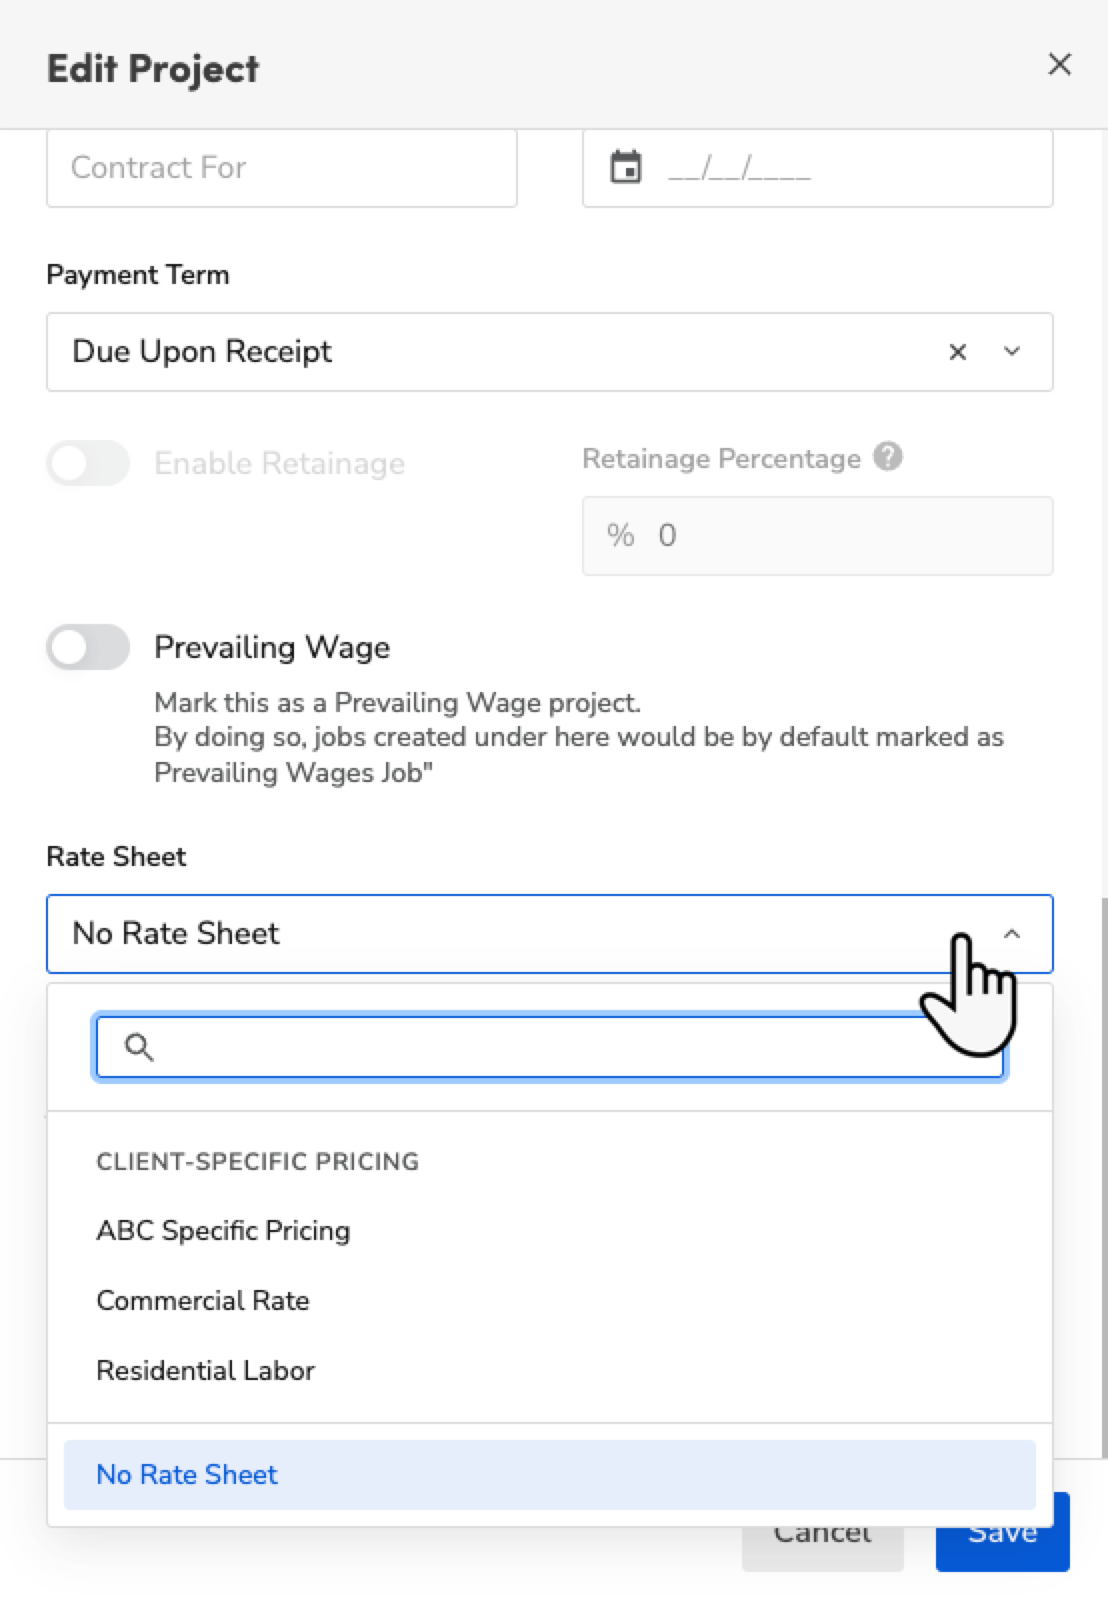
When finished, click Save
 .
.
See Set up unique prices with client-specific pricing for more information.
Run project management reporting
ServiceTitan offers multiple reports to track the progress of your projects, uncover cost details, and unlock insights to keep your projects on time and profitable. The most commonly used reports are the Work In Progress [WIP] - Percentage of Completion Method report and the Work in Progress (WIP) Summary 2 report.
Run the Work In Progress [WIP] - Percentage of Completion Method report
Run the Work In Progress [WIP] - Percentage of Completion Method report to calculate the correct amount of recognized revenue for projects based on the Percentage of Completion method. For a project to be included in the WIP report, make sure that Percentage of Completion is enabled in the project settings.
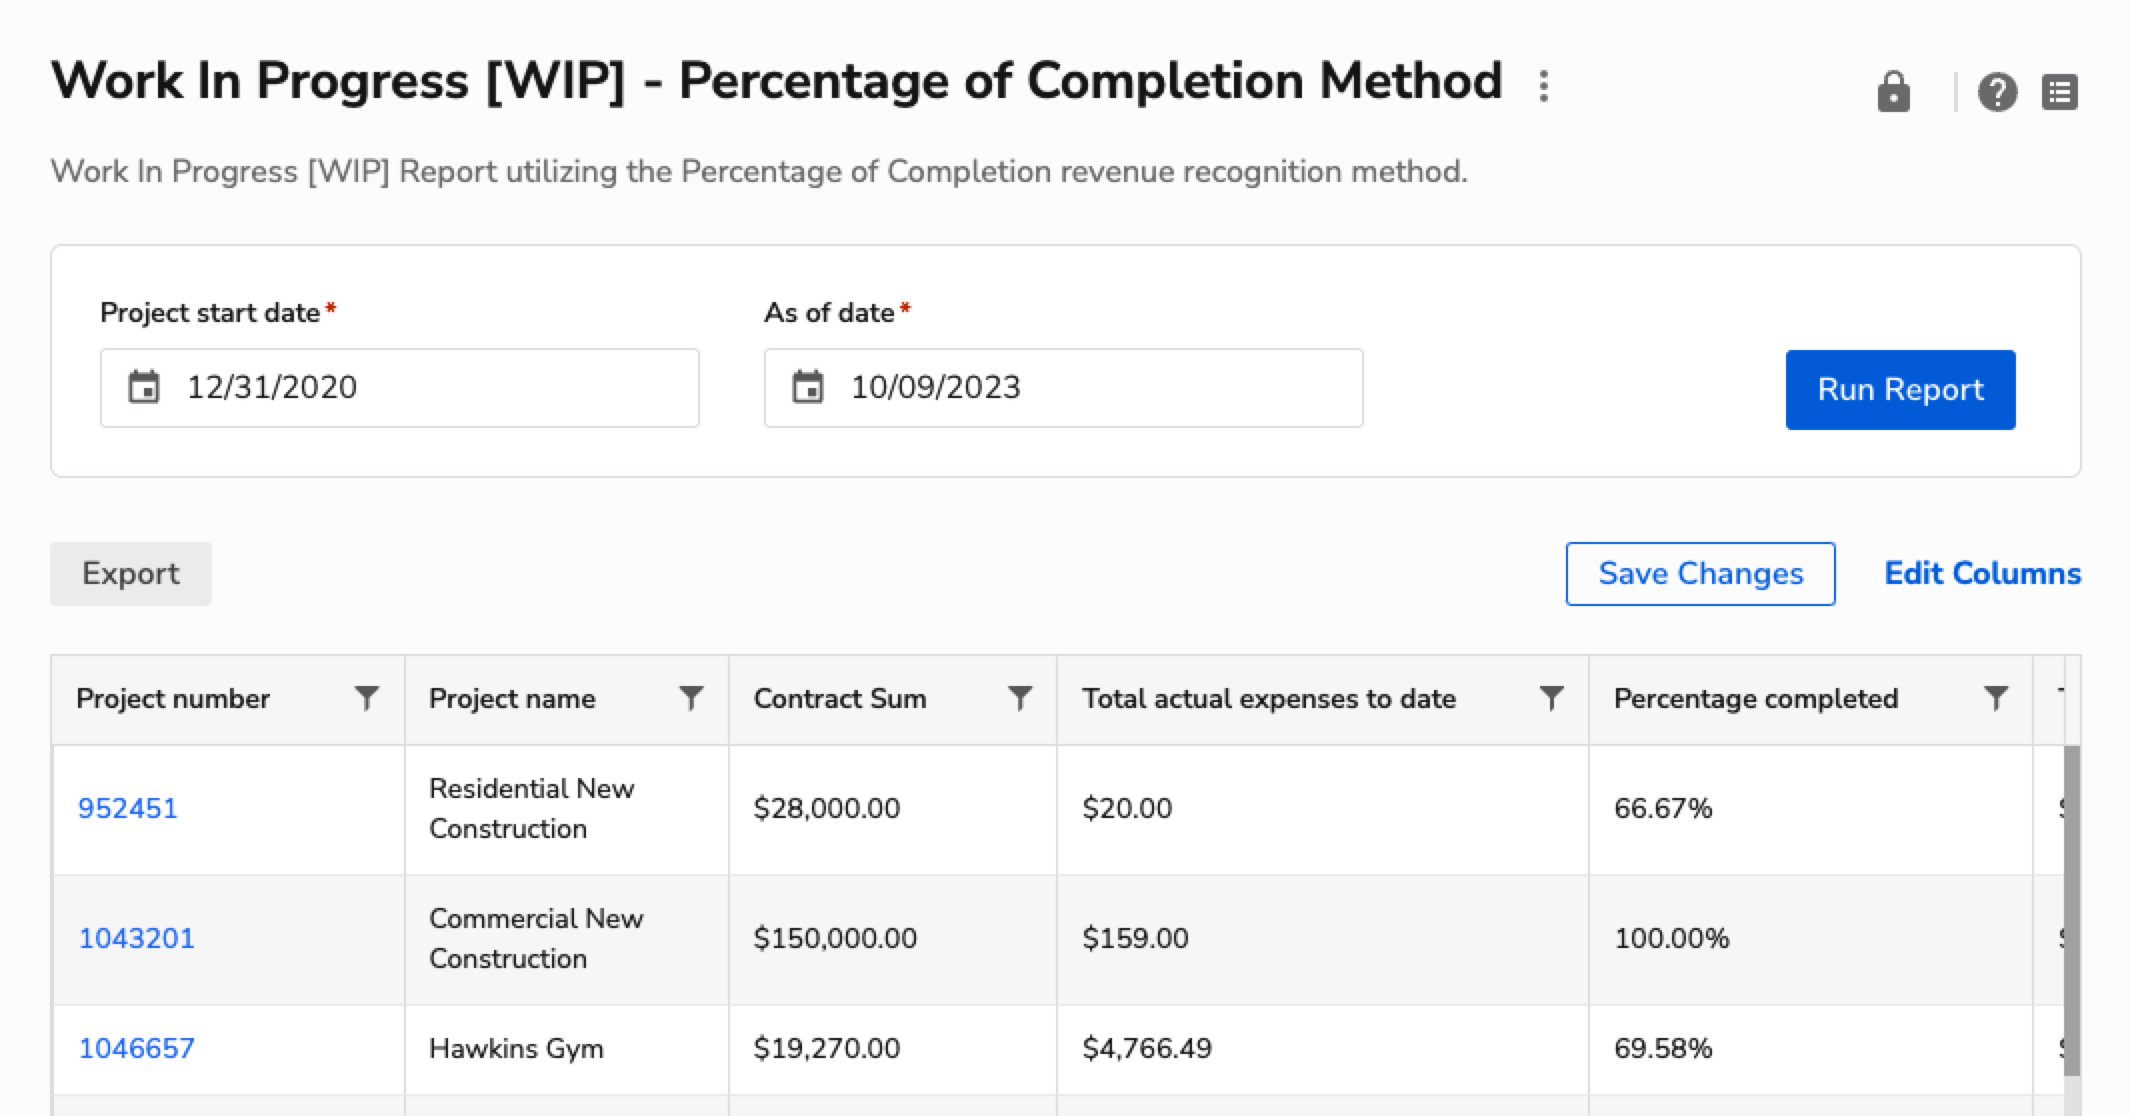
In the Work In Progress [WIP] - Percentage of Completion Method report, projects populate if the Project Completion Date field is either blank or after the date that is set in the As of date field.
Note: The Project Start Date field on the Project Edit page needs to be filled in to run the Work In Progress [WIP] - Percentage of Completion Method report.
Run the Work in Progress (WIP) Summary 2 report
The Work in Progress Summary 2 report is an end-to-end report built to help Commercial and Construction customers manage in-progress projects, as well as completed projects. The report provides a reporting base for you to be able to review transactional data from a project to-date perspective next to project data for a specific period of time.

The Work in Progress Summary 2 report uses multiple filters to give deep financial insight in your projects.
Report filters include:
Transactions From-To (Required): Reports on project transactions between the two entered dates. The dates entered into the Transactions From-To filter connect to KPIs that don't have "TD" in their name.
This filter provides dynamic date options, such as week-to-date, last month, and more to enable scheduling the report for your project managers.
Combine this date filter with the Transactions As Of Date Options date filter to report on two time frames simultaneously.
Transactions As Of Date Options: Measures costs as of a given date. The date entered into the Transactions As Of Date Options connects to the KPIs that have "TD" (To-Date) in their name.
Options include:
Same as Transaction To Date: The date entered in the To part of Transactions From-To. Selecting this option pulls everything prior to that day into the "TD" columns.
Today: Today's date. Select this option to view transactions as of today's date.
Custom Date: Select this option if you want to measure transactions as of a specific date. If you select this option, include the specified date in the Transactions As of Date (if custom) field.
Combine this date filter alongside the Transactions From-To to report on two time frames simultaneously.
Transactions As of Date (if custom): This filter works with the Transactions As Of Date Options filter when the value is set to Custom Date. You can enter a date to view transactions as of the entered date.
Example:
"As a Project Manager, I need to report on the project's costs from last month compared to the project's costs to date"
Set Transactions From-To date range to Last Month.
Set Transactions As Of Date Options to Today.
Run the report.
Project Status: Isolate projects by their status. In the dropdown menu, Parent statuses are visible. Sub-statuses aren't searchable but you can filter for any substatus by instead filtering for its parent status.
Options include:
In Progress: Project is in progress.
Pending Scheduling: Project is pending scheduling.
Scheduled: Project is scheduled.
Hold: Project is on hold.
Canceled: Project is canceled.
Completed: Project is completed.
Examples:
To isolate completed projects, select the Completed project status.
To isolate in progress projects, select the In progress status.
Sync statuses include:
Invoice Cost Sync Status: Include invoices by status.
The Pending/Posted/Exported option provides the widest view of your data.
Select the Posted/Exported option to exclude pending invoices from the data.
Select the Exported option to exclude pending and posted invoices from the data.
Invoice Revenue / Billed Sync Status: Include invoices by status.
The Pending/Posted/Exported option will provide the widest view of your data. Select the Posted/Exported option to exclude pending invoices from the data.
Select the Exported option to exclude pending and posted invoices from the data.
Use case: Best used by Accountants in bookkeeping workflows. See all invoices that have ever been created, or see only the posted/exported invoices
Vendor Returns Sync Status: Include returns by status.
The Pending/Posted/Exported option provides the widest view of your data.
Select the Posted/Exported option to exclude pending returns from the data.
Selecting the Exported option to exclude pending and posted returns from the data.
Vendor Bill Sync Status: Include bills by status.
The Pending/Posted/Exported option provides the widest view of your data.
Select the Posted/Exported option to exclude pending bills from the data.
Select the Exported option to exclude pending and posted bills from the data.
Vendor Costs From: Include costs associated with bills and receipts.
Select Bills to pull your costs from the vendor bills.
Select Receipts to pull your costs from the vendor receipts.
Examples:
To show all results for any transactions, the filters should be set to Pending/Posted/Exported.
To ensure your accounting system is in sync with the WIP report, set the filters to Exported. This ensures that you're only seeing transactions that have been exported to your accounting system.
Work in Progress (WIP) Summary 2 use cases
Question: "Can you show me costs from last month compared to costs to date?"
Answer: Set Transactions from-to to Last Month. Set Transactions as of date options to Today.
Setup: Arrange non-TD KPIs against TD KPIs to see to-date against a specified time frame.
Note: The Transactions As Of Date options connect to the KPIs that have "TD" (To Date) in their name. The Transactions From-To filter connects to KPIs that don't have "TD" in their name.
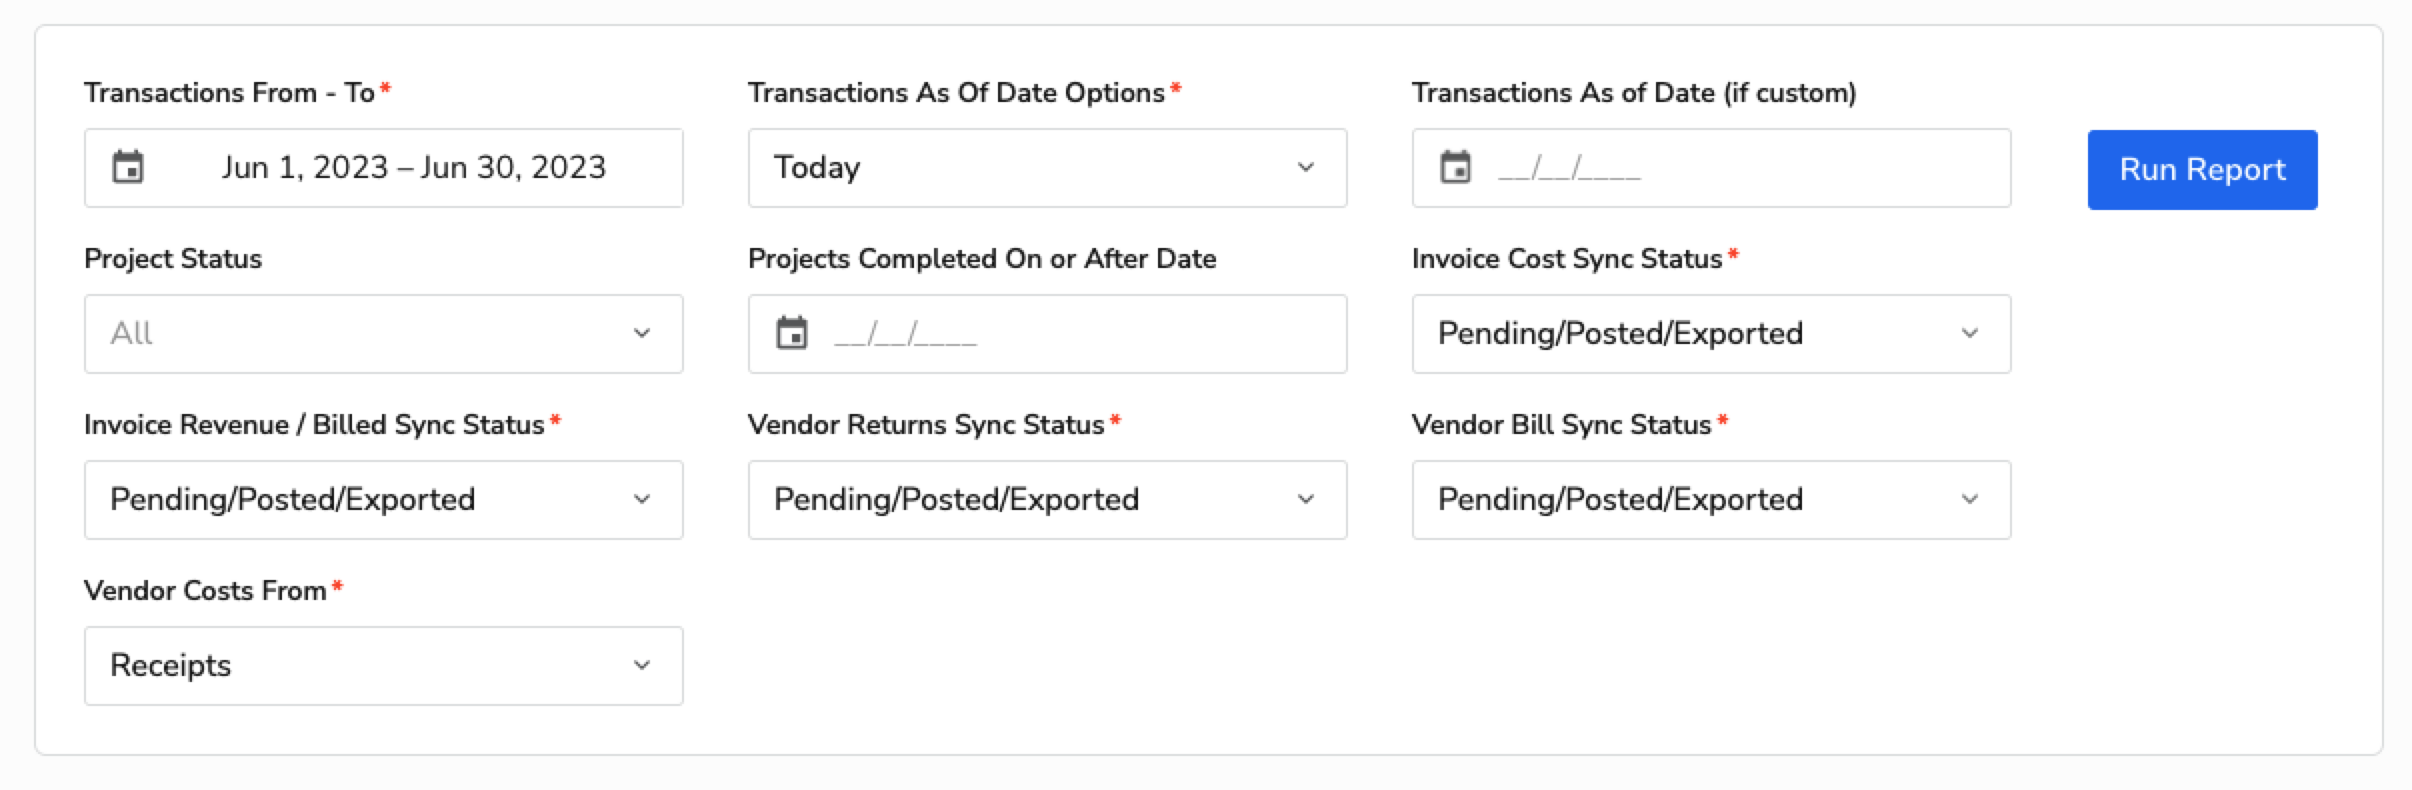
Question: "I need to do my WIP review, and I forgot to do it on the last day of the month. Can I go back and review costs from the previous month, as well as project to date costs at the end of that month?"
Answer: Set Transactions From-To to Last Month. Set Transactions As Of Date options to Same as transaction to date. This captures information from the previous month and allows you to view the month in isolation against any TD metrics you want. The example below isolates June against June because the Transactions as of date option is the same as the To-date in transactions From-to.

Question: "How can I reconcile explicitly with what's in my accounting software?"
Answer: The key here is the Today selection on transactions as of along with only exported. Set Today as the selection for Transactions as of, and set the sync statuses to Exported. The transactions From-to date filter in this context is negligible because you are tying transactions out with your accounting software.
