Coming soon
Release ST-83
Overview
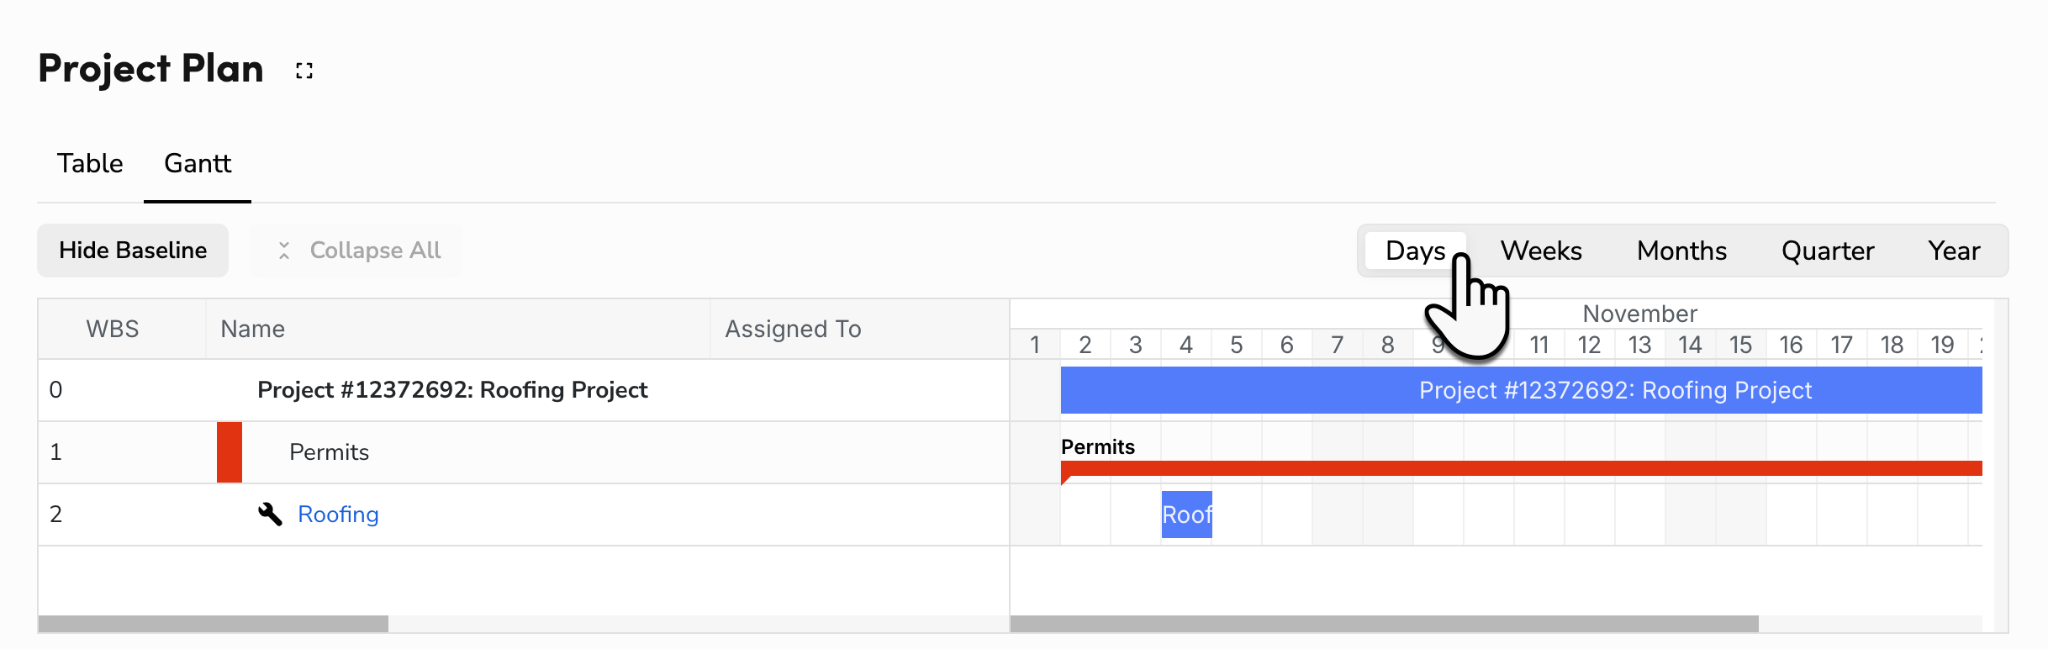
Project Plan allows you to group project tasks and jobs into structured phases with clear timelines, helping you track progress and keep projects on schedule. You can also view your plan as a Gantt chart, so you can visualize your progress chronologically. Built directly into the project record, Project Plan keeps your project’s schedule and work in one place.
Planning Tasks supports both office and technician task assignment, allowing for more granular and responsive project tracking.
Note: If your account uses Planning Tasks, Project Plan also includes features such as Technician Tasks, Dependencies, Milestones, and Baselines.
Who uses this feature
Office employees
Primarily for Residential Construction and Commercial Construction business types
Applies to all trades
Feature configuration
Account configuration is required to use Project Plan, Planning Tasks, and Budget Codes. Project Plan also requires Budget vs Actual (for more, see Show the Project Plan on a project type).
Project Plan, Planning Tasks, and Budget Codes are currently in Limited Release and available for specific accounts. If you want to enable these features for your account:
Project Plan and Budget vs Actual: Reach out to your CSM.
Planning Tasks: Reach out to your CSM.
Budget Codes: Join the waitlist here.
Note: The Budget Hours, Revised Hours, Scheduled Hours, and Actual Hours columns need additional account setup. If you don’t see them, reach out to your CSM.
Things to know
A new group opens expanded so you can start adding items to it. Click the arrow next to a group’s name to collapse or expand it and see the tasks, jobs, and subgroups inside it.
To see more of your plan at once, click the Expand icon at the top of the Project Plan to open it full screen.

Use Collapse All or Expand All to close or open every top-level group.If you’d like to use budget codes with your project plans, see Budget Codes overview.
Duration counts every calendar day between the start and end dates of an item. Working Days counts only the days set as working days for the project, so the two numbers differ whenever a date range spans a non-working day.
Planning Tasks are a brand-new task experience and are not related to or compatible with Task Management.
This workflow is currently ideal for customers who are comfortable scheduling outside of ServiceTitan.
Planning Tasks are available on projects created after this functionality was enabled for your account, and on existing projects that don’t already have legacy tasks. You can’t use legacy tasks on these projects.
You cannot currently schedule directly against a task. This feature is primarily for general task management.
If you need to use the ServiceTitan schedule, you can add a job to the Project Plan and add the Planning Task to that job. The job must belong to a project that uses Planning Tasks.
Tasks can be assigned to both office staff and technicians. Technicians can view and update task progress (percentage complete) directly from the Field Mobile App.
Project plan settings
Project Plan settings live in three places: on each project type, on each project, and in your account's settings. Changes to a project's settings apply only to that project.
Show the Project Plan on a project type
The Project Plan section, and the Project Plan control in Project Type settings, only appear when both Project Plan and Budget vs Actual are enabled for your account. If Budget vs Actual was already on when Project Plan was turned on, Project Plan is shown on every active project type automatically. If Budget vs Actual was turned on afterward, nothing changes automatically: project types that ServiceTitan set up for your account keep Project Plan hidden, and project types you created in Settings show it.
If you don’t see the Project Plan section on a project, it may be hidden for the project’s project type. An administrator or office employee with the View Project Type Settings permission can go to Settings > Operations > Project Types, edit the project type, and click the Show  icon next to Project Plan so it shows.
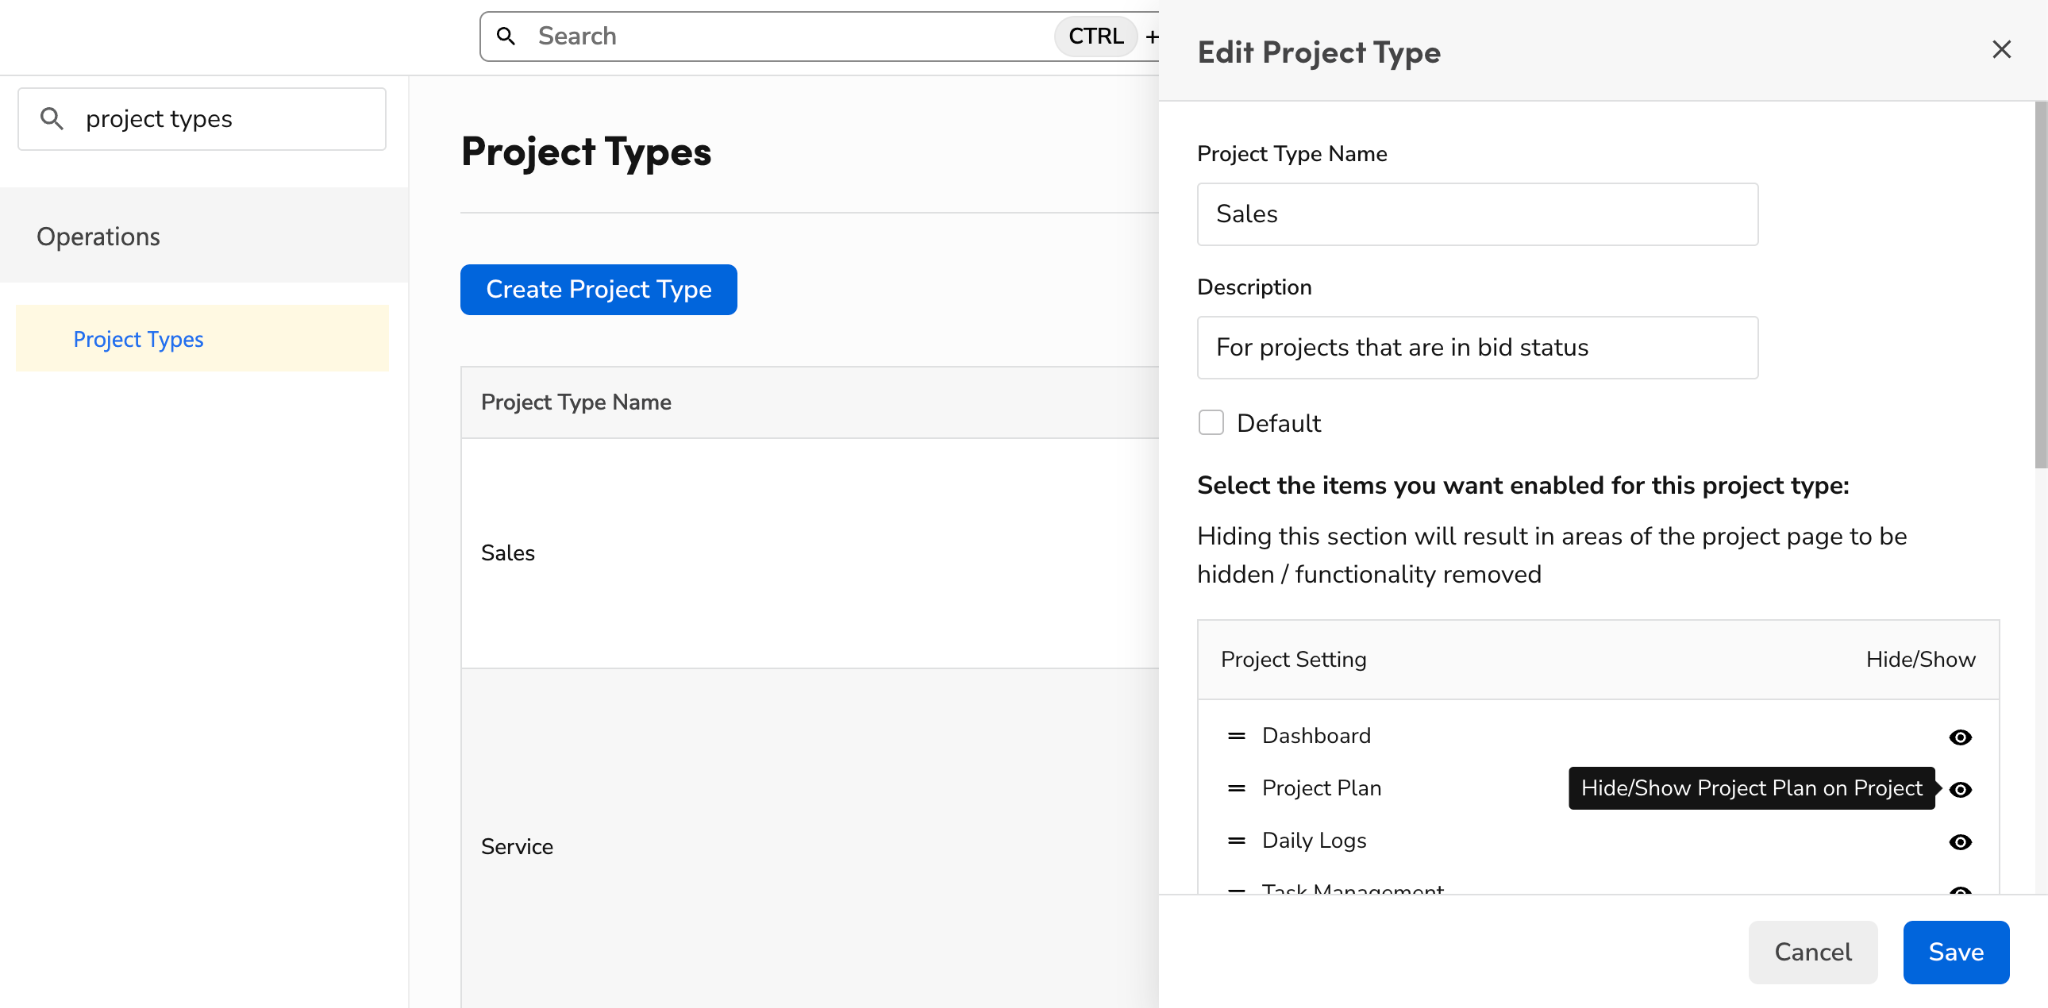
New projects follow their project type’s setting. Projects without a project type always show it. Existing projects that already had a project type keep their earlier setting, so the Project Plan doesn’t show on them until you edit the project type from the project itself and turn on Project Plan there.
Open a project's Project Plan settings
Each project has its own Project Plan settings. Changes apply only to that project.
Go to the project you want.
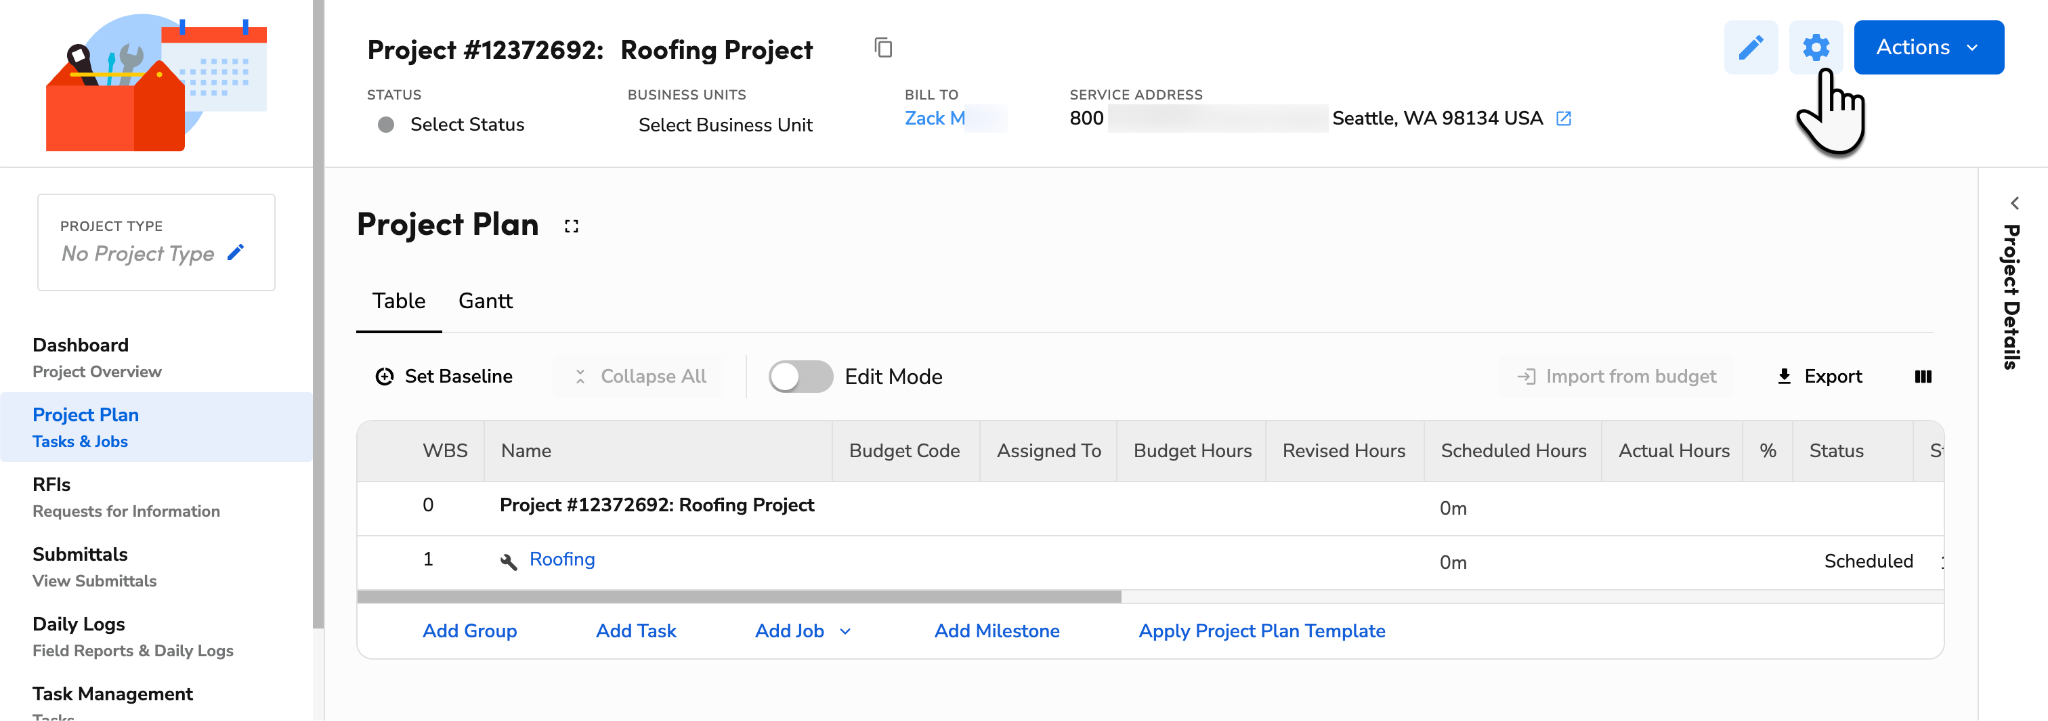
At the top of the project, click the Settings
 icon.
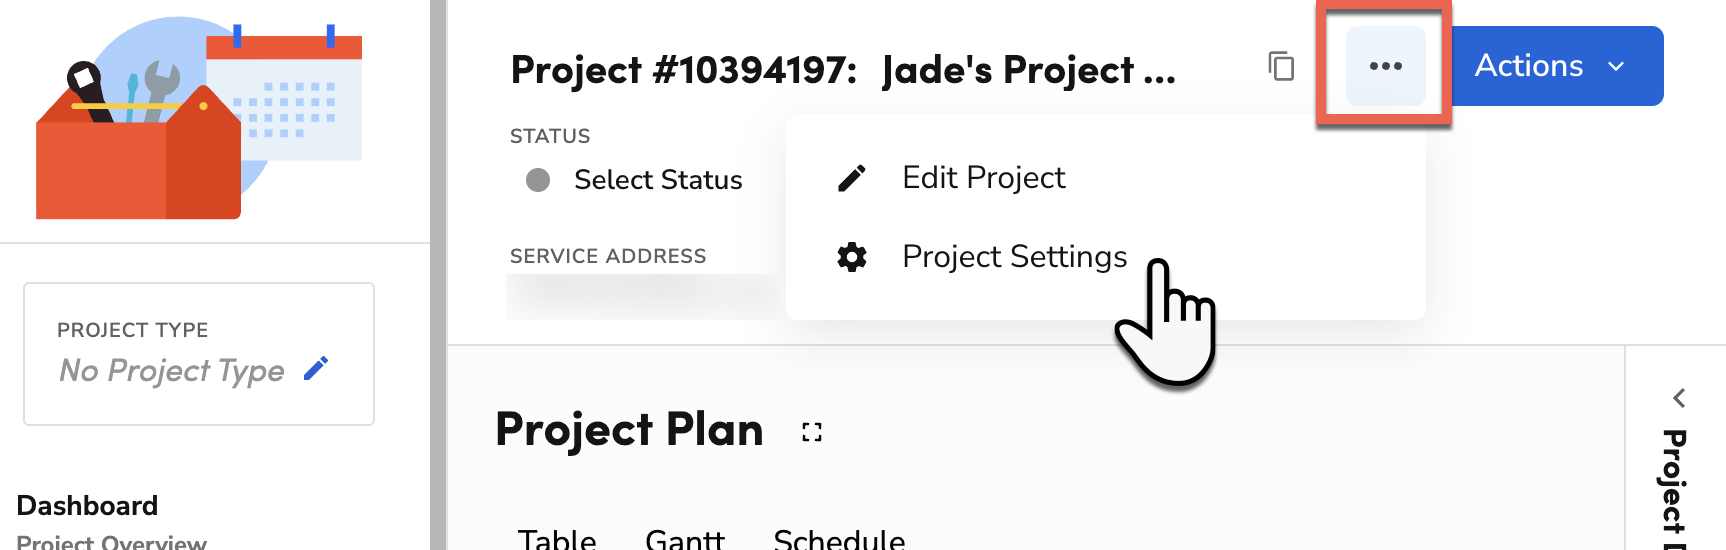
Tip: If you're on a smaller screen and the icon is hidden, click More
 > Project Settings.
In the Project Settings panel that opens, scroll to the Project Plan section and make your changes.
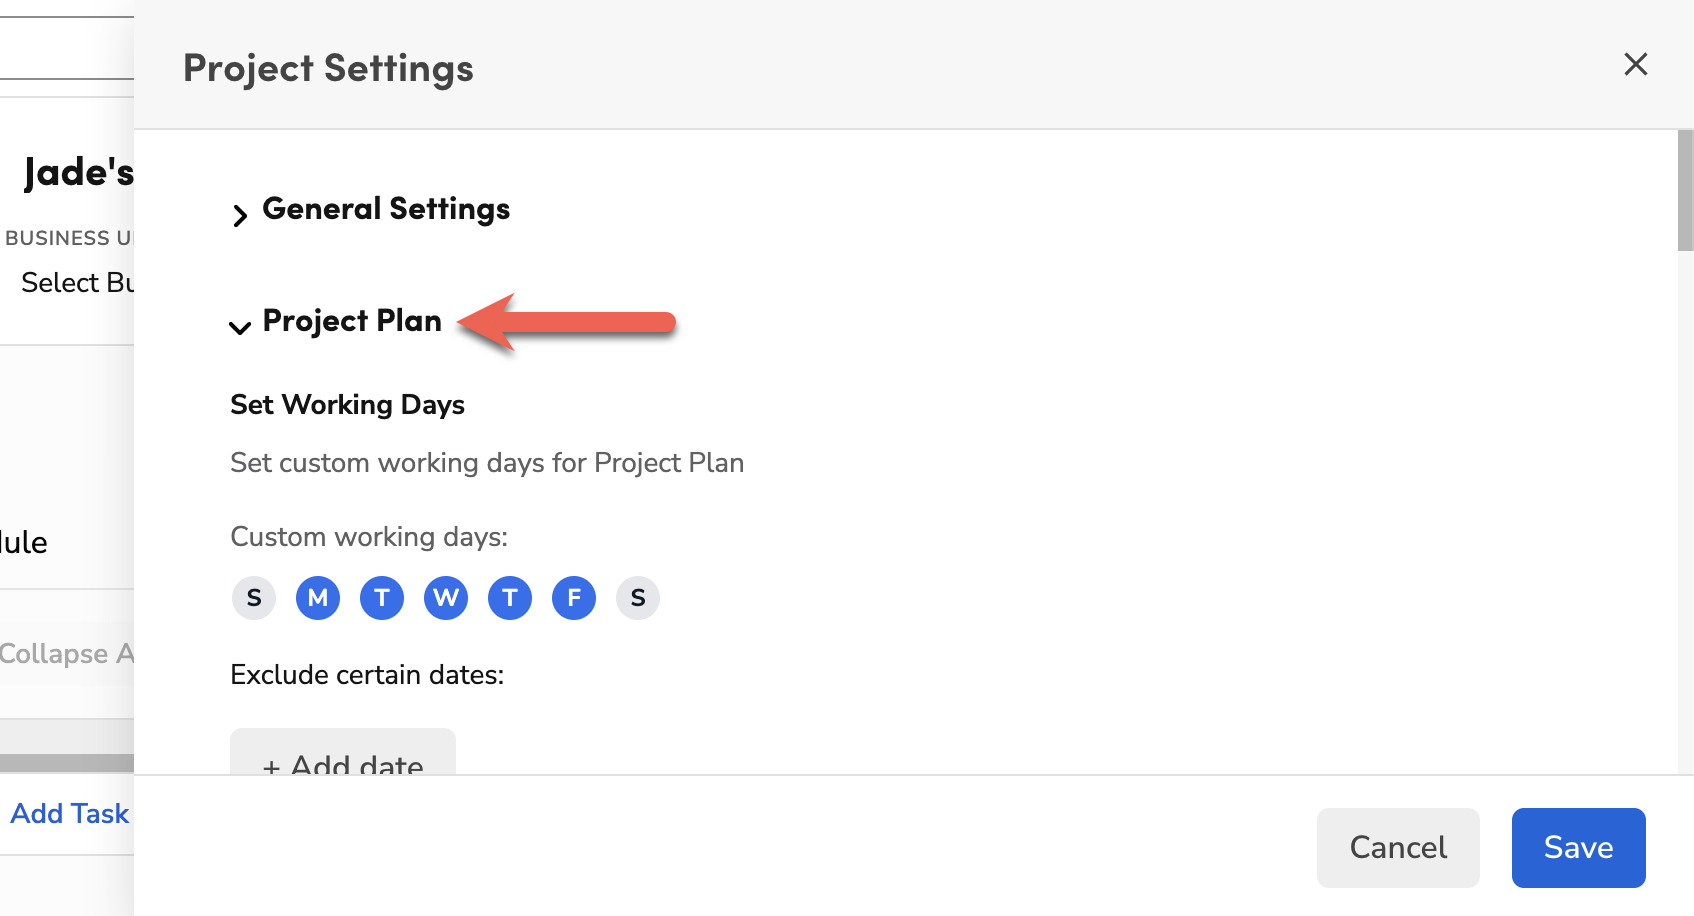
When finished, click Save.
The Project Plan section has the following settings, explained below:
Set working days and hours for a project
Working days decide how working days and lag time are counted in the project’s plan. Working hours set the default times used when you schedule technicians.
Open the project’s settings.
For Set Working Days, select the days of the week that count as working days. Monday through Friday is the default.
(Optional) For Exclude certain dates, click + Add date to add dates or date ranges that aren’t working days, such as holidays. Click × to remove one.
(Optional) For Set Working Hours, set a Start Time and End Time. Working hours come from the project’s business unit, or from your account if the business unit has none. Click Restore Default to go back to them.
When finished, click Save.
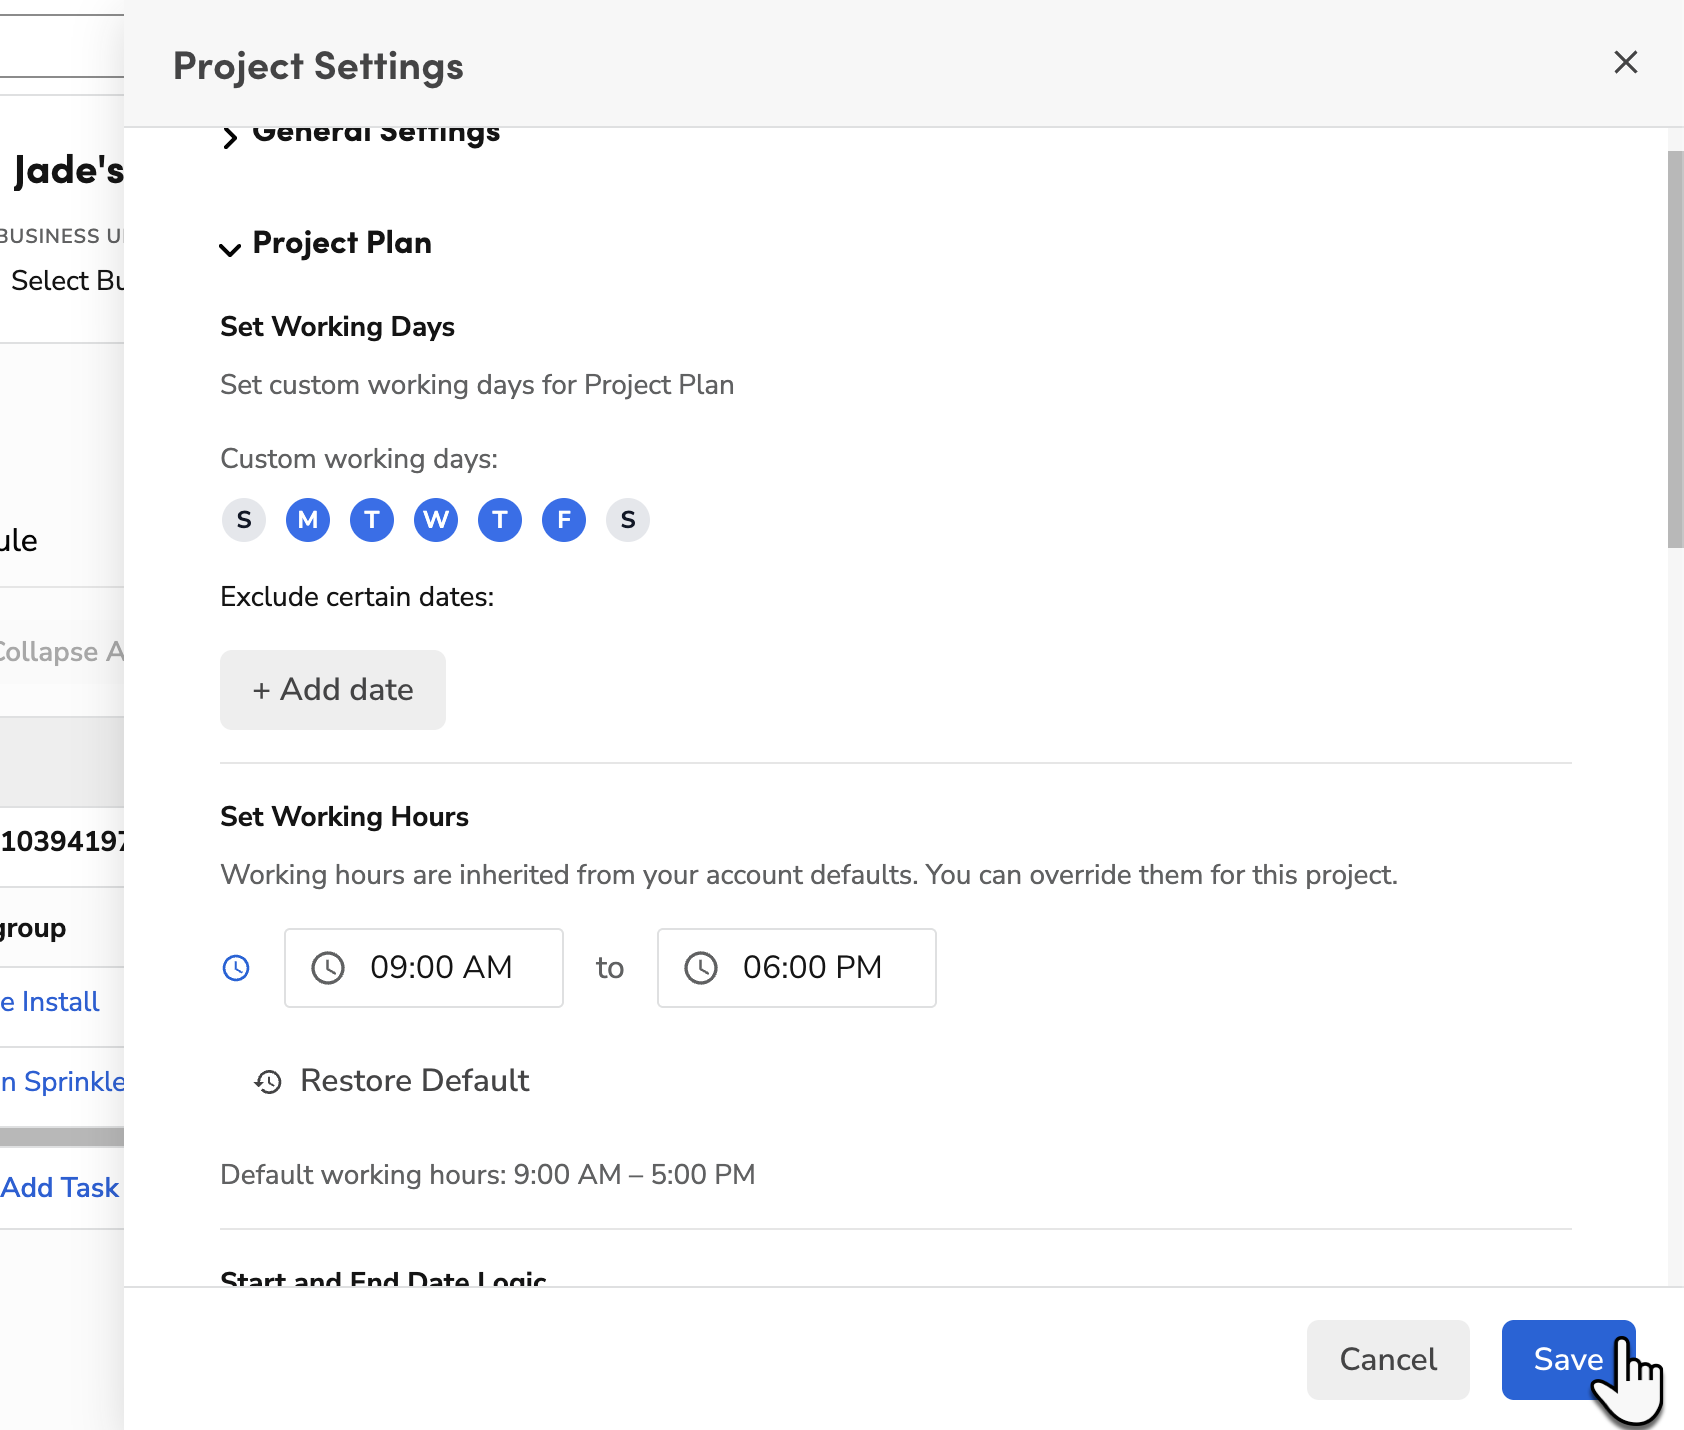
Note: A project uses your account’s working days until you save its own. After you save a project’s settings, its working days stay as saved, even if your account’s working days change later.
Set start and end date logic in the Project Plan
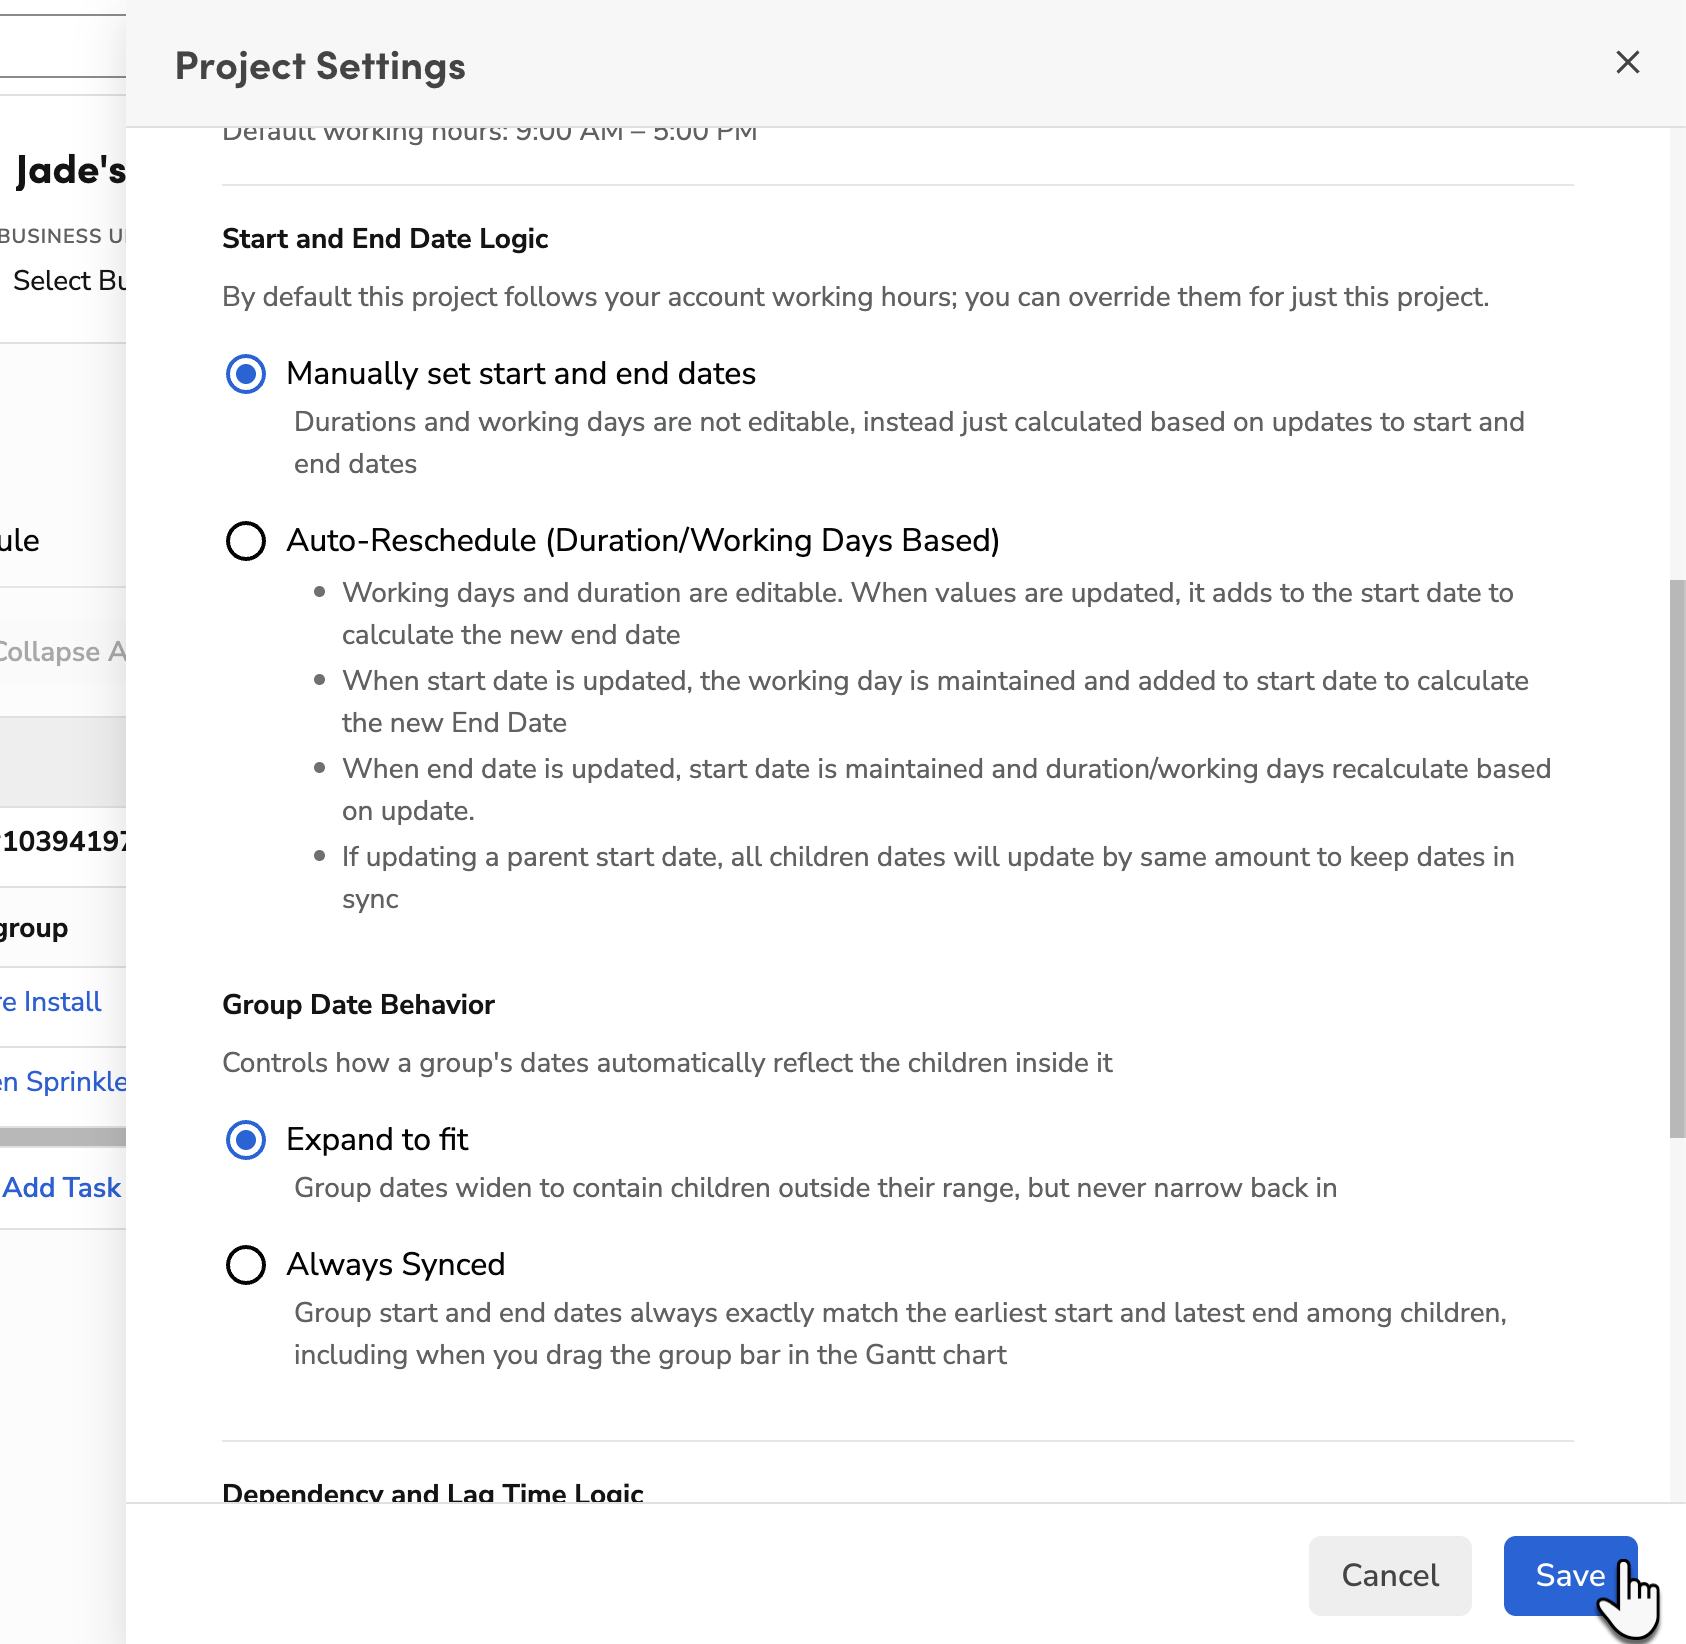
Project Settings includes a Start and End Date Logic option that determines how task and group dates are entered and maintained:
Open the project’s settings.
Find the Start and End Date Logic section and choose one of the following:
Manually set start and end dates: You enter the start and end date for every item yourself. This is the default.
Auto-Reschedule (Duration/Working Days Based): You enter a duration, in working days, for each item instead of fixed dates. When you set or change a start date, the end date is calculated automatically to preserve that working-day duration. If you edit the end date directly, the duration updates instead—but your chosen duration is always preserved whenever you update the start date.
(Optional) For Group Date Behavior, choose how a group’s dates follow the items inside it:
Expand to fit: Group dates widen to contain children outside their range, but never narrow back in. This is the default.
Always Synced: Group start and end dates always exactly match the earliest start and latest end among children, including when you drag the group bar in the Gantt chart.
When finished, click Save.
Regardless of which option you choose:
If you enter a start date without an end date or an end date without a start date for a task, the missing date automatically fills in to match. You'll see an error if you try to set an end date earlier than the start date.
With Auto-Reschedule or Always Synced turned on, changing a group’s start date automatically shifts every child task within that group, and any nested subgroups, by the same number of working days—you don't have to manually re-date each task after moving a group. For example, Group A runs 1/5–1/20, with Child 1 at 1/5–1/10 and Child 2 at 1/11–1/20. If you move Group A's start date to 1/12 (a 5-working-day shift), Child 1 moves to 1/12–1/17 and Child 2 moves to 1/18–1/27—the spacing between them is preserved. If shifting a group's start date would move a job in the tree outside the range of that job's earliest and latest appointment dates, you'll see an error and the change is blocked.
If a task has a dependency, changing the date or duration of the task it depends on can move its dates and those of any further downstream dependent tasks. How much depends on the project’s Dependency and Lag Time Logic: with Flexible, a dependent task moves only when the change would make it overlap; with Strict, every change ripples to all downstream tasks by the same amount. This applies whether you use Manually set start and end dates or Auto-Reschedule. For example, if a dependent task doesn’t have dates yet, entering an end date on the task it depends on fills in the dependent task’s dates. It starts after the lag time and, until you change it, ends on the same day.
With Strict, if a task has a dependency, you can't select a start date that violates that dependency. For example, if a task has a Finish to Start dependency with a 1-day lag and its predecessor ends on 9/9, the earliest you can start the task is 9/10. Trying to select an earlier date is blocked.
Choose how dependencies move dates
Note: Requires Planning Tasks.
Each project has a Dependency and Lag Time Logic setting that controls how a task’s dates change when the task it depends on moves.
Open the project’s settings.
For Dependency and Lag Time Logic, choose one of the following:
Flexible: Only shifts dependent task dates if a schedule change creates a direct overlap, letting you move tasks freely otherwise. This is the default.
Strict: Automatically ripples any date change forward or backward by the exact same duration to maintain a rigid schedule.
When finished, click Save.
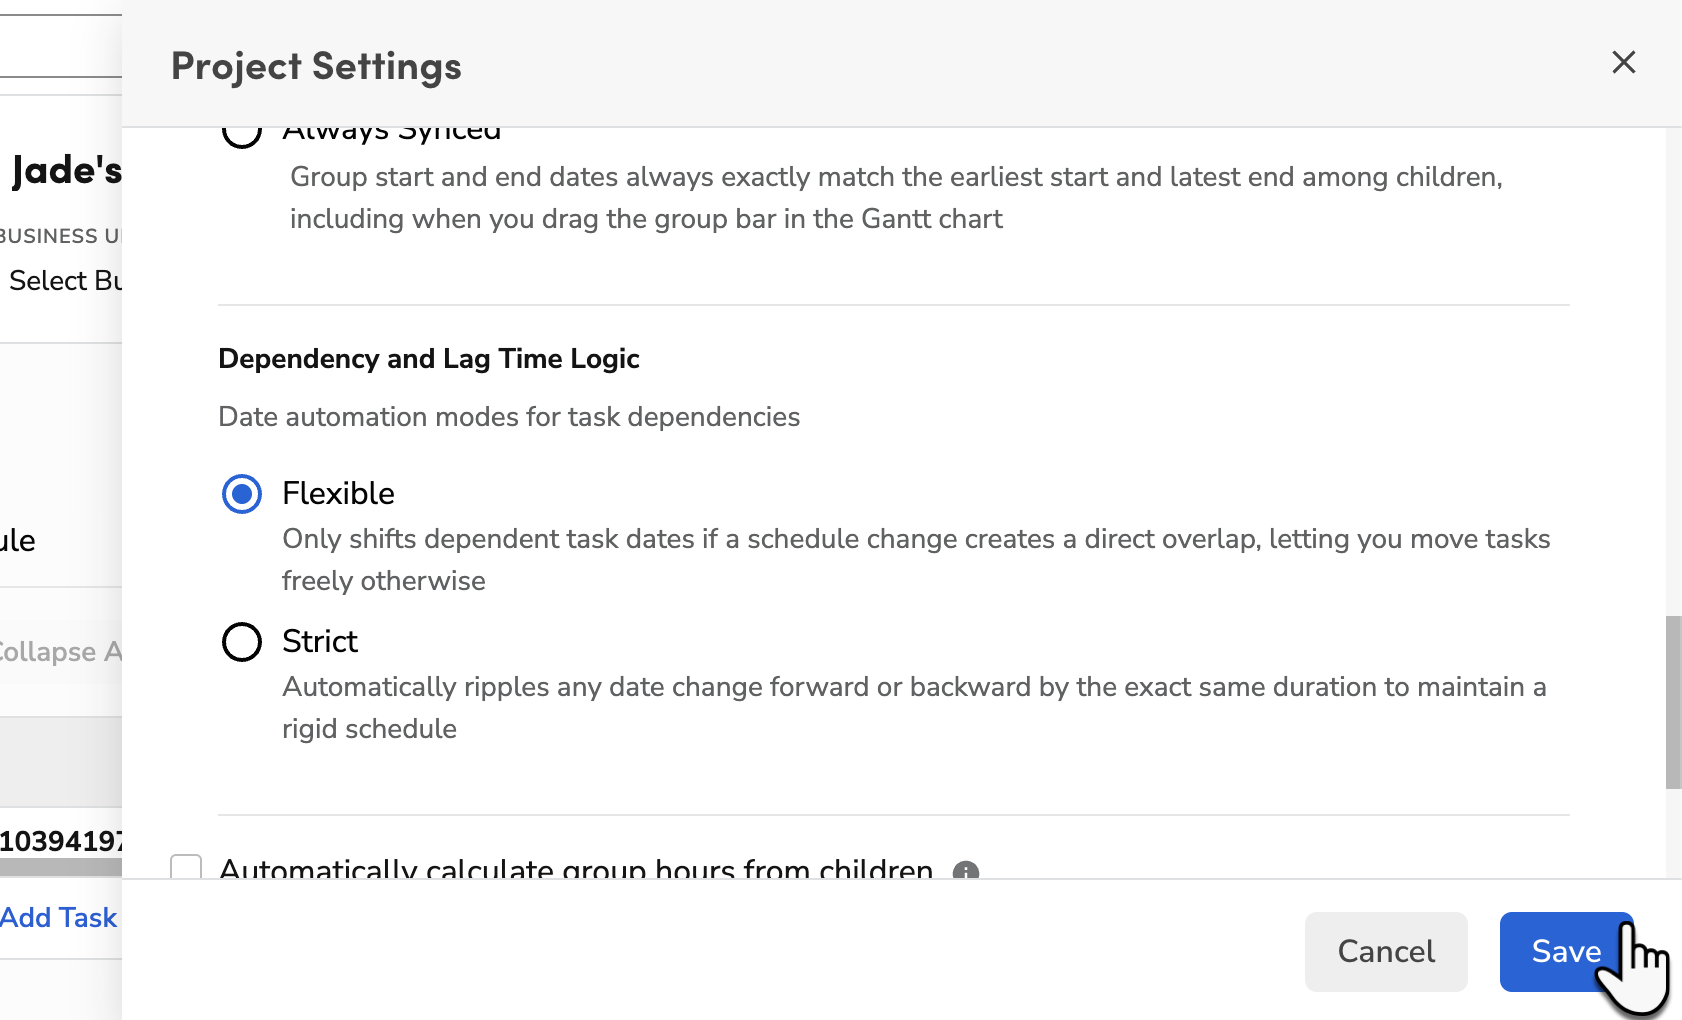
Note: With Strict, dates set by a dependency are locked. To change them, change the predecessor task’s date or the dependency’s lag time, or switch the project to Flexible.
Choose how group hours are calculated
By default, the Budget Hours and Revised Hours of a group you created are the total of the items inside it. To enter hours on groups directly, turn this off.
Open the project’s settings.
In the Project Plan section, deselect Automatically calculate group hours from children, then click Save.
Note: Turning this setting back on clears any hours entered on groups.
For how to enter hours on groups, see Enter budget and revised hours on groups.
Set up dependency blocking
Note: Requires Planning Tasks.
Choose whether dependencies are strictly enforced (Hard Blocking) or informational only (Soft Blocking). This setting applies to every project in your account.
Go to Settings > Operations > Project Settings and click the Project Setup tab.
Note: The View Project Settings permission is required to do this. Please contact the account administrator on your team.
For Dependency Blocking Logic, choose between Soft Blocking (Allow status changes even if dependencies aren't met) and Hard Blocking (Prevent status changes if dependencies aren't met). Soft Blocking is the default.
Note: This setting only appears when both Project Plan and Planning Tasks are enabled on your account. Additionally, the Access Settings permission is required to do this. Please contact the account administrator on your team.
When finished, click Save.
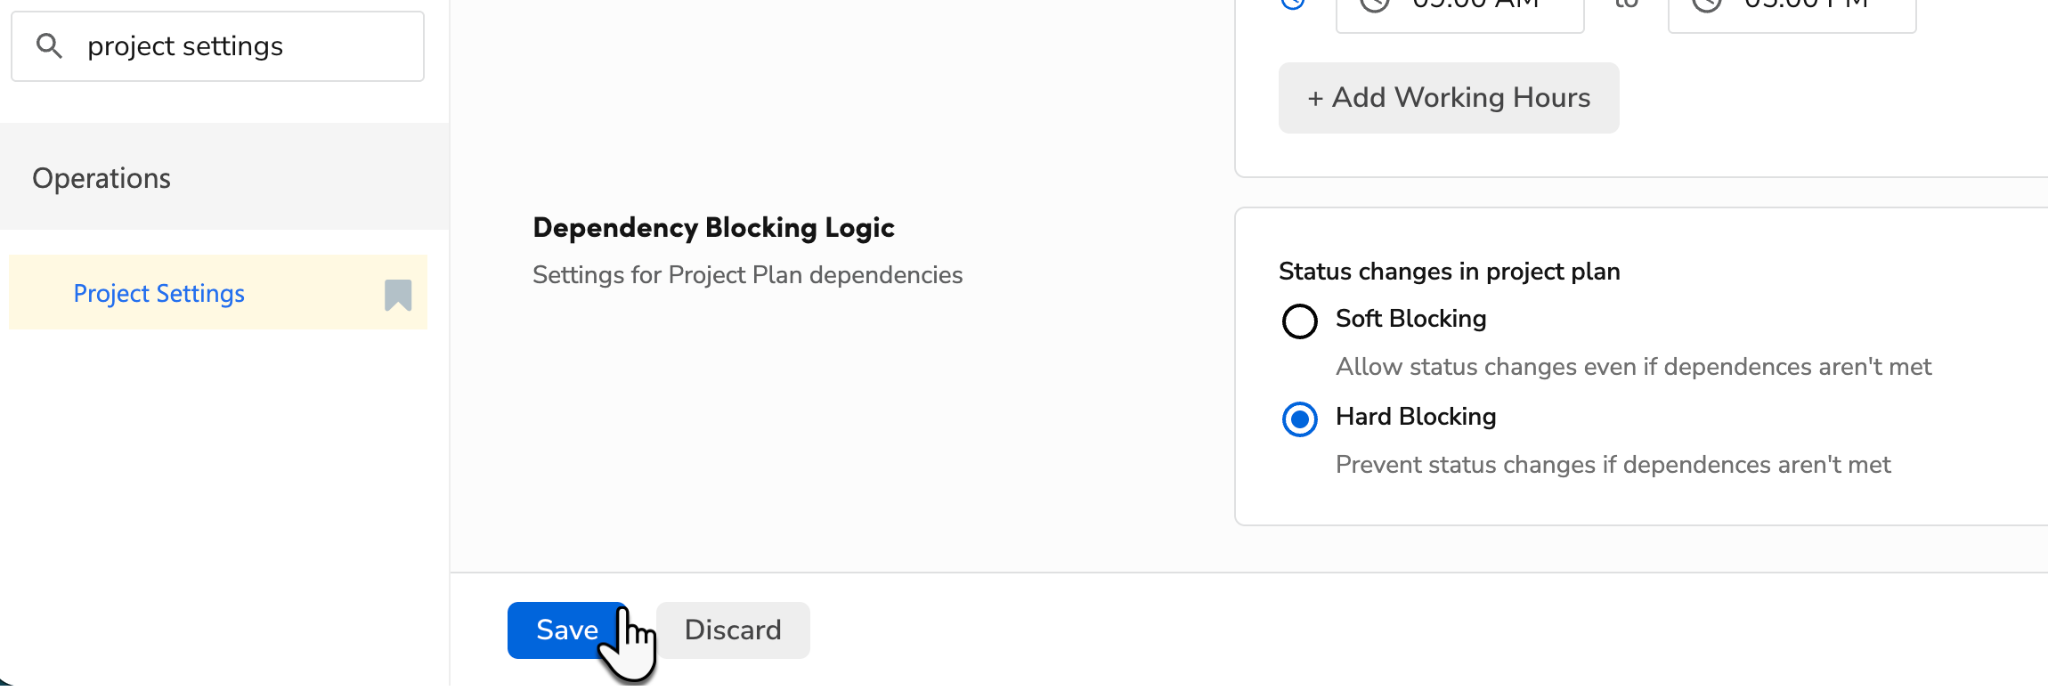
With Soft Blocking on, you can change a task's status (start or complete it) even if its predecessor hasn't reached the required status yet—dependencies are informational only. With Hard Blocking on, you can't change a task's status until its predecessor reaches the status the dependency requires.
Set default working days and hours for your account
Your account’s working days apply to every project that doesn’t have its own. Working hours set the default times for scheduling, by business unit.
Go to Settings > Operations > Project Settings and click the Project Setup tab.
Note: The View Project Settings permission is required to do this. Please contact the account administrator on your team.
For Set Working Days, select the days of the week that count as working days. Monday through Friday is the default.
(Optional) For Exclude specific working dates, click + Add date to add dates or date ranges that aren’t working days. Click × to remove one.
(Optional) For Set Working Hours, set the Start Time and End Time for Default Working Hours, which applies to every business unit you don’t assign elsewhere. To give some business units different hours, click + Add Working Hours, set the times, and select the Business Units. Each business unit can belong to only one set.
When finished, click Save.
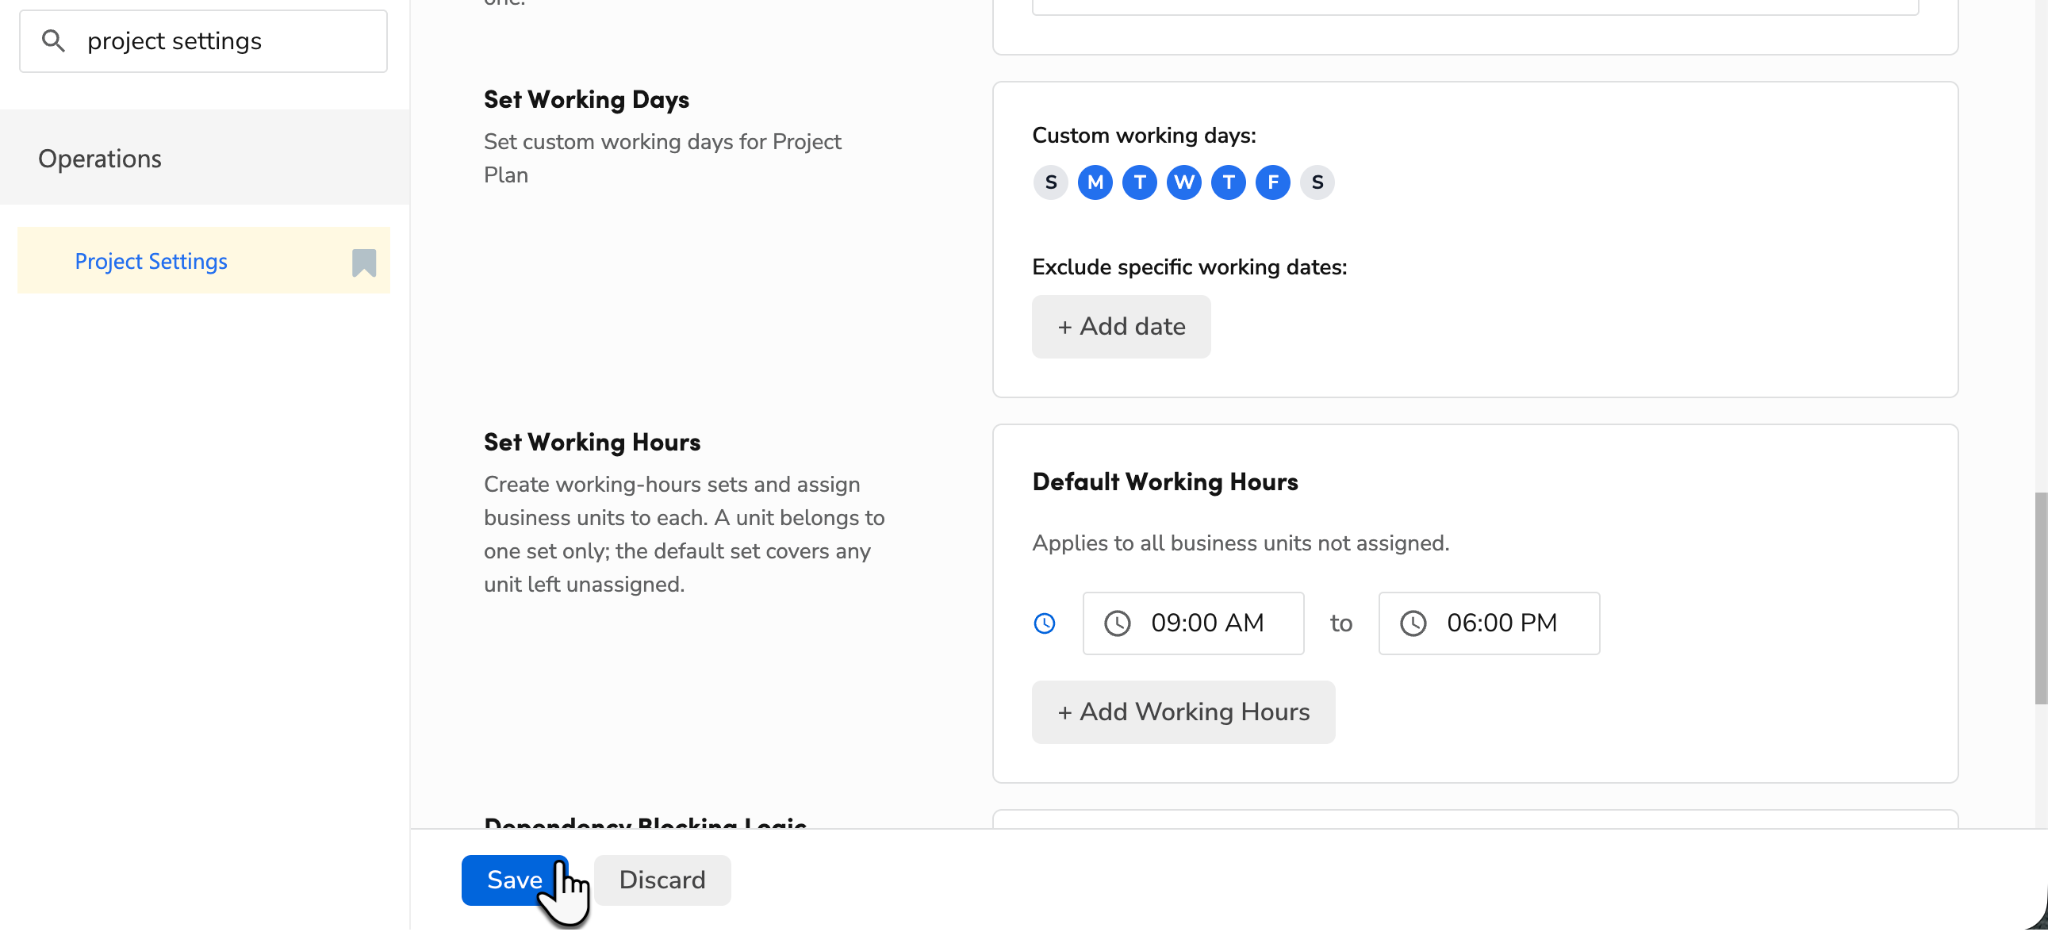
Note: Changing working days doesn’t move dates that are already in a plan. It changes how working days are counted from then on.
Create a Project Plan template
Note: Requires Planning Tasks. Templates also require account configuration.
Build a Project Plan template once and apply it to any project, so you don’t have to recreate the same groups, tasks, and milestones every time.
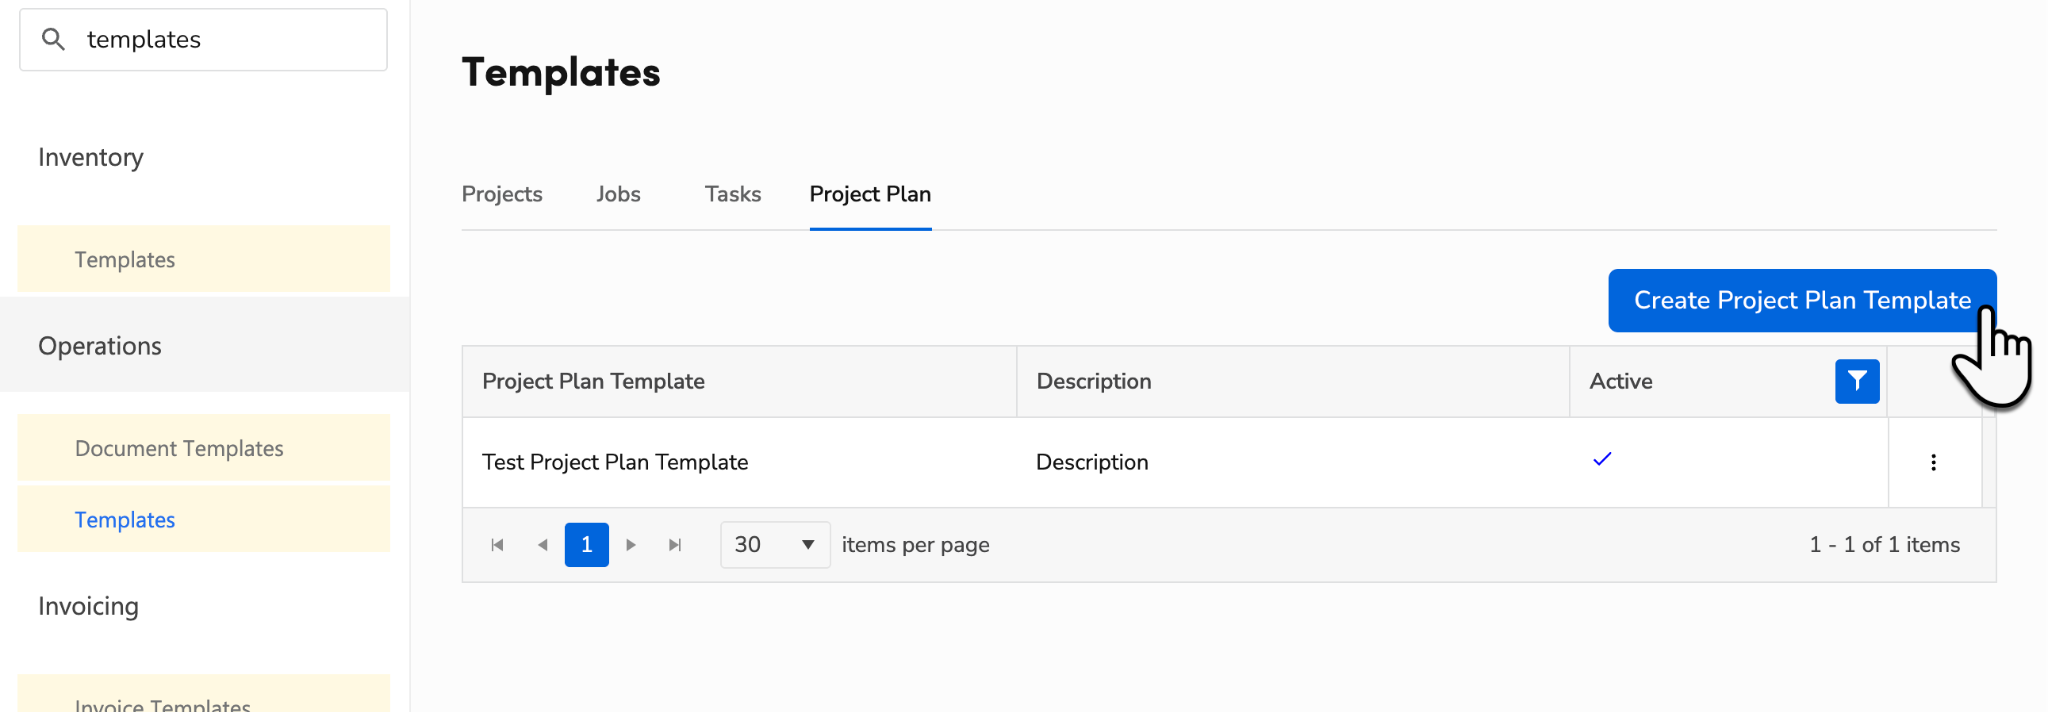
Go to Settings > Operations > Templates and click the Project Plan tab.
Click Create Project Plan Template.
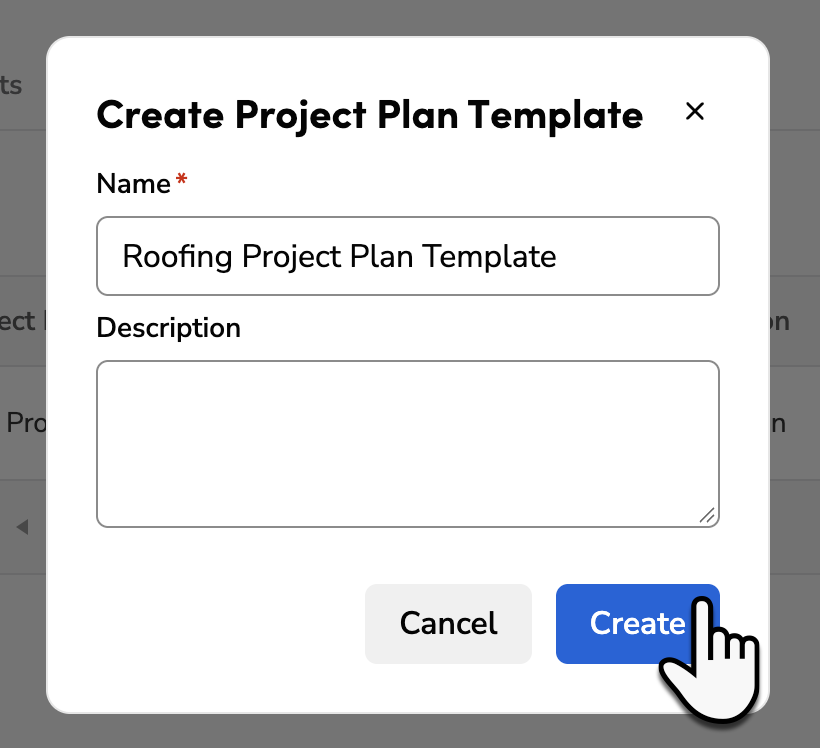
In the window that opens, enter a Name. (Optional) Enter a Description.
Click Create.
Add groups, tasks, and milestones as needed.
When finished, click Save.
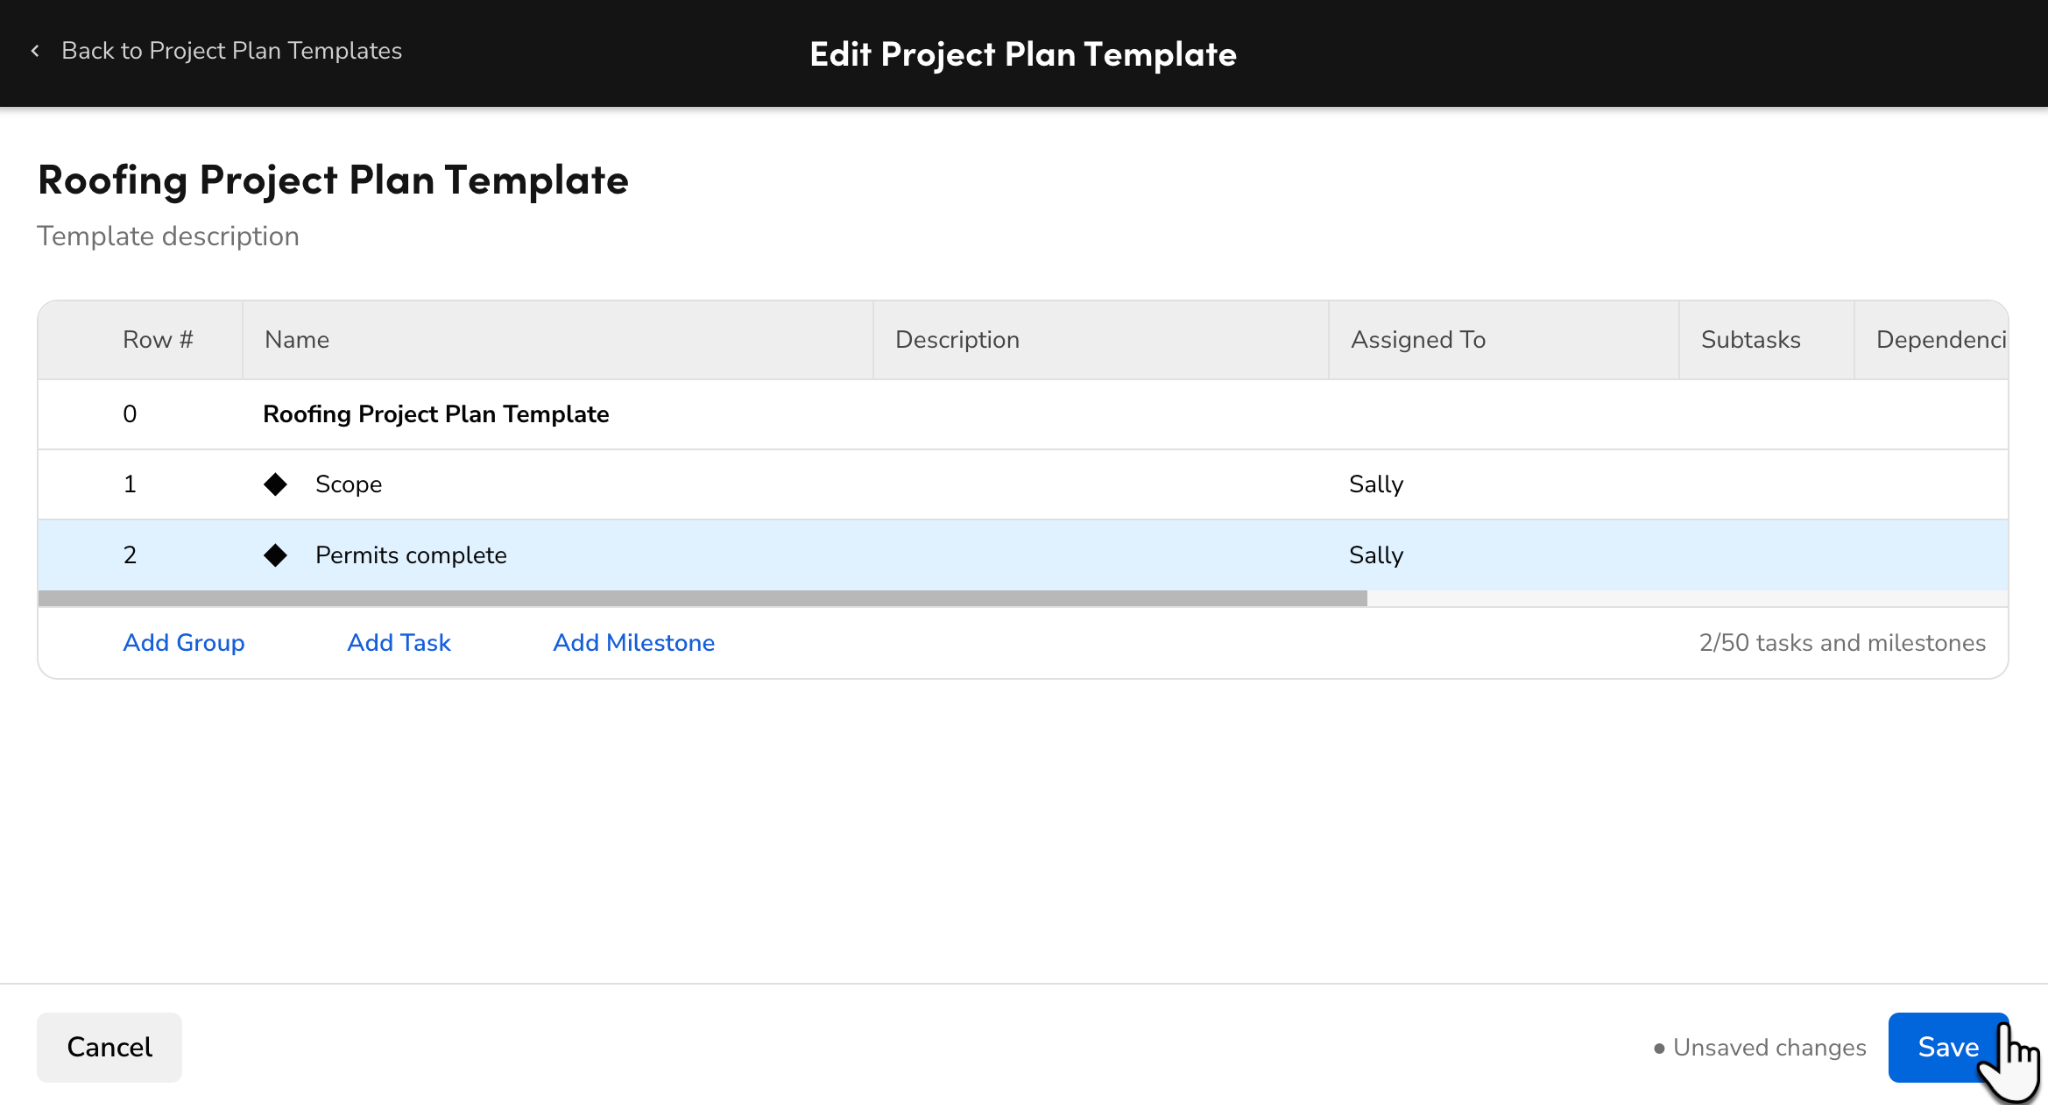
Things to know:
A template can hold up to 50 tasks and milestones.
For Assigned To, you can choose a specific employee or User Applying Template, which assigns whoever applies the template.
To deactivate a template, click More
 > Deactivate. Deactivated templates can’t be applied to projects, and they’re hidden from the list unless you filter for Inactive. To use one again, select Reactivate.
Tip: If a project has more than 50 tasks, split them into several templates, for example one per group or phase, and apply each one to the plan or to a group.
Build a project plan
A project plan is made up of headers called groups. Each group is then made up of tasks and jobs representing the work that needs to be completed for that phase of the project. You can also create subgroups with their own tasks and jobs.
To create a project plan:
Go to the project you want to make a plan for.
In the side panel, click Project Plan. Any jobs or tasks that have already been created for this project are populated.
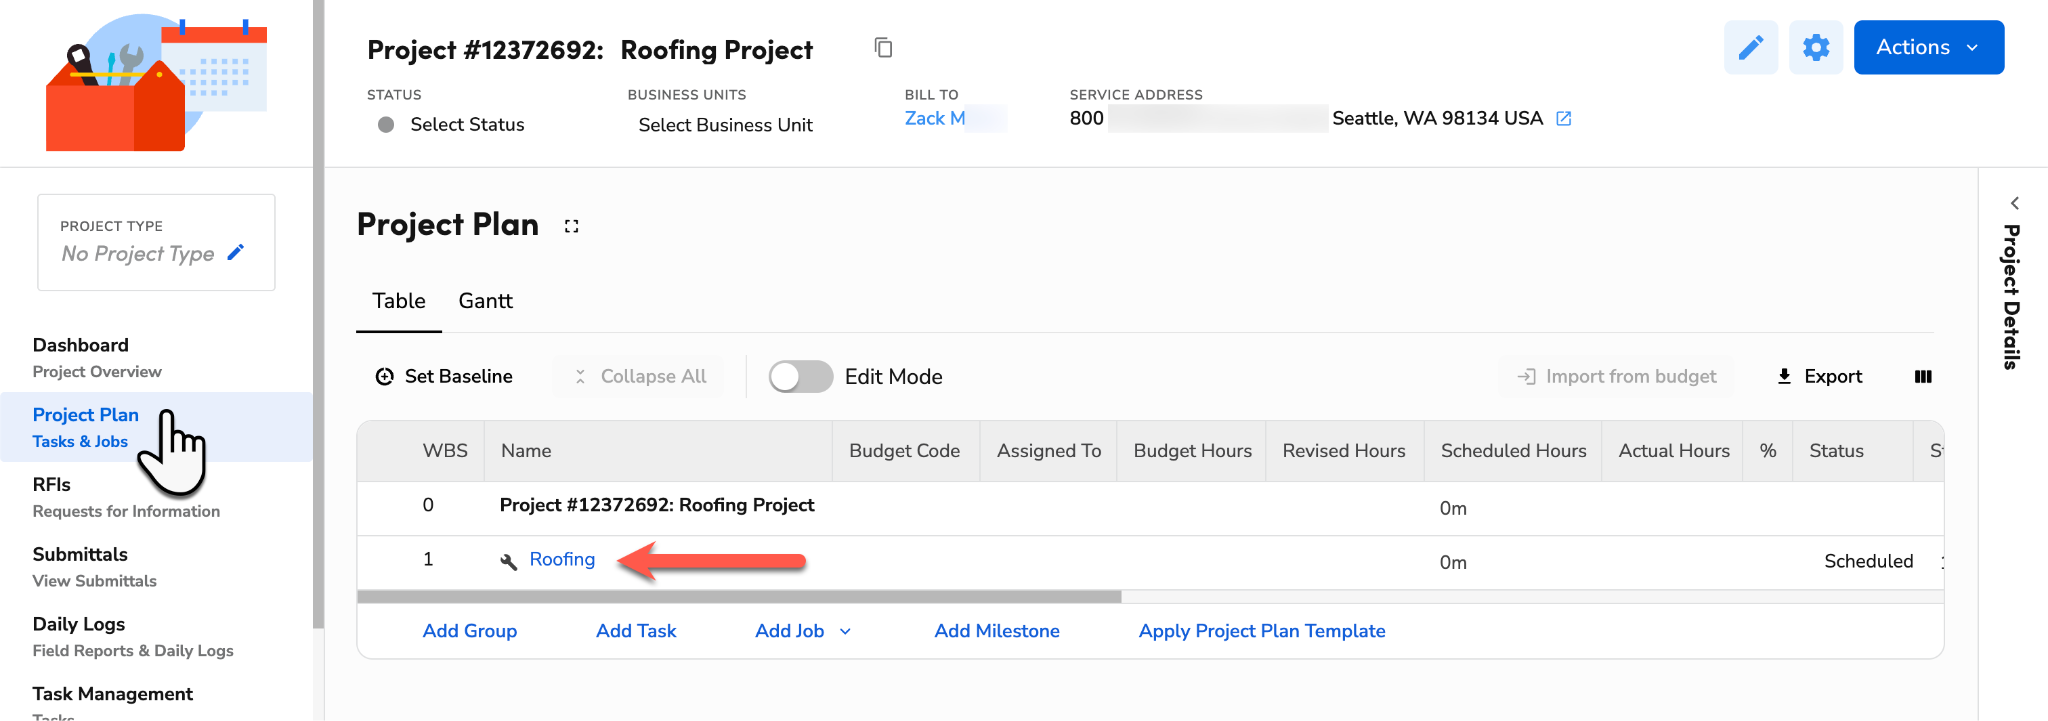
Note: If you don’t see the Project Plan section, see Show the Project Plan on a project type.
(Optional) Click Add Group to create a group, such as a trade, phase, building, or floor.
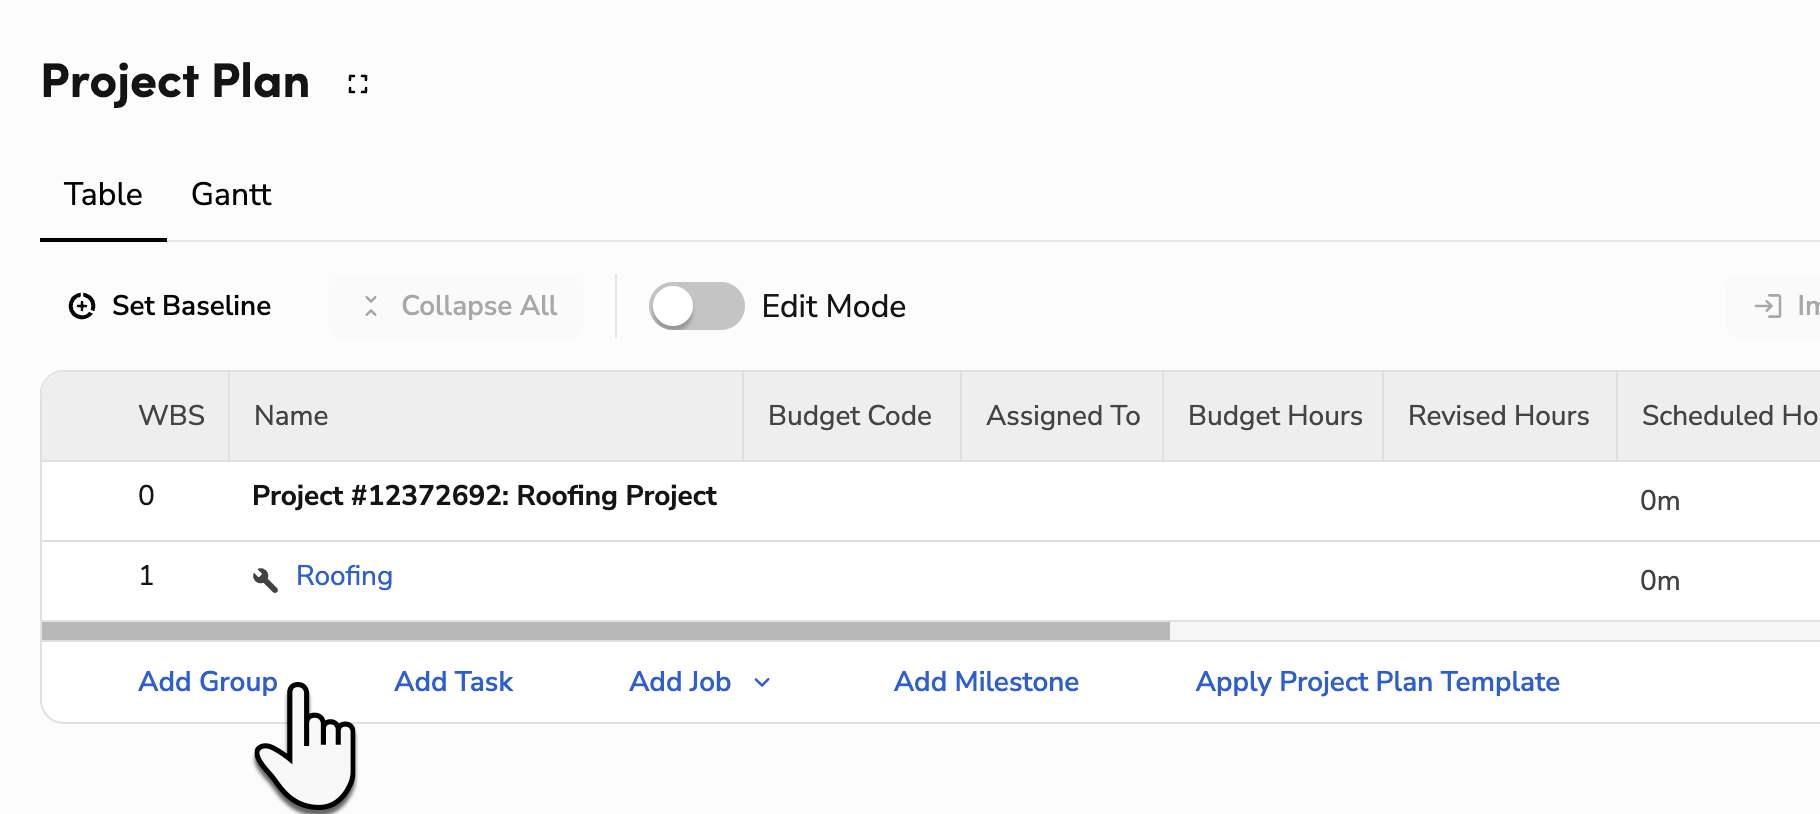
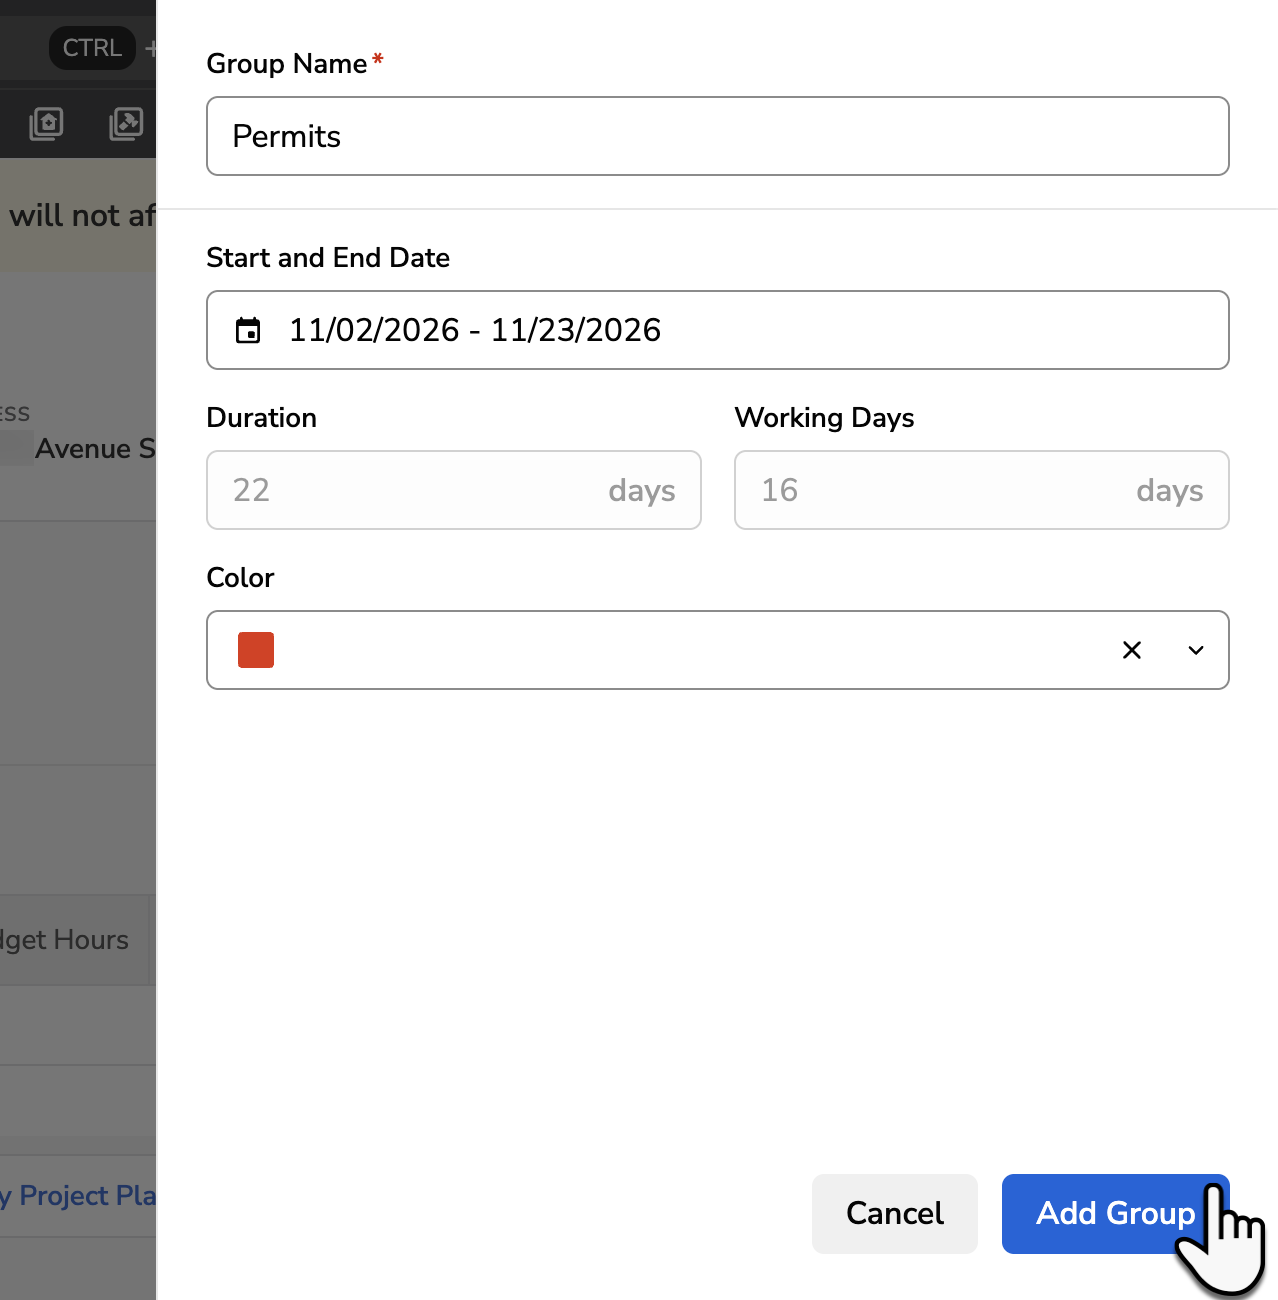
In the panel that opens, enter a Group Name and, optionally, a Start and End Date and Color. Duration and Working Days are automatically calculated from the dates.
Click Add Group to confirm your choices.
(Optional) Create subgroups by clicking More
on the group and selecting Group under Add. 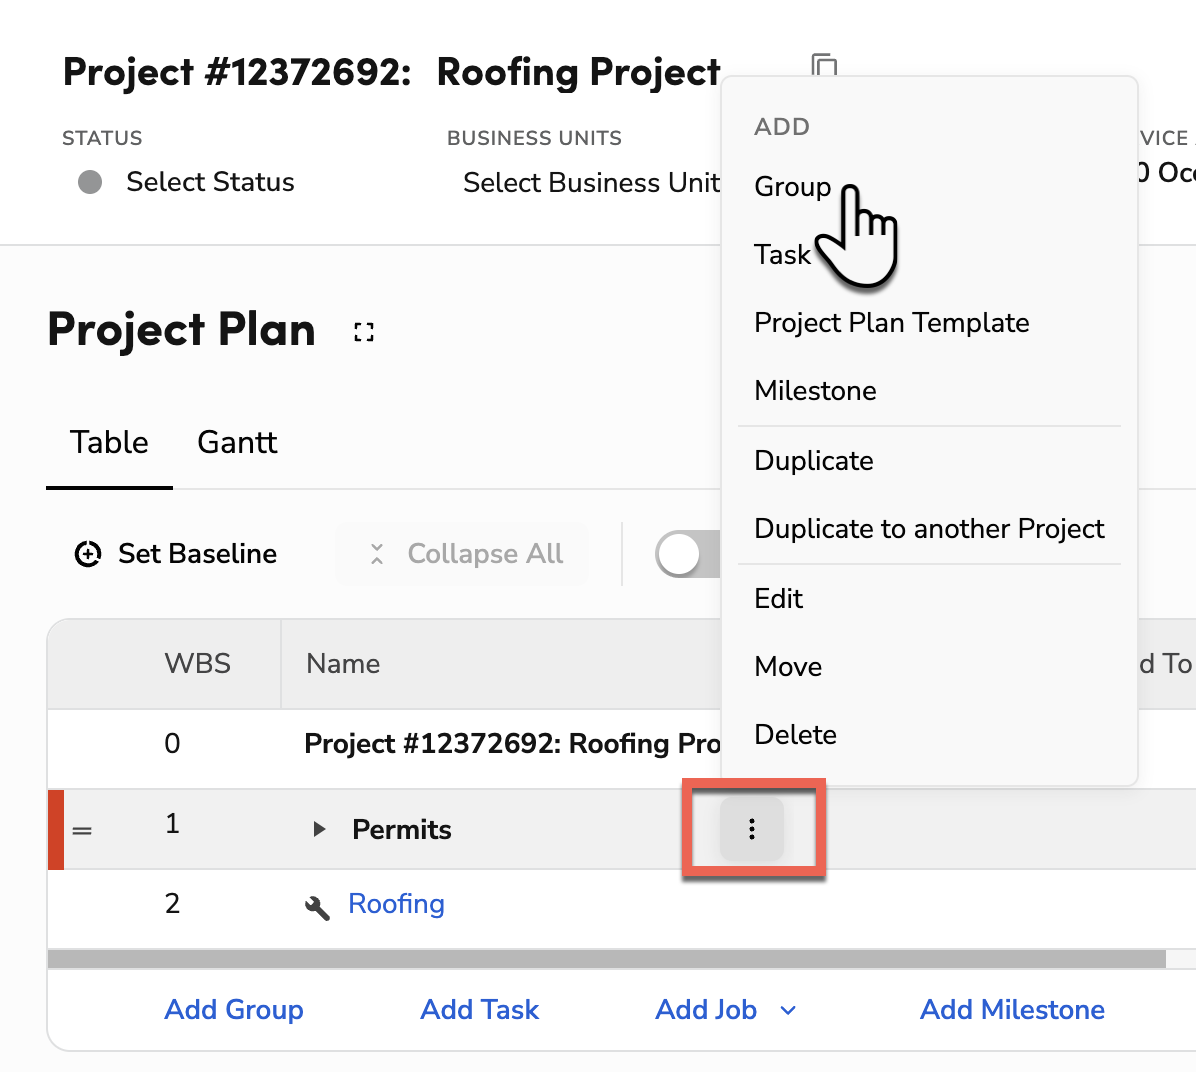
Note: Adding groups and subgroups is optional. If you don’t want to break down the project this way, you can just add a list of tasks without grouping them.
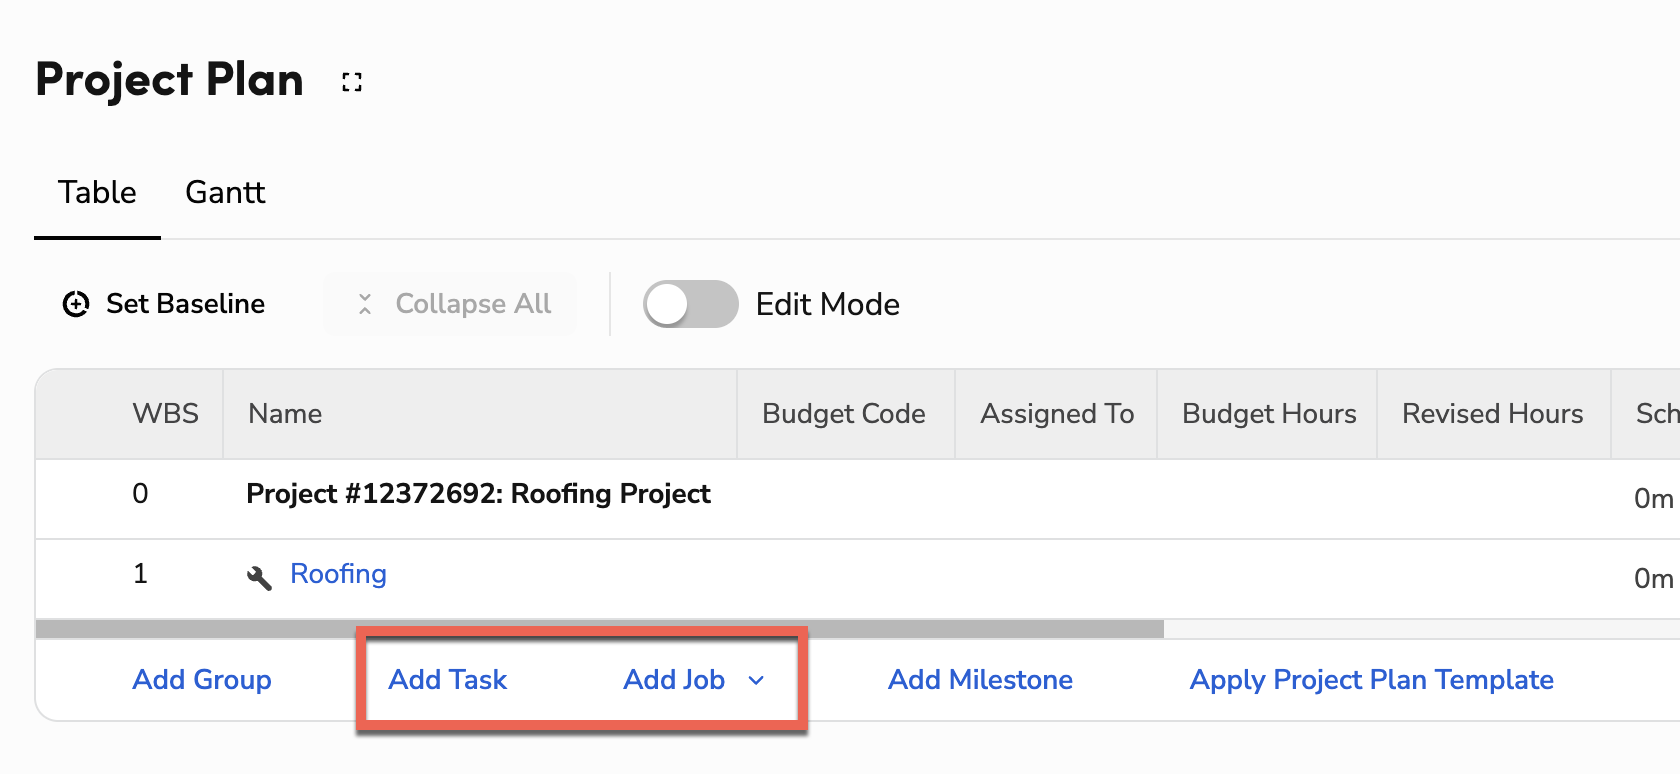
To add a new task or job to the plan, click Add Task or Add Job.
Tip: You can also add a task by clicking More
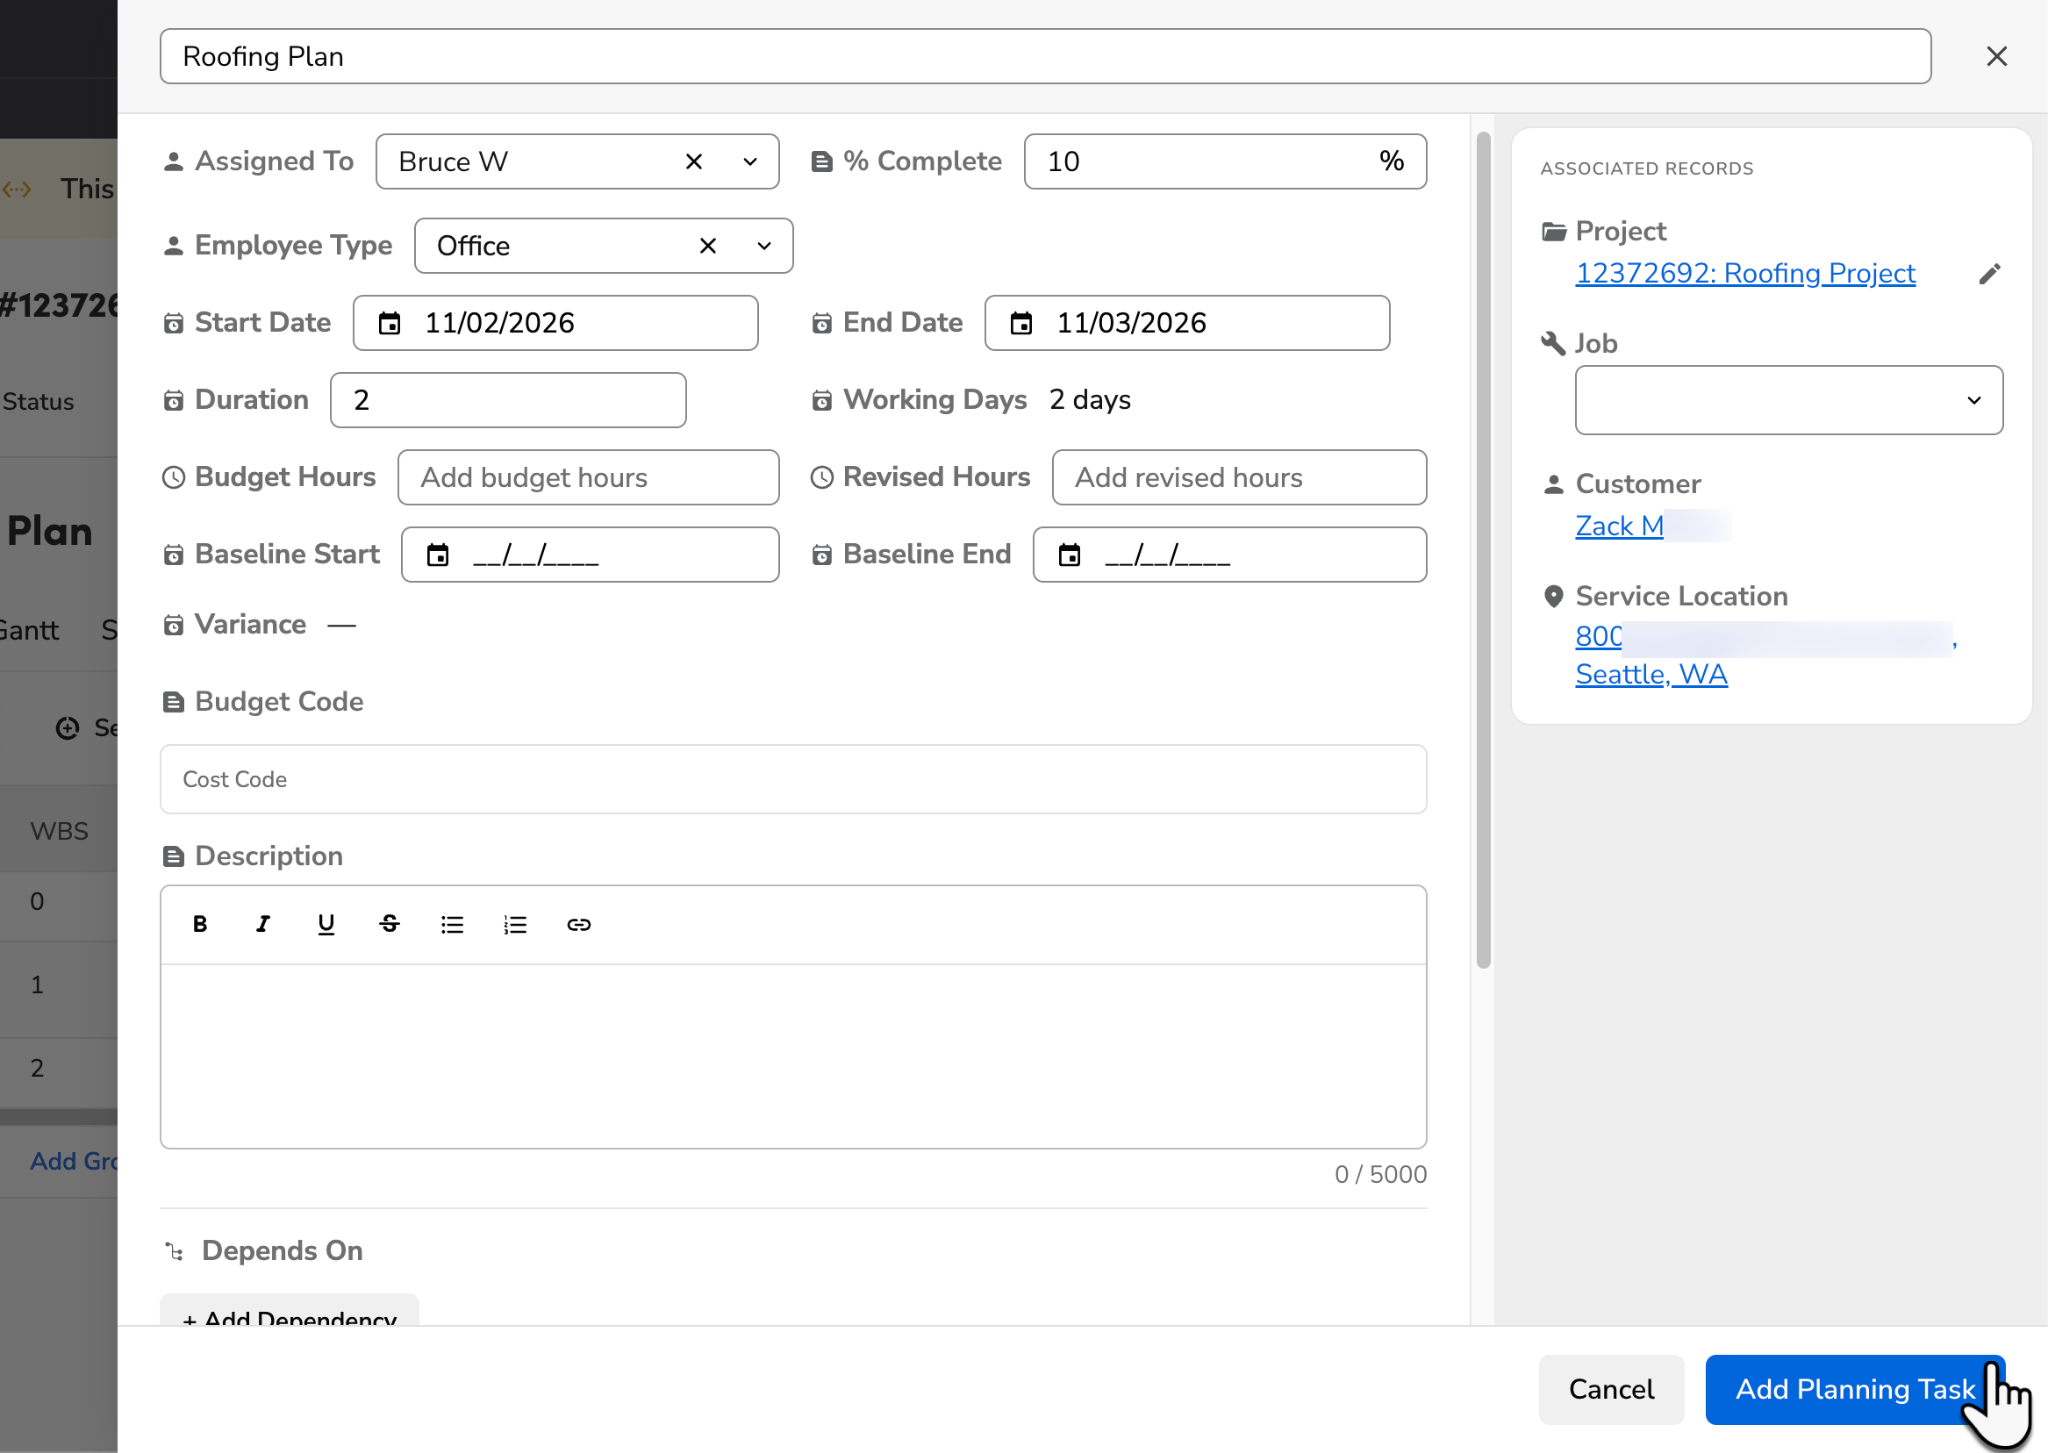
.Enter the task or job's details, then click Add. For Planning Tasks, enter a name for the task. In the task details, you can also enter:
Assigned To: Select an office employee or a technician.
Employee Type: Select Office or Technician. Selecting Technician makes it a technician task, which is the type the Field Mobile App shows by default.
% Complete: The percentage of the task that is currently finished.
Dates: Provide target start and end dates.
Description: Enter details about the task.
Subtasks: Break down the task further if needed.
When finished, click Add Planning Task.
To use a job template, select Add Job Template from the Add Job dropdown below the Project Plan.
Note: Templates require account configuration. See Project, job, and task templates overview for more information. Every project can use Job Templates, which add a set of jobs with their details already filled in. Other templates depend on how your project tracks tasks:
Projects that use Planning Tasks can use Project Plan templates, which reuse a set of groups, tasks, and milestones. See Apply a Project Plan template below.
Projects that use Task Management tasks can use Task Templates, which add a set of tasks with their details already filled in. To apply a Task Template, select Add Task Template from the Add Task dropdown below the Project Plan.
Repeat steps 3-9 until the plan is complete.
Add milestones in the Project Plan
Note: Requires Planning Tasks.
A milestone marks a key date in your project, such as an inspection or a handoff. A milestone has a single due date, shows as a diamond on the Gantt chart, and can be linked to tasks with dependencies.
Go to the Project Plan for your specific project.
Click Add Milestone at the bottom of the plan.
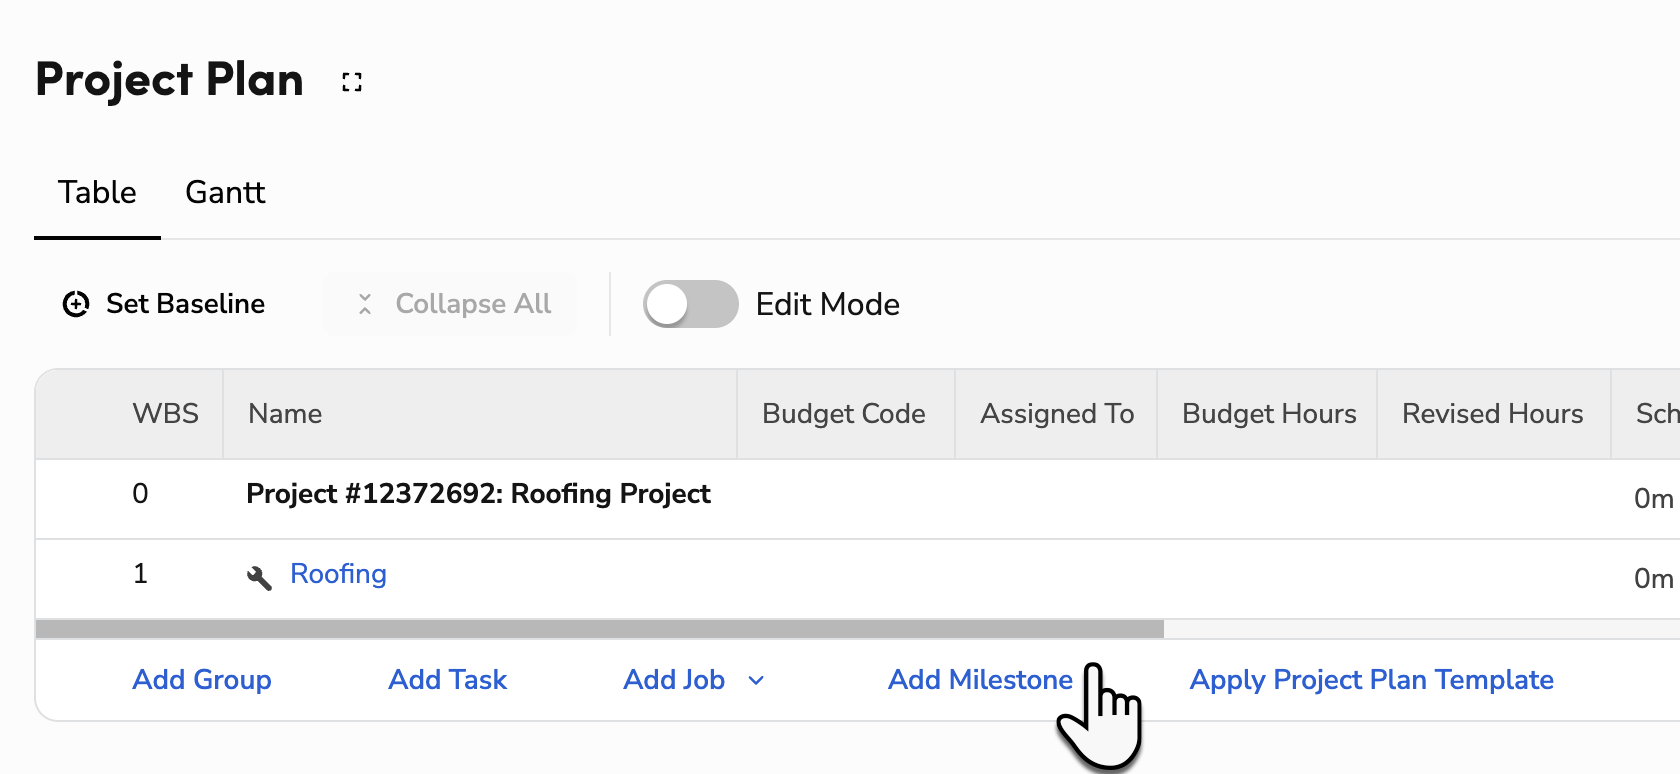
Note: To add a milestone inside a group, click More
for the group and select Milestone under Add.Enter a name and a Due Date. (Optional) Select who it’s Assigned To.
Click Add Milestone.
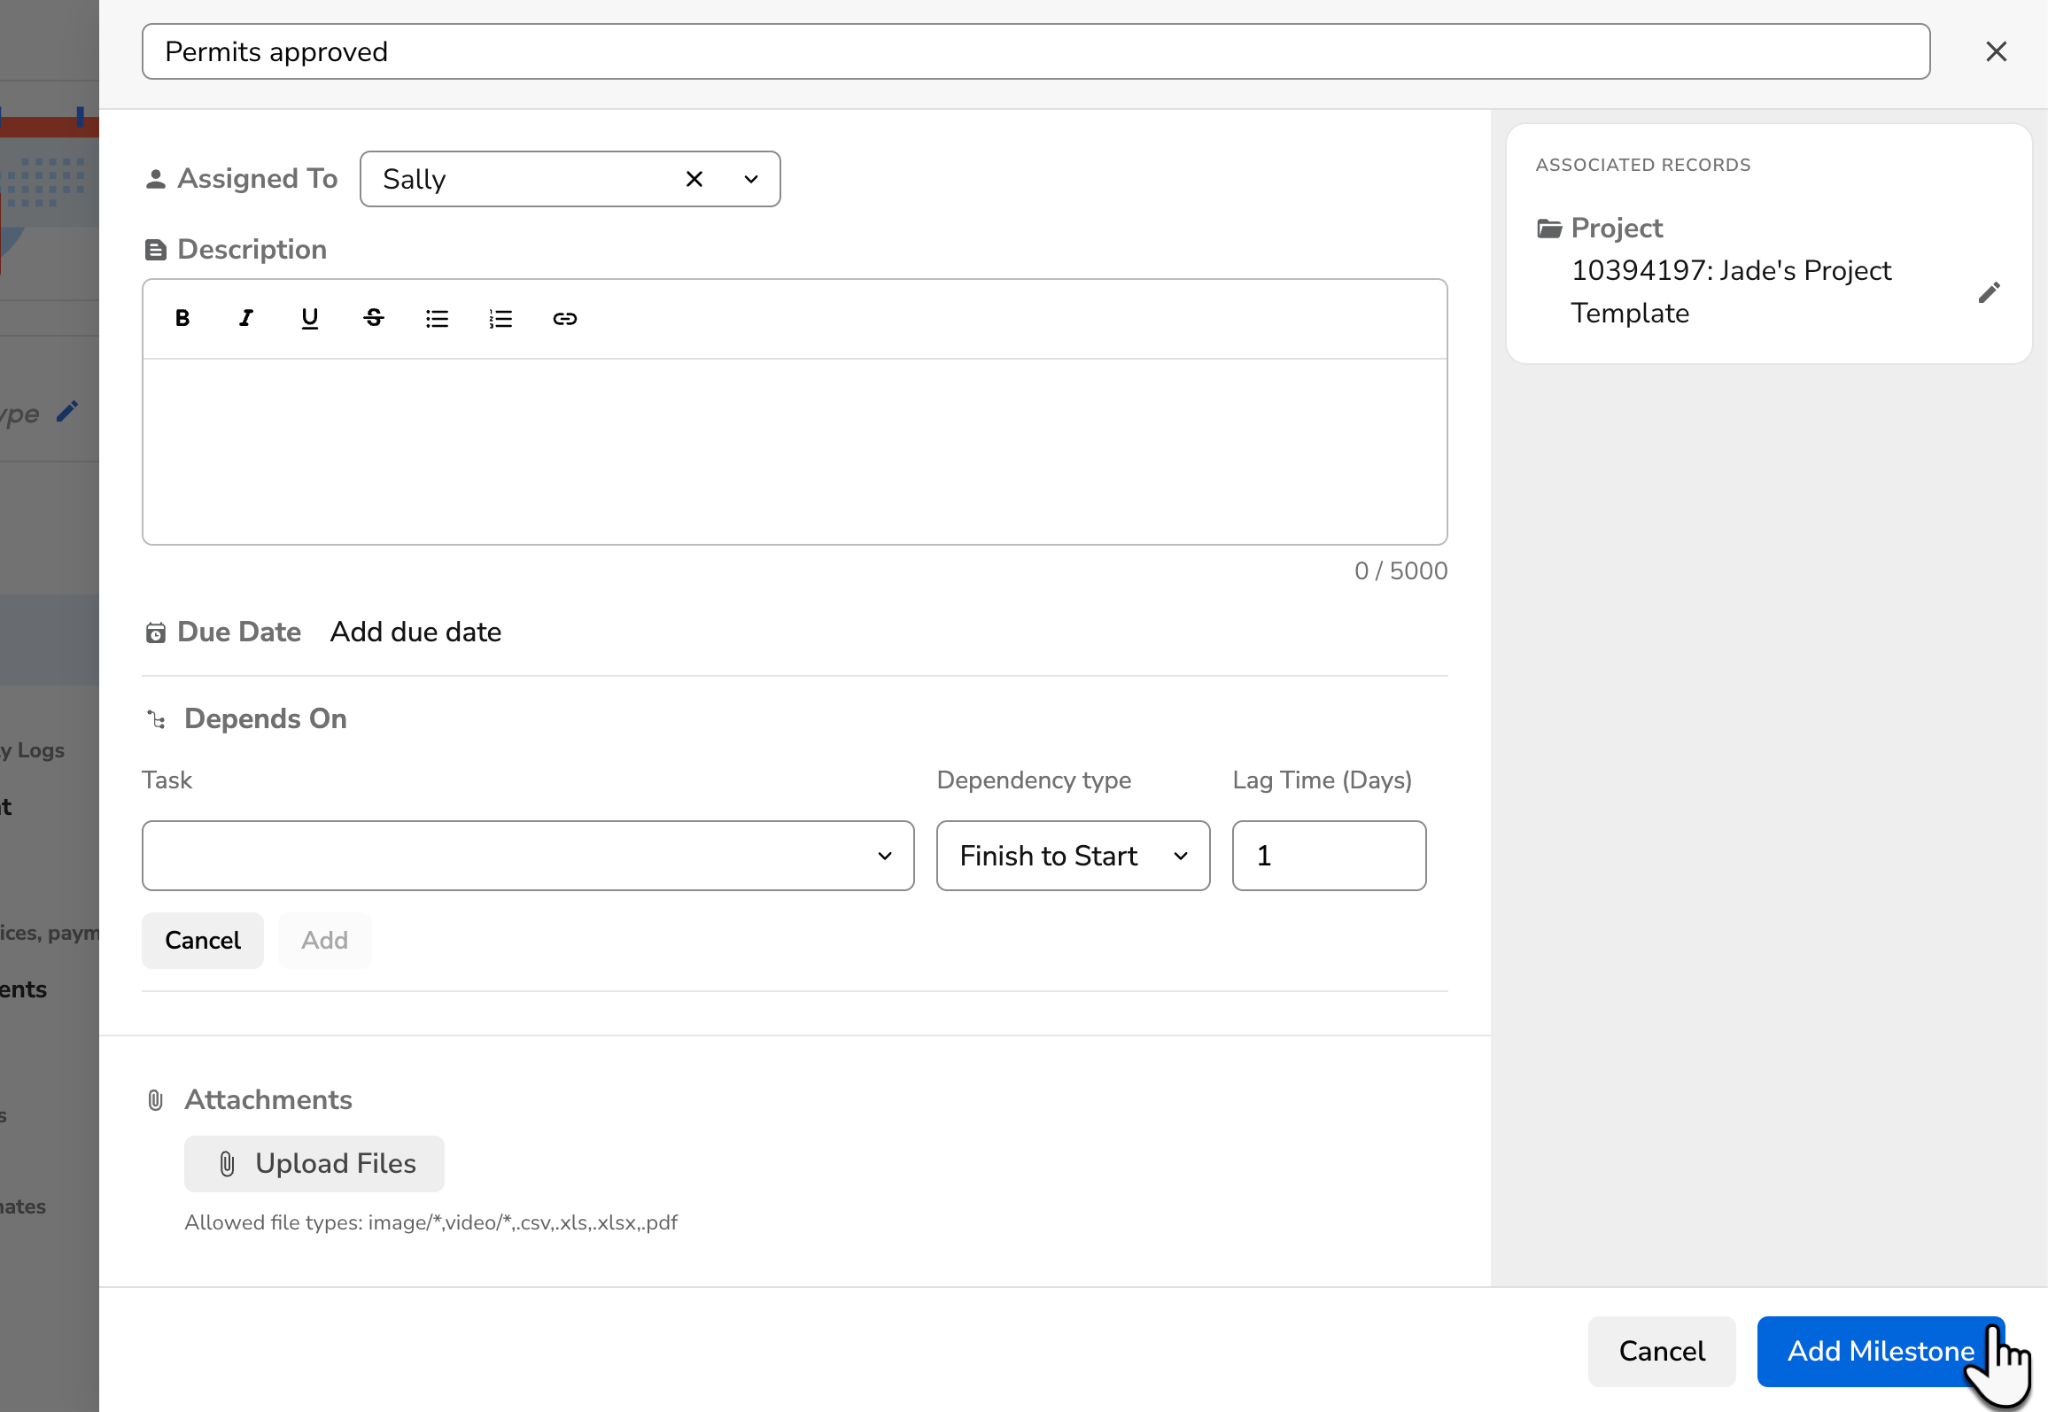
Note: A milestone can only be 0% or 100% complete.
Apply a Project Plan template
Note: Requires Planning Tasks. Templates also require account configuration.
To create a template, see Create a Project Plan template.
Go to the Project Plan for your specific project.
Click Apply Project Plan Template at the bottom of the plan.
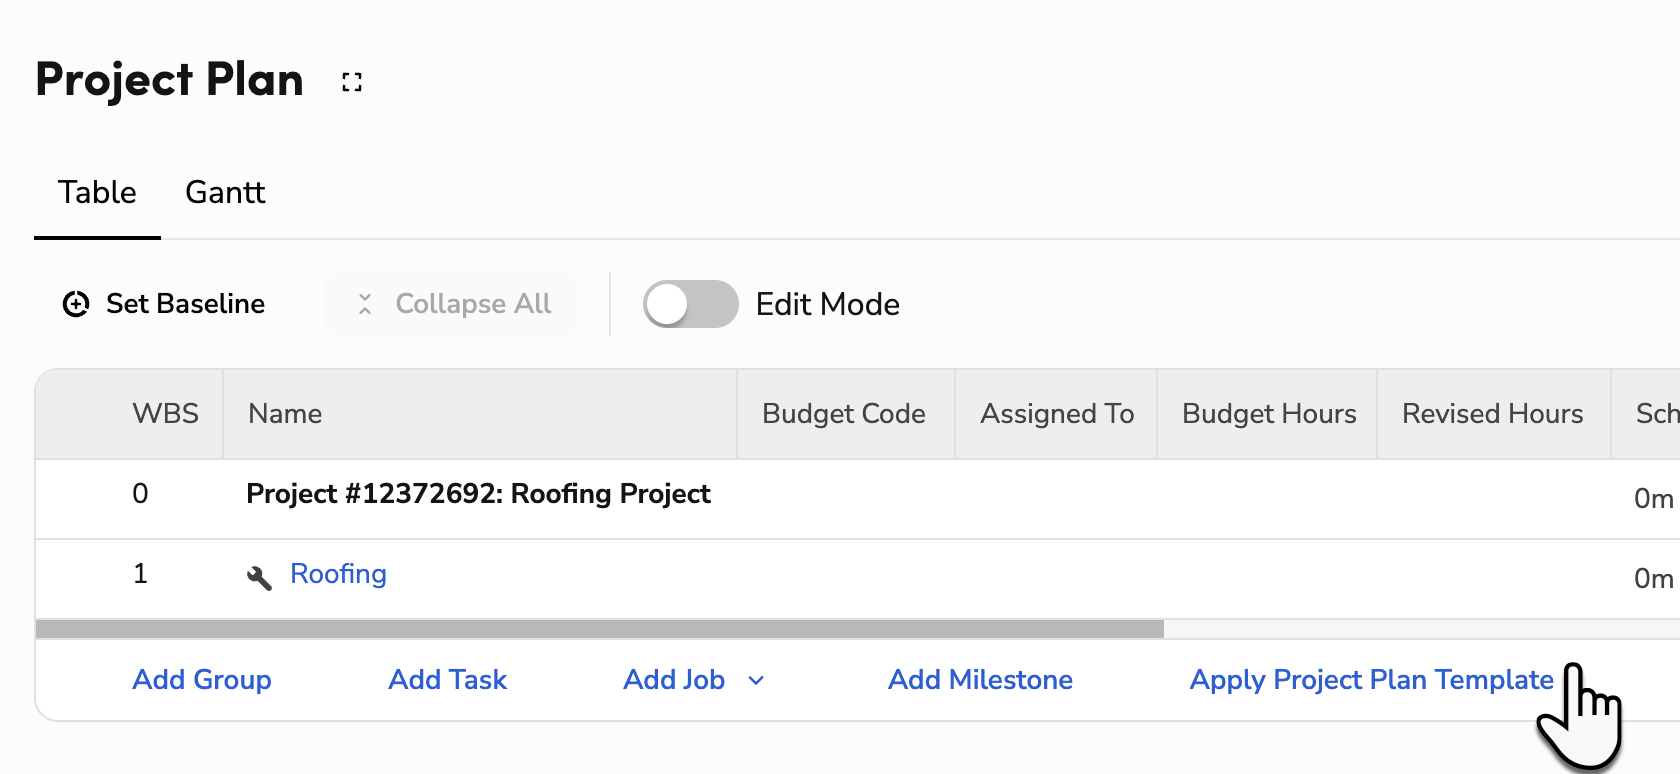
Note: To apply it inside a group, click More
for the group and select Project Plan Template under Add.Select an active Project Plan Template and, optionally, a Start Date, then click Apply.
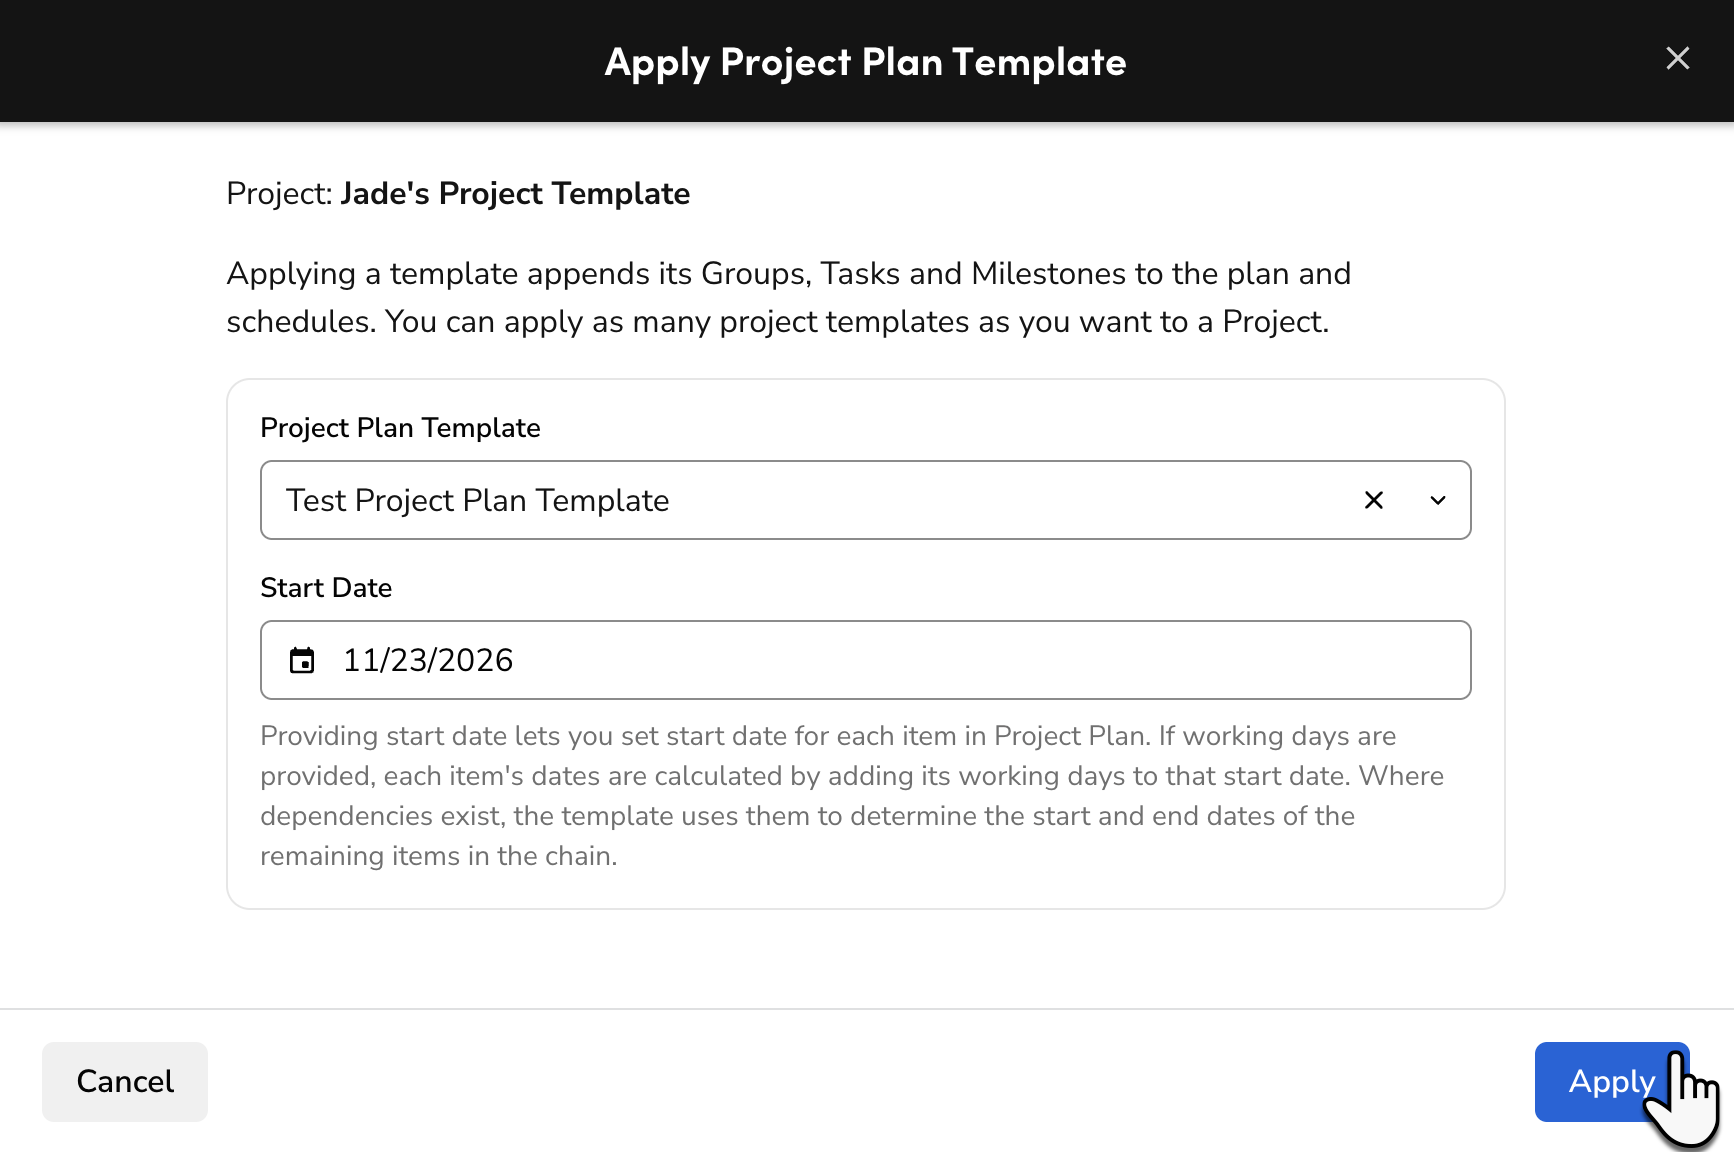
The template’s groups, tasks, and milestones are added with their dependencies and lag times, and their dates are calculated from the start date. The first task starts on the date you enter, and each later task gets its dates from its working days and dependencies. If you don’t enter a start date, the template’s items are added without dates, and their working days aren’t used. Their dependencies are still added.
Applying a template again adds another copy. If a task’s budget code can’t be placed in the project’s budget code structure, the template is still applied and a warning appears above the plan. Those tasks are added without that budget code, or with the group’s budget code instead.
Update a project plan
After you build a plan, you can move, reorder, edit, and reschedule its groups, tasks, milestones, and jobs.
Move an item to another group
Go to the Project Plan for your specific project.
To move an existing task or job into a group, click More
and select Move. 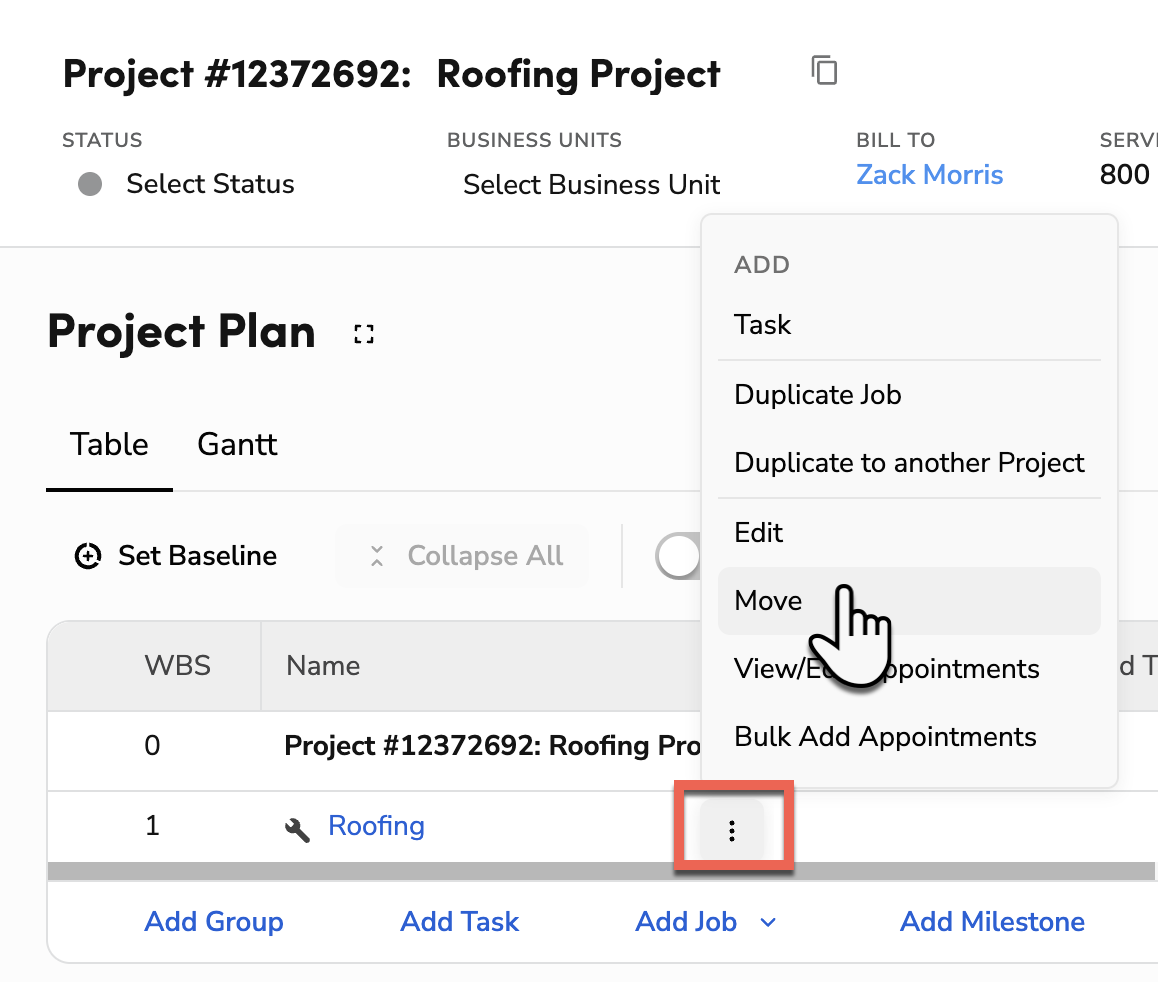
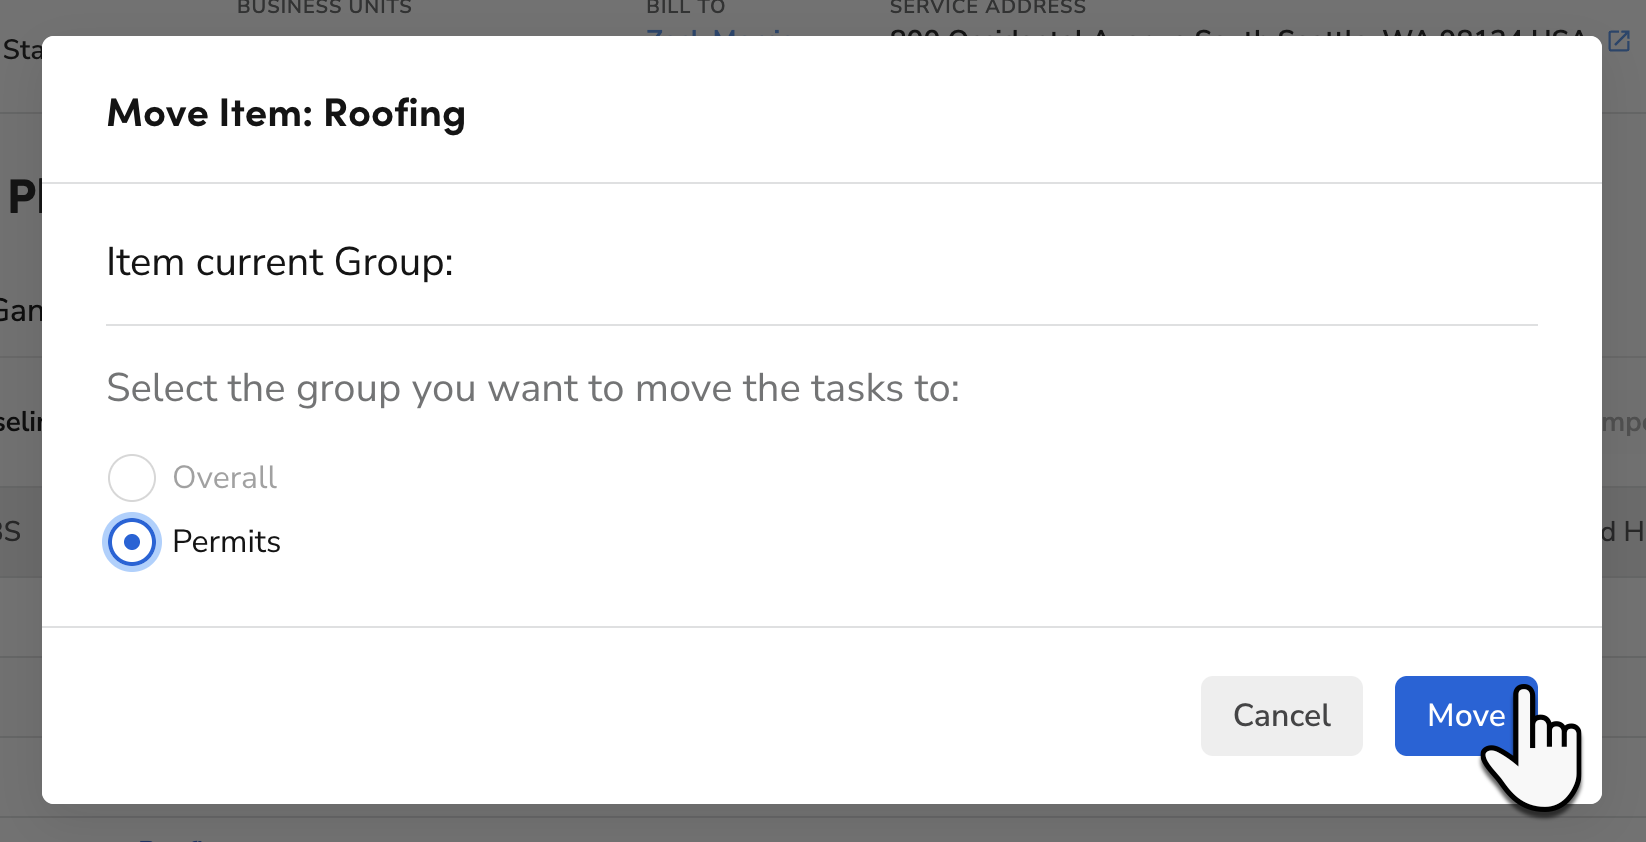
Select the group you want to move the task or job to, then click Move.
Tip: You can also move tasks, jobs, and groups by dragging and dropping them around the table.
Note:
You can move an item into any group or to the top of the plan, shown as Overall. You can’t move an item into a job or a milestone.
The item is added at the end of the group you choose. To change its position, drag it.
A Planning Task that belongs to a job stays in that job.
Groups imported from your budget codes can’t be moved.
Reorder items by dragging
Groups, tasks, and jobs can be moved and reordered by dragging and dropping them. Reordering requires dropping the item exactly where the cursor is.
Drag a row onto a group to put it inside that group, at the end. Drag it between two rows to put it in that position.
You don’t need to turn on Edit Mode to drag rows.
You can’t drop an item onto a task or a milestone.
If you drop an item into a group with a different budget code, you’re asked to confirm the move.
Only legacy tasks can be dropped into a job. Dragging on the Gantt chart changes dates, not position.
Use Edit Mode
To make bulk changes to the groups, tasks, and jobs in a project plan:
Go to the Project Plan for your specific project.
Turn on the Edit Mode toggle.
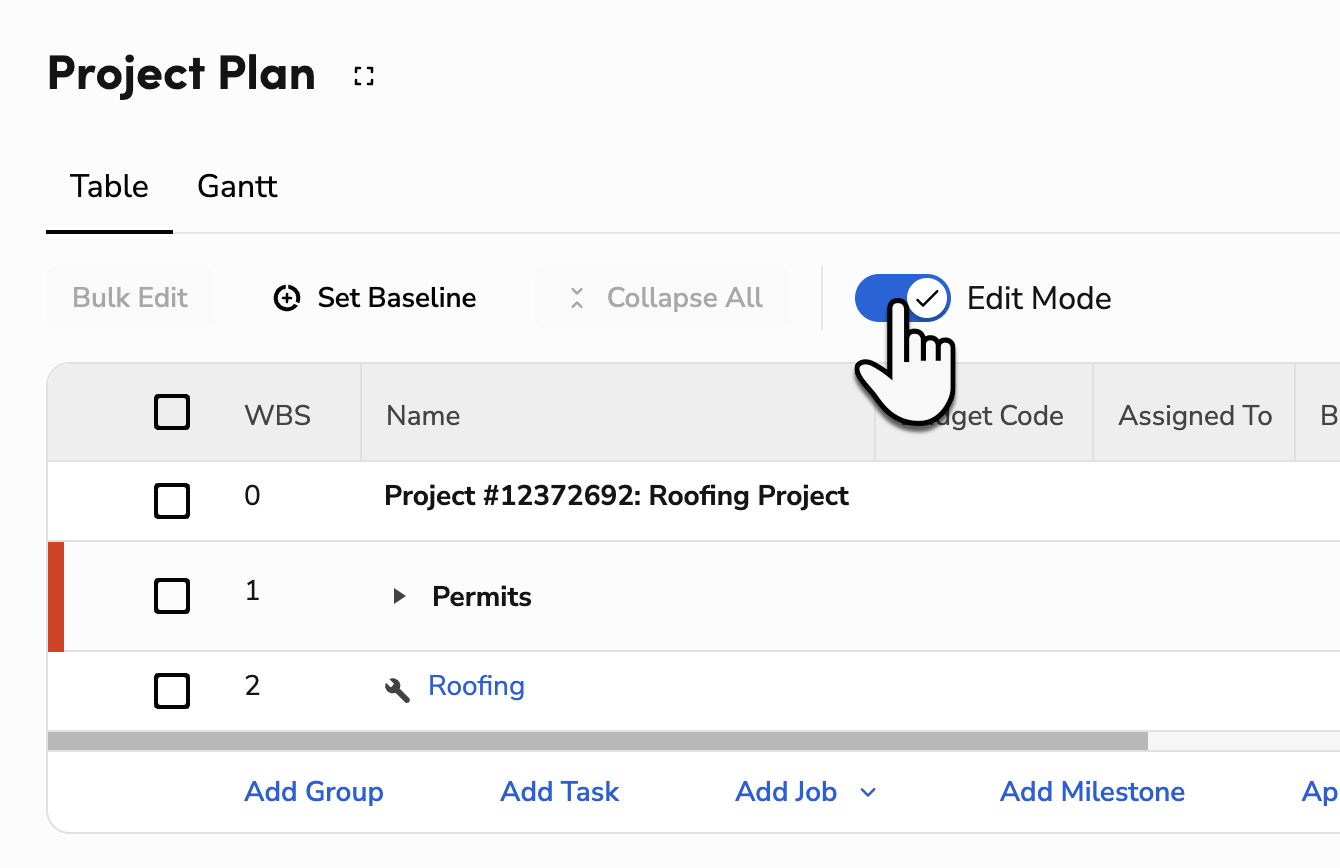
Click any fields with an Edit
 icon and make your changes.
Note: The Assigned To and Status fields for jobs can only be edited on the job record. To edit the Name field, change the job's job type.
When finished, turn off the Edit Mode toggle.
In Edit Mode, you can edit these columns, depending on the type of item. Some common columns you might edit are:
Name: all items except items imported from the budget.
Assigned To and Status: tasks and milestones. For jobs, these come from the job’s appointments.
% Complete, Start Date, and End Date: all items. A milestone can only be 0% or 100% complete.
Duration and Working Days: items with both dates. Working Days is editable only with Auto-Reschedule turned on.
Depends On, Baseline Start, Baseline End, Budget Hours, and Revised Hours: Planning Tasks.
Note: Dates locked by a strict dependency are read-only, and a job's dates must stay within its appointments.
Update task statuses in the Project Plan
Note: Requires Planning Tasks.
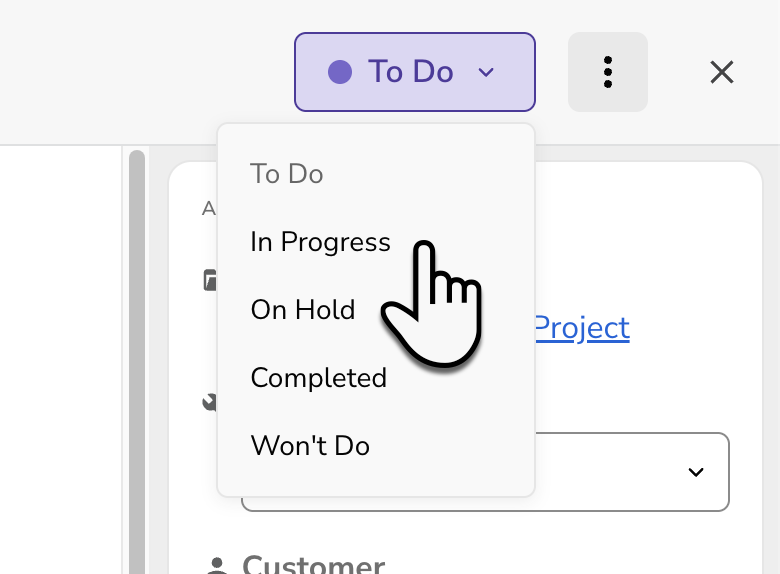
After you create a task, you can also edit it and choose its status (To Do, In Progress, On Hold, Completed, Won't Do).
Go to the Project Plan for your specific project.
Find the task you want and click More
> Edit. 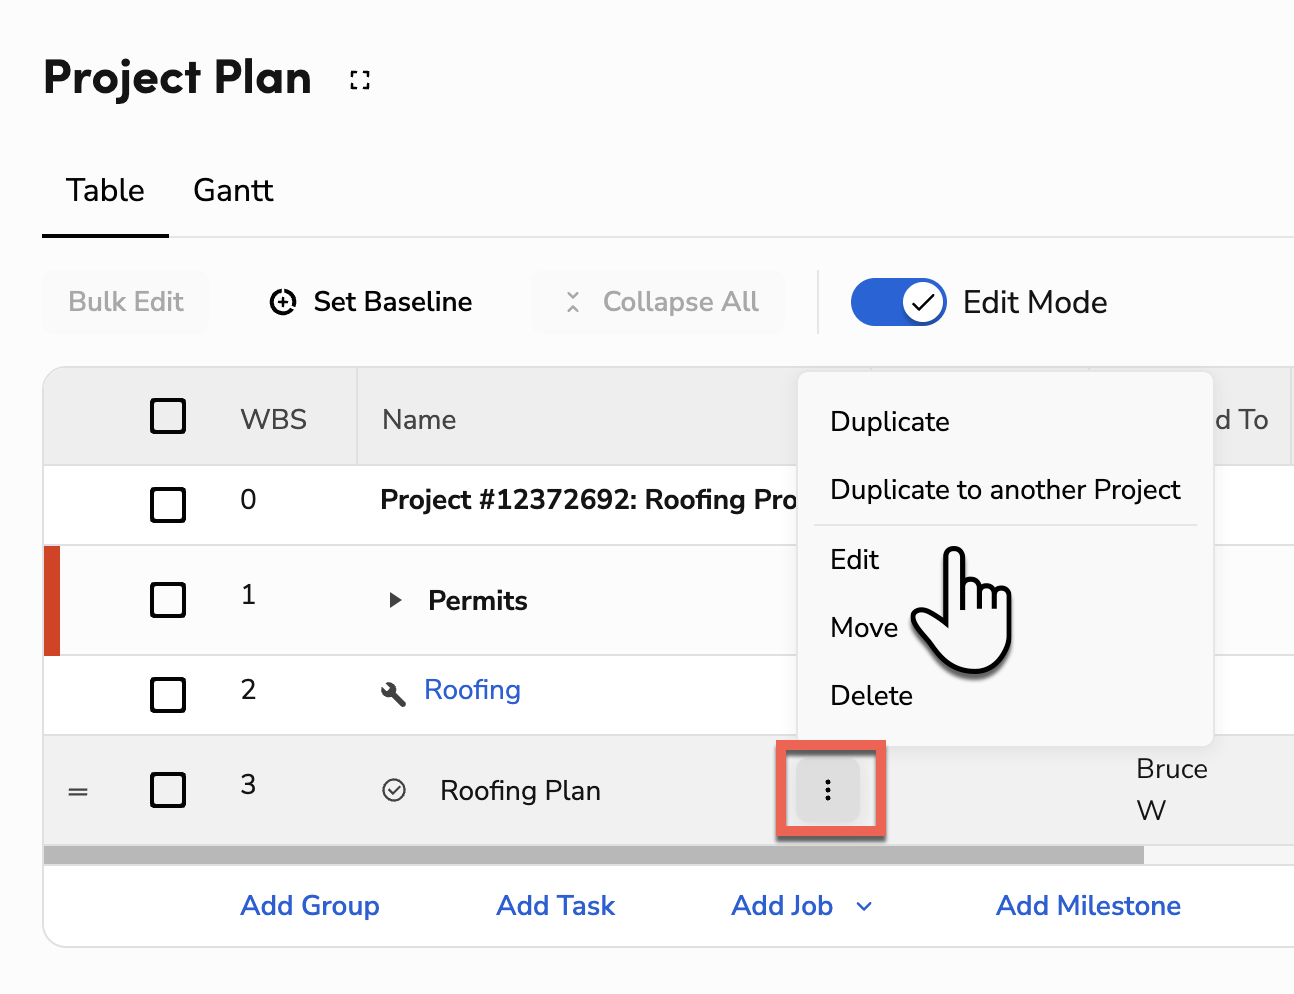
In the panel that opens, click the Status dropdown and select a status.
Note: If the task has a dependency and Hard Blocking is turned on for your account, you won't be able to change its status until the related predecessor task reaches the required status. For more, see Add dependencies between tasks below.
When you set a task to Won't Do, you can also record a reason. It appears in the task panel and in the Won't Do Reason column of the Project Plan table.
Tip: To mark a task complete without opening it, click the Check icon next to its name. Click it again to set it back to In Progress.
Edit an item’s details
To change more than one field of an item, click More for it and select Edit.
Groups open a panel where you can change the group’s name, status, dates, color, and other details. When finished, click Save.
Planning Tasks and milestones open the Task Details or Milestone Details panel. Changes are saved as you make them.
Jobs open the Edit Job panel. You need permission to edit jobs.
Tip: You can also click an item’s name in the Project Plan table to open its details. A job’s name opens the job in a new tab. Names can’t be clicked while Edit Mode is on.
Bulk edit tasks in the Project Plan
Note: Requires Planning Tasks.
Use bulk edit to update the status, assignee, or percent complete for multiple items in your Project Plan at the same time, without opening each one individually.
Note: If you select different items like jobs and tasks for bulk editing, some fields won't be editable because they only apply to one type of item. For example, if you select jobs and tasks, you won't be able to edit Assigned To or Status because job statuses are pulled from actions taken on the job and technicians assigned to the appointments.
Go to the Project Plan for your specific project.
Turn on the Edit Mode toggle.
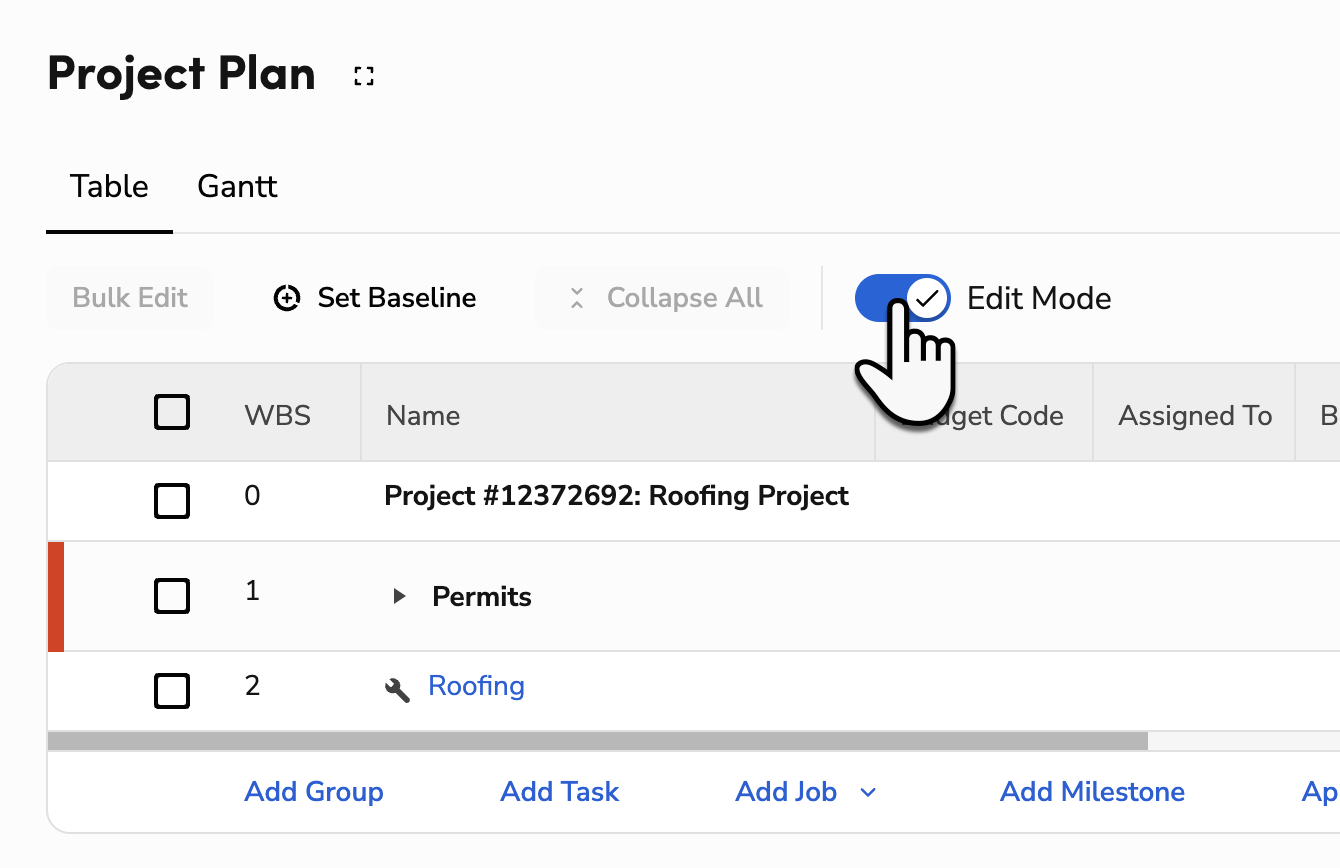
Select the checkboxes next to the items you want to edit. The Bulk Edit button appears in the toolbar.
Tip: To select all items, select the checkbox in the column header row.
Click Bulk Edit.
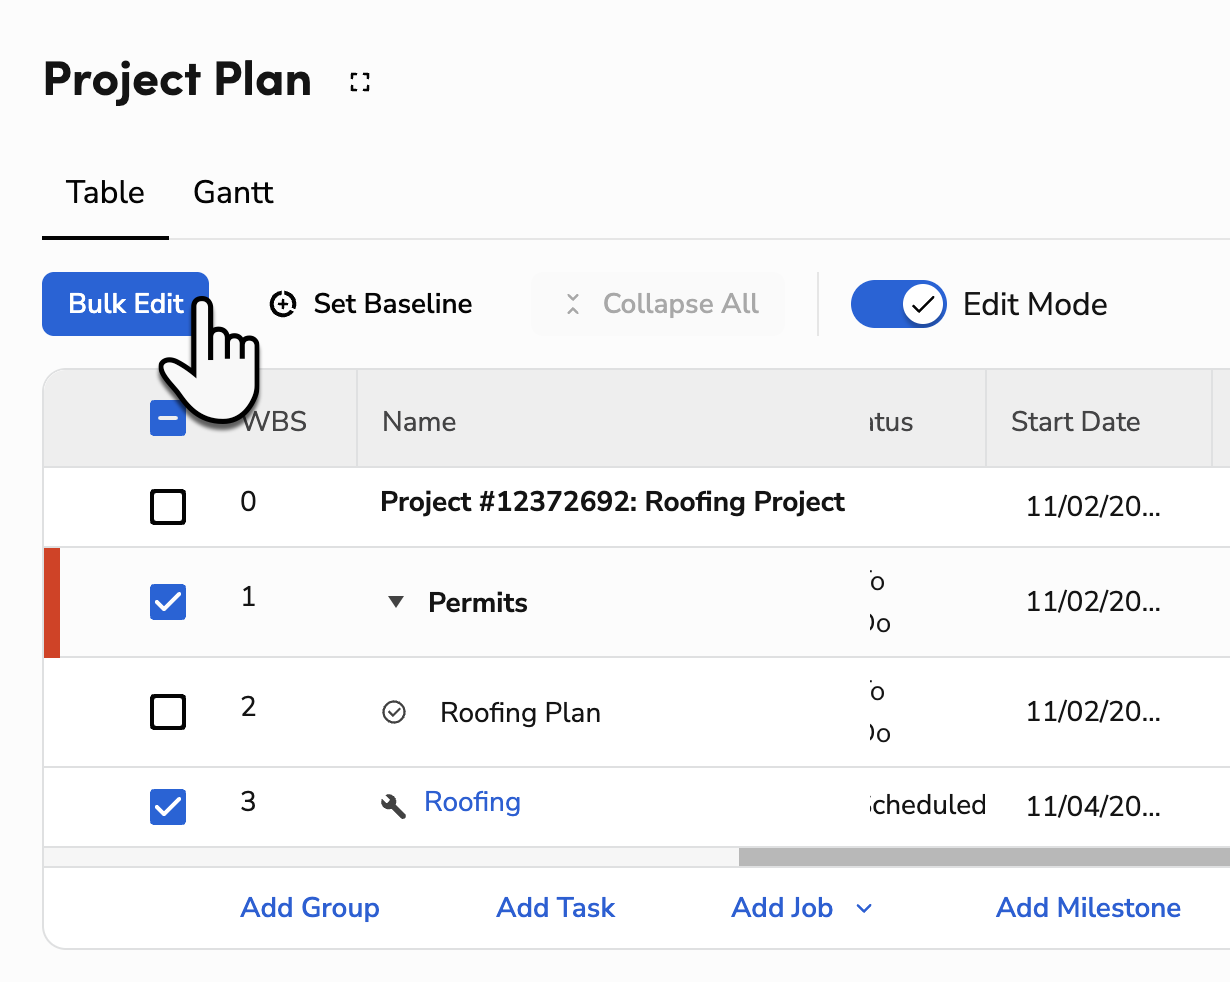
In the Bulk Edit panel that opens, update any of the following fields:
Status
Assigned To
Percent Complete
Note: Only the fields you change will be applied. Any field left as Keep as is remains unchanged on each selected item.
When finished, click Save, then turn off the Edit Mode toggle.
Manage tasks using the Gantt chart in the Project Plan
The Gantt chart provides a visual representation of your project timeline and allows for quick scheduling adjustments.
Go to the Project Plan for your specific project.
Click the Gantt tab.
To extend a timeline, click and drag the edge of a task bar.
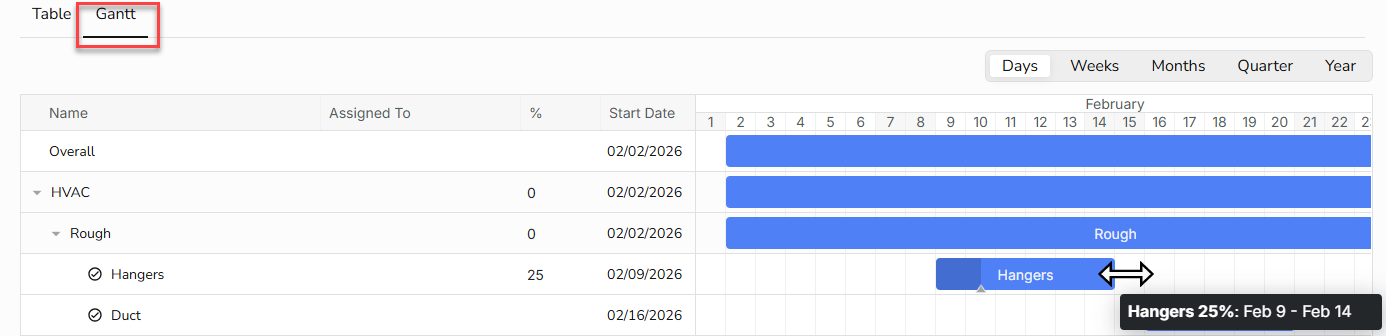
To reschedule a task or group, click and drag the entire bar to shift the dates completely.
Note: If Auto-Reschedule or Always Synced is turned on, dragging a group's bar shifts every child task and nested subgroup by the same number of working days, keeping their relative spacing intact. Tasks linked by a dependency also recalculate automatically. For more, see Set start and end date logic and Add dependencies between tasks.
Add dependencies between tasks in the Project Plan
Note: Requires Planning Tasks.
Dependencies let you link tasks and milestones so the schedule reflects which items rely on others to start or finish.
Dependency types
Finish to Start (FS): The most common type. A task can't start until its predecessor finishes. Default lag time: 1 day.
Start to Start (SS): A task can't start until its predecessor starts. Default lag time: 0 days.
Finish to Finish (FF): A task can't finish until its predecessor finishes. Default lag time: 0 days.
Start to Finish (SF): A task can't finish until its predecessor starts. Default lag time: 0 days.
Lag time is a built-in delay (in working days) between a task and its predecessor. For example, you might add a day to let paint or cement dry before the next task can begin. You can set a lag time for each dependency. Lag time can’t be negative. A task can have more than one dependency (1:many), and circular dependencies aren't allowed. For example, if Task B depends on Task A, you can't also make Task A depend on Task B.
To choose whether dependencies block status changes, see Set up dependency blocking. To choose how dependencies move dates, see Choose how dependencies move dates.
Add a dependency from the task details
Go to the Project Plan for your specific project.
Find the task you want and click More
> Edit.Click + Add Dependency.
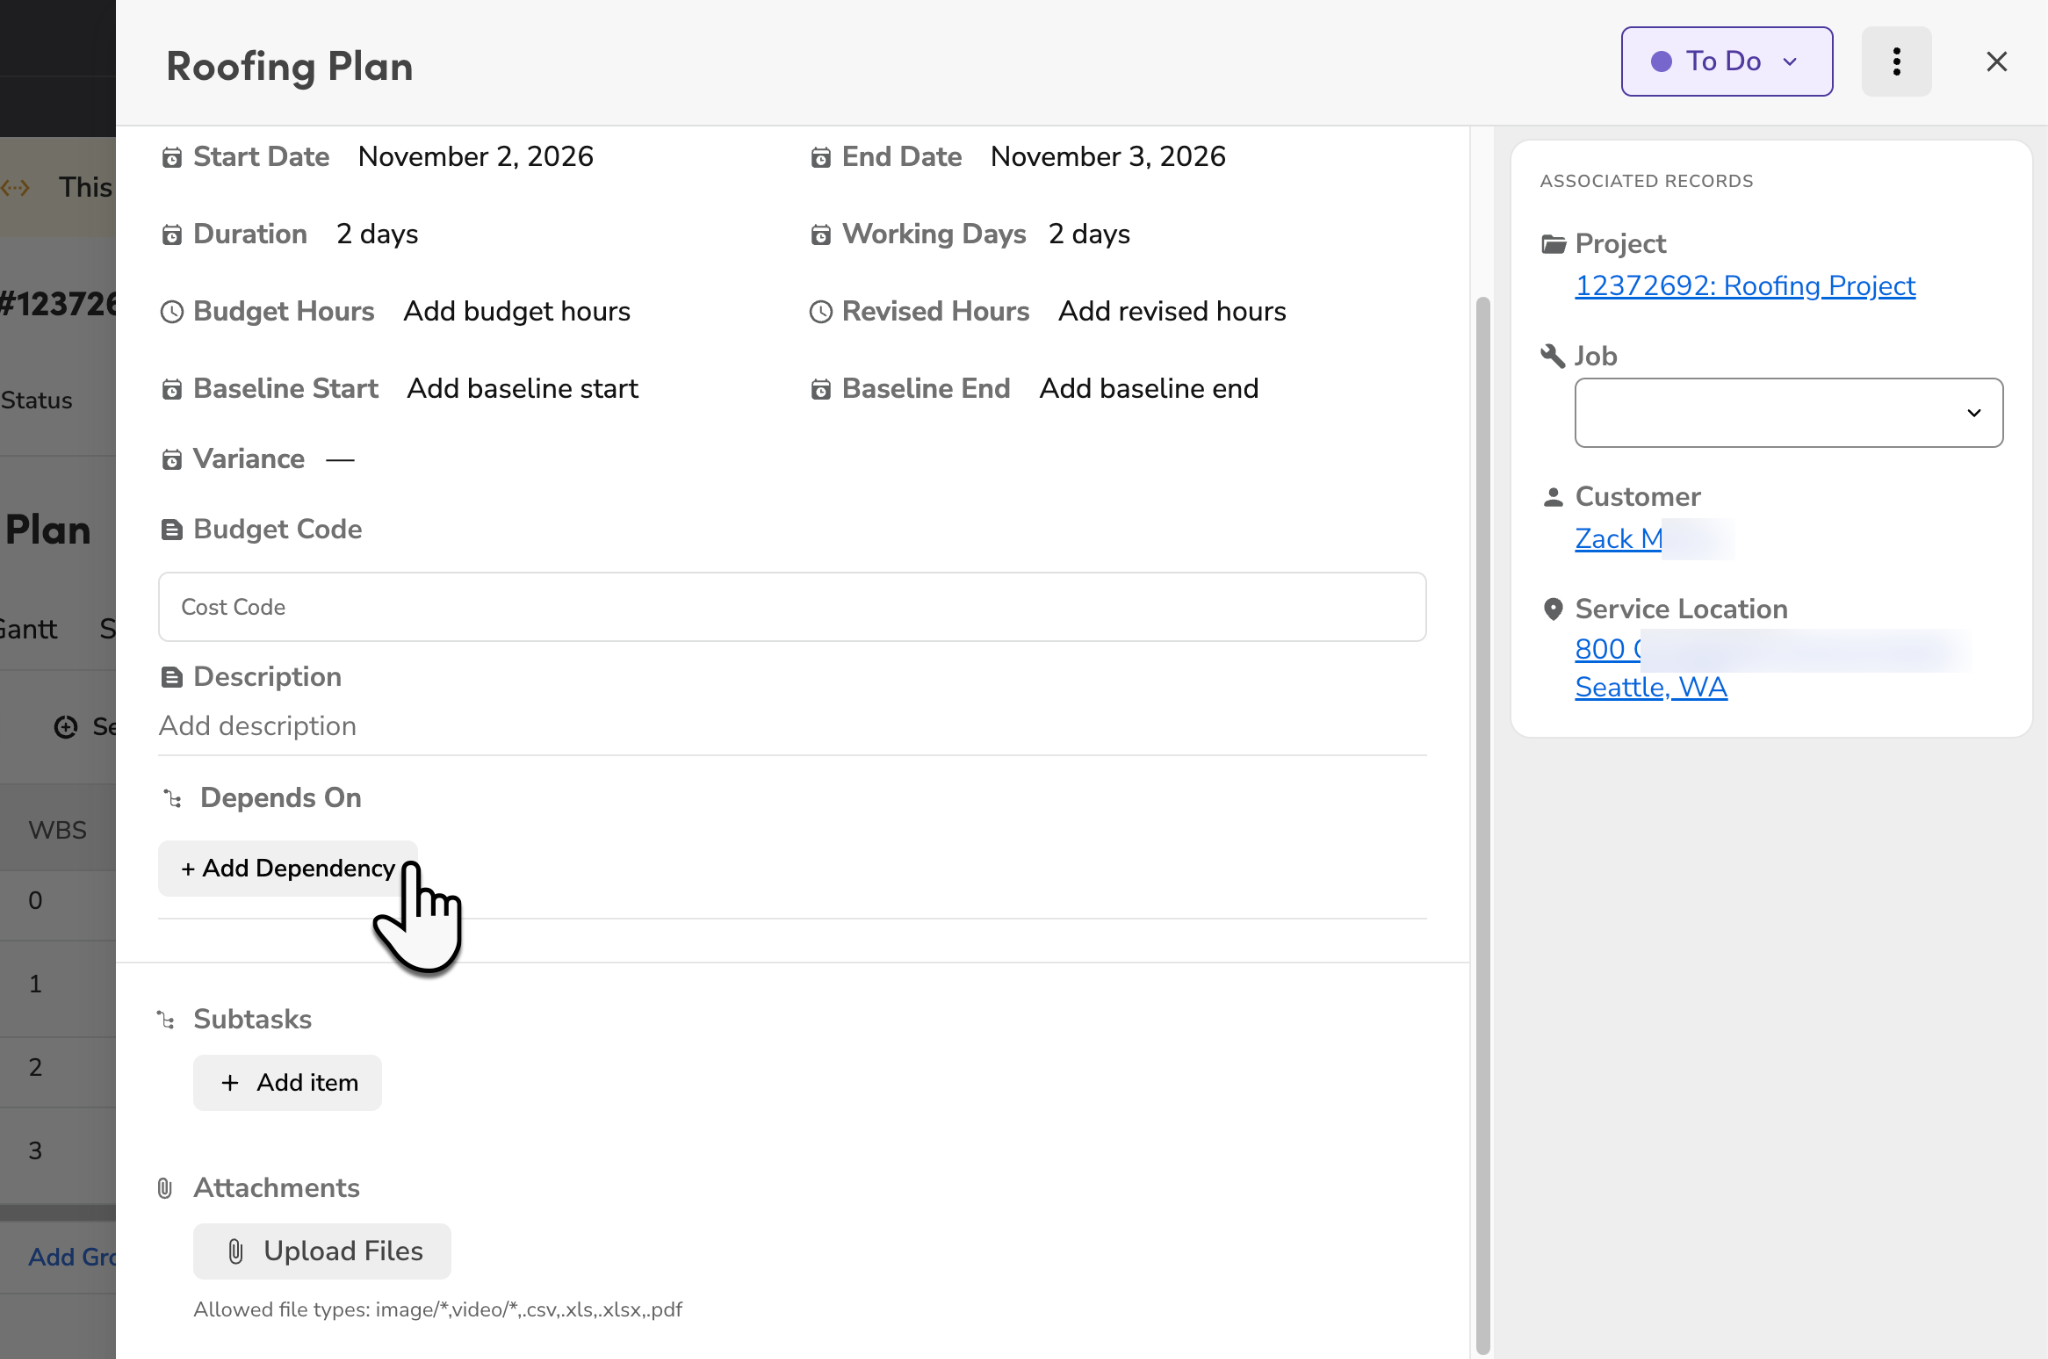
Choose the dependency type.
(Optional) Adjust the lag time. It defaults to 1 day for Finish to Start dependencies and 0 days for all other types.
When finished, click Add.
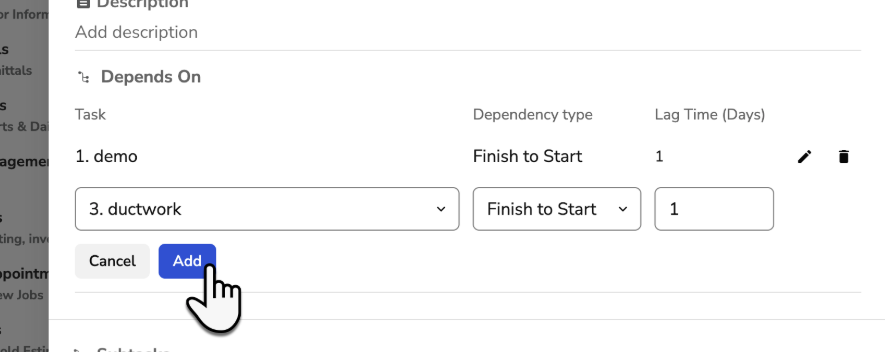
Add a dependency from the Project Plan table
Go to the Project Plan for your specific project.
Turn on the Edit Mode toggle.
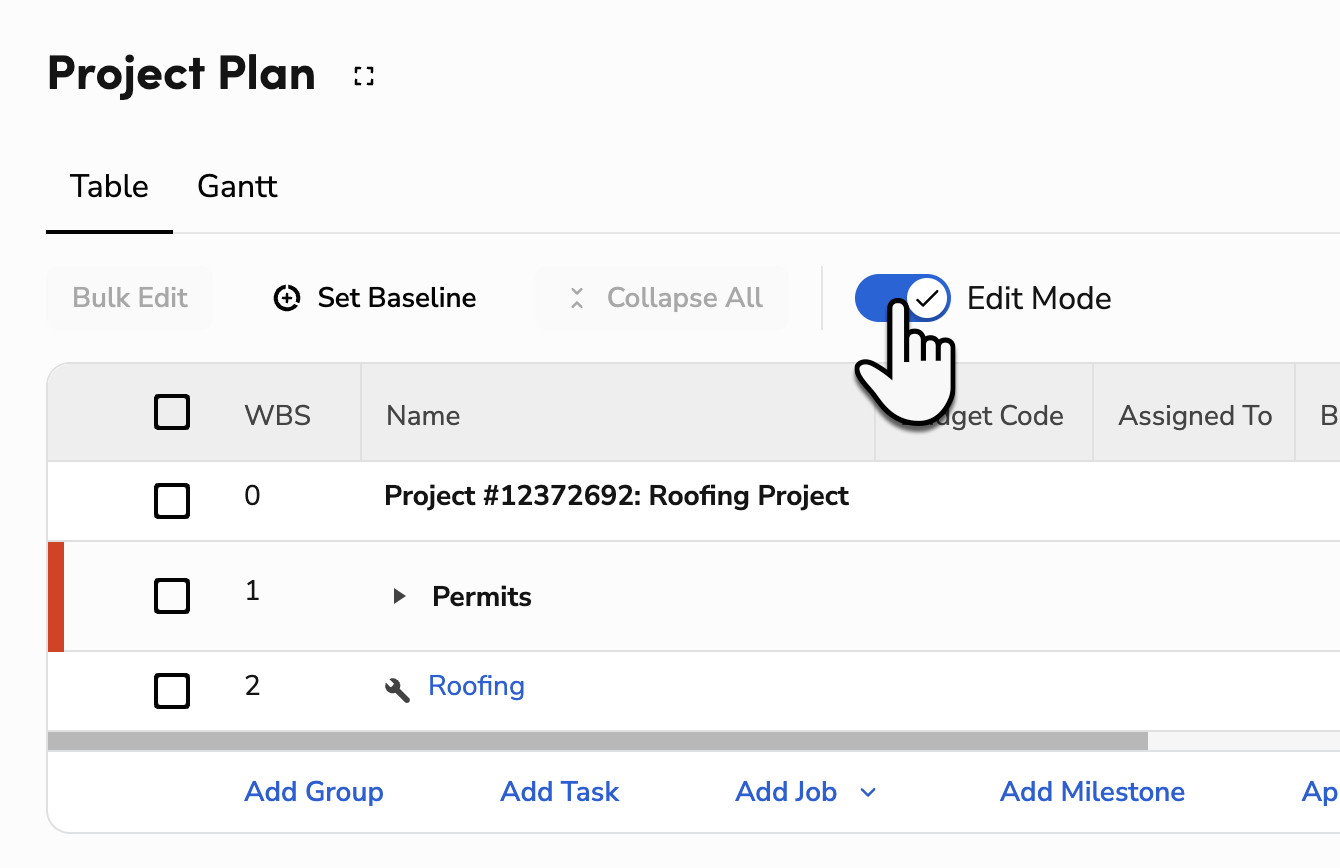
Click the Depends On cell for the task or milestone you want.
Click Add Depends On, then choose the Task Name, the dependency type under Depends On, and the Lag Time.
When finished, click Save.
Tip: Click Remove all to clear every dependency for that task.
Add or remove a dependency from the Gantt chart
You can also view, create, and delete dependencies directly from the Gantt chart:
Go to the Project Plan for your specific project.
Click the Gantt tab.
Hover over a task bar to reveal connection points at its start and end.
Click and drag from one task's connection point to another task to create a dependency between them. This defaults to a 1-day lag time for a Finish to Start dependency, or 0 days for any other type.
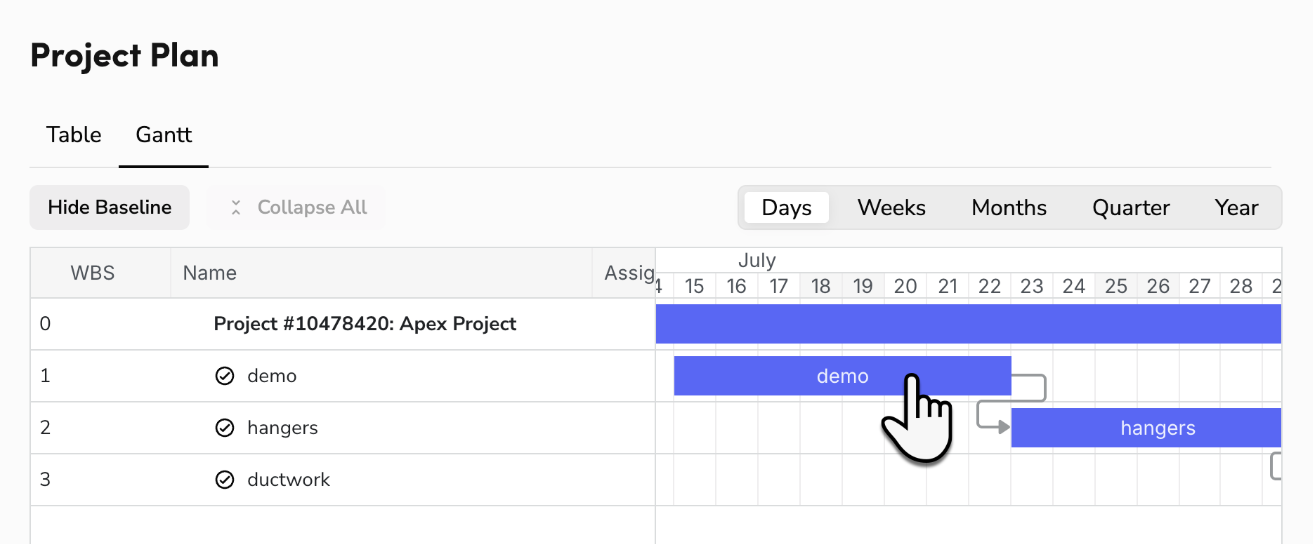
To remove a dependency, double-click its arrow in the Gantt chart, then select Ok to confirm. 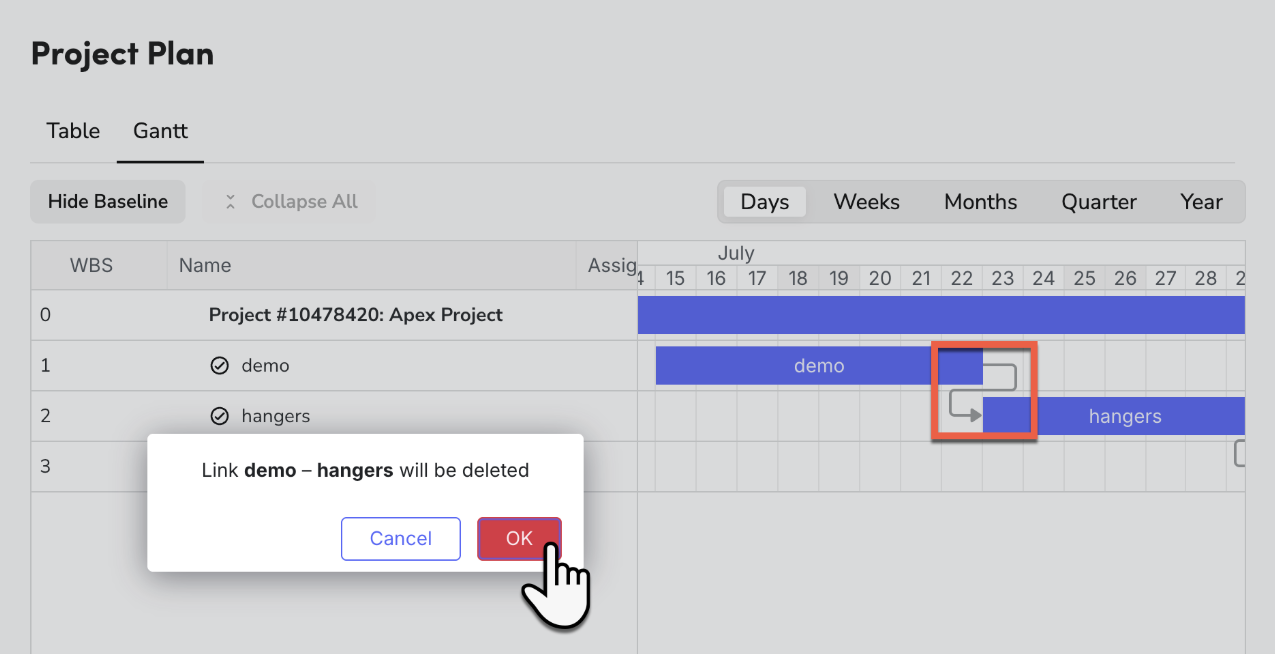
Dependency arrows on the Gantt chart indicate the dependency type by which end of each bar they connect:
Finish to Start: The arrow runs from the end of the predecessor's bar to the start of the dependent task's bar.
Start to Start: The arrow runs from the start of one bar to the start of the other.
Finish to Finish: The arrow runs from the end of one bar to the end of the other.
Start to Finish: The arrow runs from the start of the predecessor's bar to the end of the dependent task's bar.
Duplicate a group in the Project Plan
Note: Requires Planning Tasks.
Duplicate a group to create a copy of it, along with its configuration, within the same project or in a different project. This saves time when similar groups repeat across a project or need to be reused in another plan.
Note: Groups imported from your budget codes can only be duplicated to another project.
Duplicate a group within the same project
Go to the Project Plan for your specific project.
Hover over the group you want to duplicate and click More
.Select Duplicate.
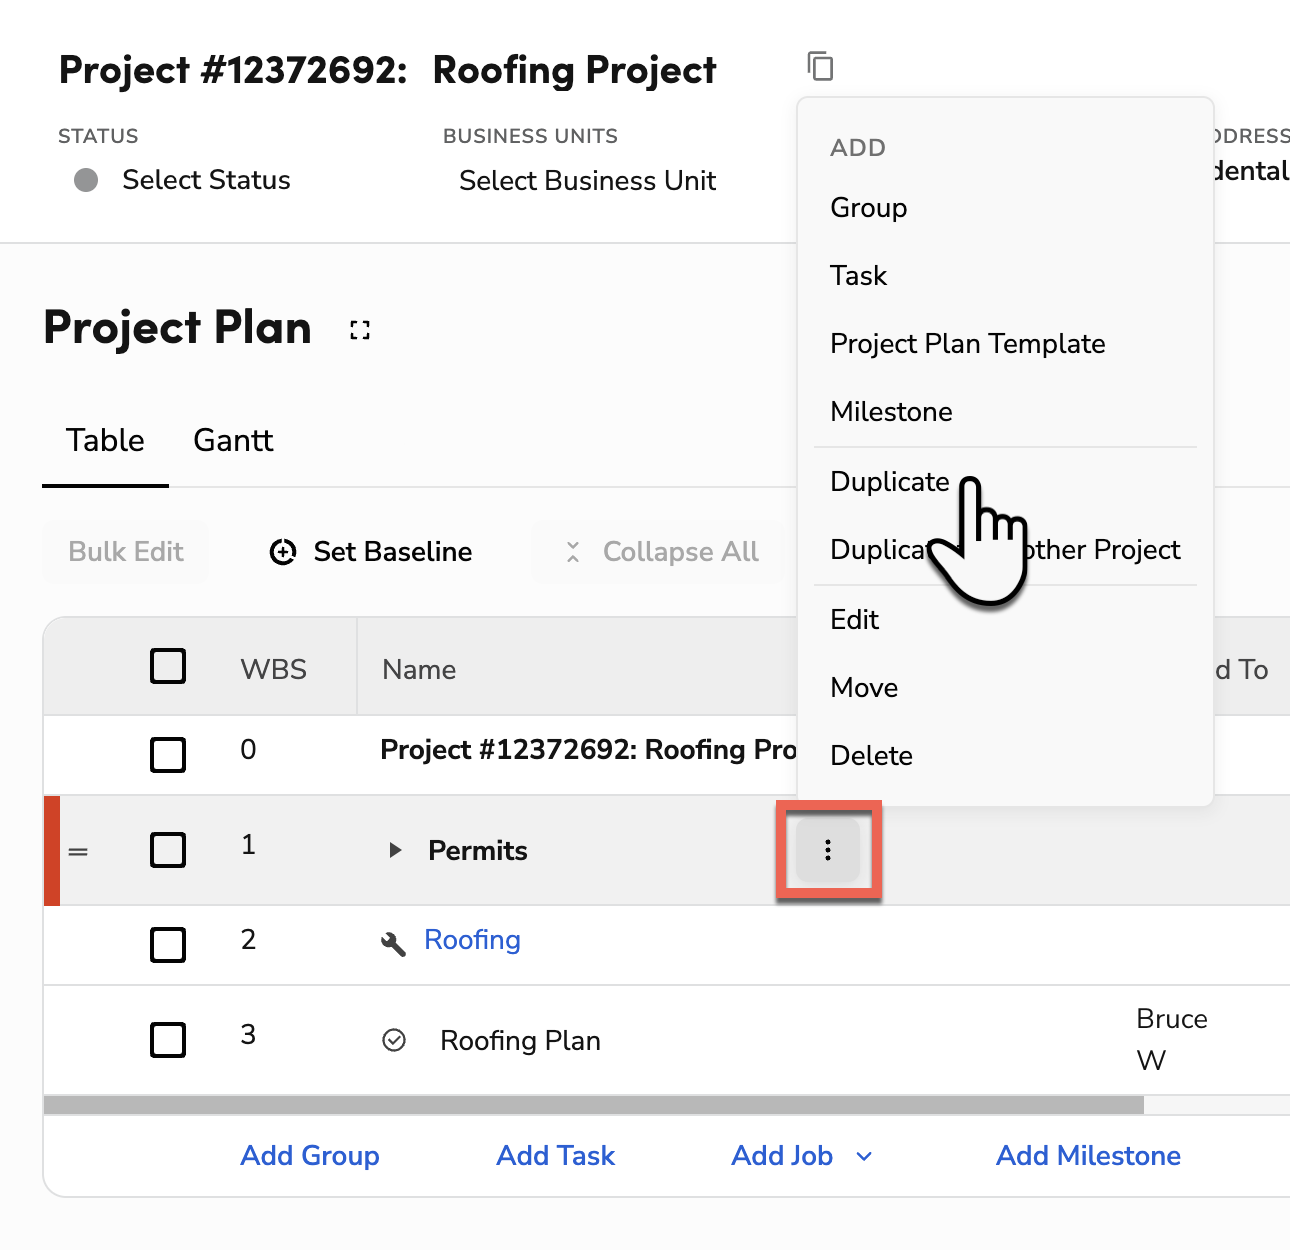
In the Duplicate window that opens, turn on the Include jobs toggle to also copy the jobs inside it, then click Duplicate.
The duplicated group appears in the Project Plan directly below the original.
Duplicate a group to another project
Go to the Project Plan for your specific project.
Hover over the group you want to duplicate and click More
.Select Duplicate to another Project.
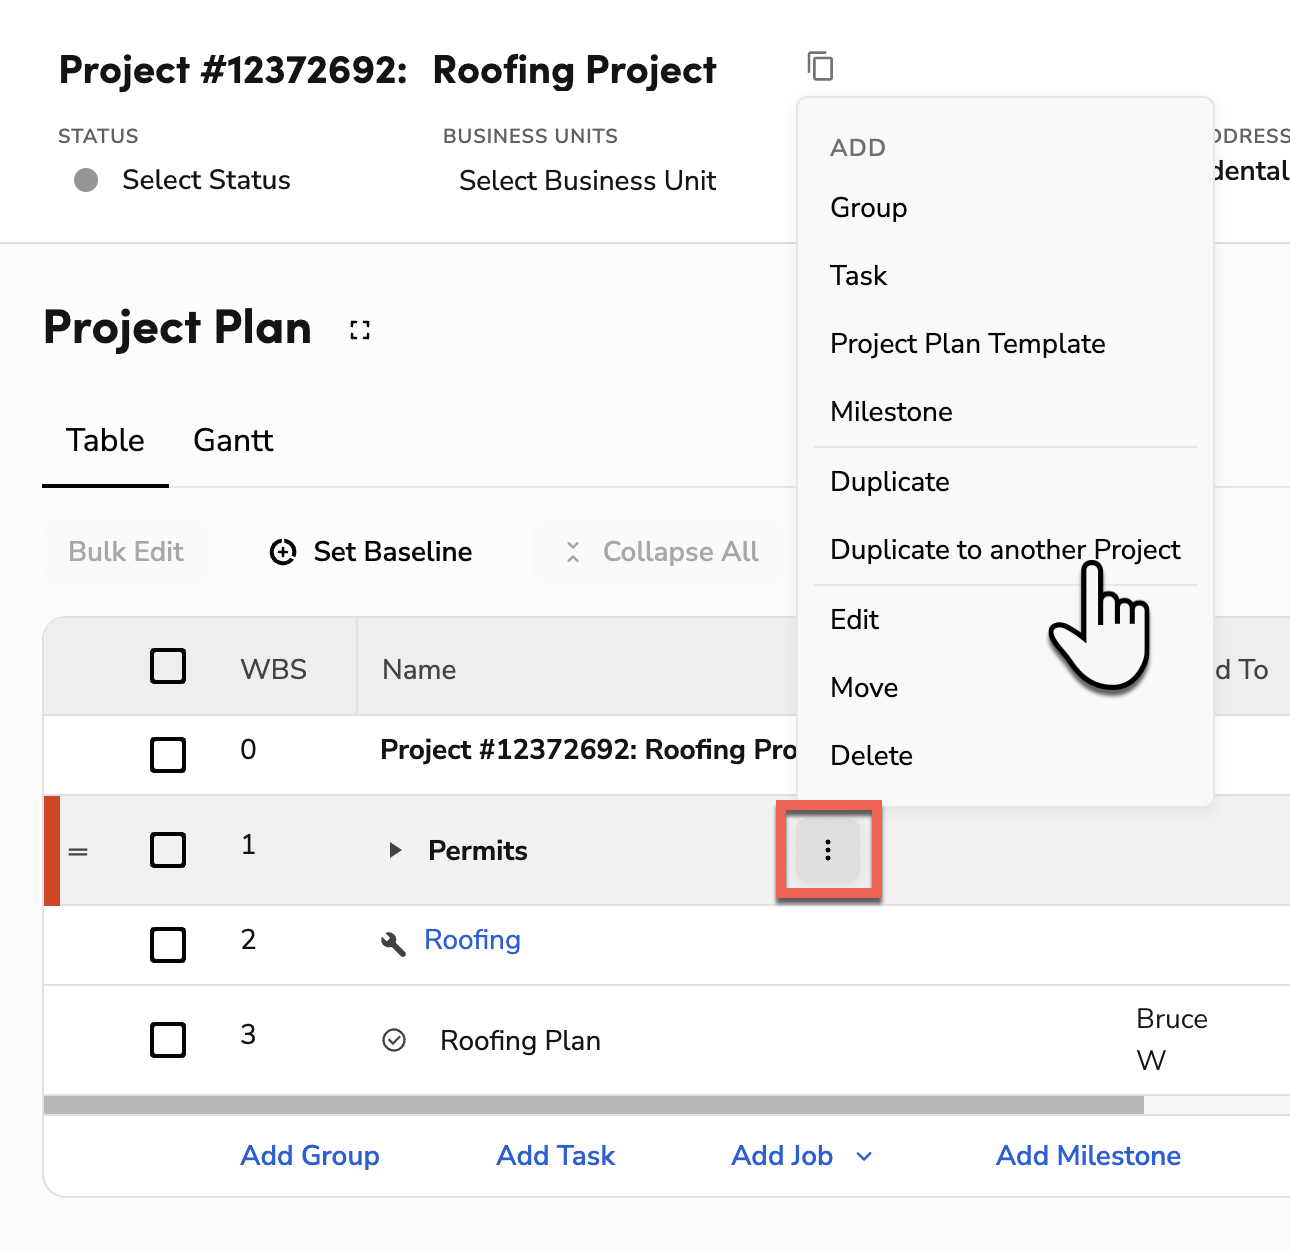
In the Duplicate to another Project window that opens, search for and select the other project.
(Optional) Turn on the Include nested items toggle to copy all nested items within the group.
Click Duplicate to confirm.
Delete a task or group in the Project Plan
Delete a task when it's no longer needed, or delete a group to remove it and its child items at once.
Note: Deleted tasks and groups cannot currently be restored. You can’t delete a milestone; if you add one by mistake, change its status to Won’t Do.
Delete a task
Note: Requires Planning Tasks.
Go to the Project Plan for your specific project.
Find the task you want to remove and click More
> Delete. 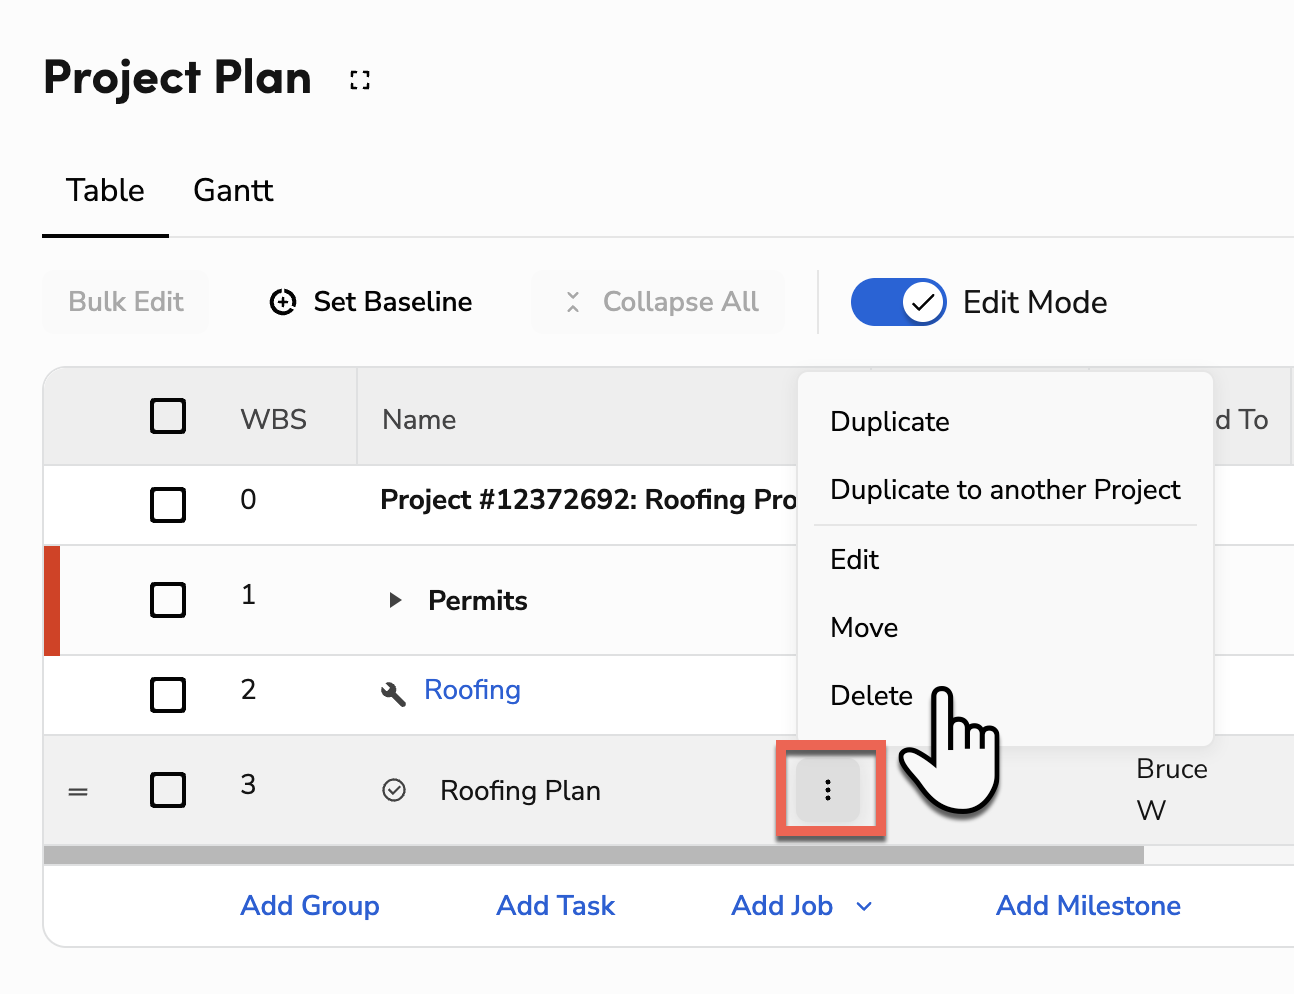
The task is removed immediately.
Delete a group
If your project doesn’t use Planning Tasks, you can’t delete a group that has anything in it, such as subgroups, legacy tasks, or jobs. Move those items to another group first, then delete the group. If your project uses Planning Tasks, you can delete a group and choose whether to keep the items inside it.
Go to the Project Plan for your specific project.
Find the group you want to remove and click More
> Delete. 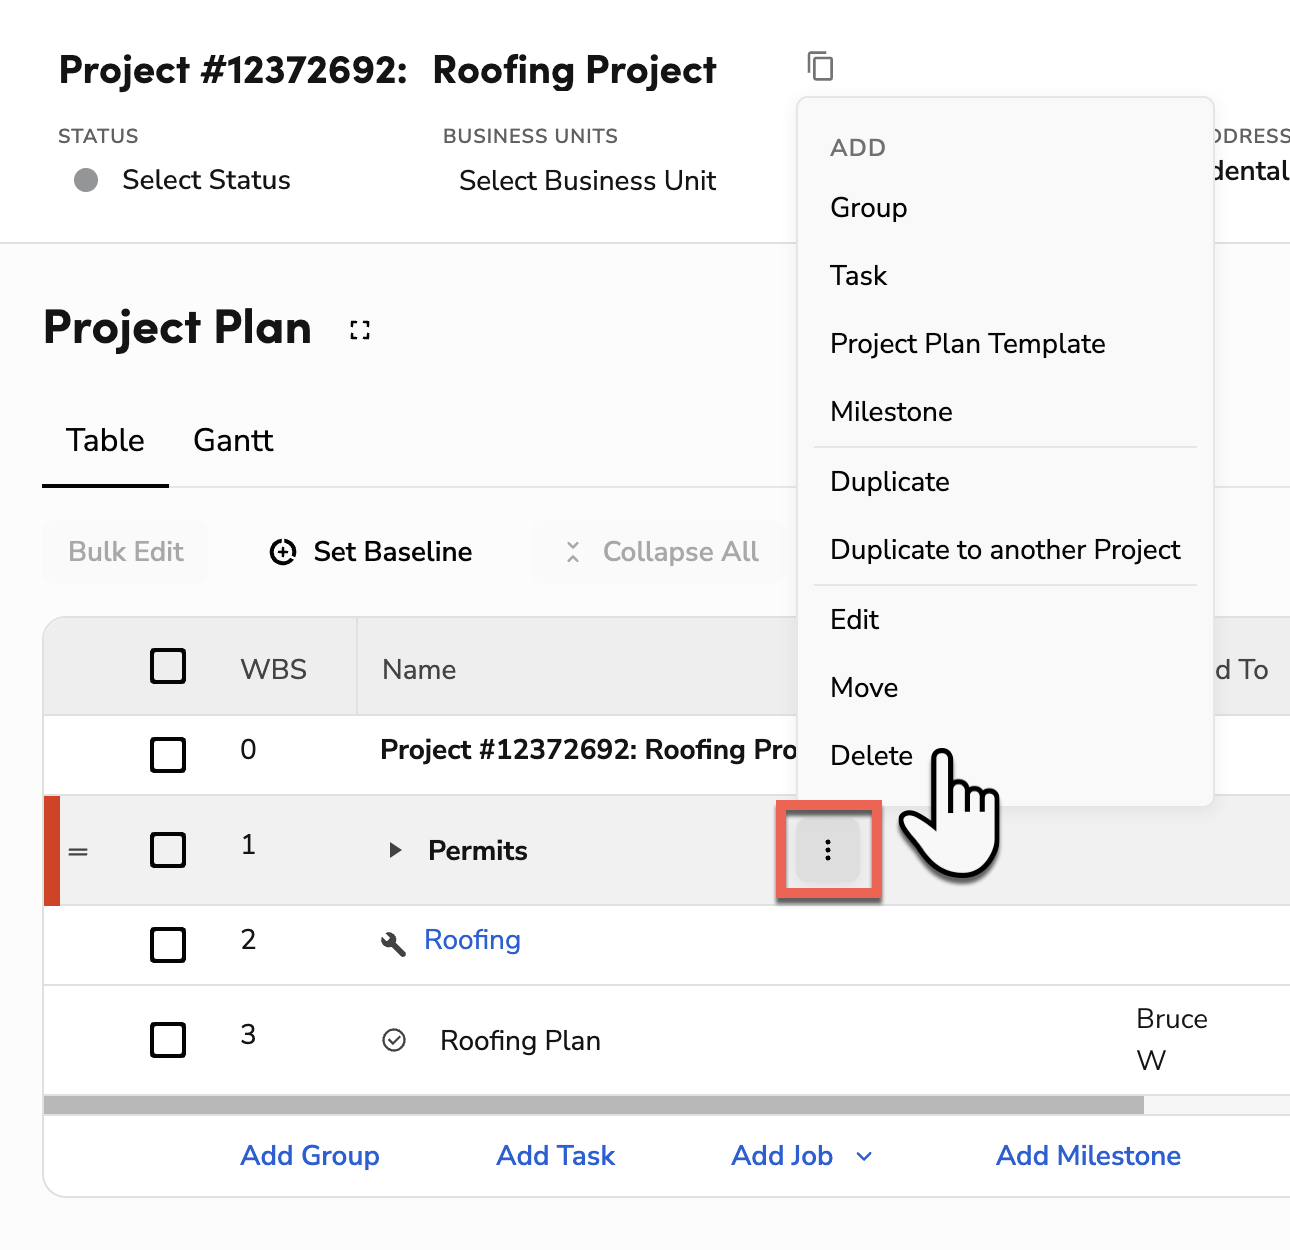
In the Delete group? window, choose one of the following:
Delete Group and Items: Deletes the group and every group, task, and milestone inside it.
Delete Group Only: Deletes only the group. Everything inside it moves up one level.
Any jobs nested inside the group are not deleted—they’re moved up to the project root instead.
Tip: Click Cancel to close the window without making changes.
Set a Baseline in the Project Plan
Note: Requires Planning Tasks.
Use a baseline to track whether your project is running on schedule by comparing your original planned dates against your current actual dates. When you set a baseline, ServiceTitan captures a snapshot of the start and end dates for every item in your Project Plan, including the overall plan, groups (including groups imported from your budget codes), jobs, tasks, and milestones. As you progress, you can compare your progress to your baseline.
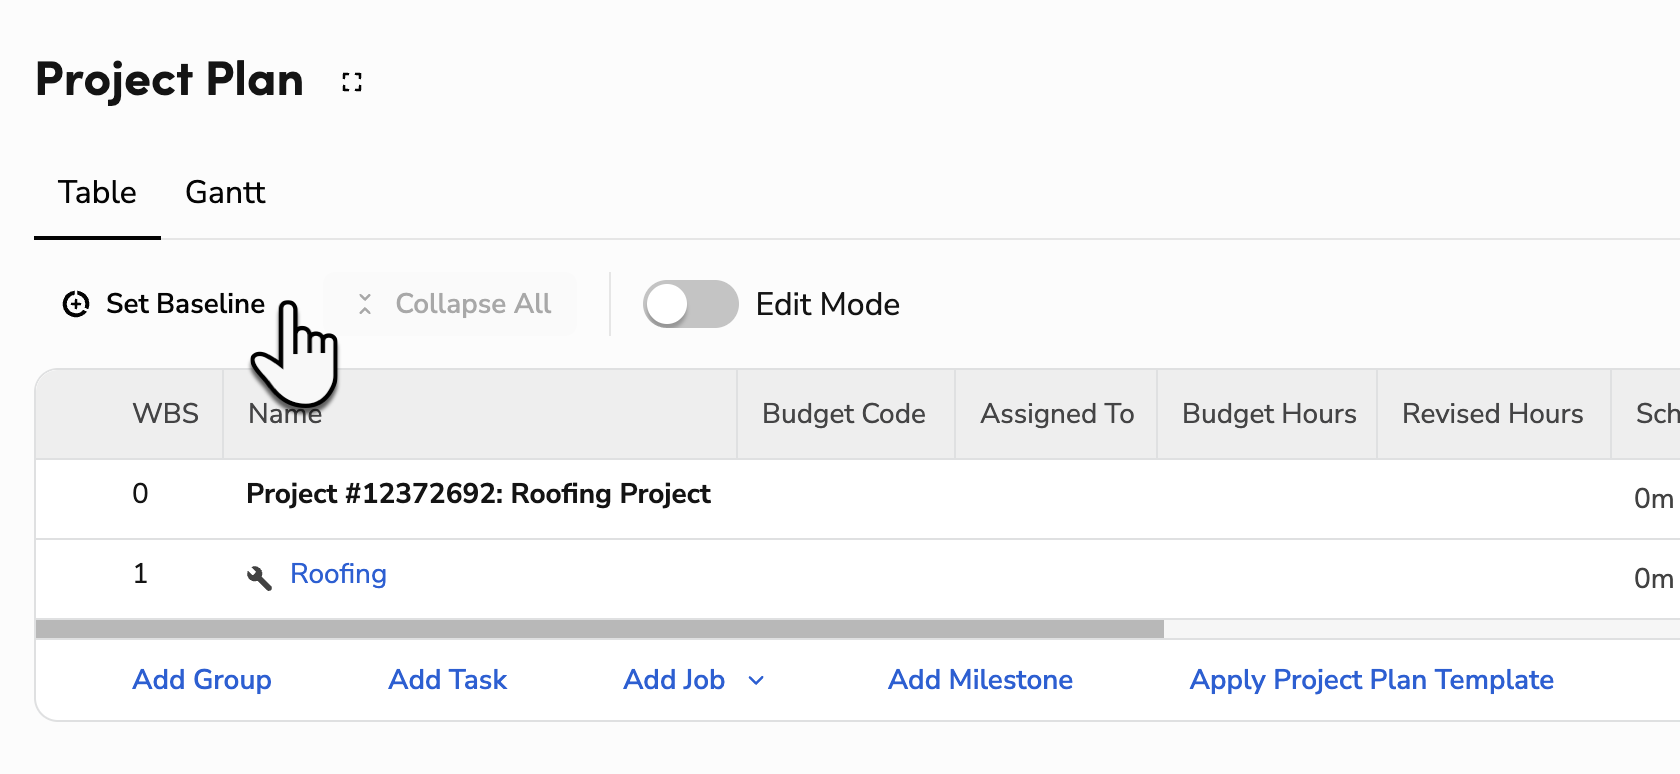
Go to the Project Plan for your specific project.
Click Set Baseline.
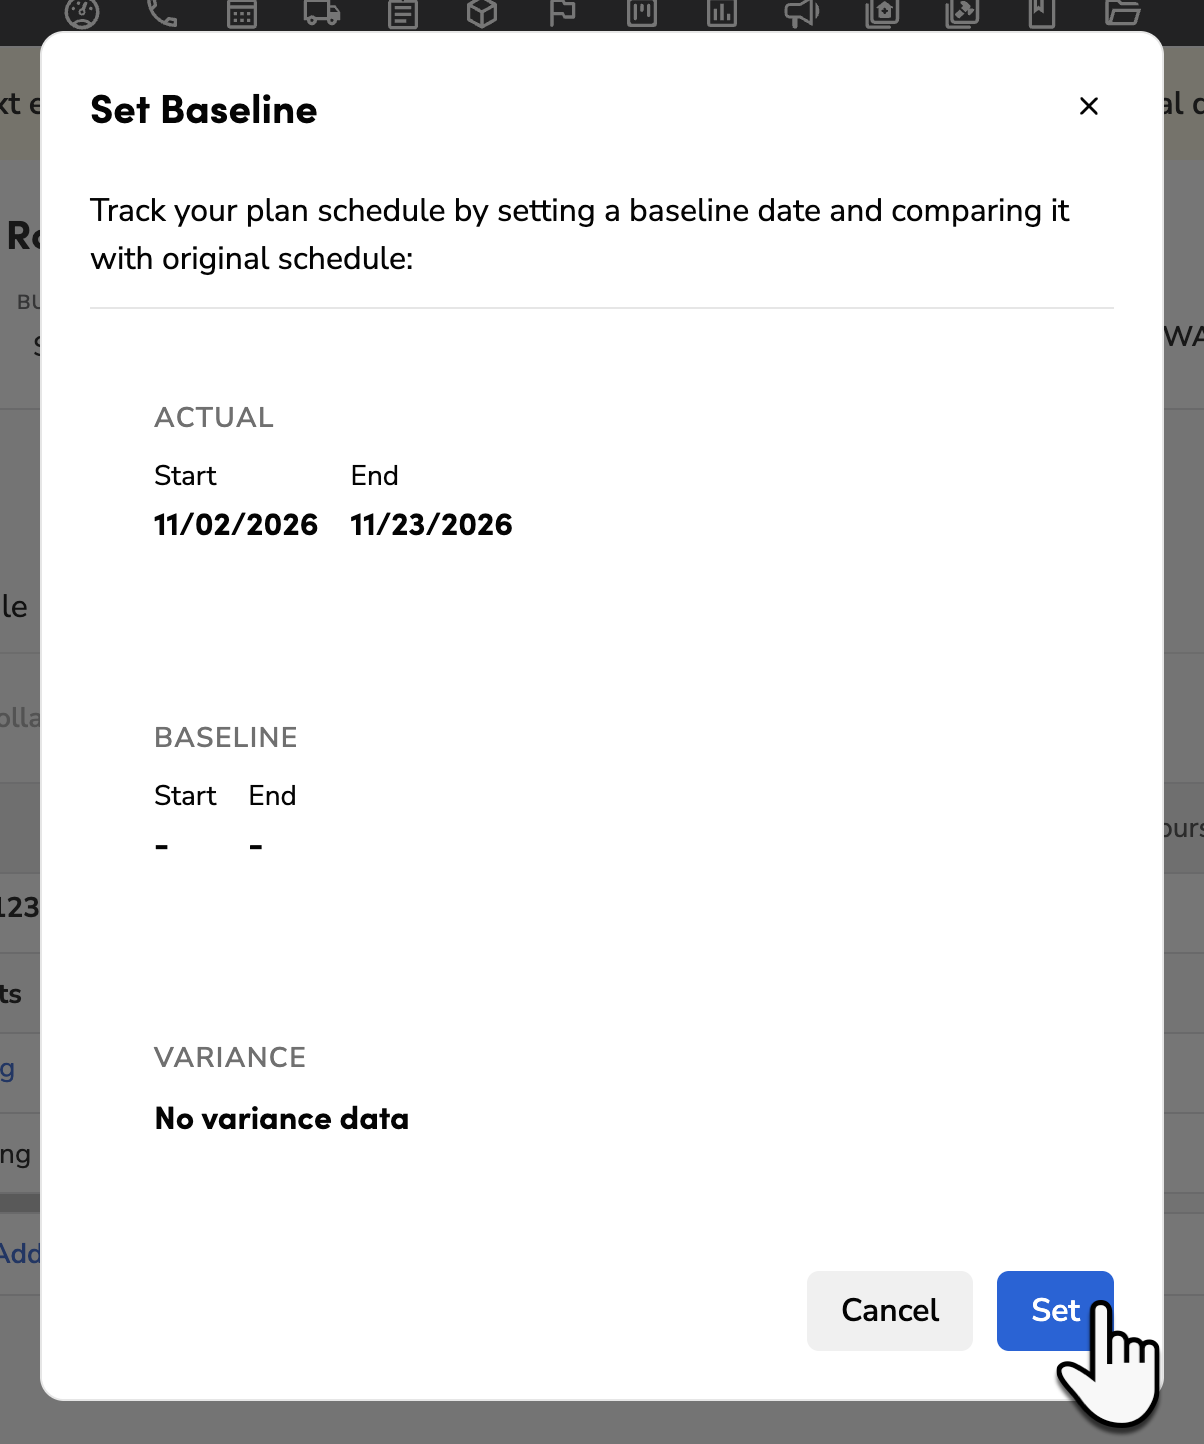
In the Set Baseline window that opens, review the following:
Actual: The current start and end dates for the overall project.
Baseline: Pre-filled with the current start and end dates. These become your saved baseline after you confirm.
Variance: The difference between the baseline end date and the actual end date. Displays one of the following: On schedule (no difference between the baseline and actual end dates), Behind X days (the actual end date is later than the baseline end date), or Ahead X days (the actual end date is earlier than the baseline end date).
Click Set to save the baseline.
The Baseline Start, Baseline End, and Variance columns in the Project Plan table populate with the saved dates.
Note: If start and end dates haven't been entered for the overall project row, the Baseline and Variance fields in the window will be empty. Add dates to the Project Plan before setting a baseline.
On the Gantt tab, baseline dates show as a thin gray bar under each task bar, and as an outlined diamond for milestones. Click Hide Baseline or Show Baseline in the Gantt toolbar to turn them off or on.
Reset a baseline in the Project Plan
Reset the baseline to update all stored baseline dates to match the current schedule.
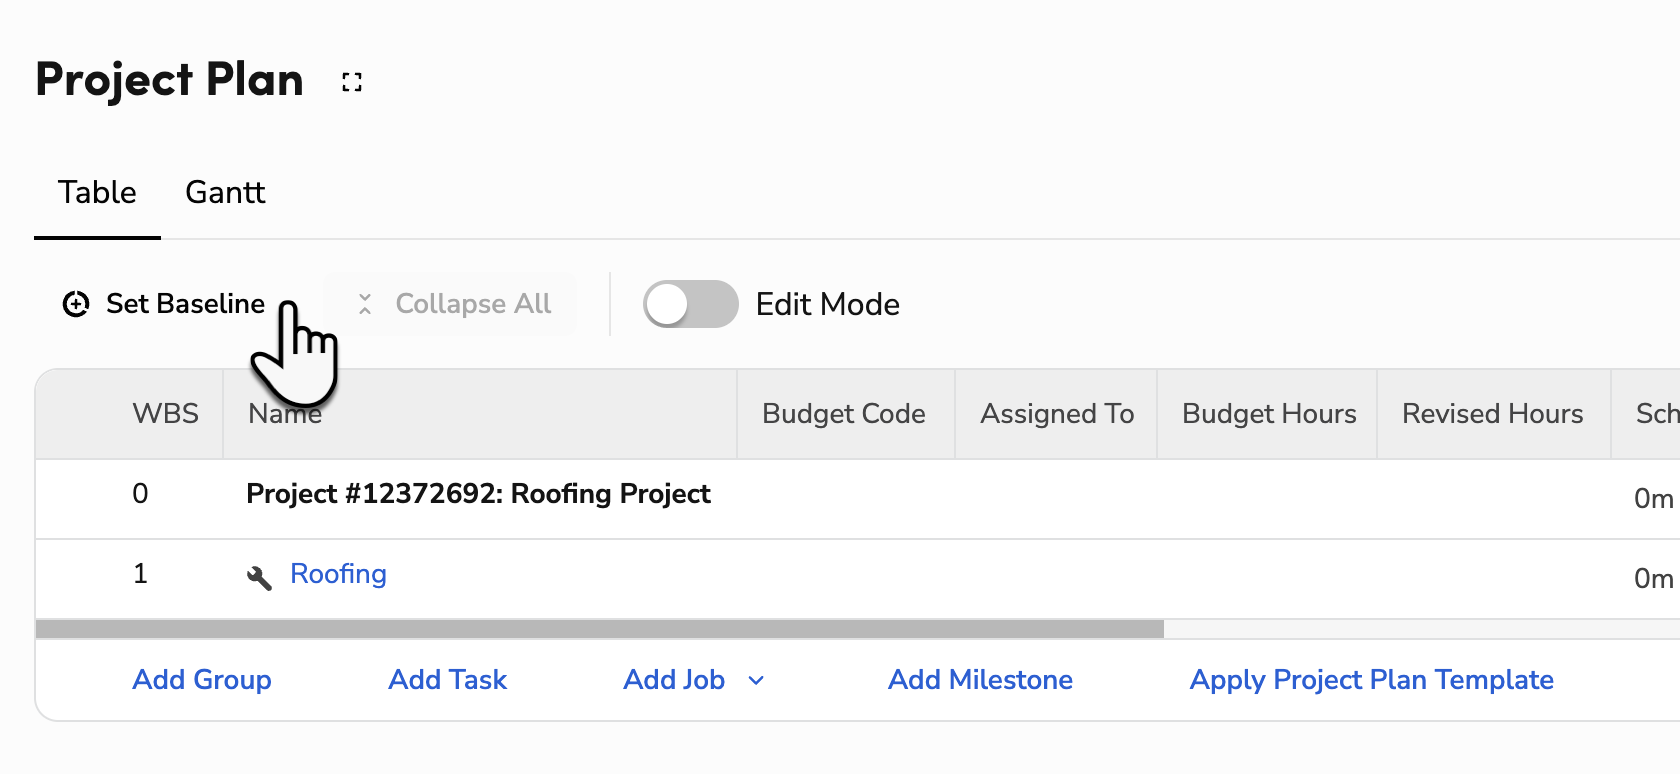
Go to the Project Plan for your specific project.
Click Set Baseline.
In the Set Baseline window that opens, click Reset.
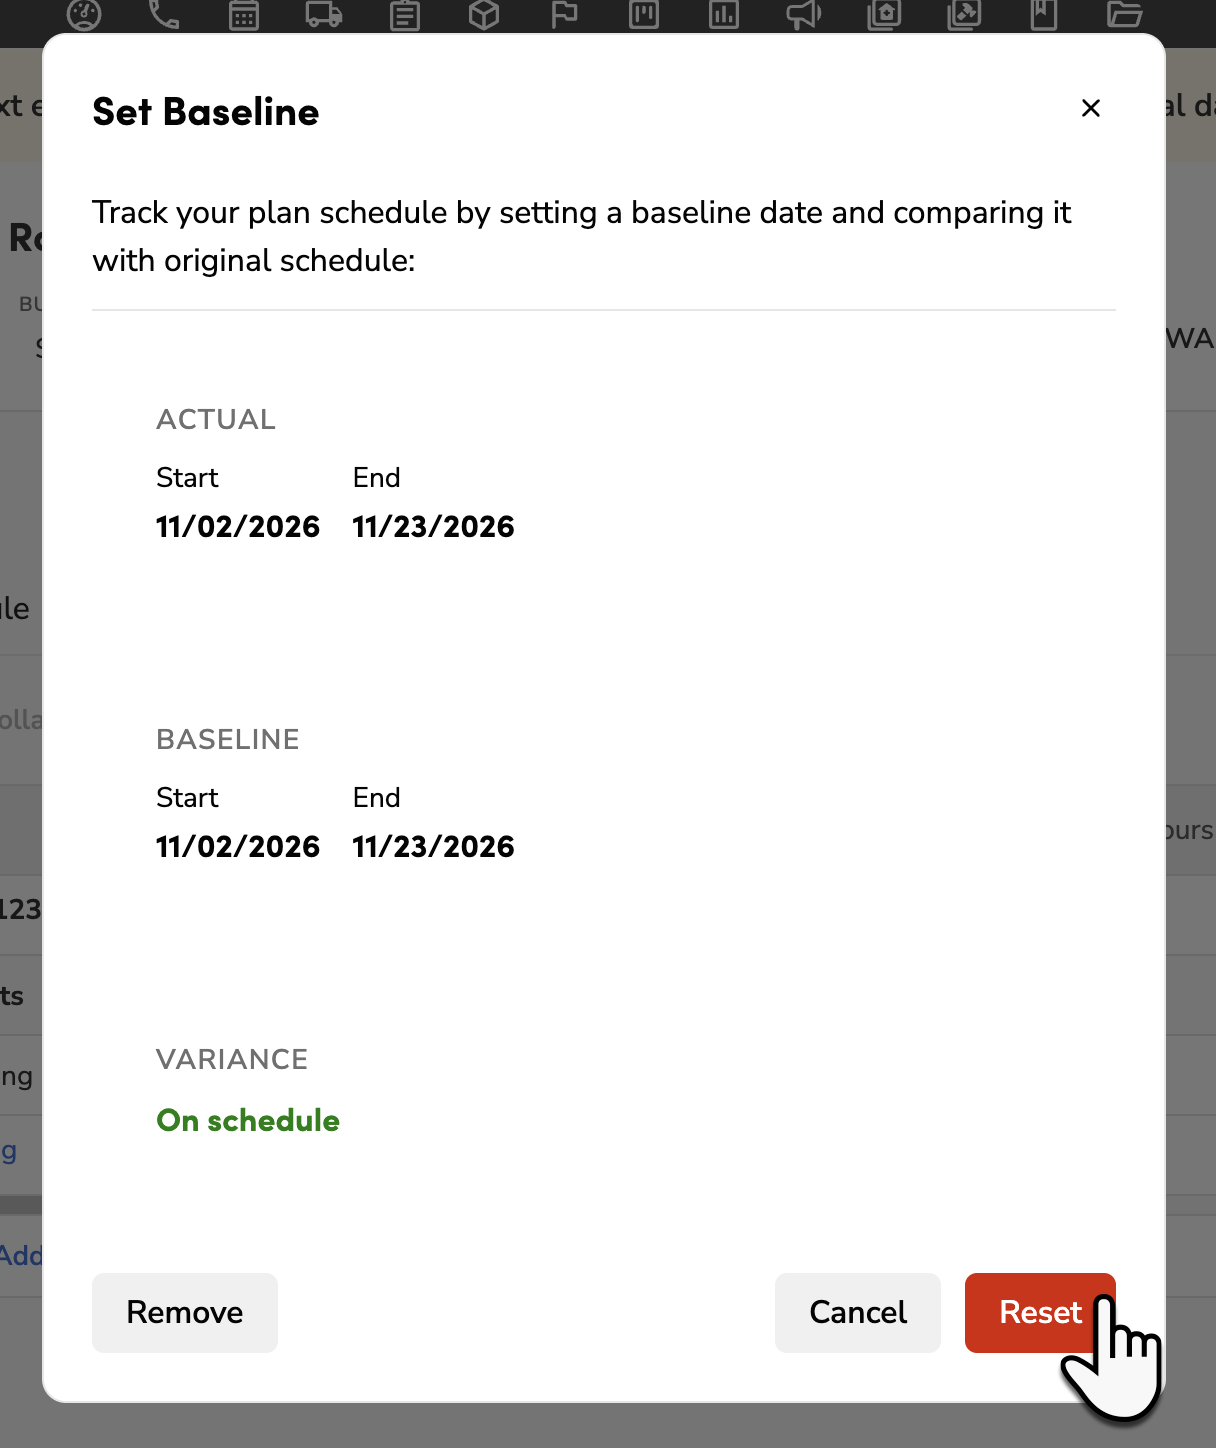
Click Reset to confirm. The project plan replaces the baseline start and end dates for every item with the current start and end dates.
Edit individual baselines in the Project Plan
Use Edit Mode to change the Baseline Start or Baseline End for each item in the Project Plan.
Go to the Project Plan for your specific project.
Turn on the Edit Mode toggle.
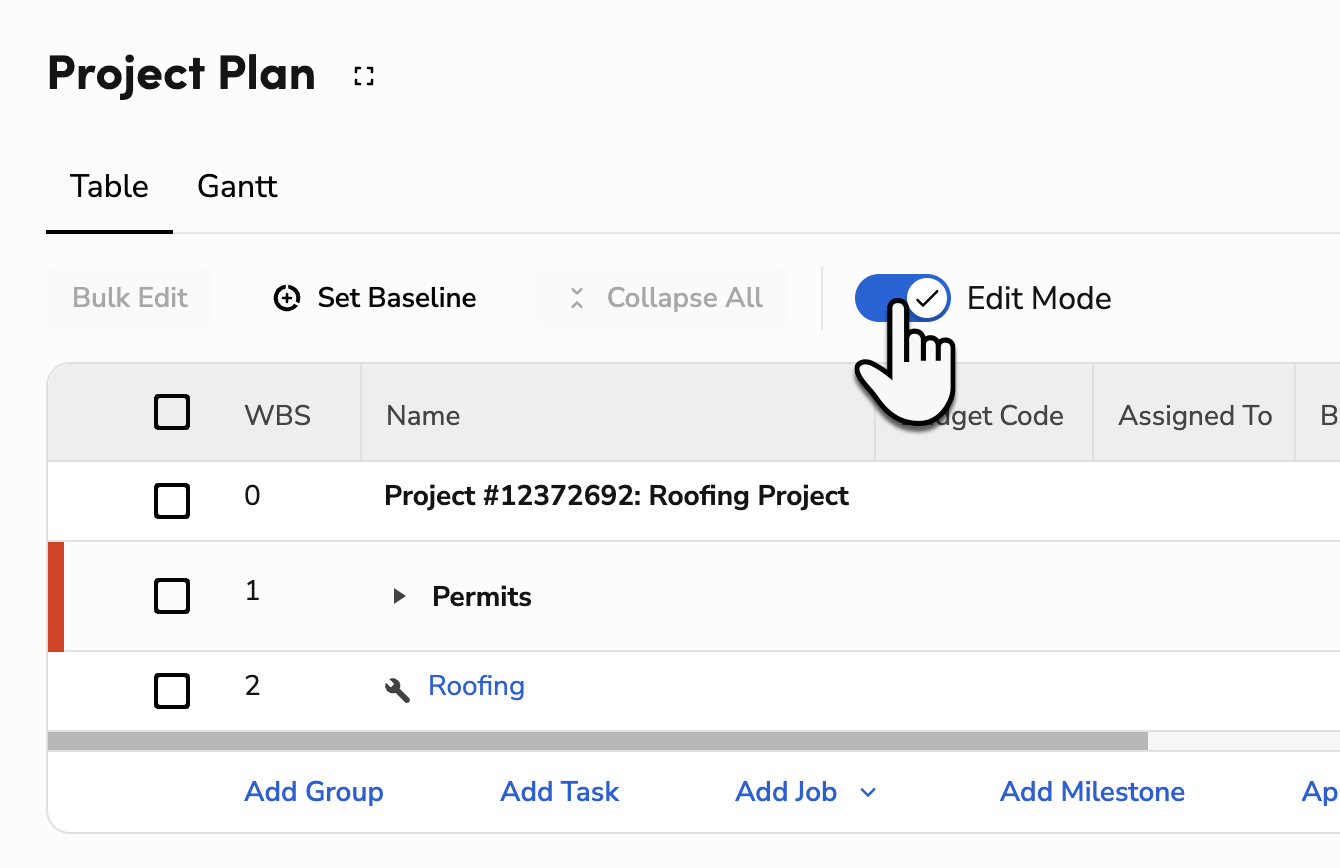
Click Edit
for Baseline Start or Baseline End for any item. 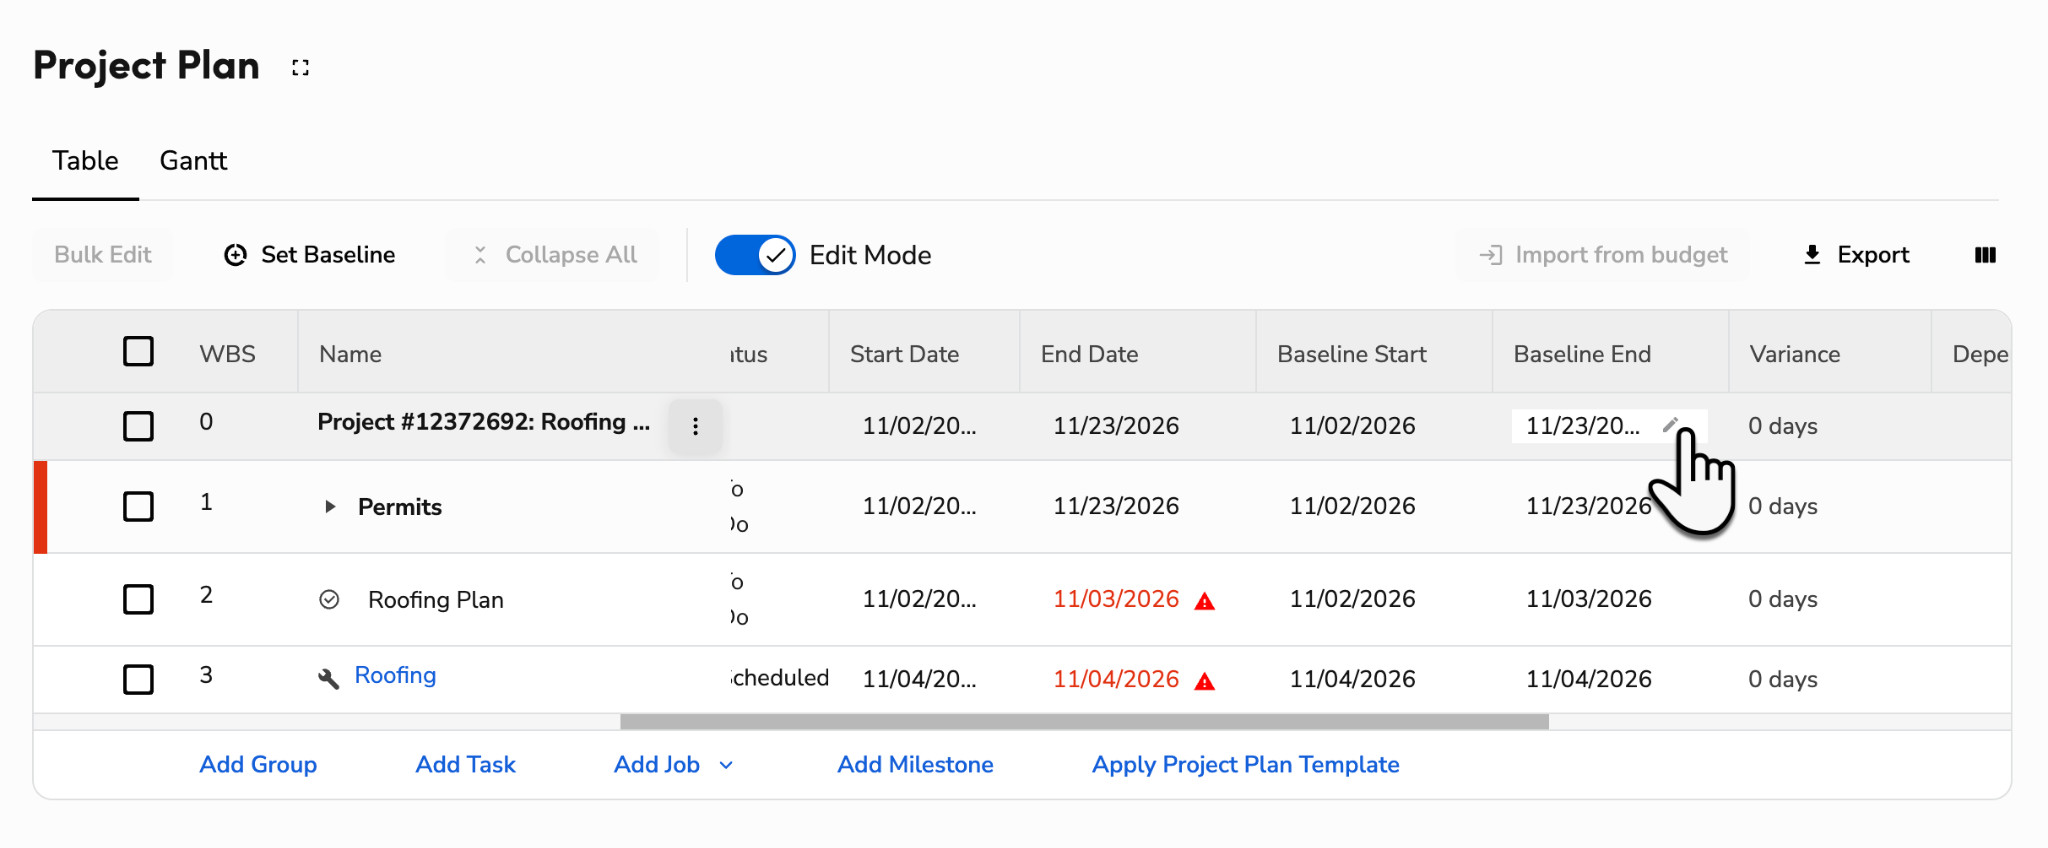
Select a new date.
When finished, turn off the Edit Mode toggle.
Remove a baseline in the Project Plan
Remove a baseline to clear all baseline dates from the Project Plan. This action cannot be undone and any schedule comparisons using the baseline will no longer be available.
Go to the Project Plan for your specific project.
Click Set Baseline.
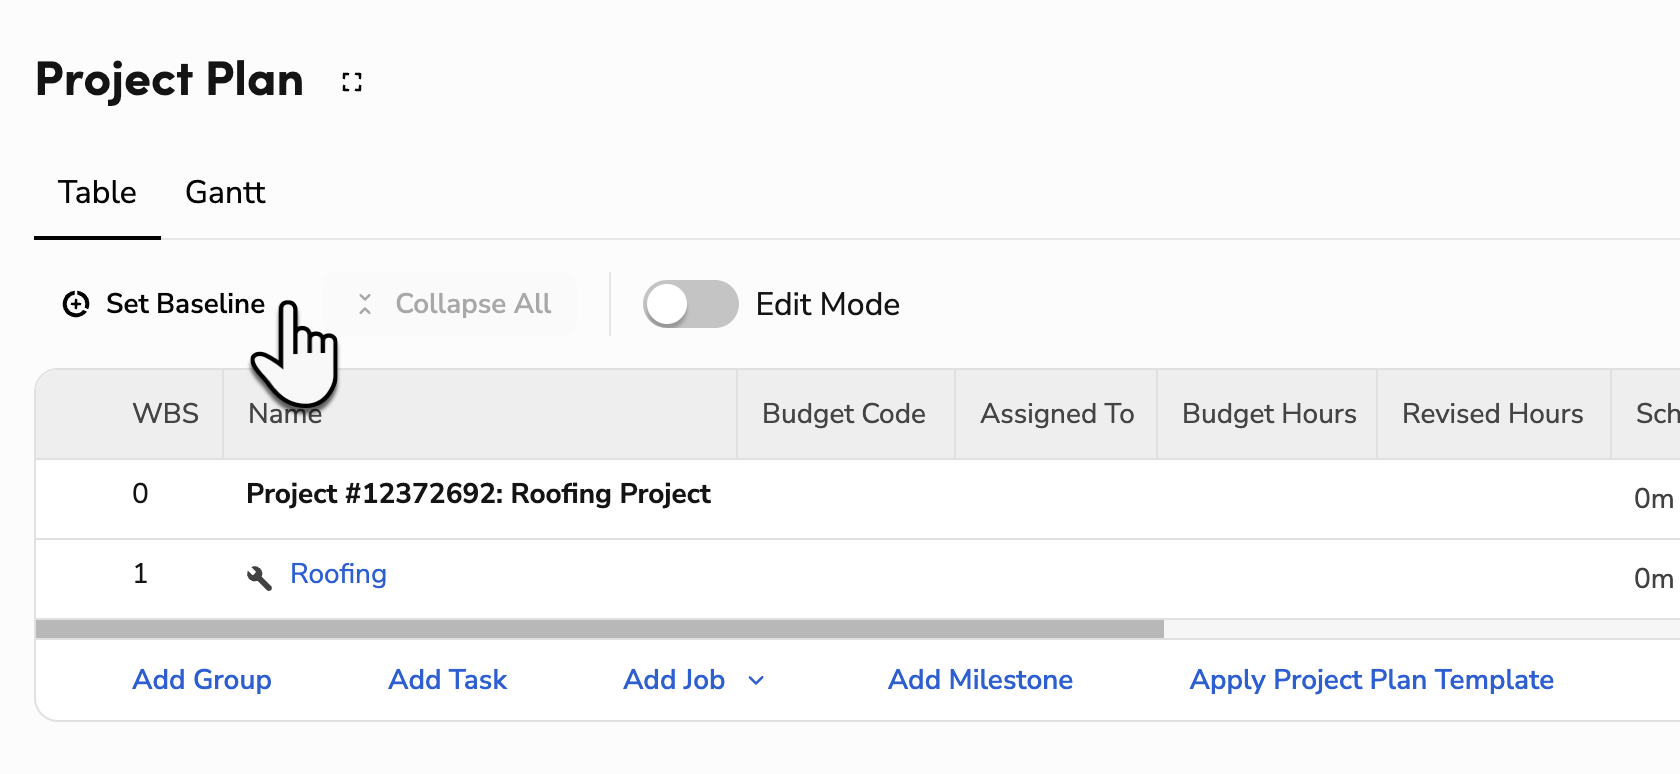
In the Set Baseline window that opens, click Remove.
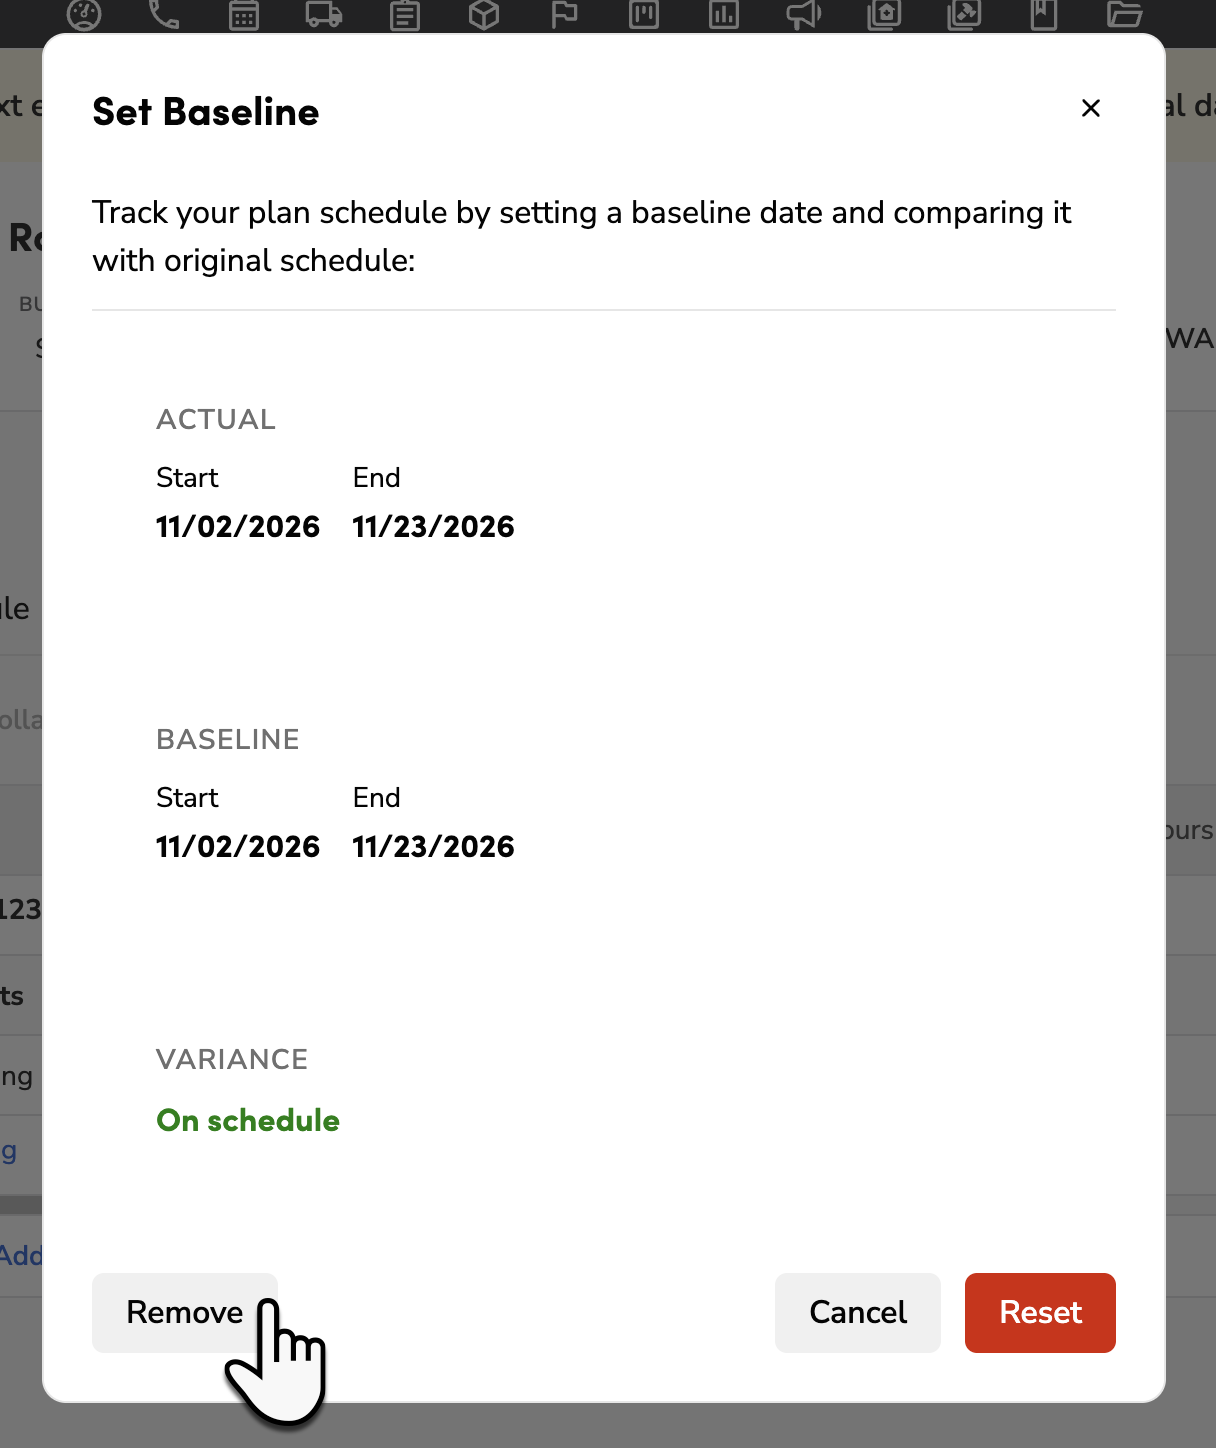
Click Remove to confirm. All baseline dates are cleared from the project plan.
Use messages and emails to communicate on Planning Tasks
Note: Requires Planning Tasks.
After a Planning Task is created, you can send it to others at your company or to people outside your company through email.
Use Chat on Planning Tasks
Go to the Project Plan for your specific project.
Find the task you want and click More
> Edit.At the bottom of the panel, click the Internal Chat tab.
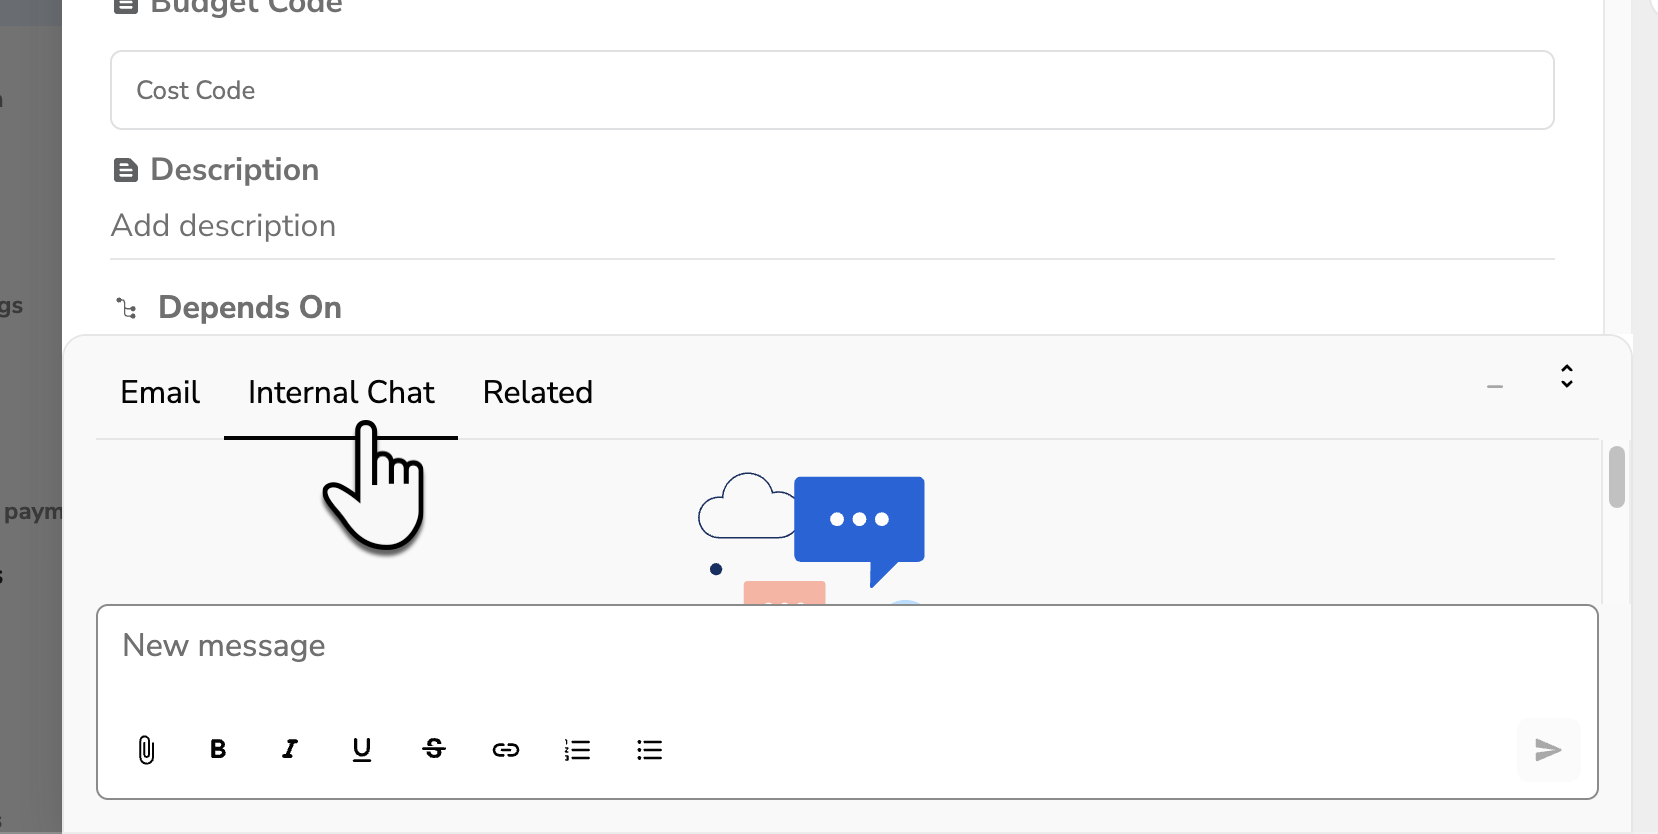
(Optional) To send the message to someone specific, enter @ and select the recipient. They get an email notification.
Enter your chat message, then click the Send
 icon.
Tip: You can also attach files and format your text using the toolbar.
Use Email on Planning Tasks
Go to the Project Plan for your specific project.
Find the task you want and click More
> Edit.At the bottom of the panel, click the Email tab.
Click Compose Email.
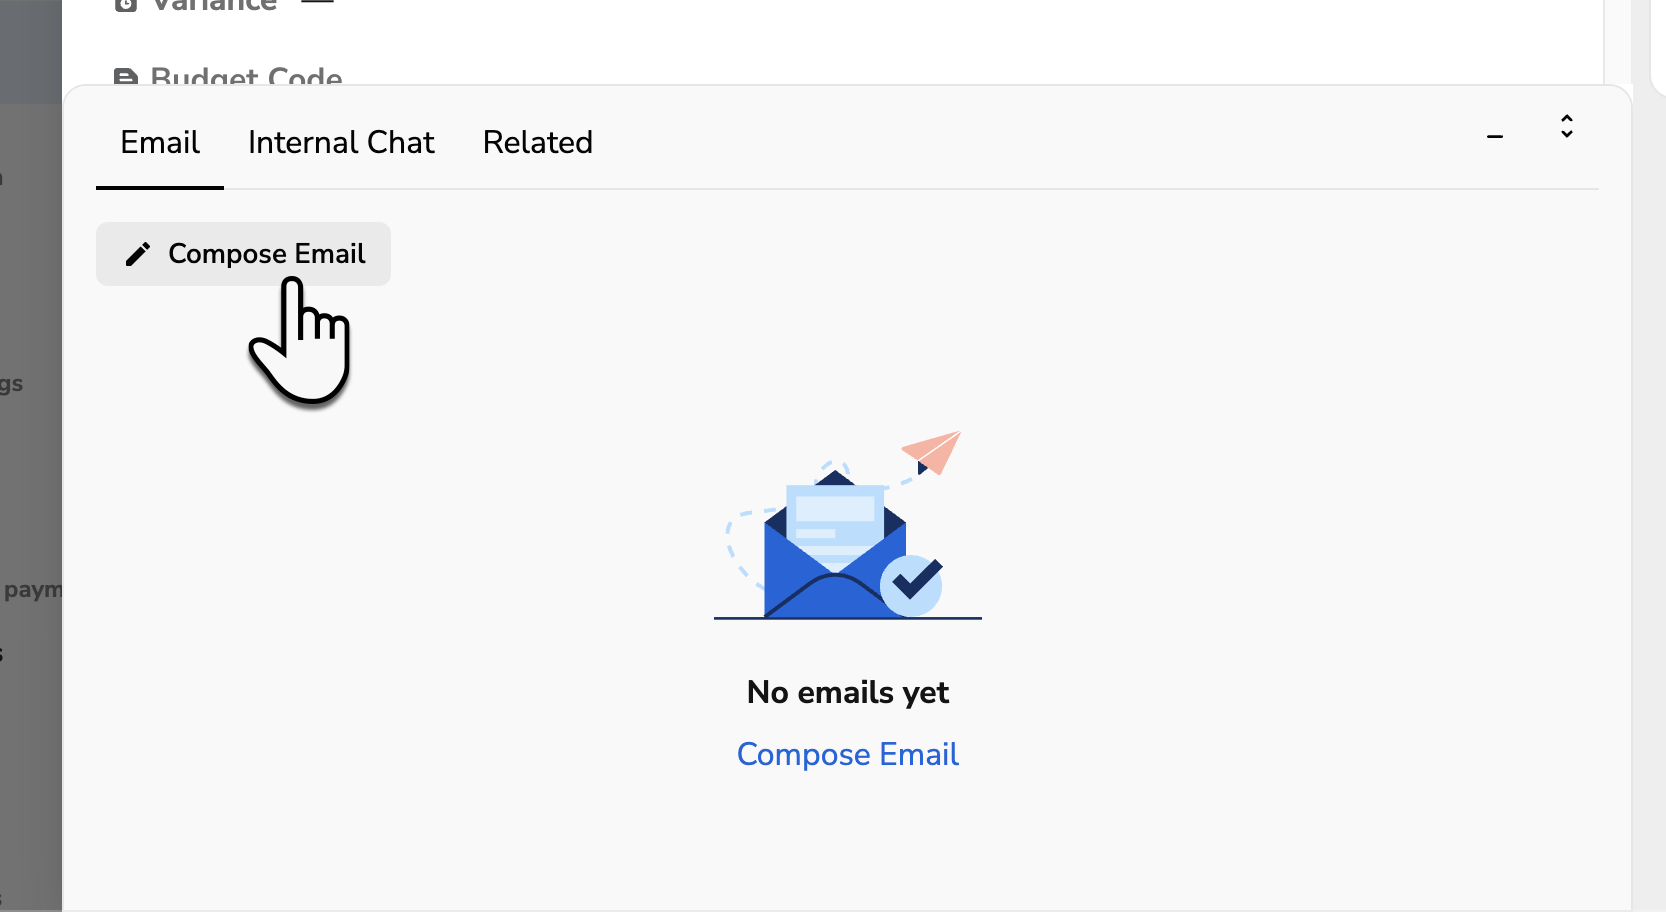
Click the To field:
If you'd like to send an internal email, select another person from the list.
If you'd like to send an external email, enter the email address and press Enter on your keyboard.
Enter a subject and write the email.
When finished, click Send now.
Tip: You can also attach files and format your text using the toolbar.
When the email is responded to, it appears in the task’s Email tab as a threaded email response to the original email sent. This ensures the conversation is contextual to that task and you don't have to open your external email inbox to see it.
Track Budget Code Hours in the Project Plan
With Budget Code Hours, the Project Plan pulls in hours from the estimate and jobs, and from Planning Tasks, to show budget, revised, scheduled, and actual hours by budget code. This helps track whether each part of the job is staffed correctly and staying on budget.
Note: Revised hours should only be different from budget hours if change orders have been created.
Review Budget Code Hours
To efficiently keep track of budget hours, revised hours, scheduled hours, and actual hours on the project plan:
Assign budget codes to a sold estimate and import them to the project plan. For the steps, see Budget codes in Project Plans.
Note: Importing from budget requires the Budget Codes feature. Importing labor line items as tasks requires the Planning Tasks feature.
Review the different Hours columns mapped onto the project plan:
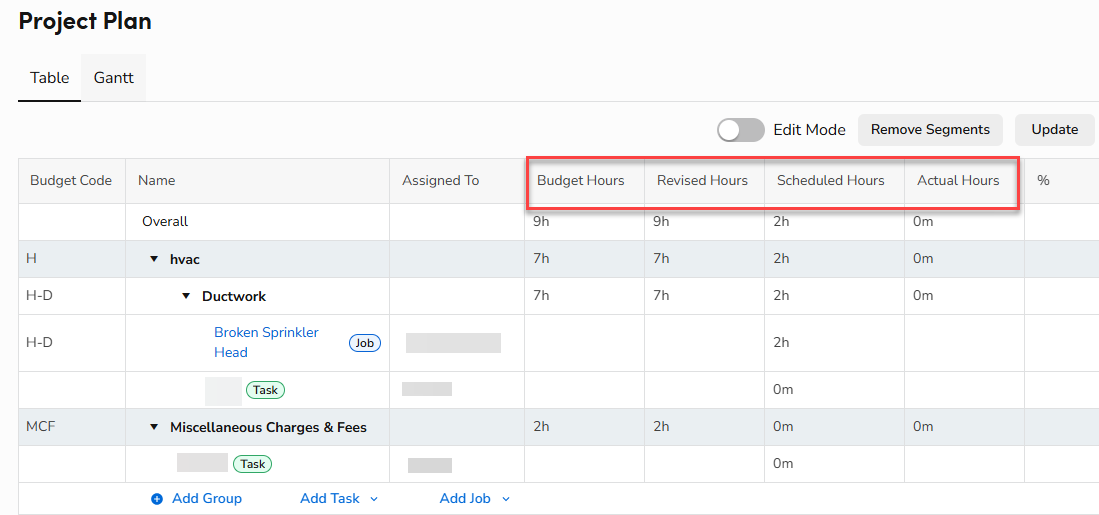
Budget Hours: The amount of Sold Hours multiplied by the Quantity on the estimate's line items that have budget codes assigned and are imported into the project plan.
Revised Hours: The total budget hours across the estimate and change orders.
Scheduled Hours: The total amount of technician hours, or duration, scheduled across appointments on a job.
Actual Hours: The total amount of timesheet hours assigned to the budget code, or logged against a Planning Task. Hours show once payroll posts them to the general ledger.
Compare these values to make sure each part of the project is meeting your preferred timeline.
What each row shows depends on its type:
Groups imported from your budget codes show the budget code’s hours. If the items inside a group don’t add up to its budget hours, the group’s hours turn red.
Groups you created show the total of the items inside them, unless the project’s Automatically calculate group hours from children setting is turned off.
Planning Tasks show their own budget and revised hours, and you can edit them in Edit Mode.
Jobs show hours only if the job has a budget code. Milestones don’t show hours.
Track hours on Planning Tasks
Note: Requires Planning Tasks.
Each Planning Task can have its own budget hours, revised hours, and budget code. When time is logged against the task, those hours show as the task’s actual hours. They’re added to the group’s actual hours if it’s a group you created.
Add hours and a budget code to a task
Go to the Project Plan for your specific project.
Click More
> Edit for the task in the Project Plan.Click Add budget hours, enter the hours, and click the Check icon to set them. Do the same for Revised Hours. If you leave one of them blank, it’s filled in with the other.

For Budget Code, choose a value for each segment, such as the cost code and phase. Segments that come from the task’s group or job are already filled in and can’t be changed.
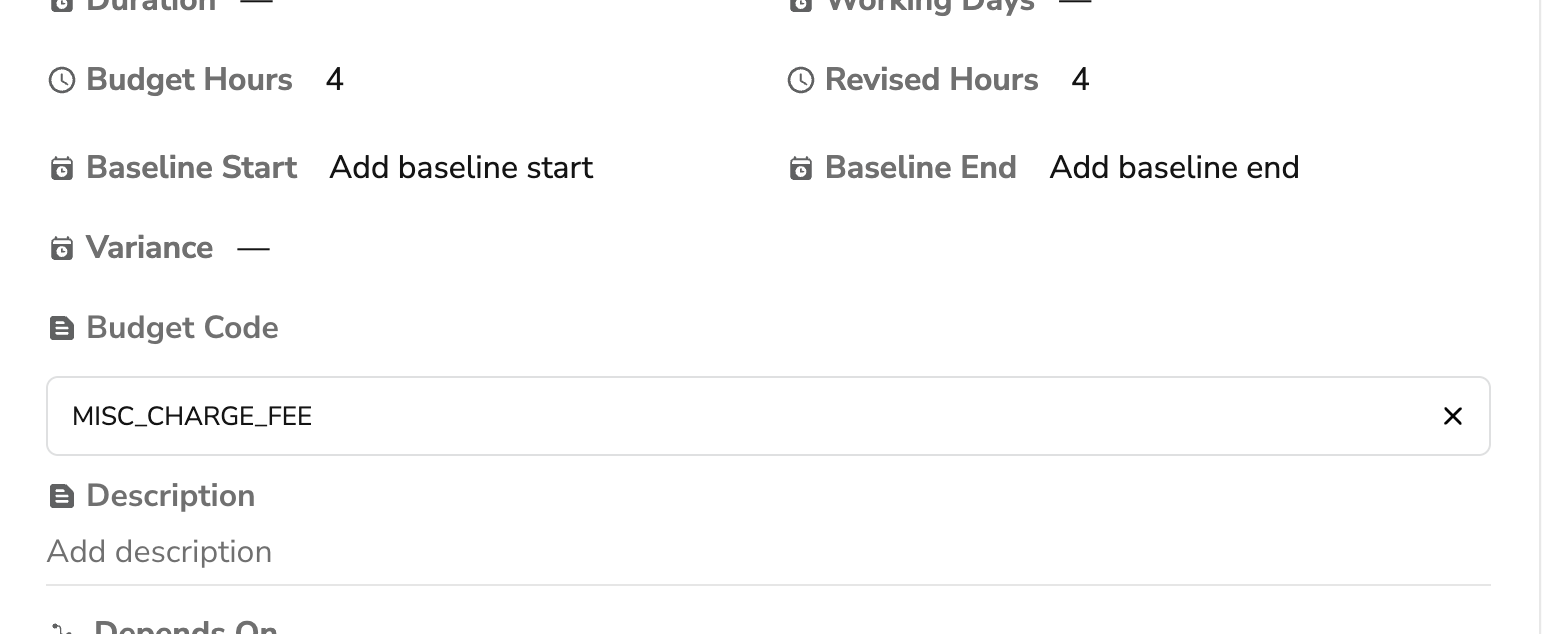
Tip: When you add a task, you can enter its hours and budget code in the task details. You can also edit a task’s Budget Hours and Revised Hours in the Project Plan table with Edit Mode turned on.
Log time against a task from the office
Go to the project you want.
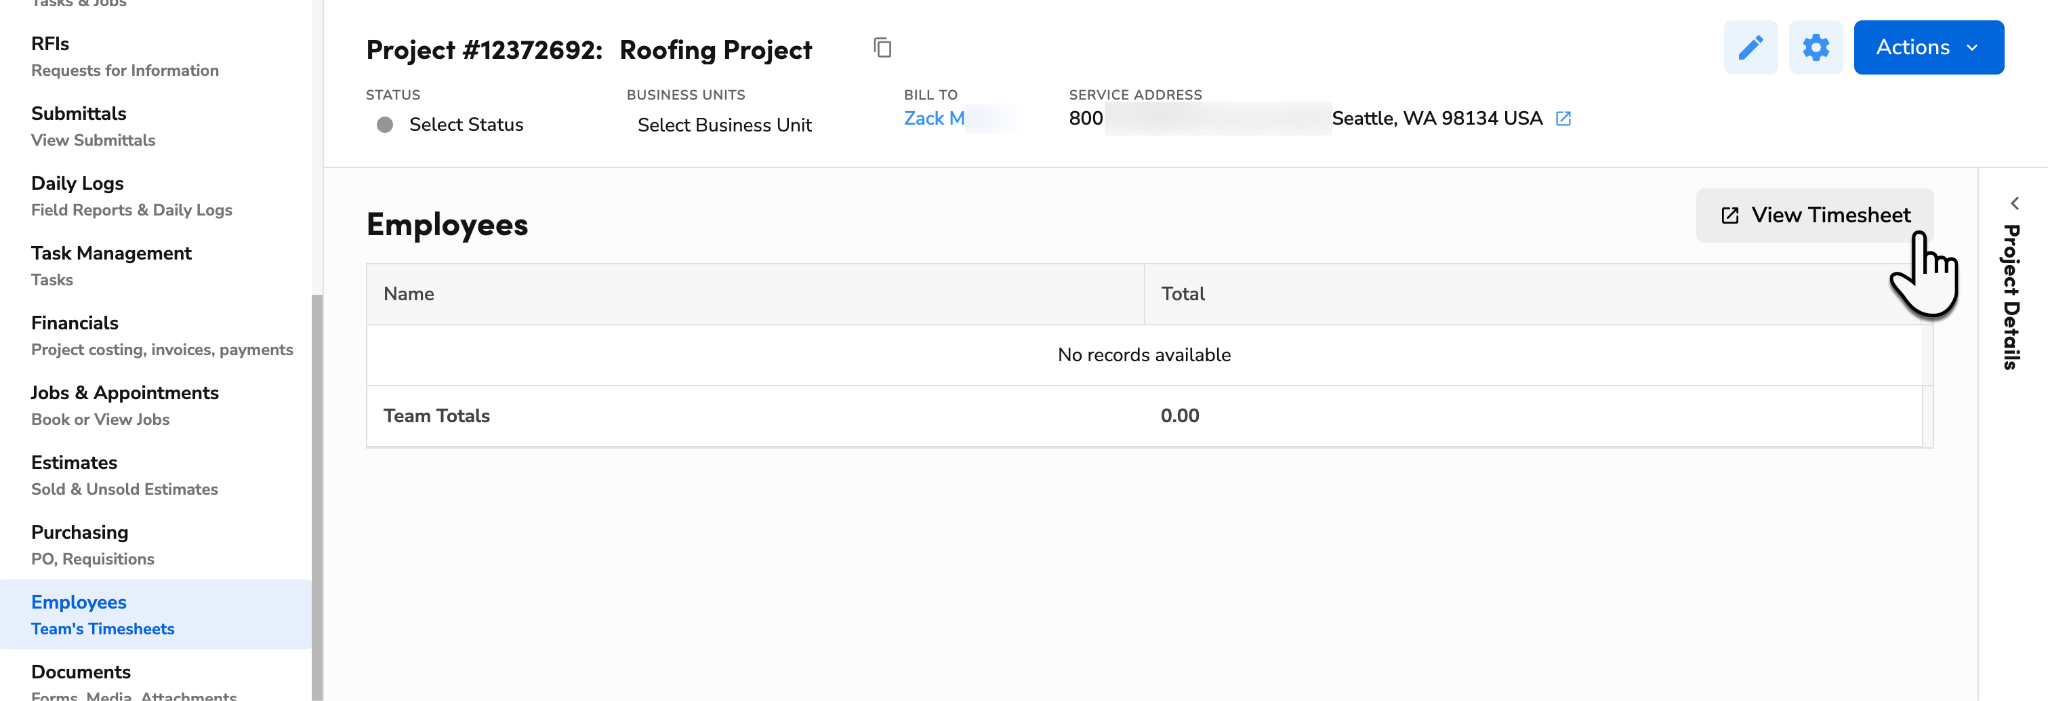
In the side panel, click Employees, then click View Timesheet.
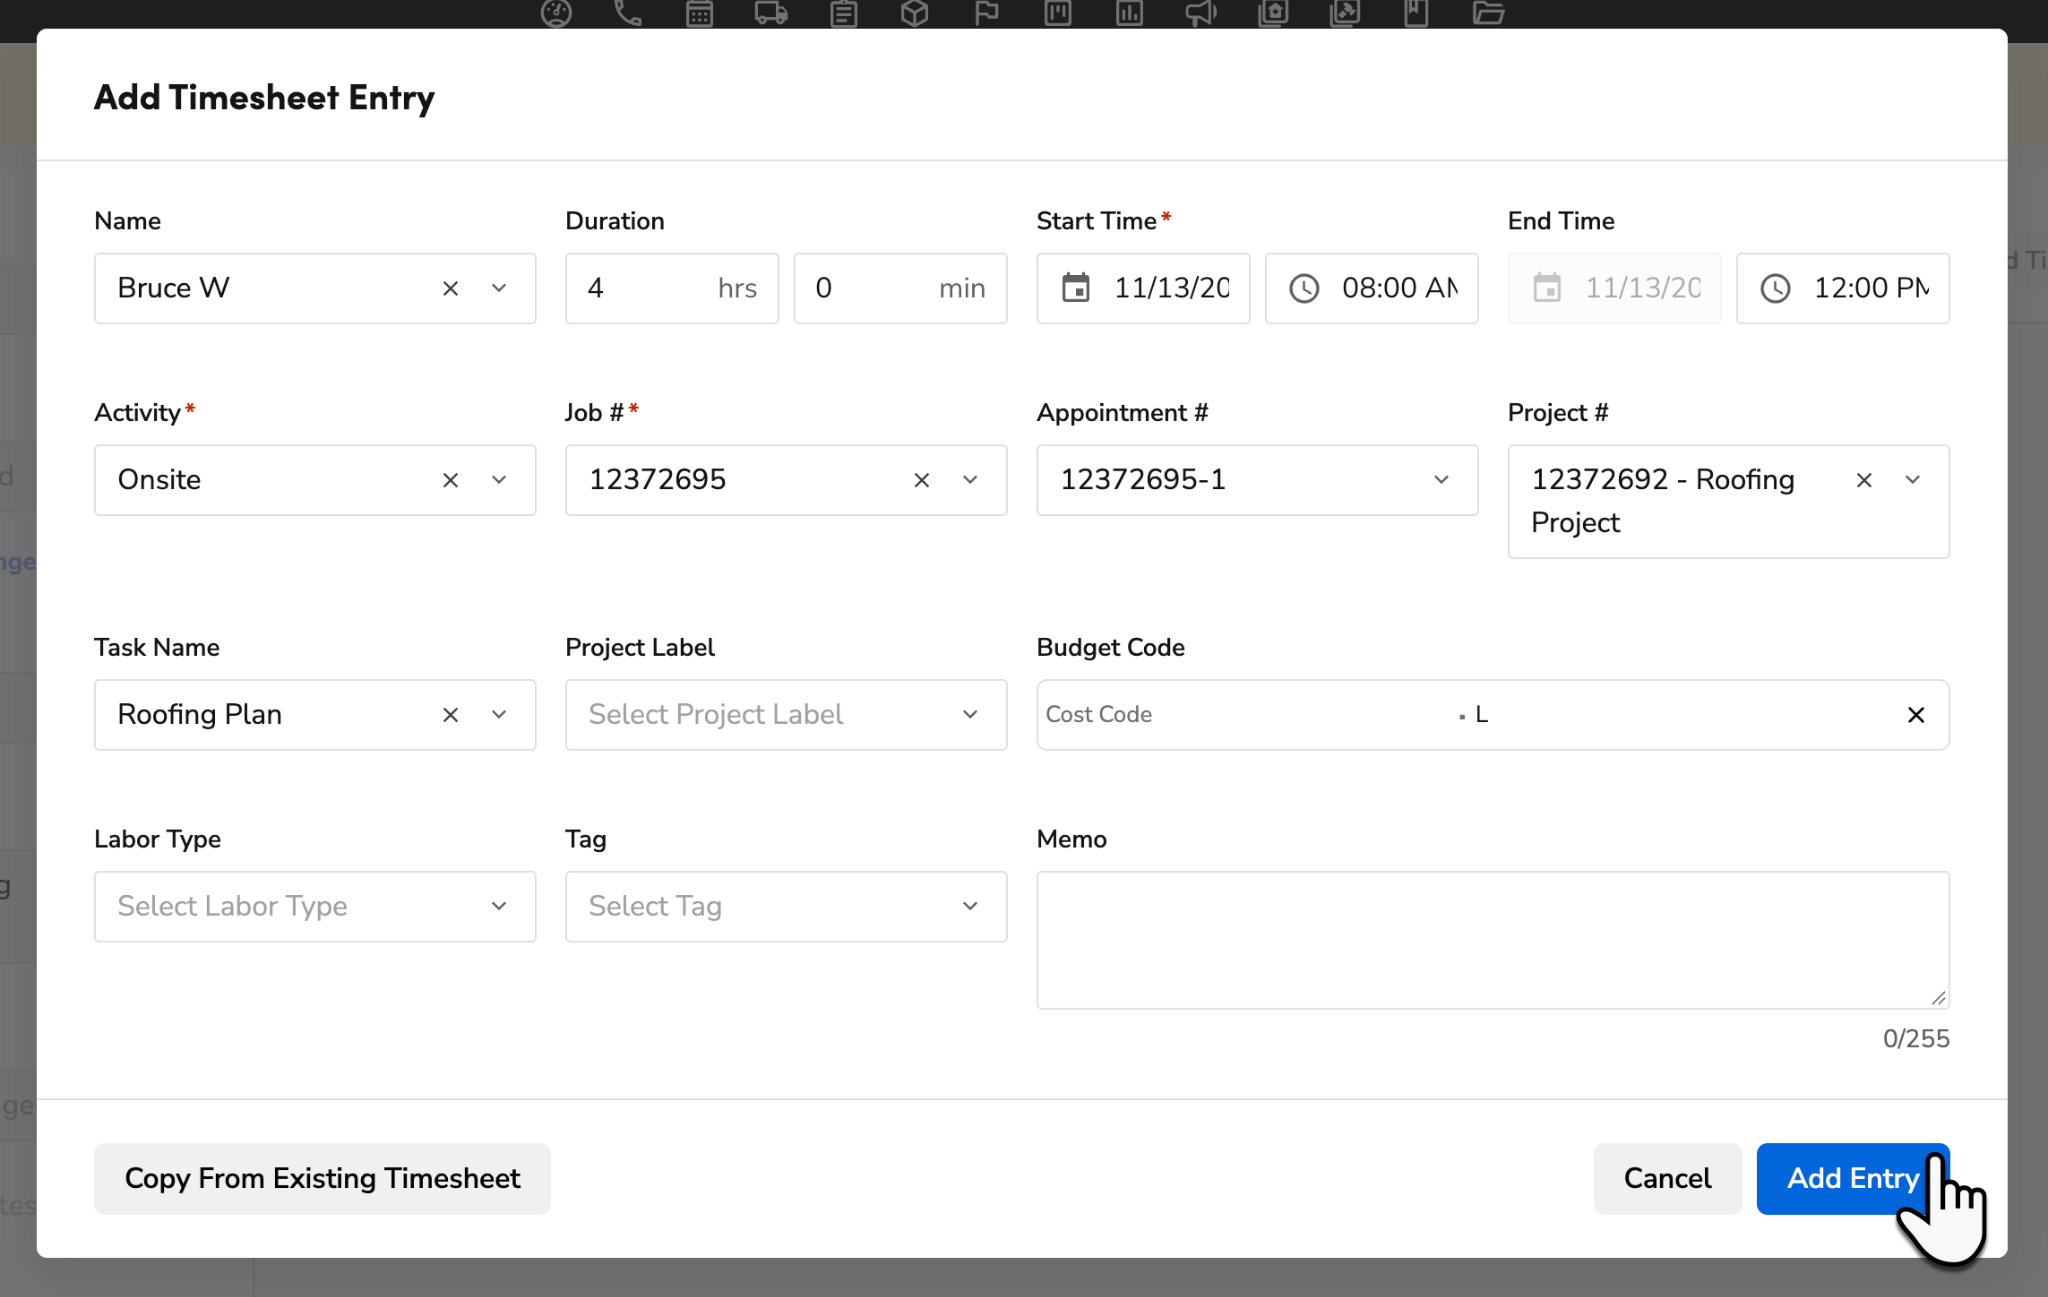
Click Add Timesheet Entry and select For an individual.
Select the Name, enter the Duration or the Start Time and End Time, and select the Activity.
In Task Name, select the task. The task’s budget code fills in.
When finished, click Add Entry.
How task hours reach the project’s financials
A task’s actual hours appear after the timesheet is processed by payroll and posted to the general ledger. In the project’s financials, those hours are counted under the timesheet’s budget code. Time logged from the office with a task selected uses the task’s budget code. Time logged from the Field Mobile App uses the task’s cost code, the worker’s cost type, and the job’s other segments, so if those don’t match the task’s budget code, the hours show under a different code or as Uncategorized. To see hours in Budget vs Actual, set the $ / QTY toggle to QTY.
Enter budget and revised hours on groups
If Automatically calculate group hours from children is turned off for the project, you can enter Budget Hours and Revised Hours on groups you created. Enter them when you add or edit the group, or in Edit Mode in the Project Plan table.
If you enter only one of the two values and the other is empty, the other is filled in with the same number.
If a group has no hours but the items inside it do, their total is suggested in gray. You can keep it or change it.
If the items inside a group add up to more hours than the group, the group’s hours are outlined in red in the Project Plan table, with a warning icon.
Track task progress across all projects
Note: Requires Planning Tasks.
Project managers can monitor task status from the office, while technicians can update progress from the field.
Go to the navigation bar and click Projects to open Project Portfolio.
Click the Tasks tab.
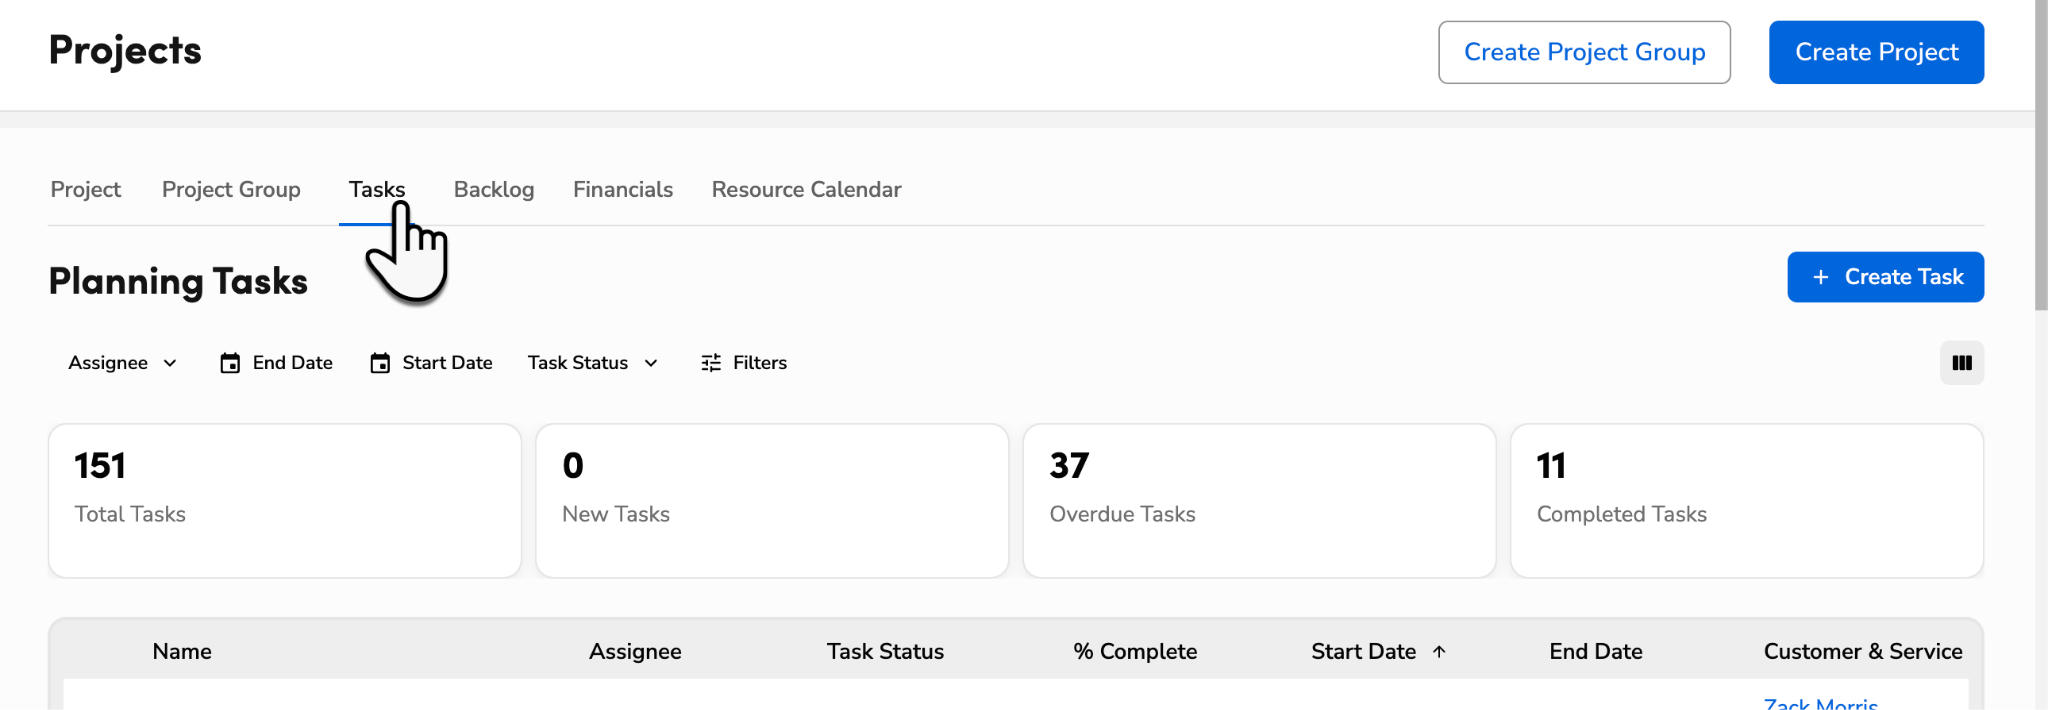
View the list of tasks across all your projects. You can filter the list by Assignee, Start Date, End Date, or Task Status to find specific tasks. You can also filter by Employee Type to separate office work from field work.
Export a project plan to Excel
To view a project plan in an .xlsx sheet:
Go to the Project Plan for your specific project.
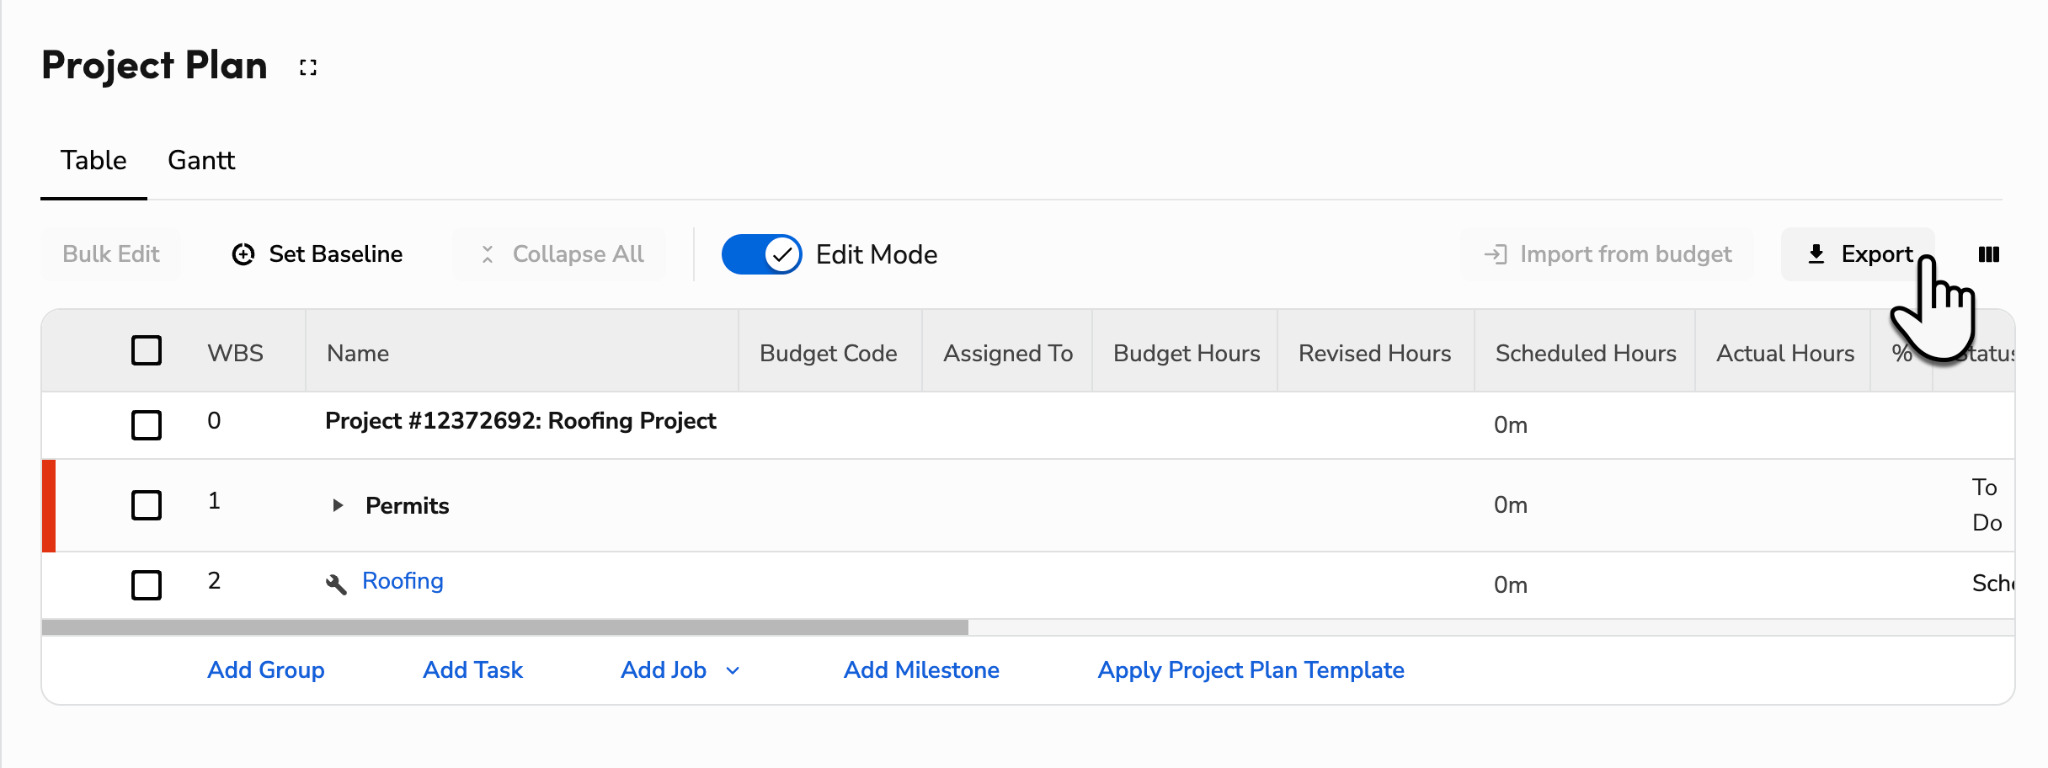
Click Export. The project plan is automatically downloaded to your device in a .xlsx format.
View a project plan as a Gantt chart
If you want to view a project plan as a timeline:
Go to the Project Plan for your specific project.
Click the Gantt tab.
Click Days, Weeks, Months, Quarter, or Year to filter the chart accordingly.