Coming soon
Release ST-83
Overview
Many commercial work orders come with a Not-to-Exceed (NTE) amount: the most you can bill without the customer's approval. With NTE limits, office teams add that cap to a job and track spend against it while work is underway. Your team sees an overrun coming before the invoice goes out, not after it's rejected.
Who uses this feature
Administrators, CSRs, dispatchers, and managers
Primarily benefits Commercial Service and Replacement business types
Applies to all trades
Feature configuration
This feature is currently in Private Preview and available for specific accounts. It is subject to change. If you want to enable this feature for your account, contact your CSM.
Account configuration is required to use this feature. Please contact Technical Support for details.
The following permissions are required to use this feature. Please contact the account administrator on your team.
View NTE
Edit NTE
View NTE Settings
Things to know
NTE limits are entered in ServiceTitan. NTE amounts on work orders from ServiceChannel or other CMMS platforms still appear in the job summary and aren't copied into the NTE field. If you use the ServiceChannel integration's Send NTE to custom field preference, the amount goes to a job custom field, which is also separate from the NTE field.
A service agreement's Not-to-Exceed Limit is text that's added to the job summary when you book a visit. It never fills in the job's NTE limit. A visit job gets its NTE from the location's or customer's default, like any other job.
NTE values you already keep in job summaries, tags, or custom fields aren't moved into the new NTE field.
A job's NTE fills in from the location's default first, then the customer's default.
View NTE and Edit NTE are separate permissions. A user with Edit NTE still needs View NTE to see the NTE card on the job.
Once a job is in progress and has an NTE limit, increasing the limit requires a reason.
Current spend is the job's invoice items, plus labor so far, plus tax. Labor so far is the billable value of the technicians' time on the job, based on your rate sheet, and labor already on the invoice isn't counted twice. If your account uses timesheet activities, time that's still running counts too; otherwise, time counts once the activity ends.
Best practices
Set customer and location defaults before you start booking NTE jobs, so new jobs fill in automatically.
Add escalation contacts to customer and location records first. NTE escalation contacts can only use contact methods already on the record.
Give everyone who approves increases the Edit NTE permission, and make sure they keep NTE notifications on, so a request doesn't sit unseen while the technician waits.
Give View NTE to the dispatchers and account managers who watch spend, not only the people who set limits.
Use cases
A facilities customer sends a work order with a $500 NTE. The CSR books the job, and the NTE fills in from the location's default.
A dispatcher sees a job's card reach 90% of its limit and calls the technician before more work is done.
A technician finds a failed part mid-job and requests more time. The service manager approves a new limit while the technician is still on site.
An administrator sets defaults for 200 commercial customers in one pass on the Not-to-Exceed Limit Settings page.
Step 1: Give your team NTE permissions
Go to the top toolbar and click Settings
 .
In the side panel, go to People > Employees or Role Permissions.
Click Edit next to the employee or role you want to update.
In the Job Booking & Dispatching > Jobs section, select the NTE permissions the role needs:
View NTE: See the NTE card and NTE values on jobs.
Edit NTE: Set the NTE when booking a job, change a job's NTE limit and escalation contacts, and review increase requests.
View NTE Settings: Open the Not-to-Exceed Limit Settings page to manage customer defaults.
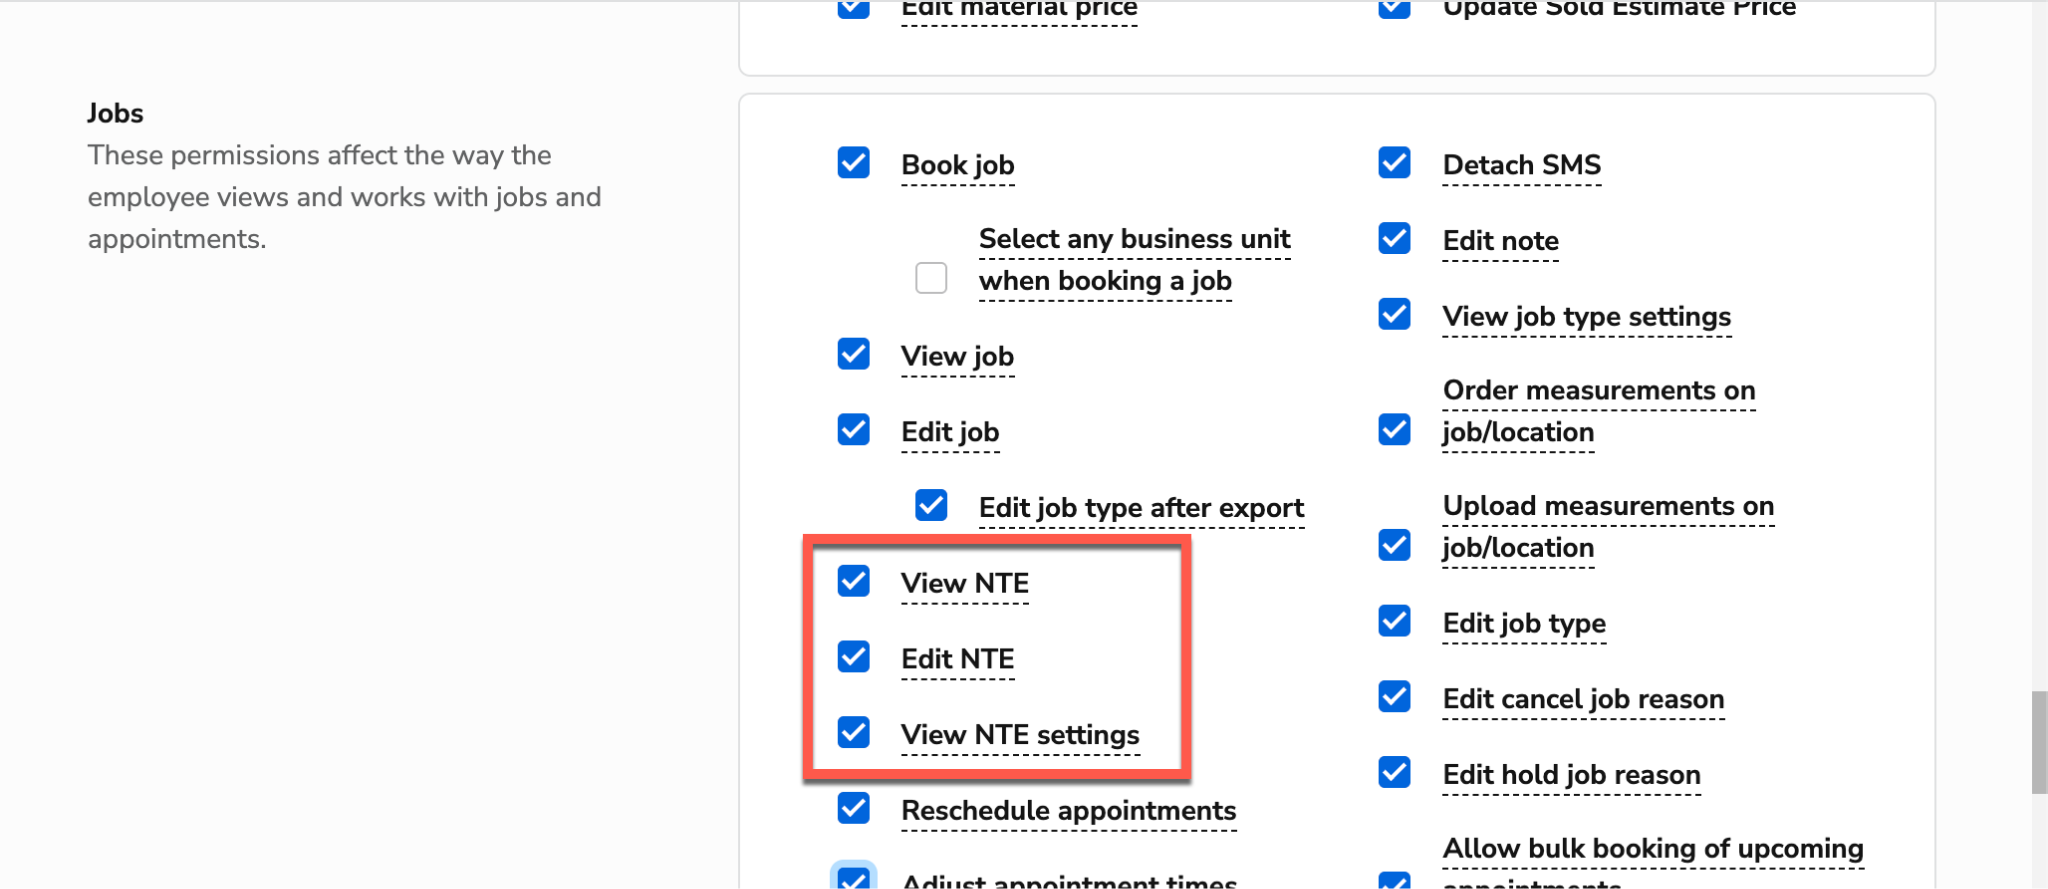
When finished, click Save Changes.
Note: When NTE is added to your account, roles that have the View job permission also get View NTE, and roles that have the Edit job permission also get Edit NTE.
Step 2: Set default NTE limits for customers and locations
Defaults fill in the NTE fields automatically when you book a job for that customer or location.
Set a default on a customer or location record
Open the customer or location record and click Edit.
In the Payment Details section, go to Not-to-Exceed Limit, select Dollar amount, enter the default NTE limit, and select the External Escalation Contacts.
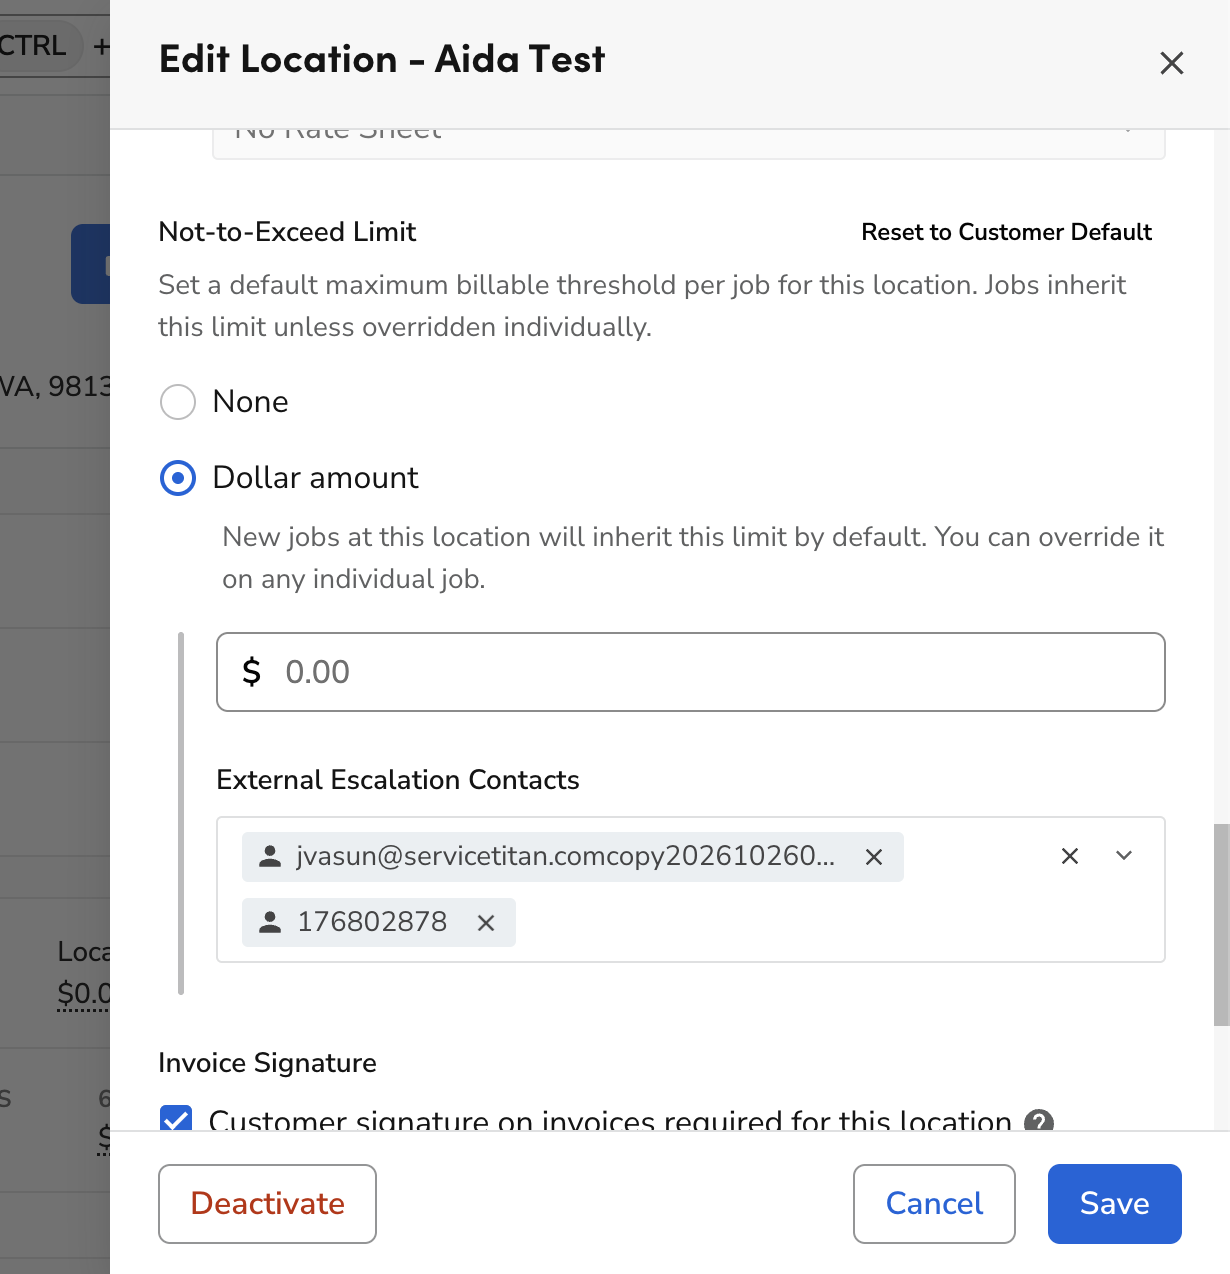
Save your changes. The default is shown under Additional Info, for example $5,000.00 / Job. Hover over it to see whether it's the Customer default or a Location override.
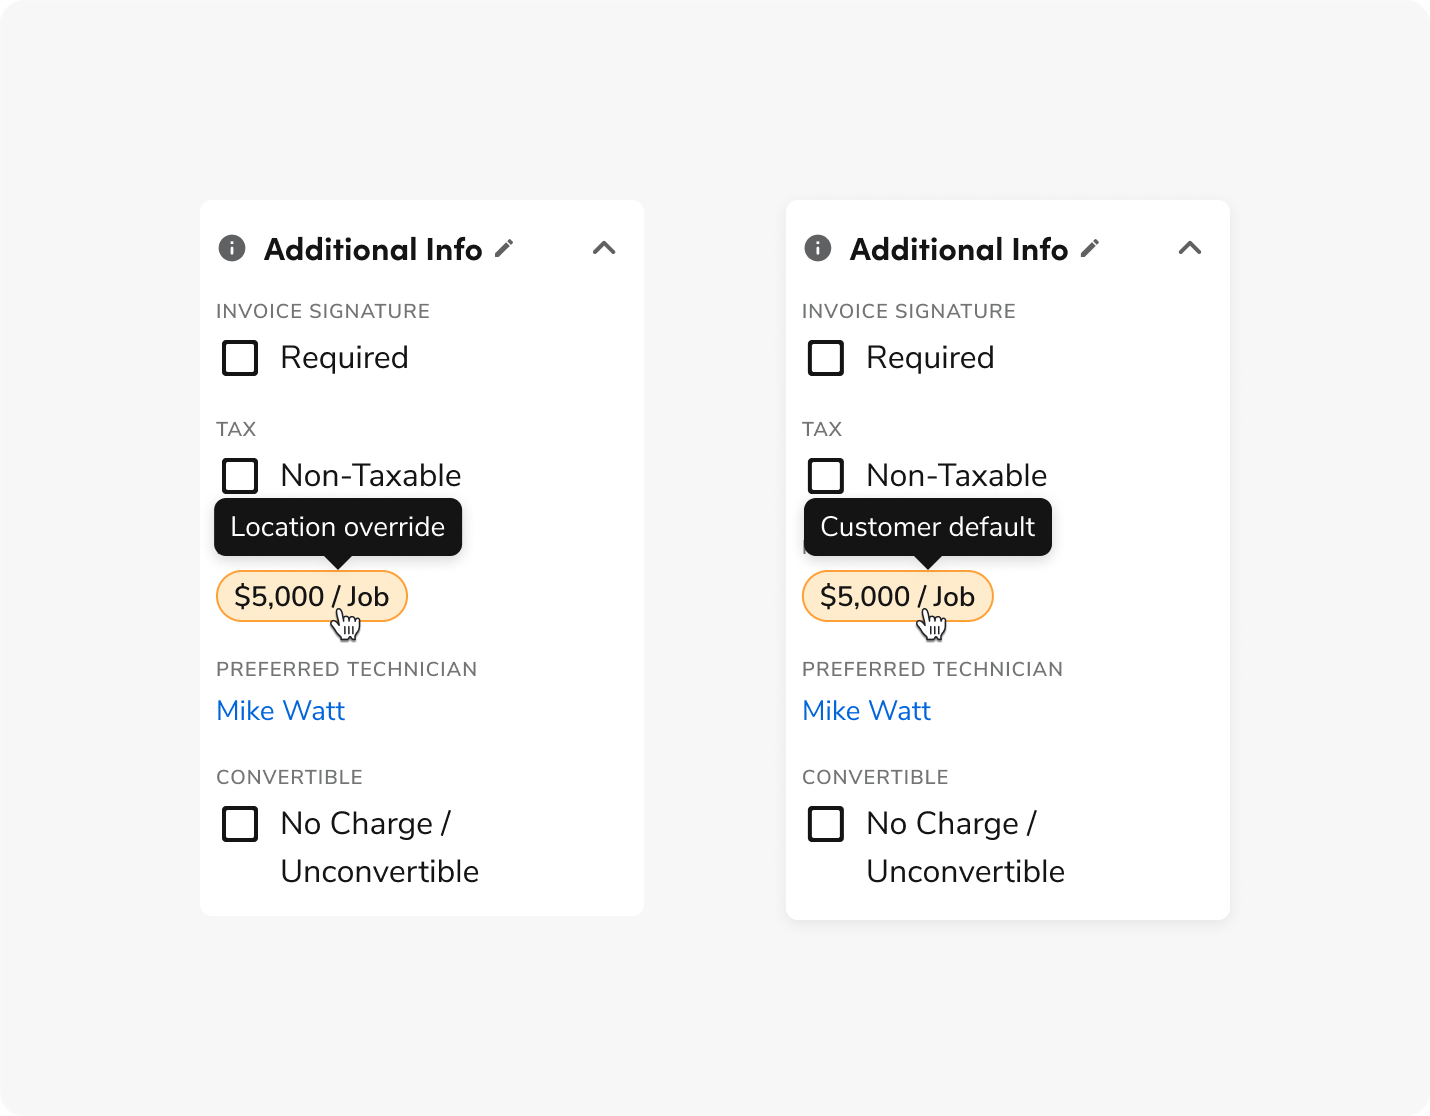
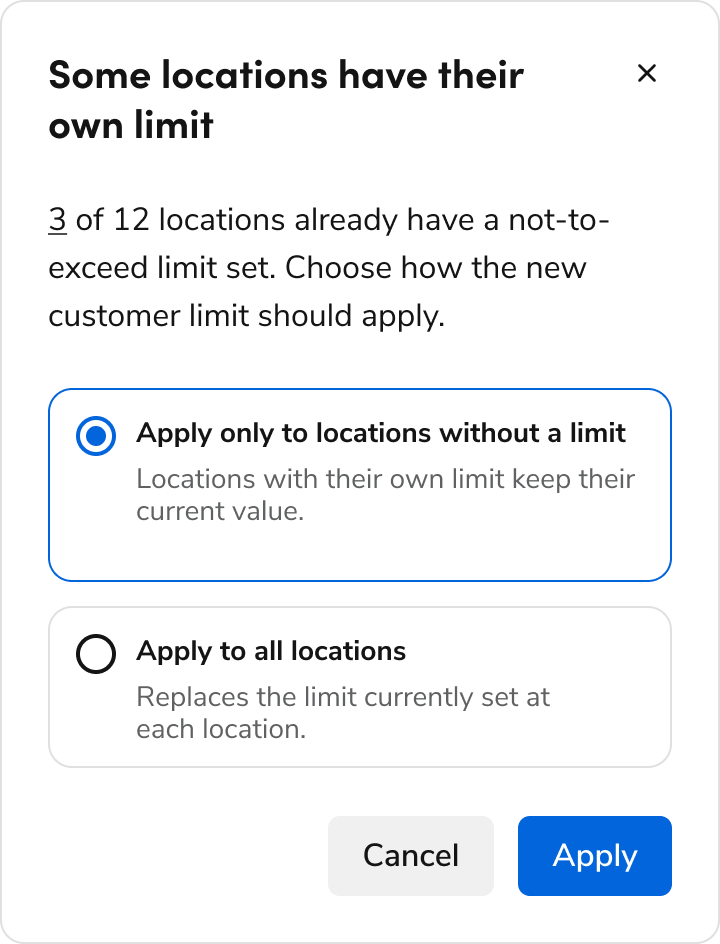
Note: A location's default overrides its customer's default. To give a location no limit even though its customer has one, select None on the location. To edit these fields, you need the Edit Customer or Edit Location permission. When you change a customer's existing default and some of its locations have their own limit, a pop-up asks whether to apply the new default only to locations without a limit or to all locations.
Manage customer defaults on the Not-to-Exceed Limit Settings page
Go to the top toolbar and click Settings
. In the side panel, go to Operations > Not-to-Exceed Limit Settings.
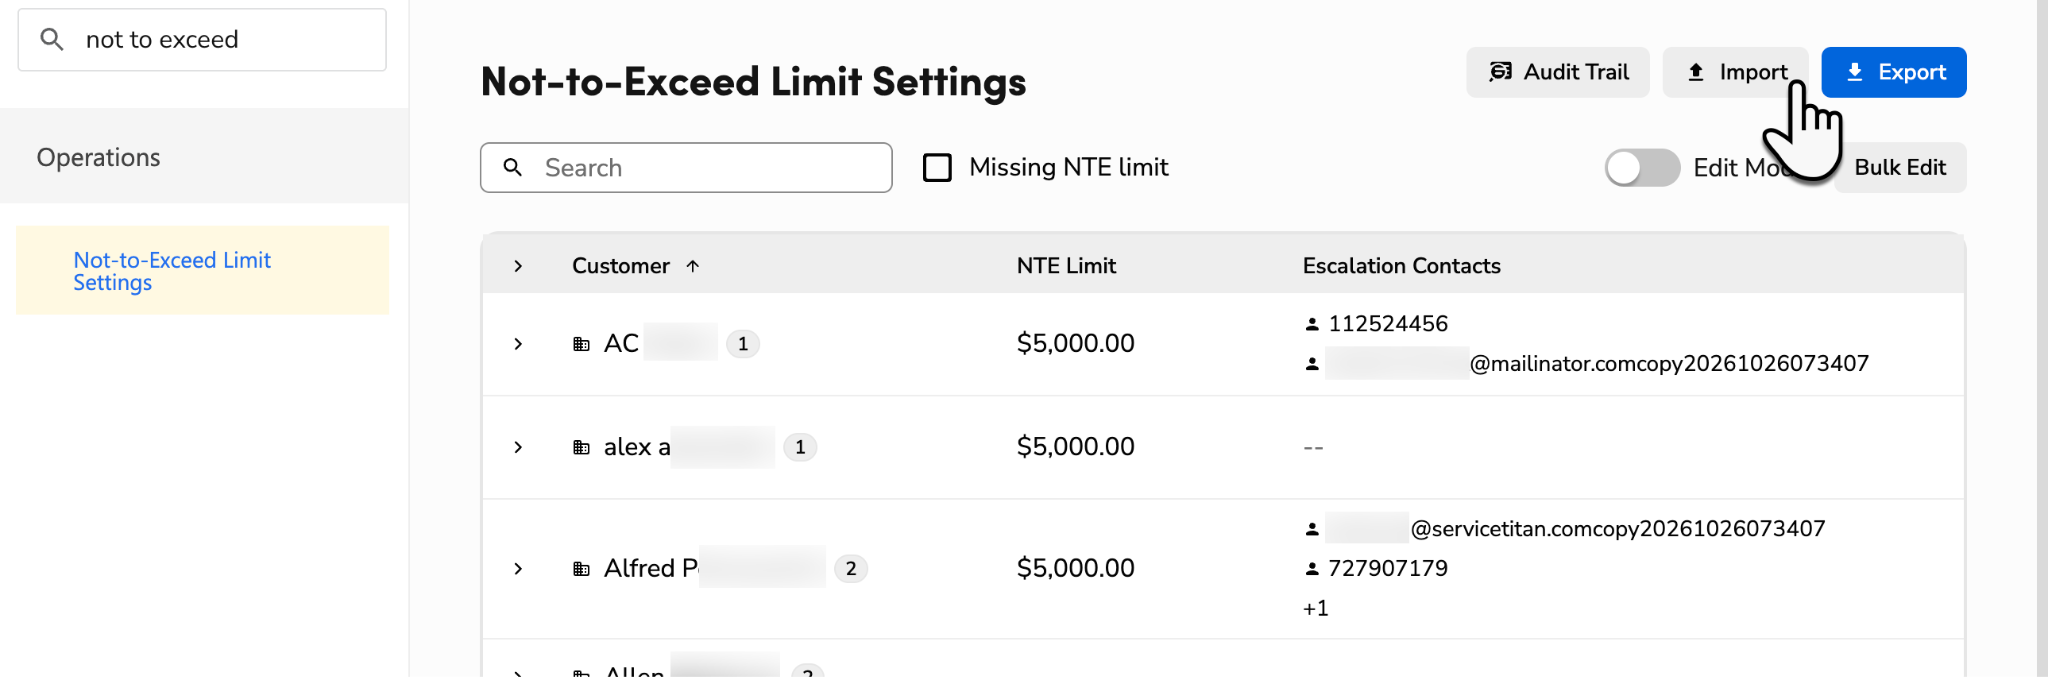
Search by customer name, or select Missing NTE limit to see customers without one. A limit that isn't set shows as --. Each customer's locations are listed under it, and a location with its own limit is marked Override.
To edit one customer or location, turn on Edit Mode, then change the NTE Limit or Escalation Contacts in its row. Changes save automatically.
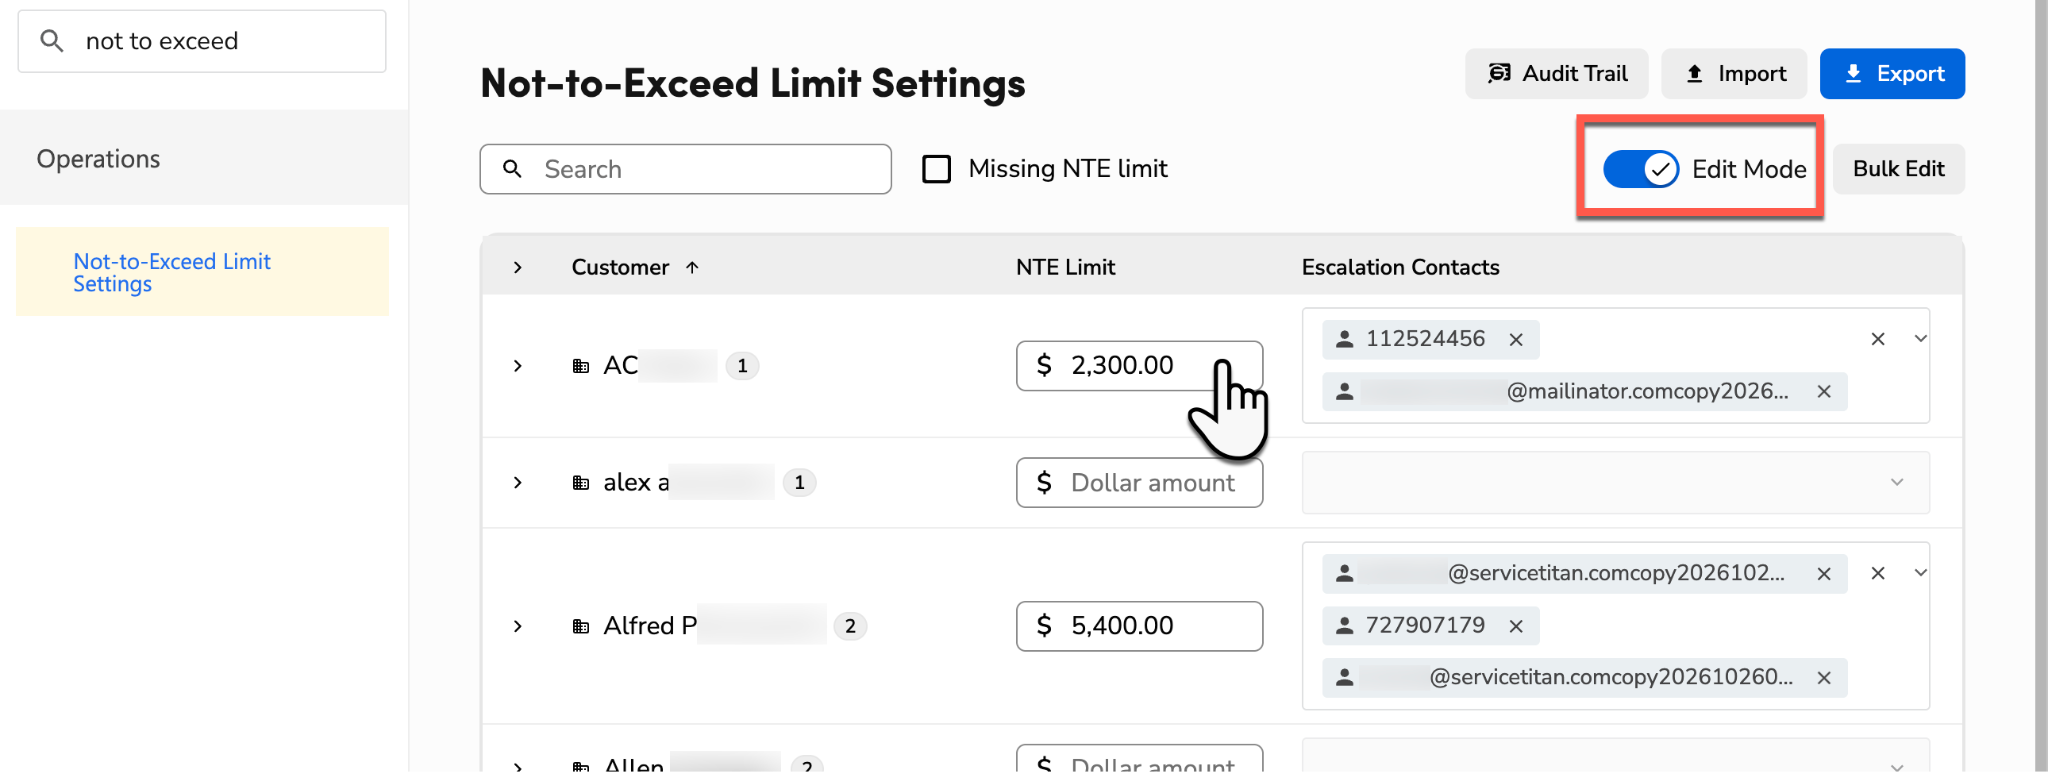
To edit several customers or locations at once, click Bulk Edit, select them, then click Continue.
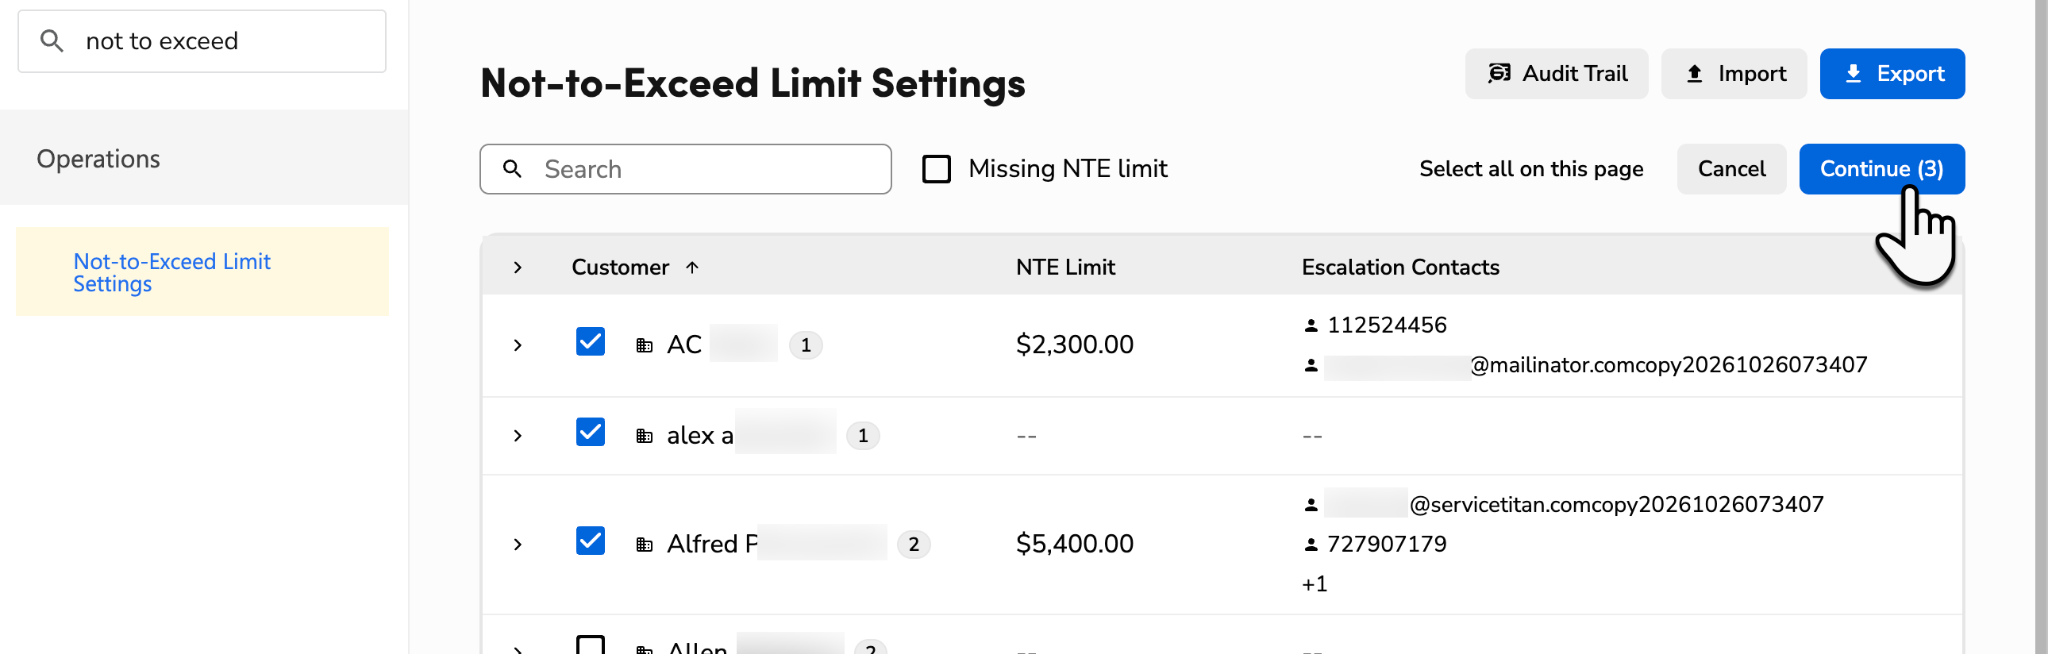
In the Configure Bulk NTE Settings pop-up, select the fields to change, enter the new values, then click Apply. One update can cover up to 1,000 customers and 1,000 locations. If you select all matching customers and more than 1,000 match, only the first 1,000 are selected.
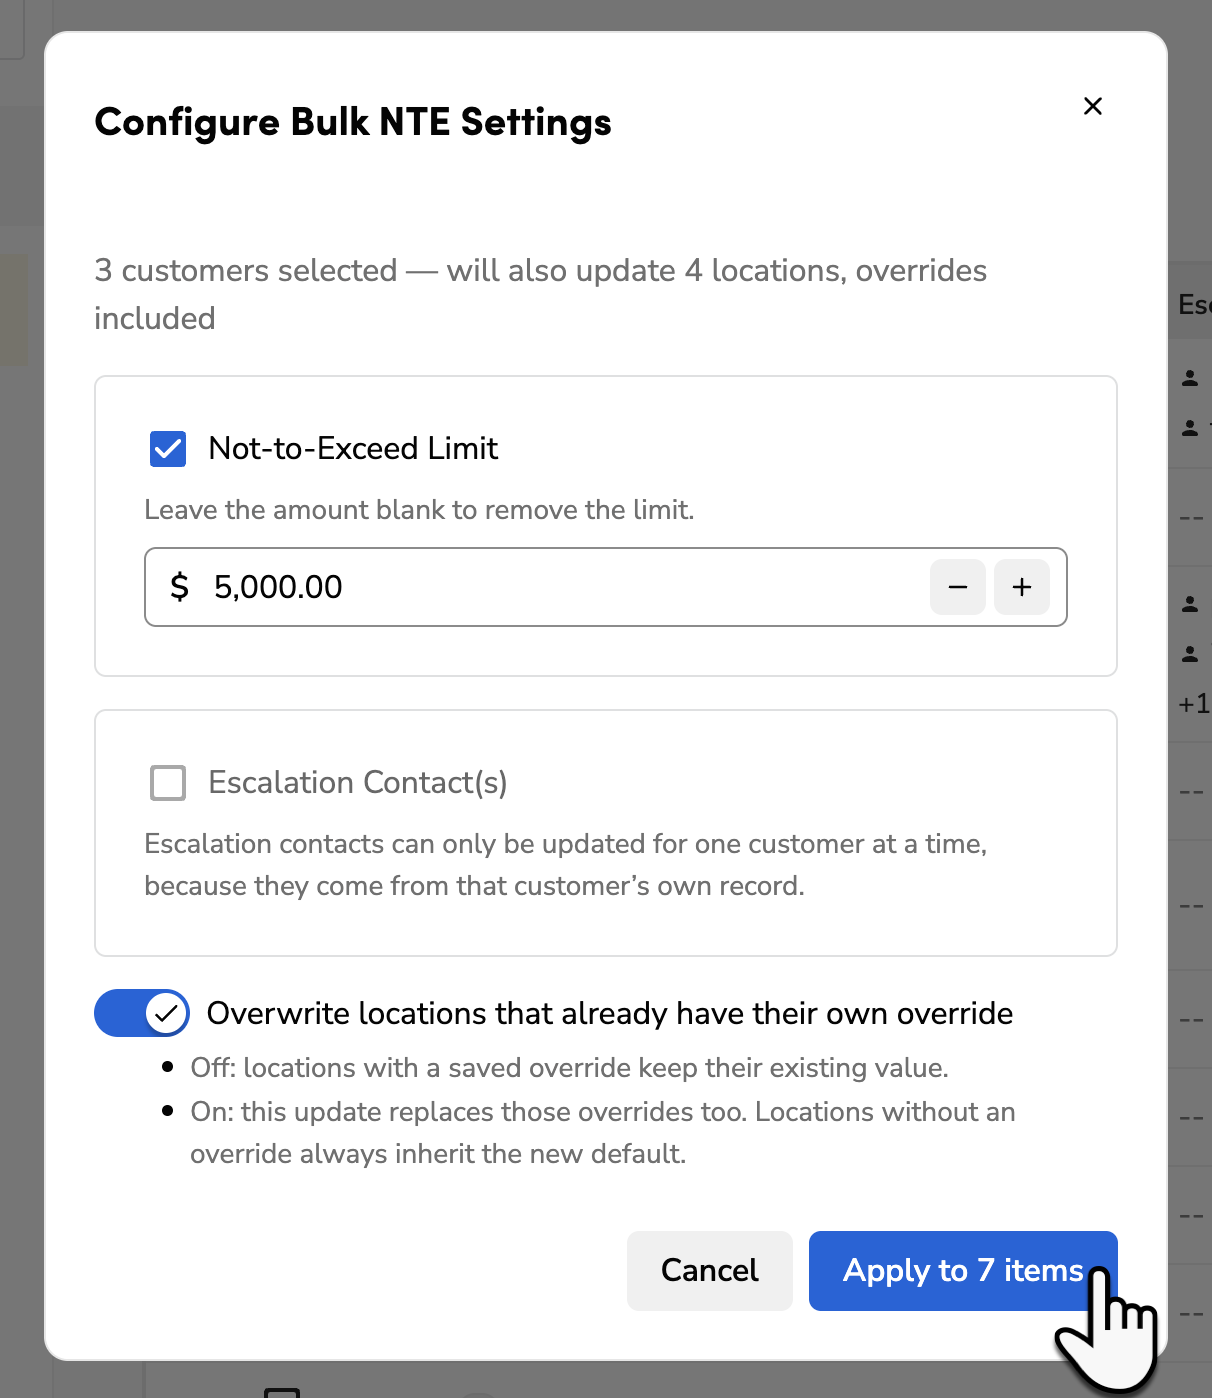
Note: In a bulk edit, contacts can be changed only when everything you selected belongs to one customer. Clearing an NTE Limit also clears its escalation contacts. Locations with their own default keep it unless you select them, or turn on Overwrite locations that already have their own override. To change a location's default, you need the Edit Location permission.
Import or export customer defaults
You can export the NTE defaults for every customer and location to a .csv file, edit the file, and import it again to update many at once.
To export:
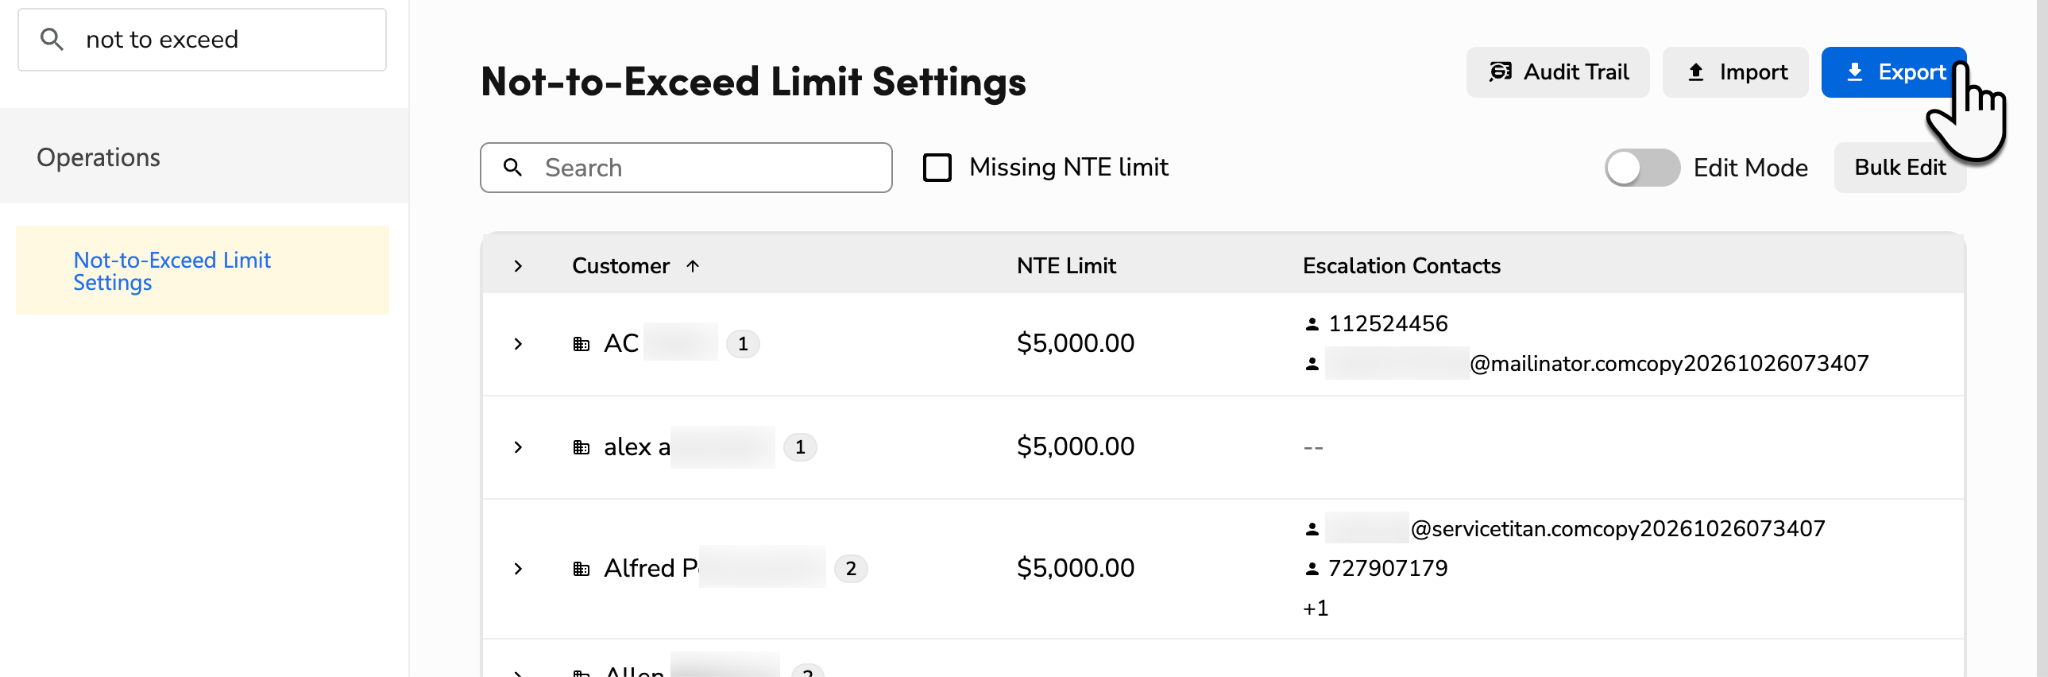
On the Not-to-Exceed Limit Settings page, click Export. The .csv file is saved to your download folder. Each customer and each location has its own row. A customer without a limit exports blank, a location shows the limit it uses (its own or its customer's), and a location set to no limit shows None.
To import:
On the Not-to-Exceed Limit Settings page, click Import. You need the Edit Customer and Edit Location permissions to import.
Upload your .csv file, then click Review Changes.
Review the results before anything is applied. The Changes tab shows the before and after values for each change, and the Skipped rows tab shows rows with errors and why. To keep a list of the errors, click Download error report.
Click Import, which shows the number of changes, to apply the valid rows.
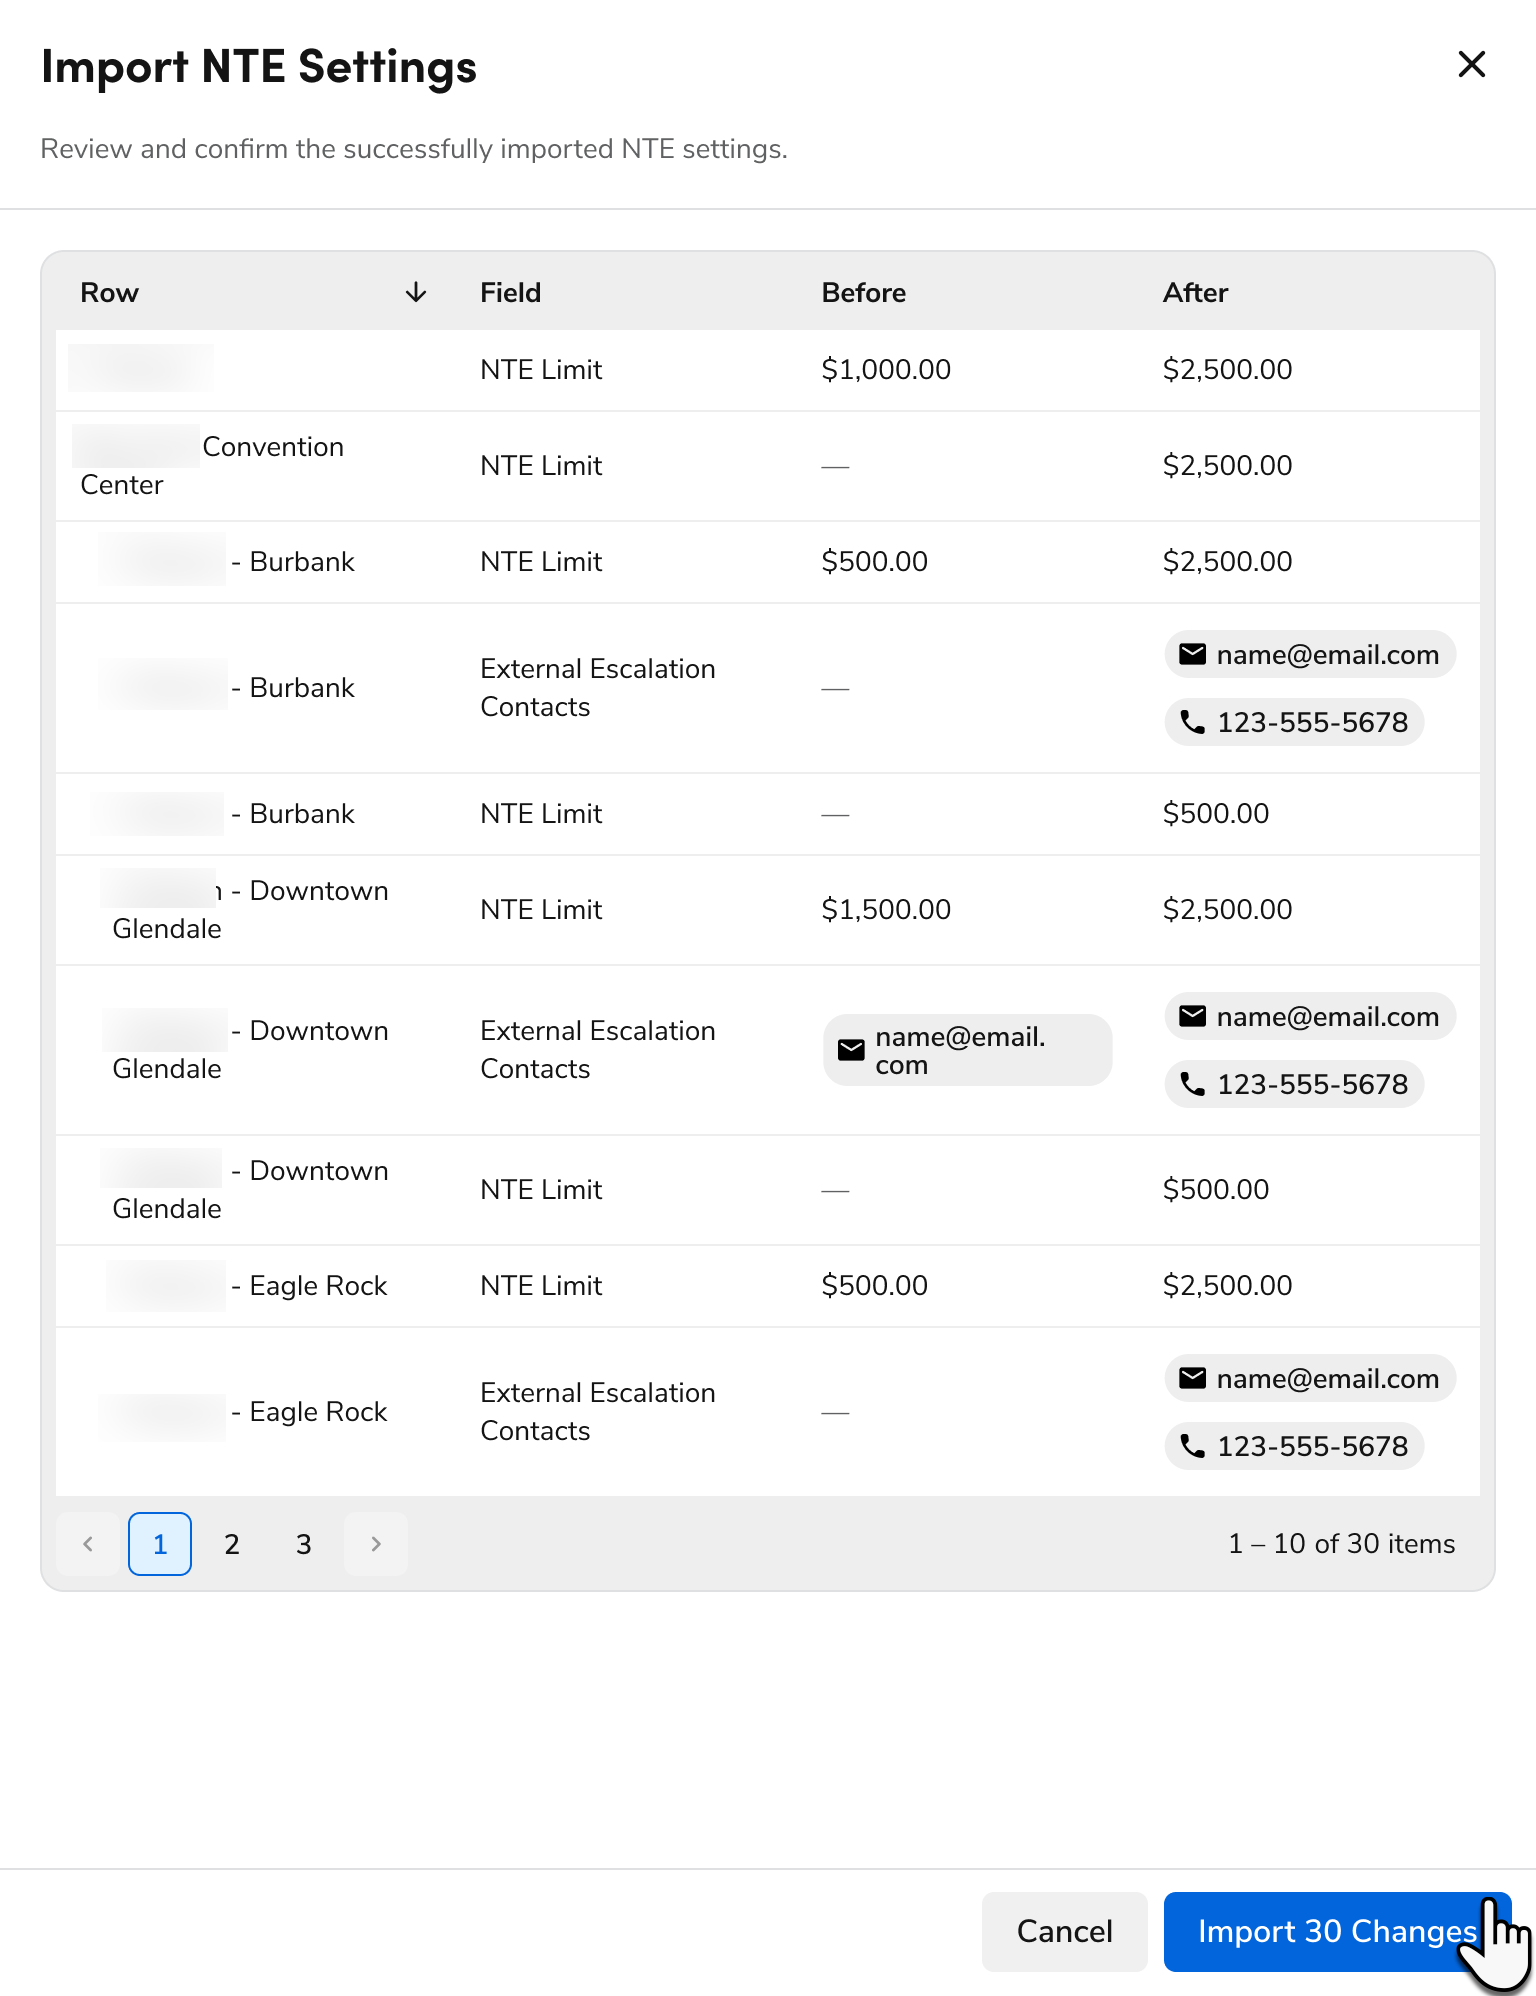
After the import, a message shows how many changes were imported and how many rows were skipped.
Note: In the NTE Limit column, enter a positive amount or leave it blank. A blank customer row has no limit, and a blank location row uses its customer's limit. To give a location no limit, enter None. In the Escalation Contacts column, list phone numbers or email addresses that are already on the customer's or location's record, separated by semicolons; an import can't add new ones. Rows with errors are skipped without stopping the rest of the import.
View the NTE audit trail
The audit trail shows every change made to customer and location NTE defaults: on the Not-to-Exceed Limit Settings page by inline edit, bulk edit, or import, and directly on a customer or location record.
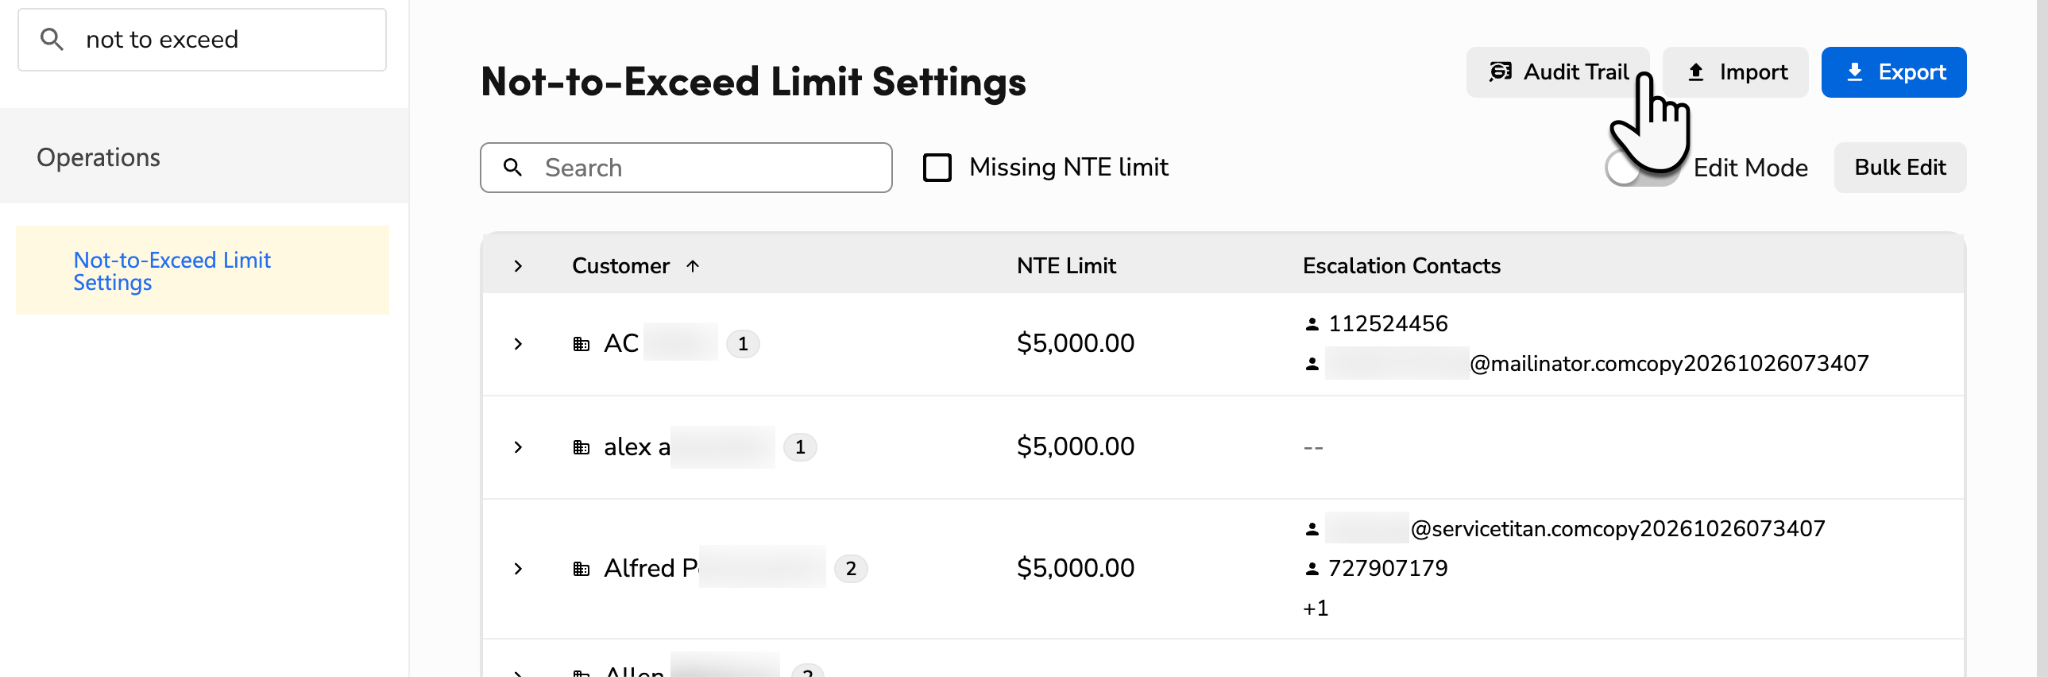
On the Not-to-Exceed Limit Settings page, click Audit Trail.
Filter by date range, username, action, or field to find a change.
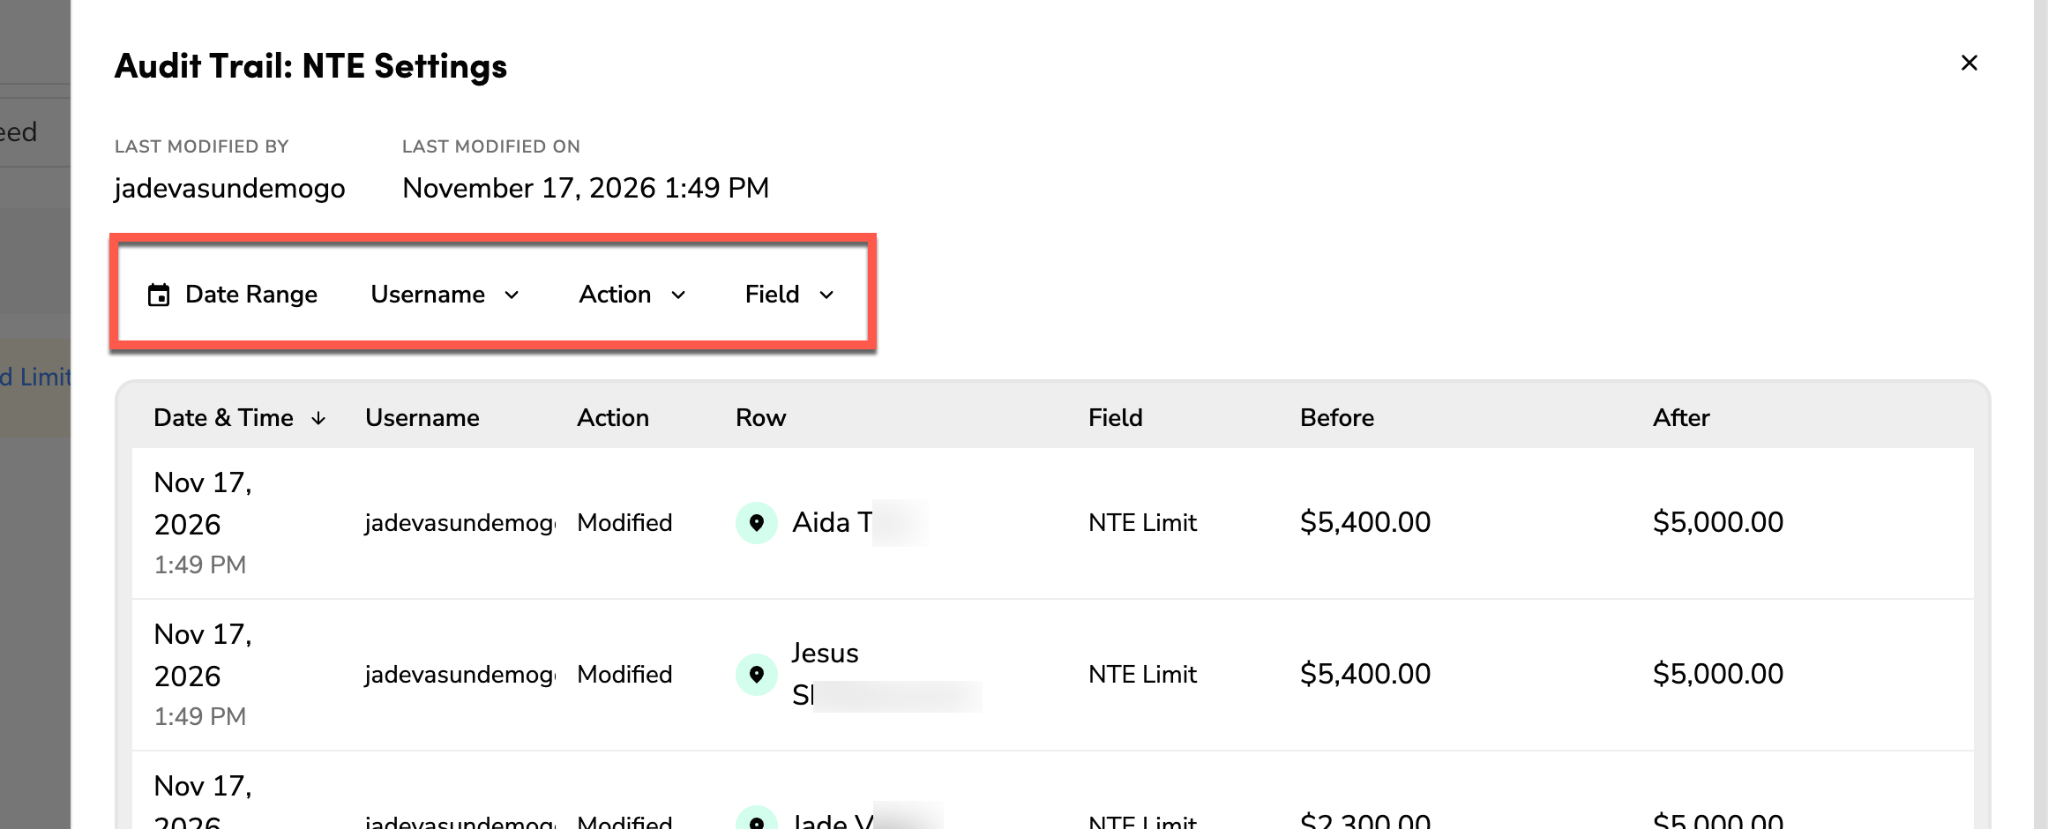
Each entry shows when the change was made, who made it, the action (added, modified, or removed), the field, the customer or location, and the value before and after. A bulk edit or import creates one entry for each customer or location and each field it changed. Entries for locations that use their customer's default can take a moment to appear. You need the View NTE Settings permission to see the audit trail.
Step 3: Add an NTE limit when booking a job
Begin booking the job as usual.
In the Job Details section, go to Not-to-Exceed Limit, select Dollar amount, and enter the amount. If the location or customer has a default, it's already filled in and marked Location Default Set or Customer Default Set.
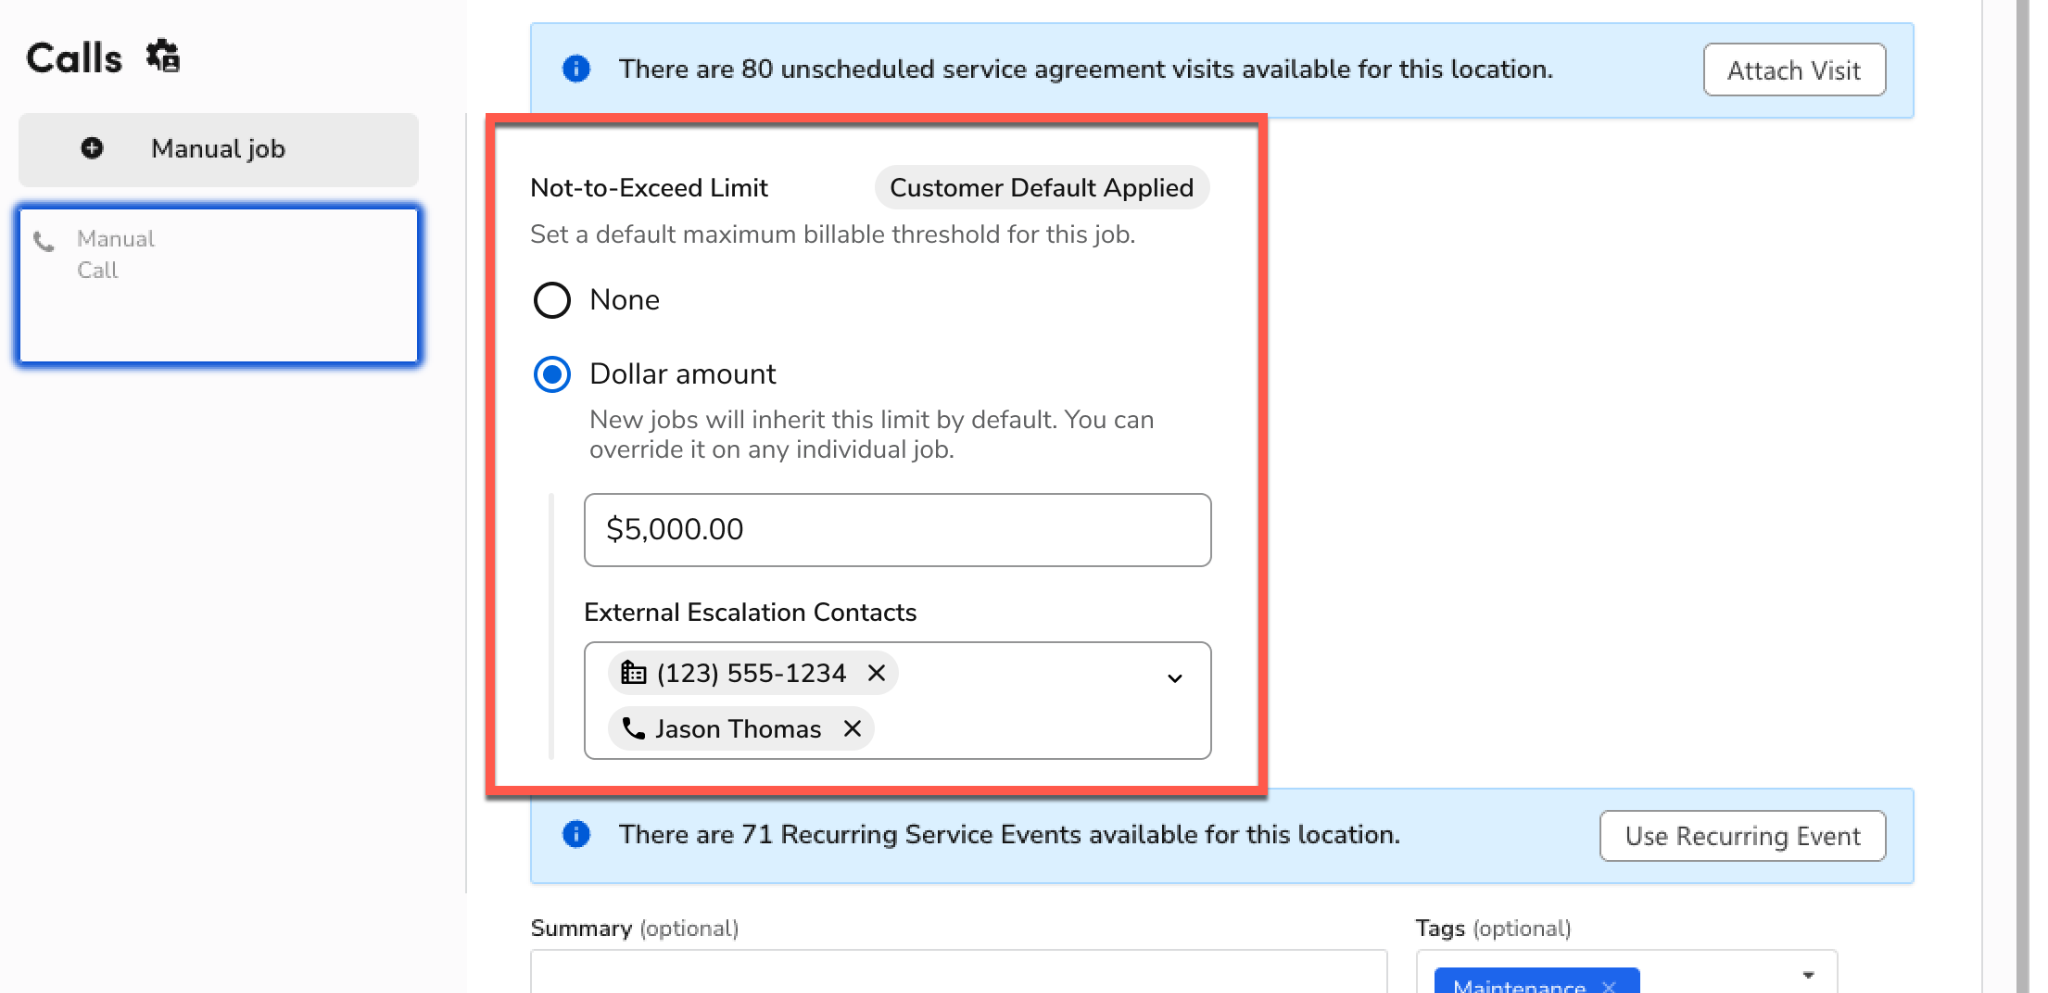
Select the External Escalation Contacts. You need the Edit NTE permission to see these fields when booking.
Click Book Job.
Step 4: Track spend on the job
When a job has an NTE limit, the job record shows the Not-to-Exceed Limit card: the Dollar limit, a progress bar, the percent used, and the current spend out of the limit (for example, $420.00 / $1,000.00). The bar turns yellow at 75% and red at 90%, and Limit Reached or Limit Exceeded appears at 100% or more.
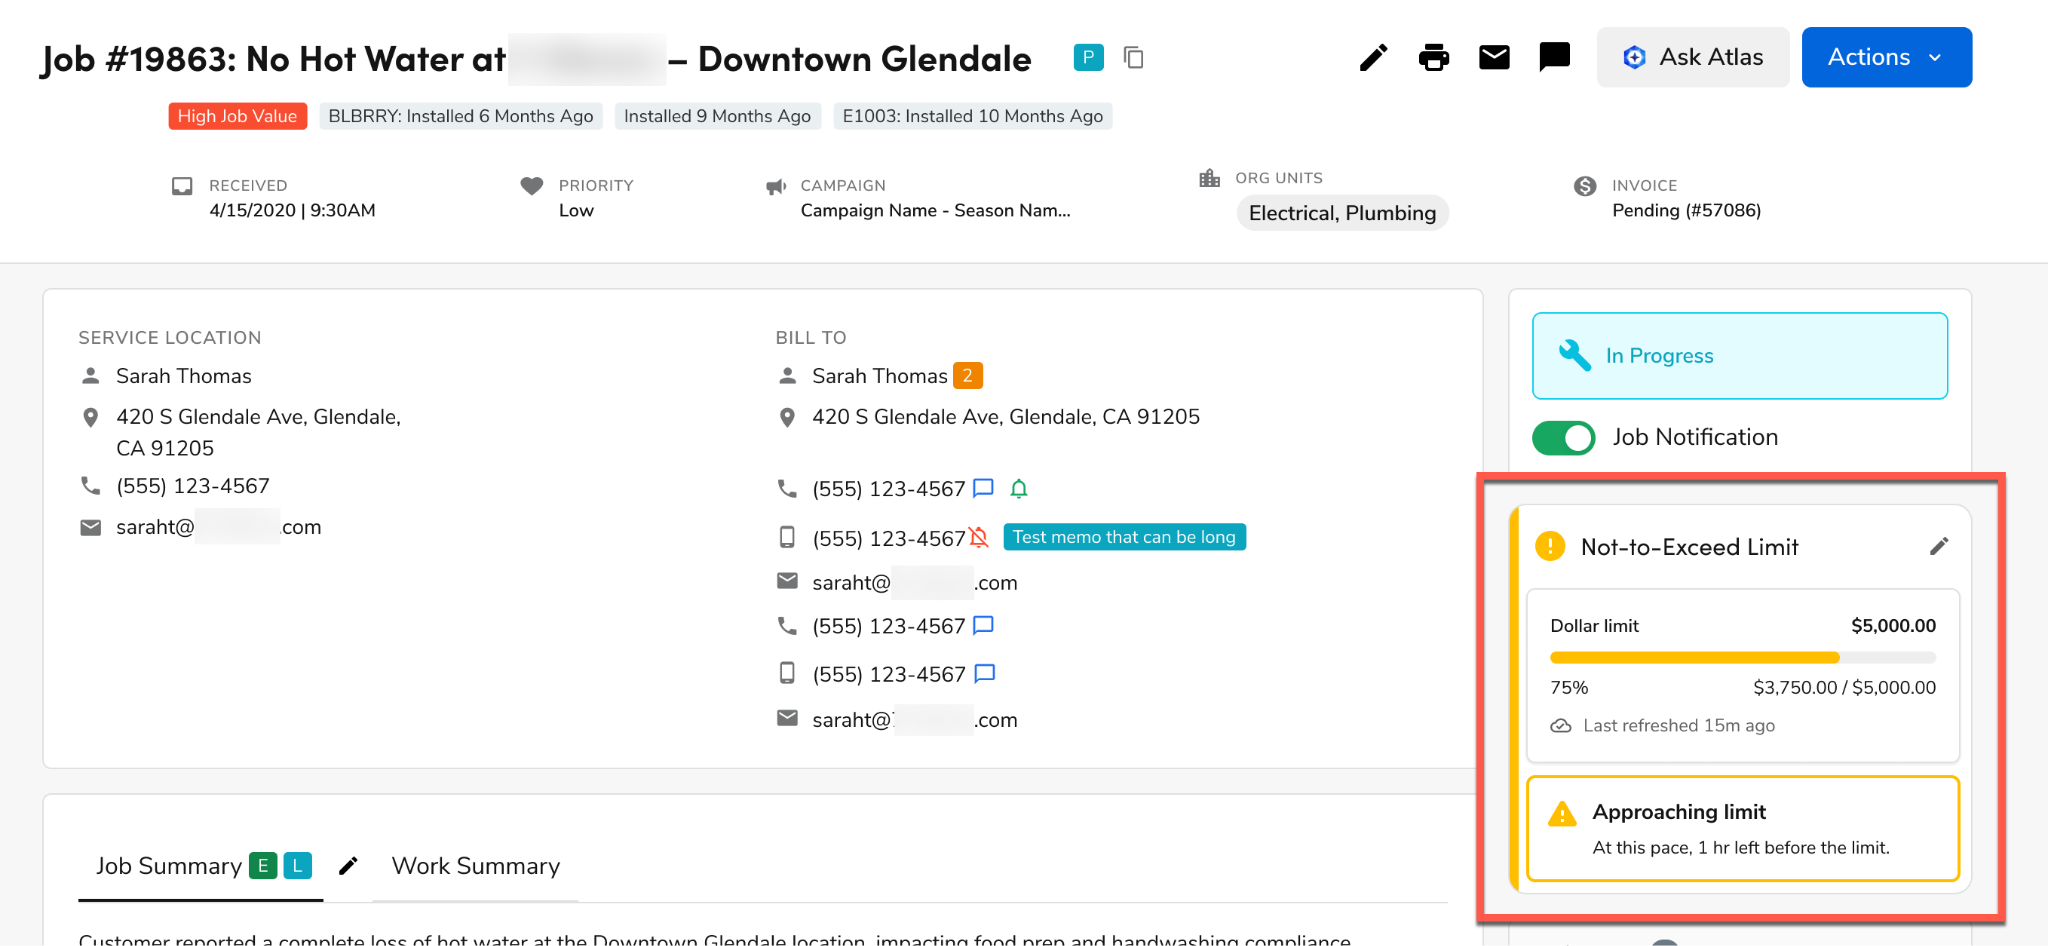
Tip: Dispatchers can also see NTE on the Dispatch Board. In the Job Details Flyout, the Not-to-Exceed Limit section below the appointment shows the same details as the card. So does the pop-up that opens when you hover over the appointment.
Step 5: Set or change a job's NTE limit
On the job record, click Edit to open the Edit Job flyout. If the job already has a limit and isn't in progress, you can also click the pencil icon on the Not-to-Exceed Limit card.
If the job is in progress, the pencil icon opens the Edit NTE Limit panel instead, where you request a higher limit. See Step 7.
In the Edit Job flyout, go to the Payment Details section. Under Not-to-Exceed Limit, select Dollar amount, enter the limit, add External Escalation Contacts, then click Save.
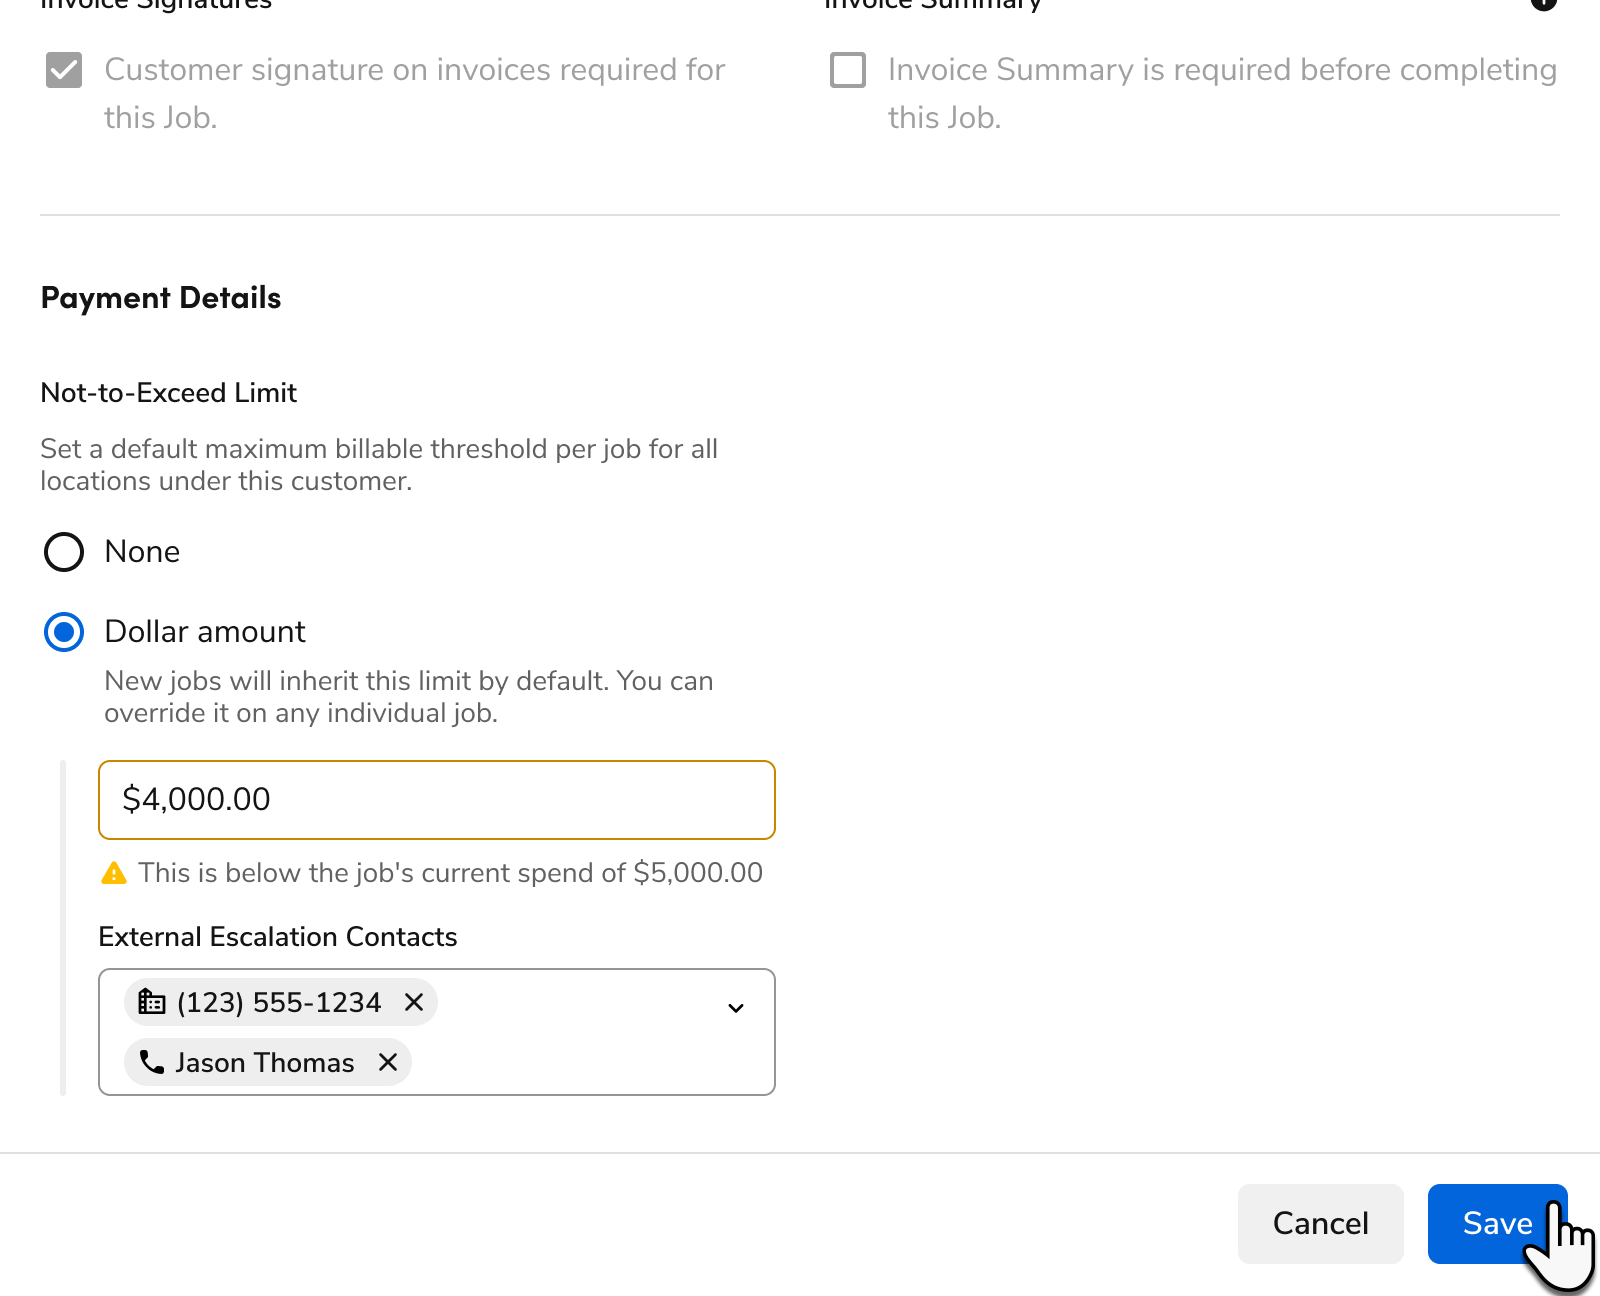
Note: If the job is in progress and you raise its existing limit, the Why Did You Edit the NTE Limit? window asks for a reason before the change is saved. Lowering the limit or changing only the contacts doesn't need a reason. While an increase request is waiting for review, the limit can't be changed here.
Step 6: Review an NTE increase request
You need the Edit NTE permission to review requests.
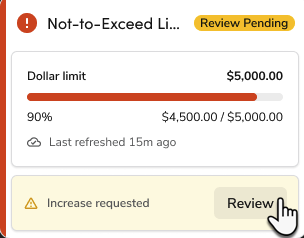
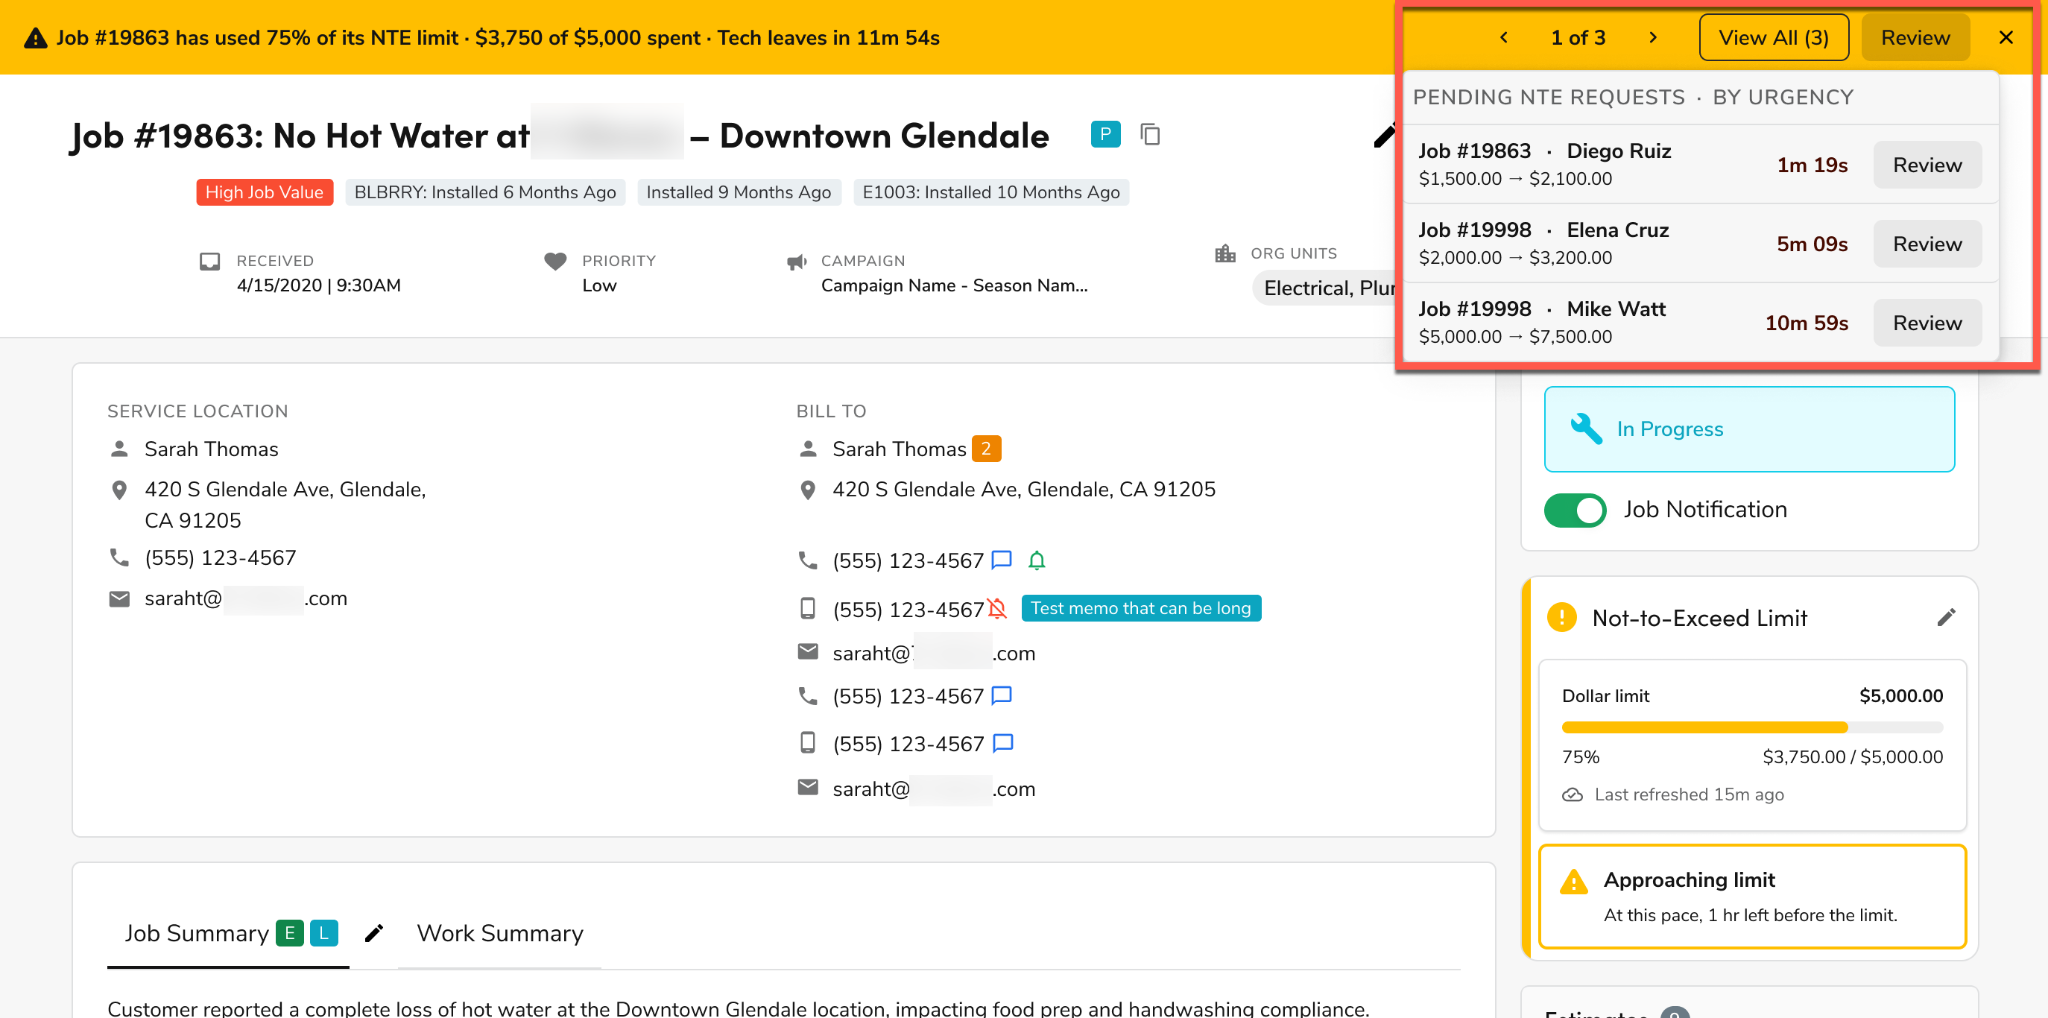
When a technician requests an increase, the job's Not-to-Exceed Limit card shows Review Pending and Increase requested, and a banner appears at the top of the job record. The banner also appears on other job records, so reviewers see the request wherever they are.
Click Review on the banner or on the card.
In the Not-to-Exceed Limit Increase Request panel, review the requester, current spend, the reason, and any notes.
Choose one:
Approve with new limit: Enter or adjust the New Limit. It must be higher than the current limit.
Deny the request: Enter a Denial Reason. The technician sees it.
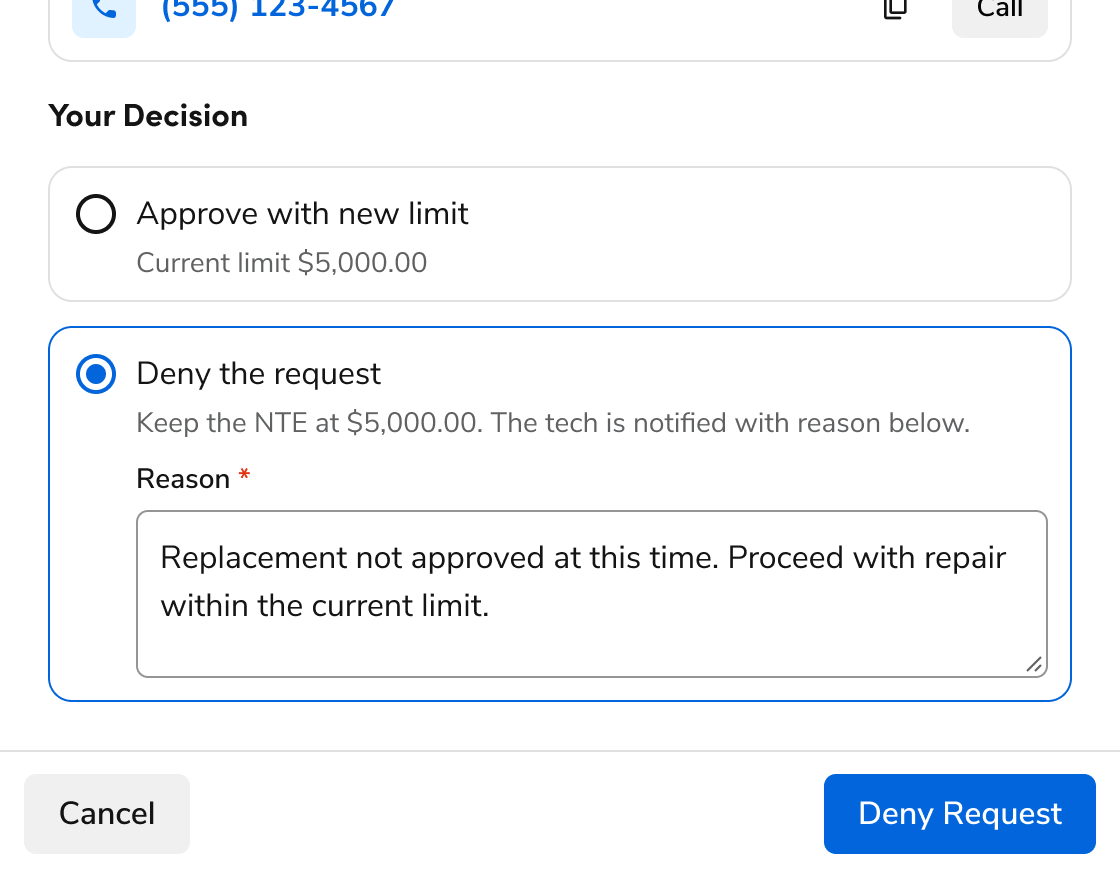
Click Approve, which shows the new amount, or Deny Request.
The decision and the request are recorded in the job's history. If several requests are pending, the banner shows how many; click View All to see them.
Step 7: Request an increase on a technician's behalf
Office users can enter an increase request for a technician, for example after a phone call. You need the View NTE and Edit NTE permissions.
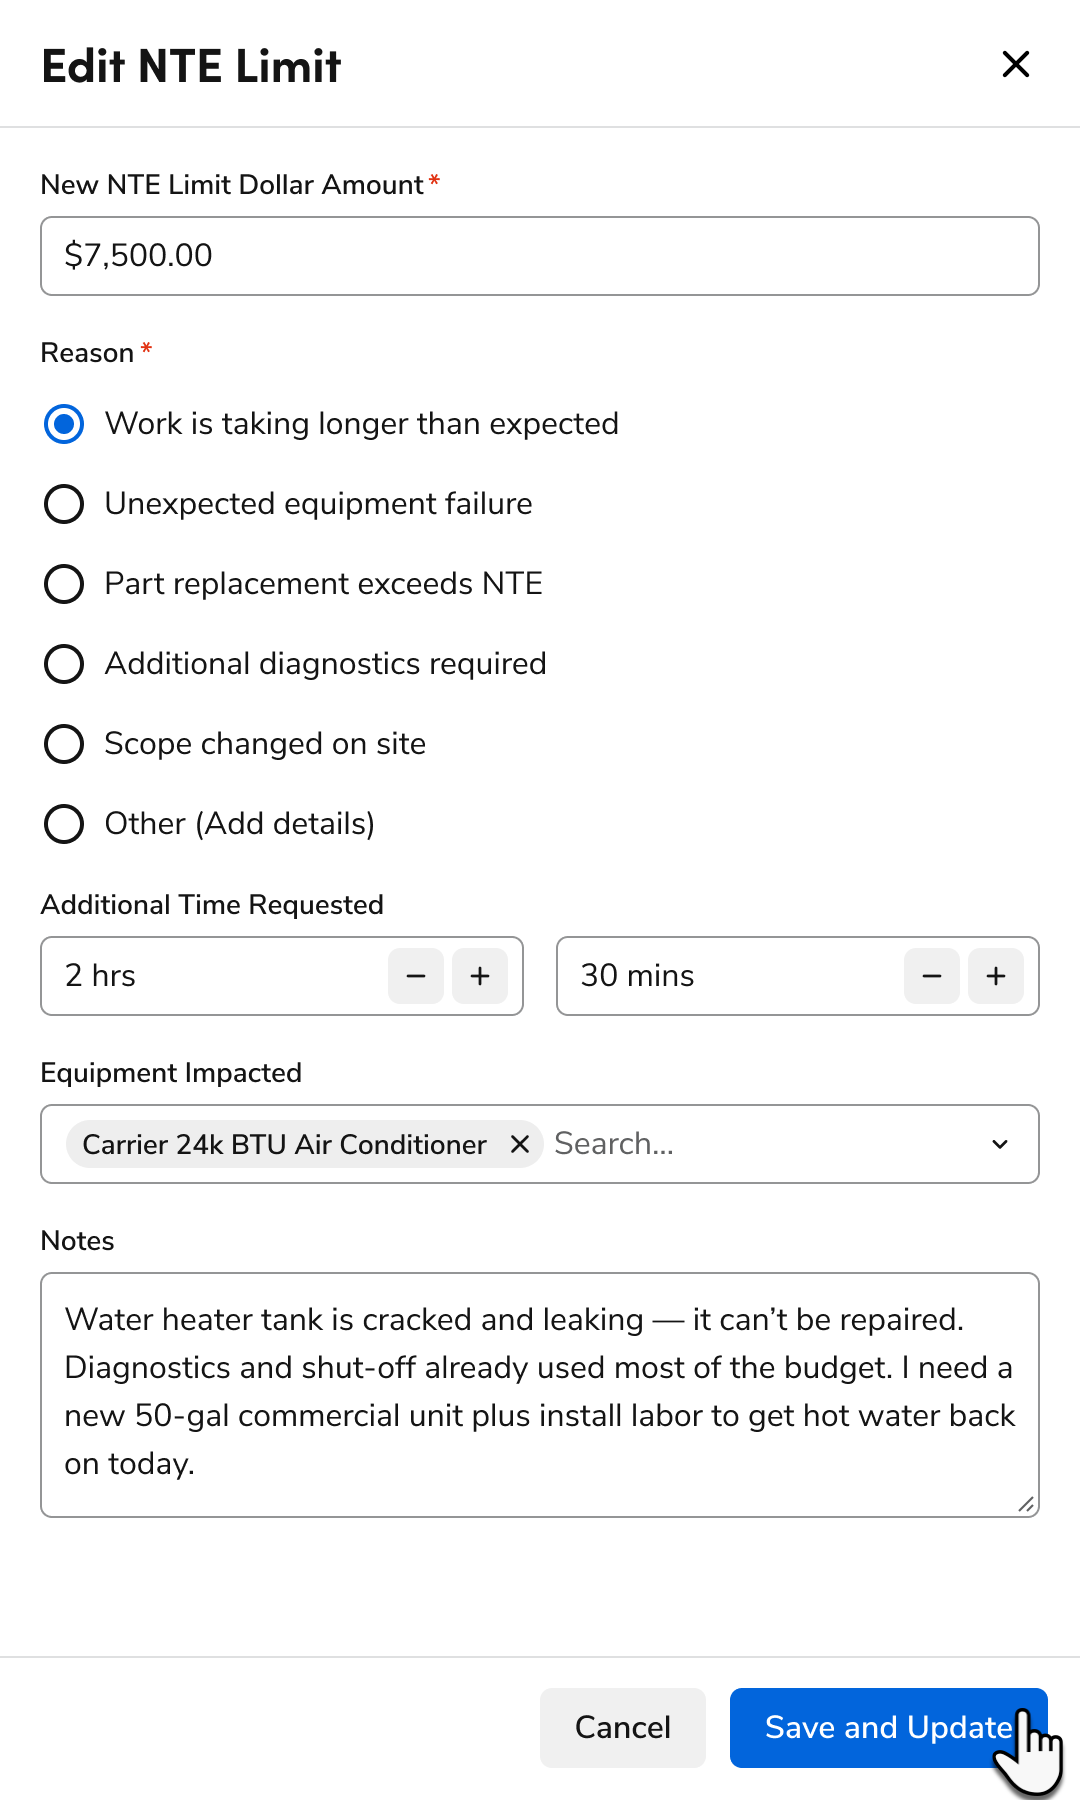
On a job that's in progress, with no request waiting for review, click the pencil icon on the Not-to-Exceed Limit card.
In the Edit NTE Limit panel, enter the New NTE Limit Dollar Amount and select a Reason. If you select Other, add Details. You can also add the Additional Time Requested, the Equipment Impacted, and Notes.
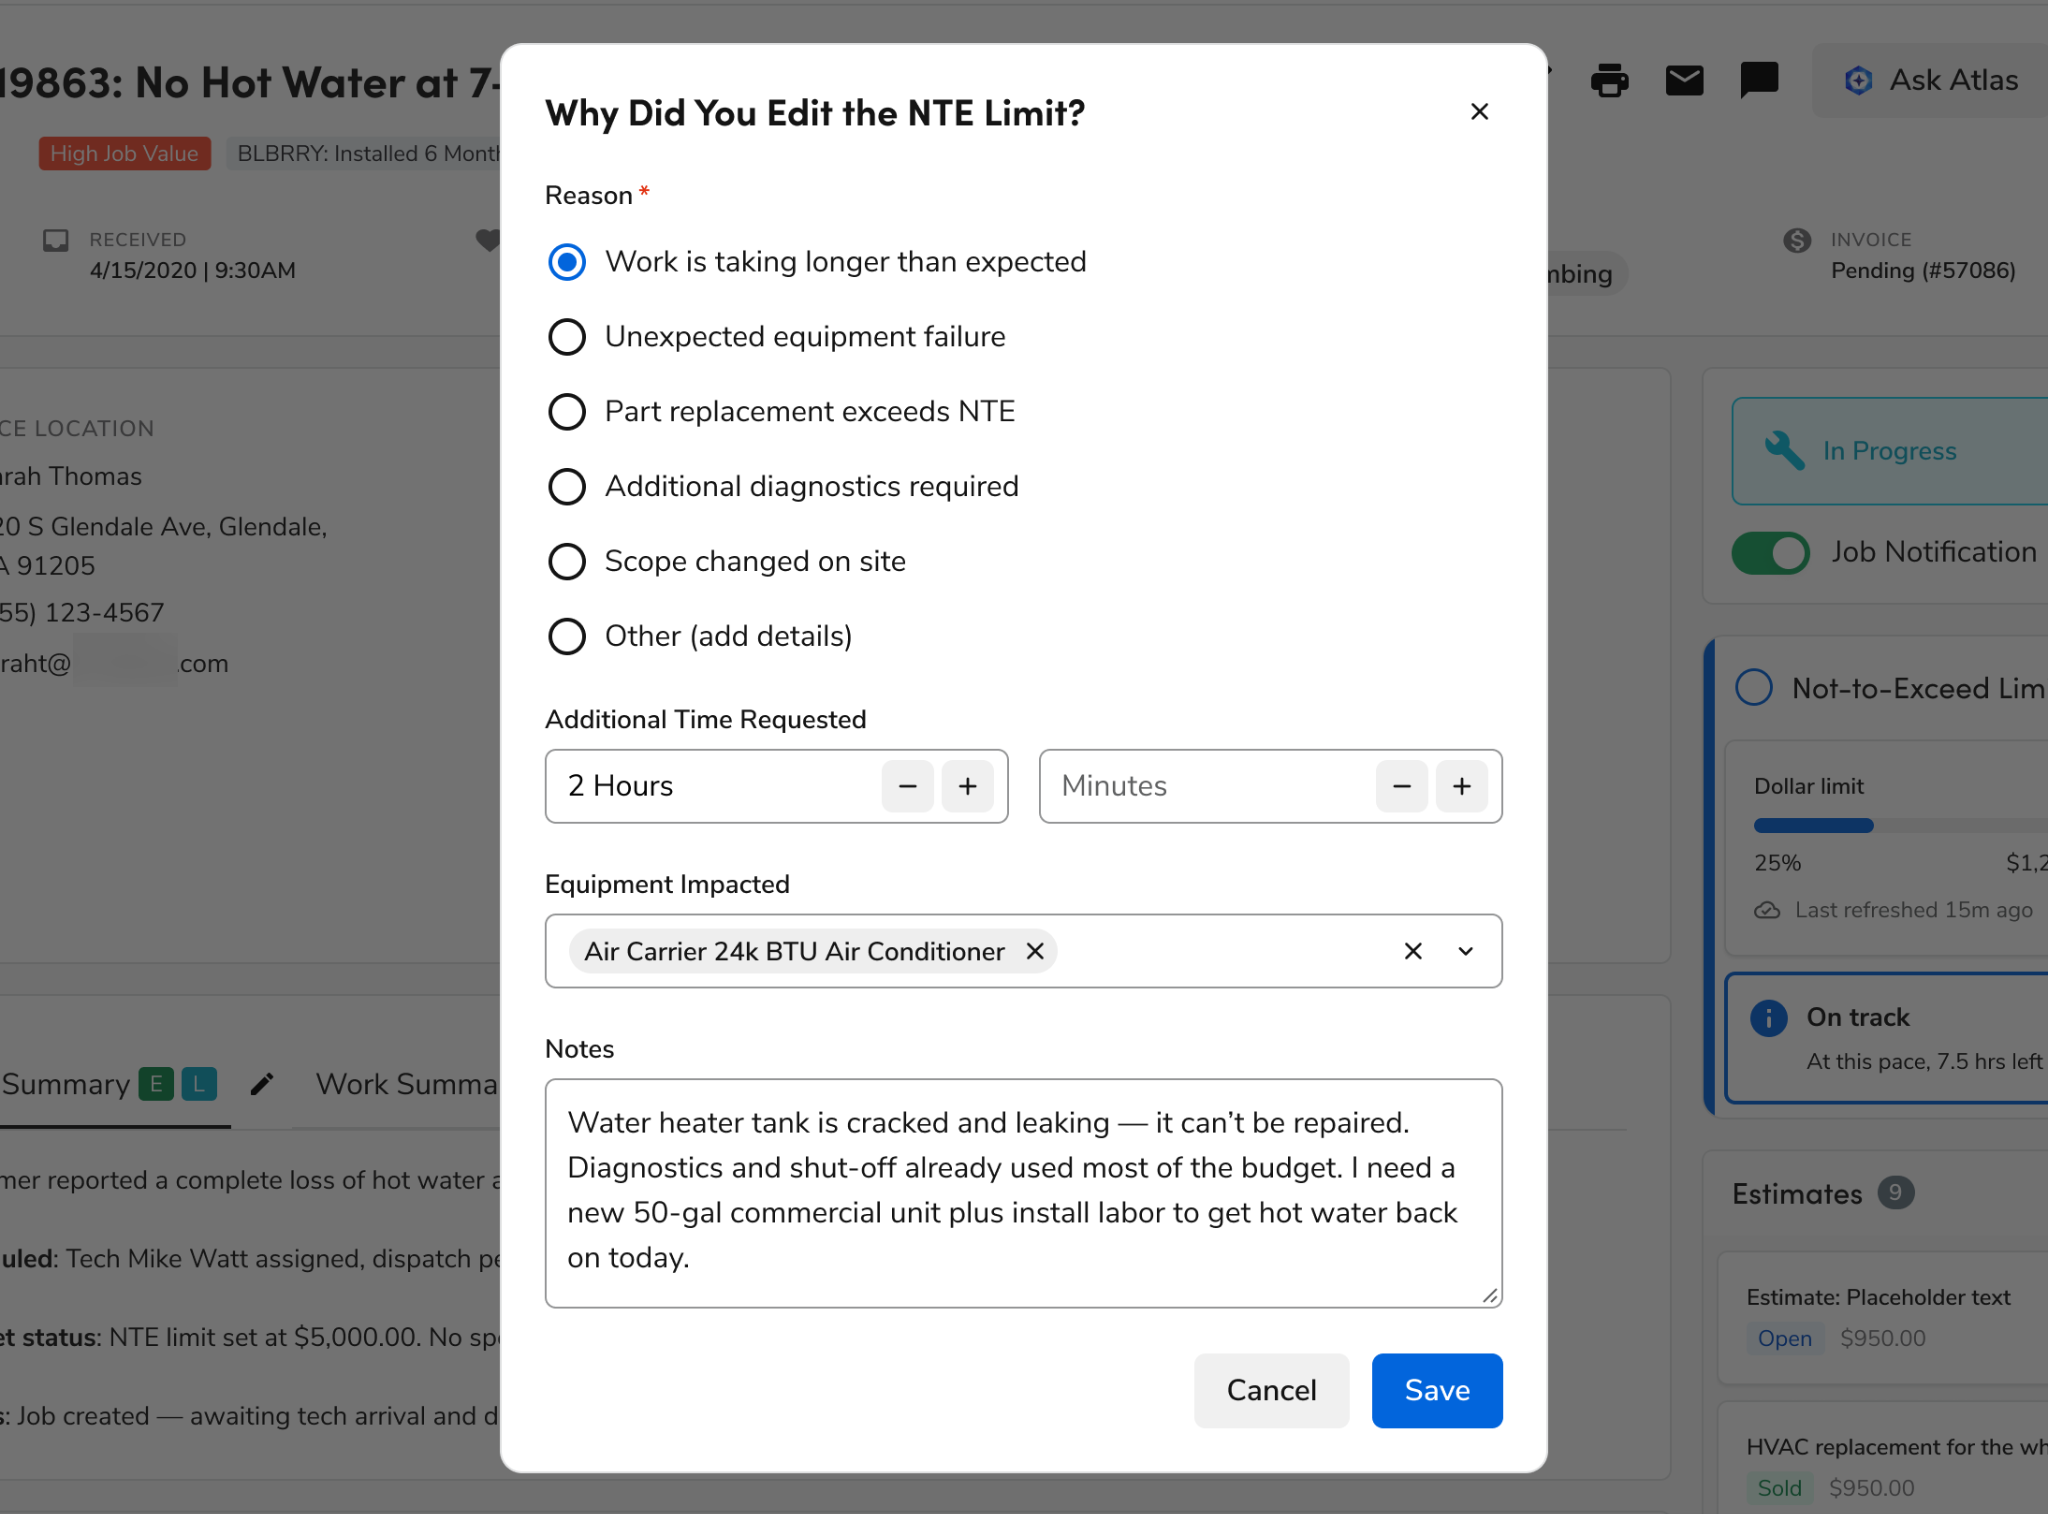
Click Save and Update. This submits a request; the limit changes only when someone approves it, as described in Step 6.
Step 8: Choose your NTE notifications
Go to the top toolbar and click Settings
. In the side panel, go to Communications > My Notifications.
NTE notifications are on by default. Turn off any you don't want for Web or Email.
.png?sv=2026-02-06&spr=https&st=2026-11-20T20%3A13%3A20Z&se=2026-11-20T20%3A33%3A20Z&sr=b&sp=r&sig=Zkt9G29YHEmU09usOpWuhETBRPgkqV3fHLah9oir2wE%3D)
Note: Threshold, request, approval, and denial notifications go to profiles with the Edit NTE permission. If you requested an increase, you're notified of the decision when you have the View NTE permission. The Mobile toggle doesn't apply to NTE notifications.