Overview
Signable Documents lets you send paperwork that needs a signature from a project or job in the Field Mobile App. Use it for documents outside your contracts, such as certificates of completion. Customers sign electronically via Docusign, and the signed copy is saved to the job or project.
Who uses this feature
Technicians, Office employees
Applies to all business types
Primarily benefits Roofing/Exterior trades
Feature configuration
This feature is currently in Private Preview and available for specific accounts. It is subject to change. If you want to enable this feature for your account, join the waitlist here or reach out to your primary ServiceTitan contact.
Account configuration and office setup are required to use this feature. Please contact your office for details.
The View/Edit Signable Documents permission is required to use this feature. Please contact your office for details.
The Field Mobile App is optimized for iOS, iPadOS, and Android phones and tablets. For more, see System requirements and mobile app information.
If you're using the Field Mobile App and need support, please contact Technical Support (through the office) or reach out directly to support@servicetitan.com.
Things to know
Signable Documents and Contracts are separate. Use a contract when the document is built from an estimate. Use a Signable Document for anything else that needs a signature and doesn’t include an estimate.
You can create and send a Signable Document from a project or a job. You don’t need to be dispatched to the job first.
The Signable Documents tab appears on projects and jobs. On a project, it lists documents sent from the project and from its jobs.
You can only send templates that your office created with the Signable Document template type.
Creating, editing, signing, and downloading documents need an internet connection.
Best practices
Review the document before you send it. Fields are highlighted by signer, so you can see which ones are yours.
If the customer needs to complete fields in the document, make them the first signer. The document must be complete before anyone can sign.
Tap Save as Draft if you aren’t ready to send. You can come back to the document later.
Attach only the photos the customer needs. These become email attachments, not part of the PDF document to be signed.
Use cases
A project manager sends a permit application to a homeowner for signature while the crew is still on site.
A technician sends a certificate of completion to the homeowner as work wraps up. The signed copy is saved to the job or project.
You send a warranty form and a lead paint disclosure together as one package, so the homeowner signs both at once.
You send a change order form to two homeowners at the same address, then countersign it after both have signed.
Create a Signable Document
The Create Signable Document window has three stages: Select Document Template, Review & Fill Document, and Add Recipients. At each stage, you can tap Save as Draft and return to the document later.
Start a Signable Document
Open the project or job and tap the Signable Documents tab.
Tap Create Signable Document.
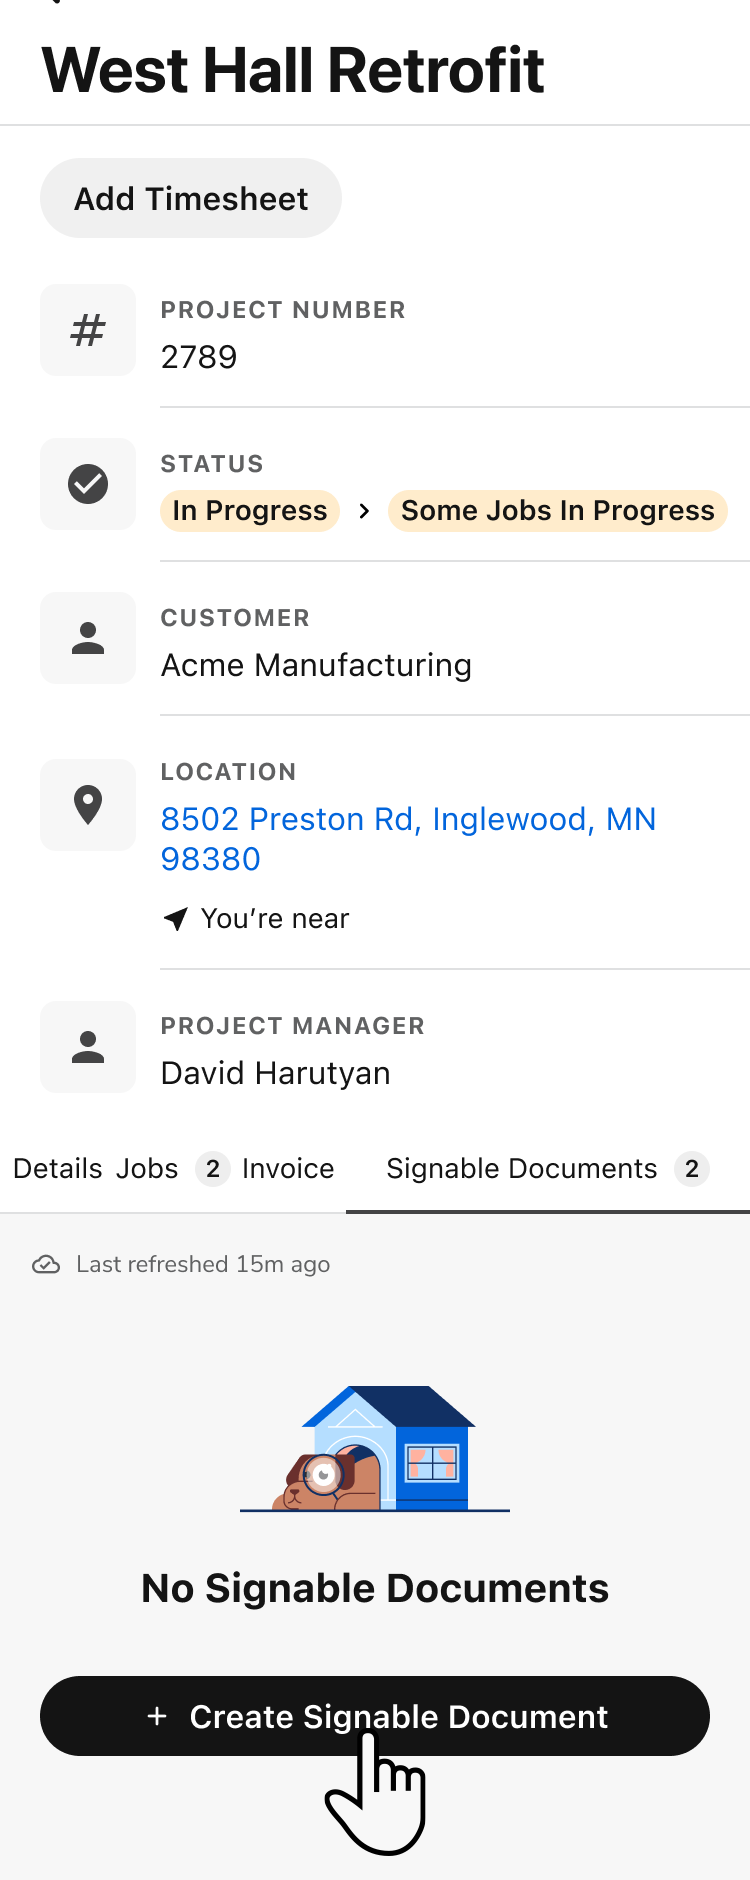
In the menu that opens, select This Project or the job you want to attach the document to.
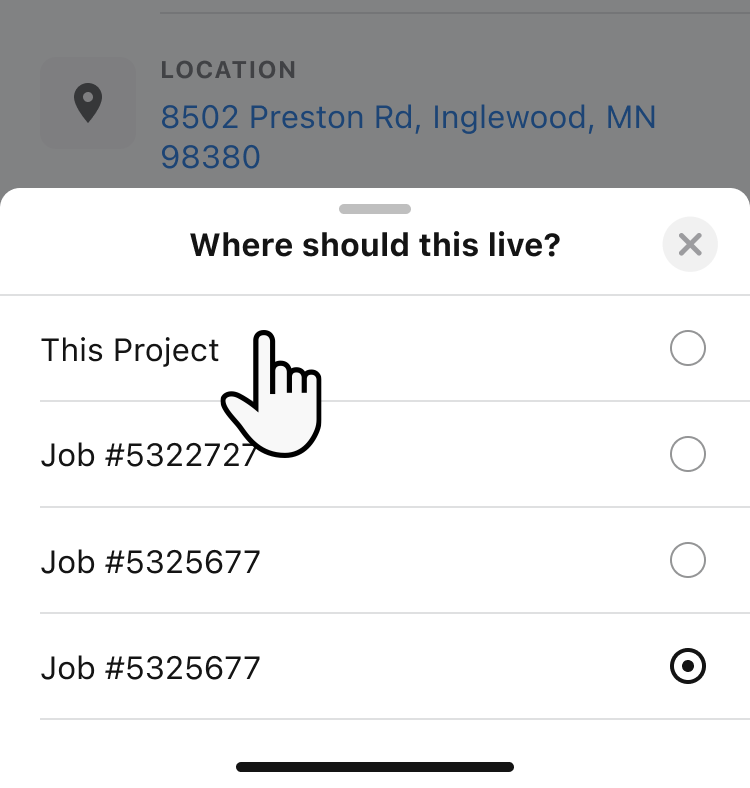
Note: If you select a job, the document also appears on the project.
Select document templates
In the Document Name field, enter a name that identifies the document.
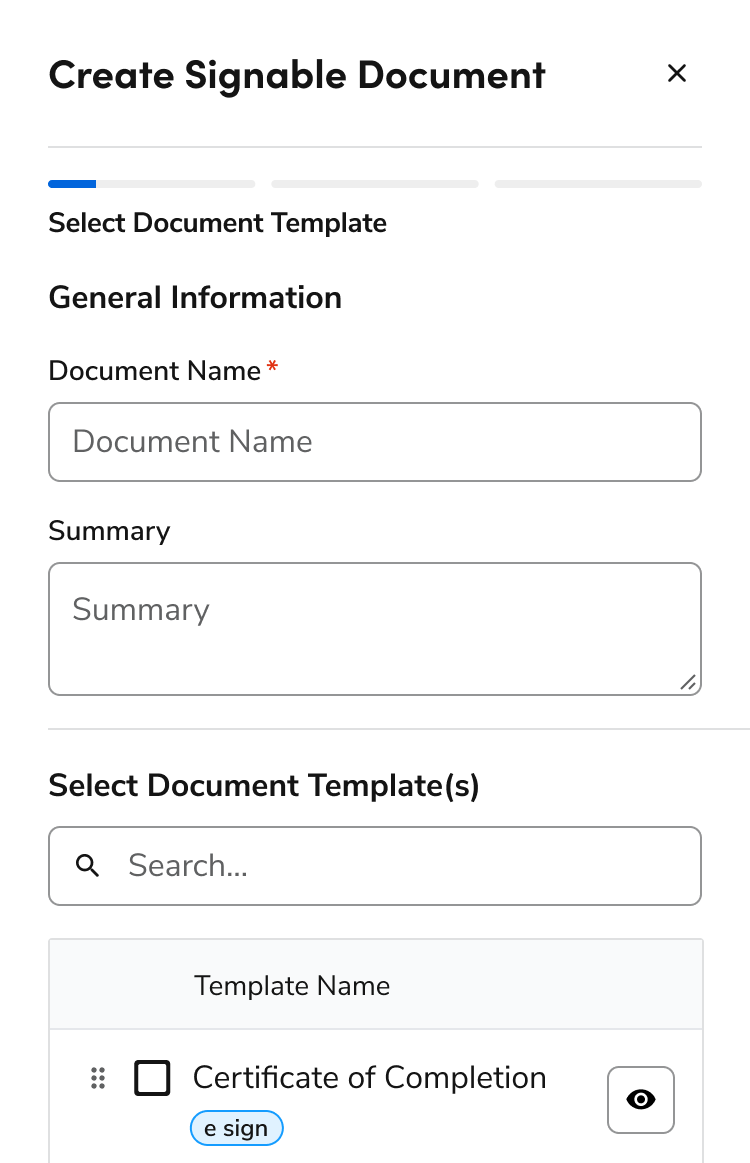
(Optional) For Summary, enter a short description of the document.
In the Select Document Template(s) section, select each template you want to include.
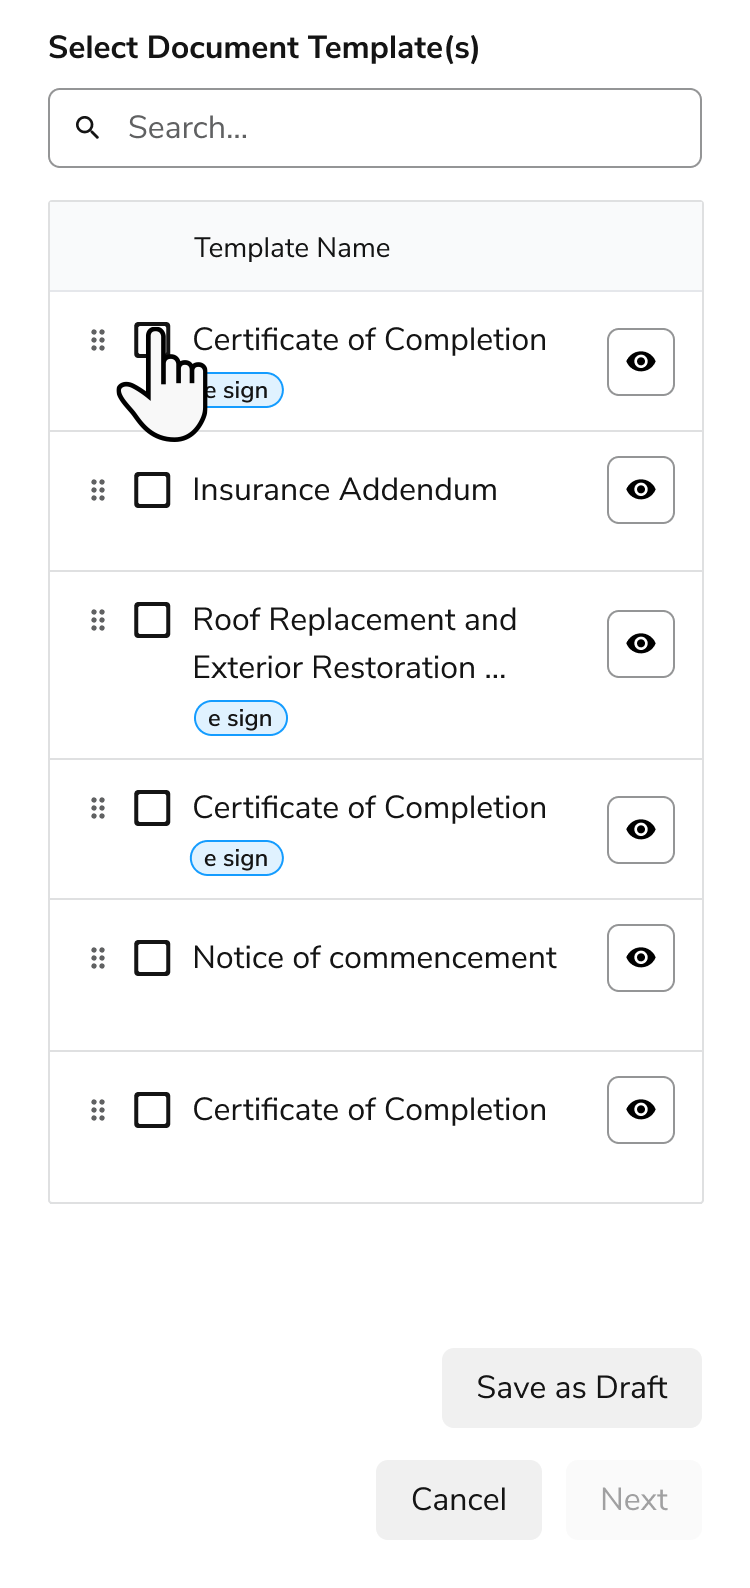
Tip: Use Search to narrow the list. To preview a template before you add it, tap Preview [eye icon].
Note: Templates that include a signature field show an e sign label. You need at least one template with this label to send the document.
To change the order of the templates, drag them into the order you want.
Tap Next.
Review and fill the document
Review the document as your recipients will see it.
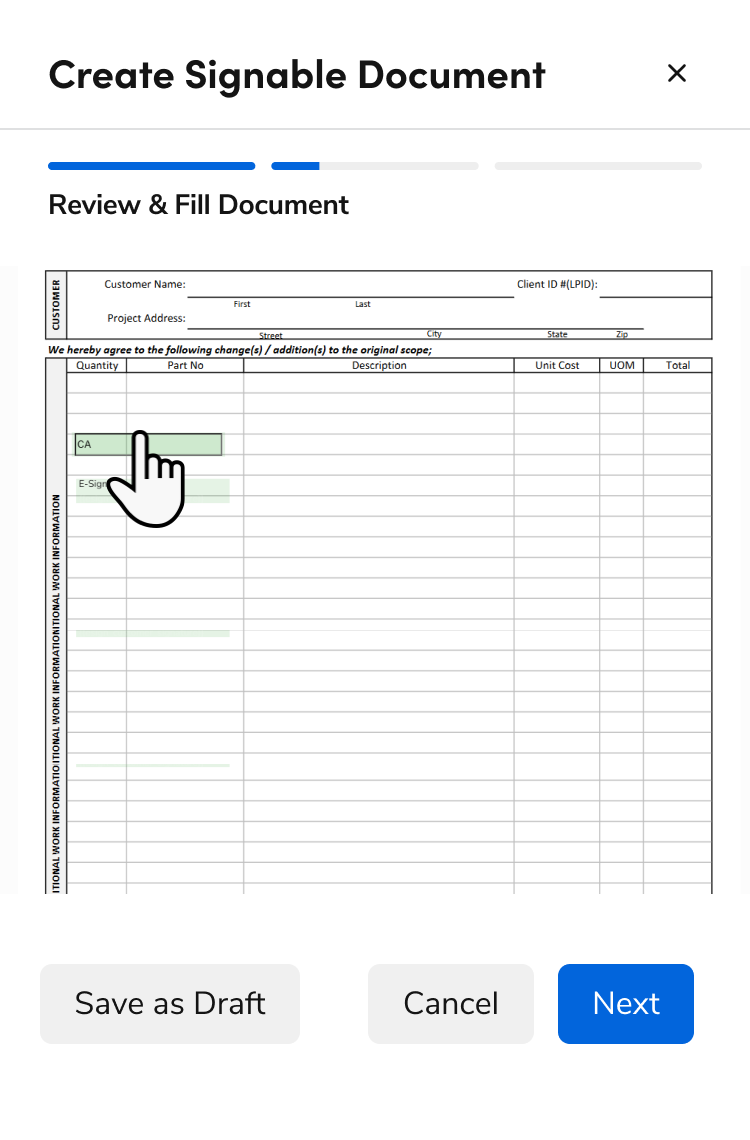
Complete the fields assigned to you. Fields are highlighted by signer.
Note: You can’t fill in fields assigned to your recipients. They stay blank until each recipient completes them when they sign.
Tap Next.
Add recipients
Under From, enter or confirm the Name and Sender Email the signature request comes from.
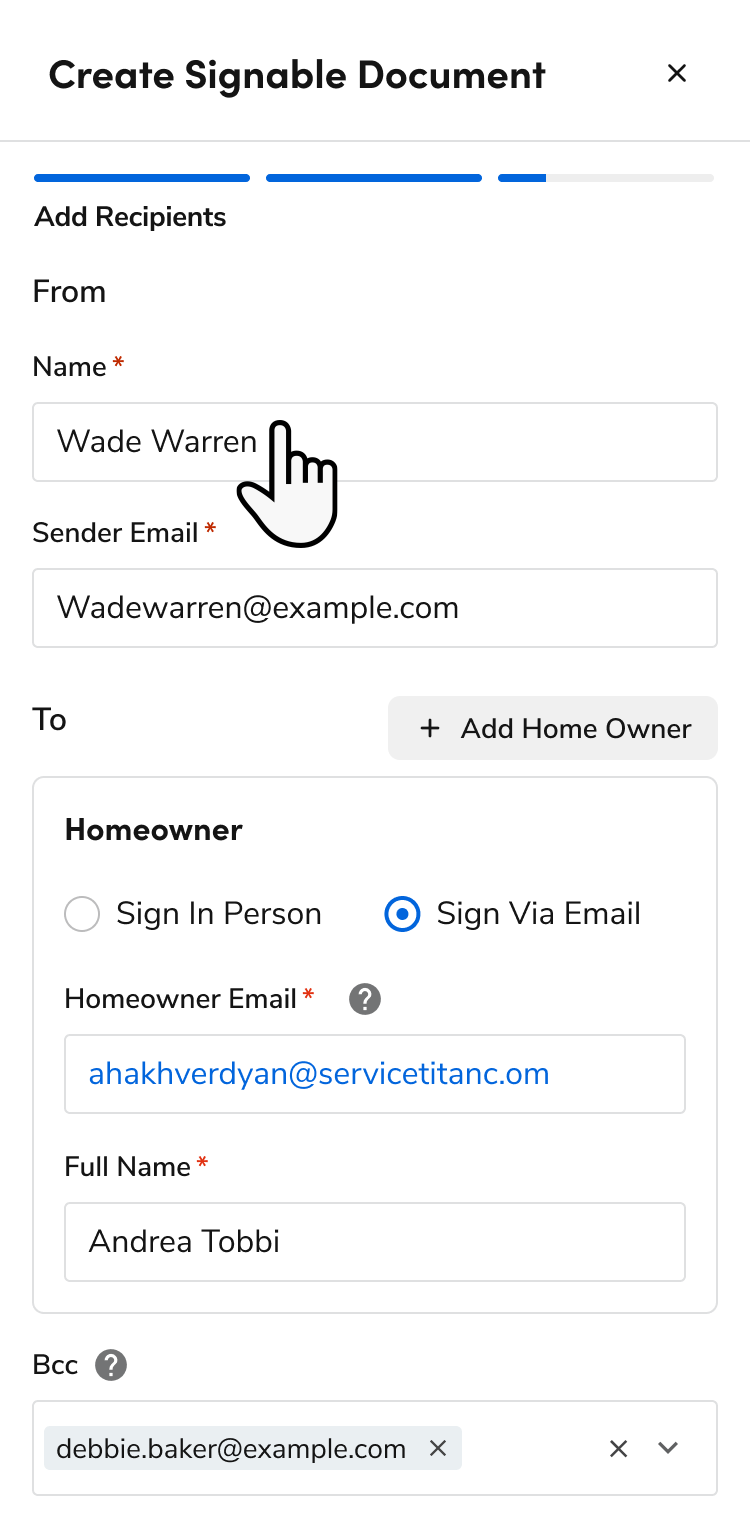
Under To, select how the homeowner signs:
Sign In Person
Sign Via Email
Enter the homeowner’s Full Name and Homeowner Email.
To send the document to another signer, tap + Add Home Owner, then repeat steps 2 and 3.
If the document needs a countersigner, enter their Full Name and Countersigner Email, then select a sign method.
(Optional) For Bcc, add anyone who should get a copy of the request email.
Write the email and send
For Subject, enter the subject line for the email.
For Summary, enter the message your recipients see in the email. Use the formatting toolbar to style it.
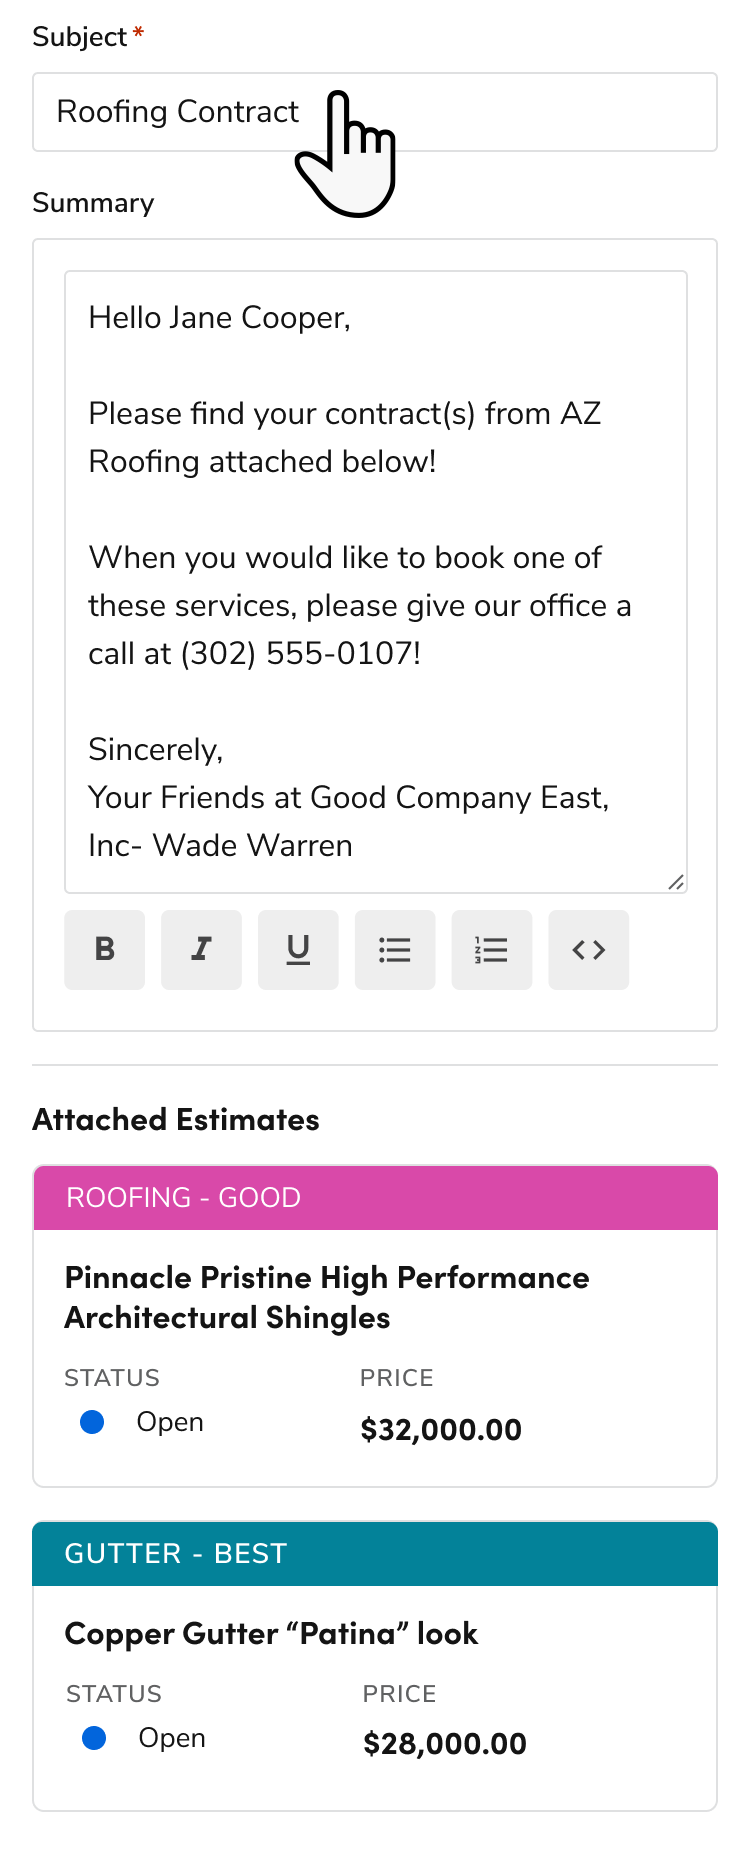
(Optional) To include photos with the email, tap Attach files.
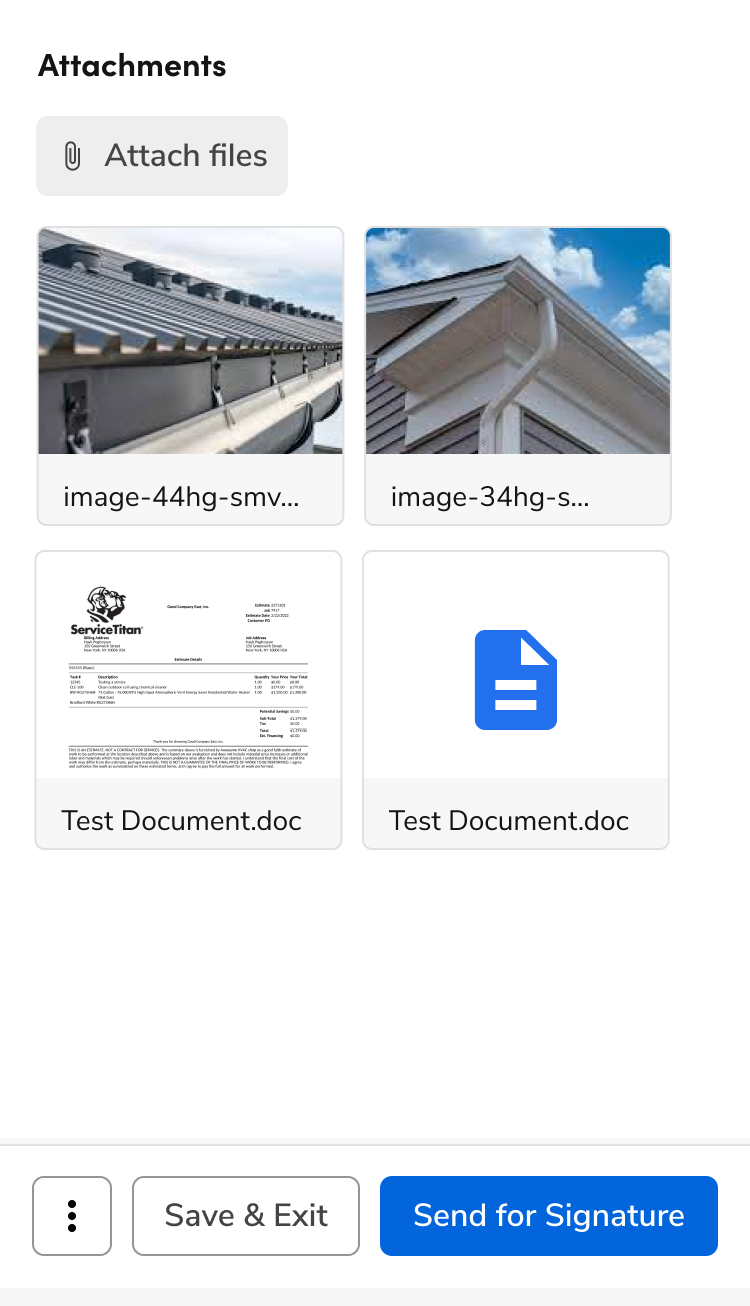
Note: Attachments are sent with the email. They aren’t added to the document itself. You can attach JPEG, JPG, and PNG files up to 10 MB.
When finished, tap Send for Signature.
Track signatures and countersign
Track signature status
Open the project or job and tap the Signable Documents tab.
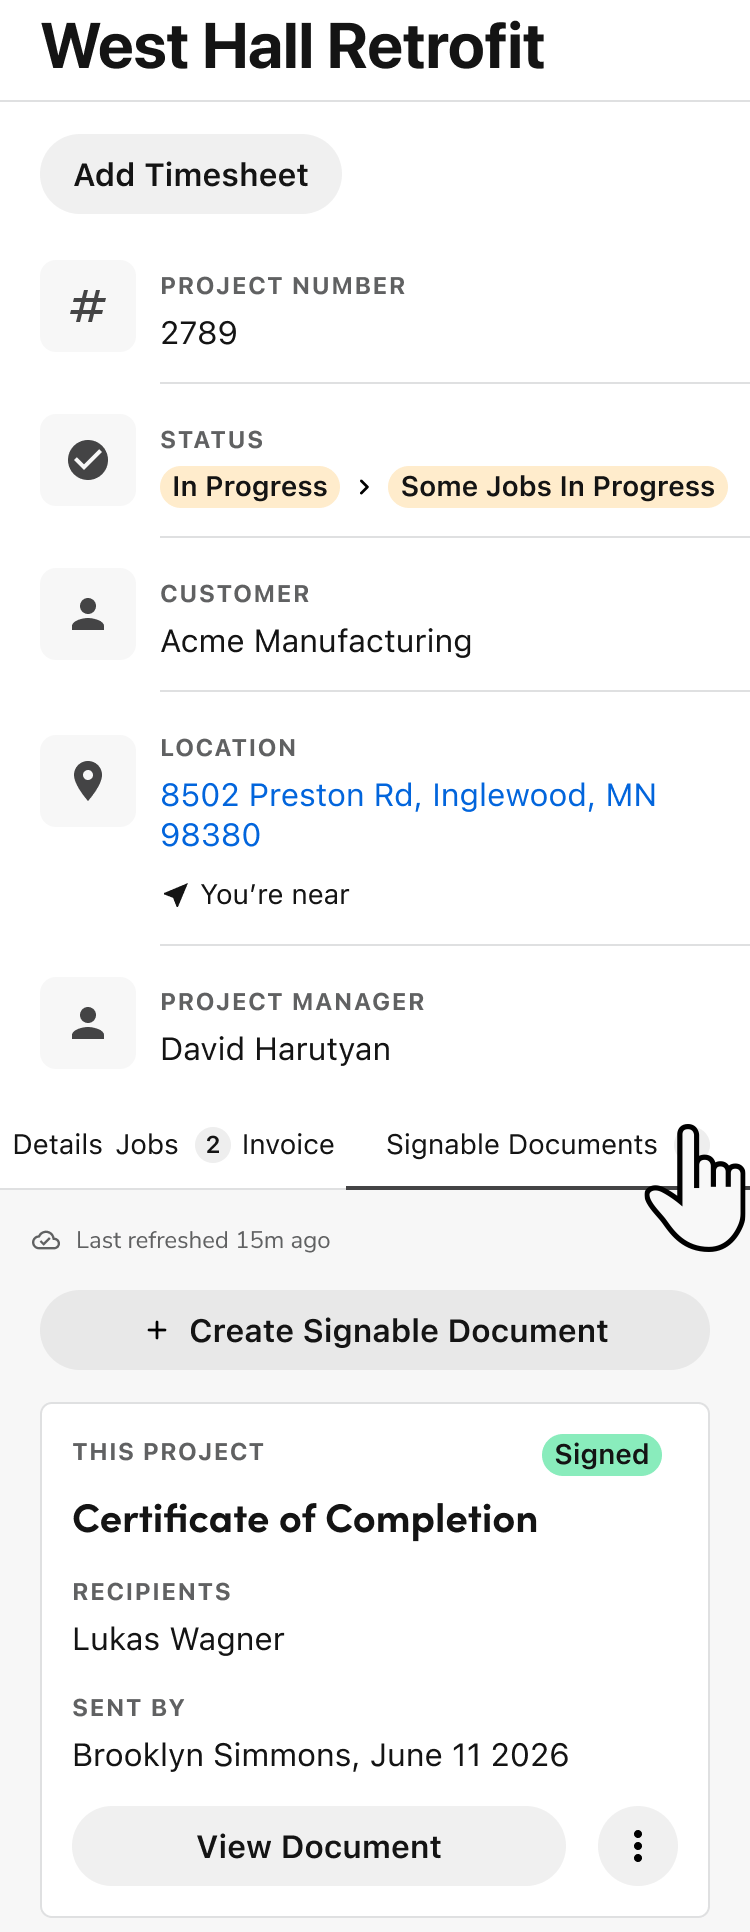
View the card for each document. Each card shows the status, document name, recipients, who sent it, and when.
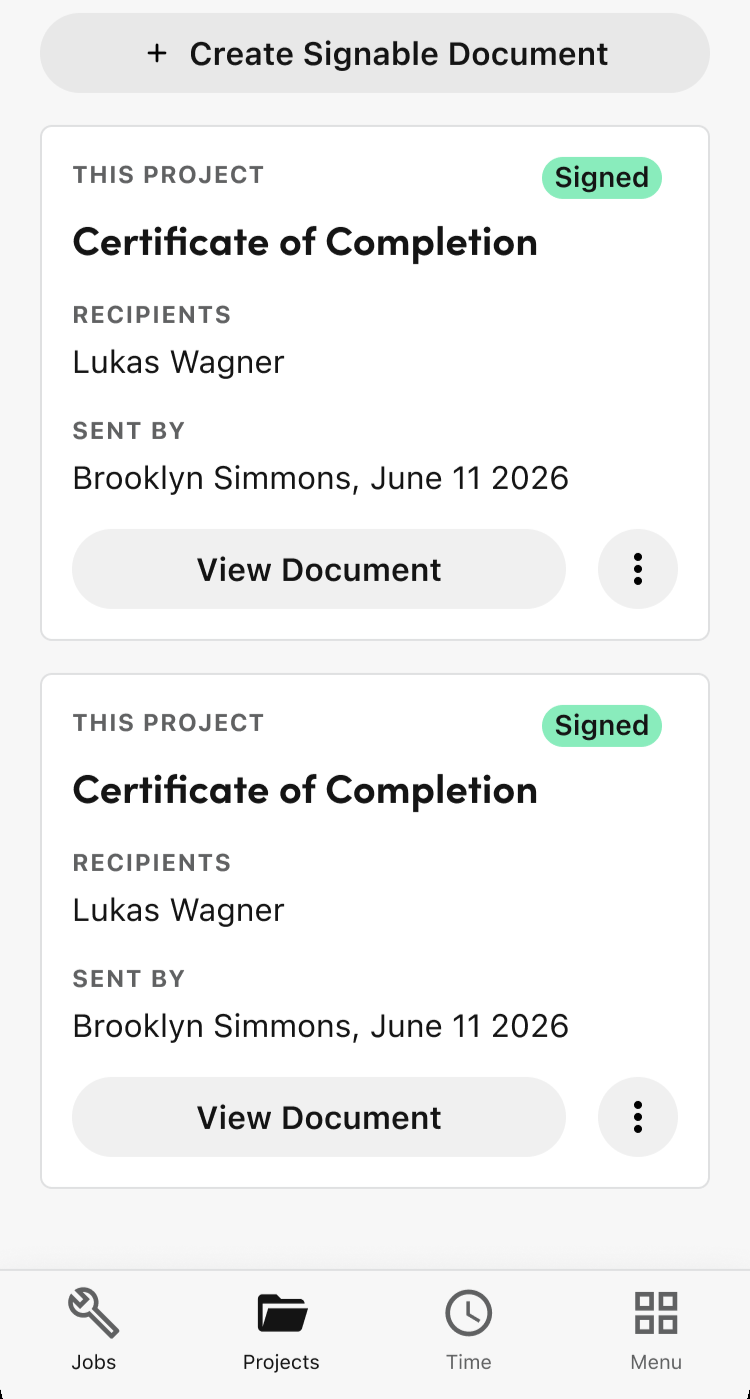
Note: On a project, each card shows where the document was sent from, either a job number or This project. To see every recipient, tap Show more.
Check the status of each document:
Draft: Created but not sent
Sent: Sent and waiting on a recipient
Partially Signed: At least one recipient has signed
Ready for Countersignature: All other signers have signed
Signed: All required signatures are complete
Note: When every required signature is collected, the completed document is emailed to all signers and saved to the job or project.
Countersign a document
When a document needs your countersignature, a banner appears at the top of the Signable Documents tab.
Open the project or job and tap the Signable Documents tab.
On the card with the Ready for Countersignature status, tap Sign Now.
On the screen that opens, follow the prompts to sign the document.
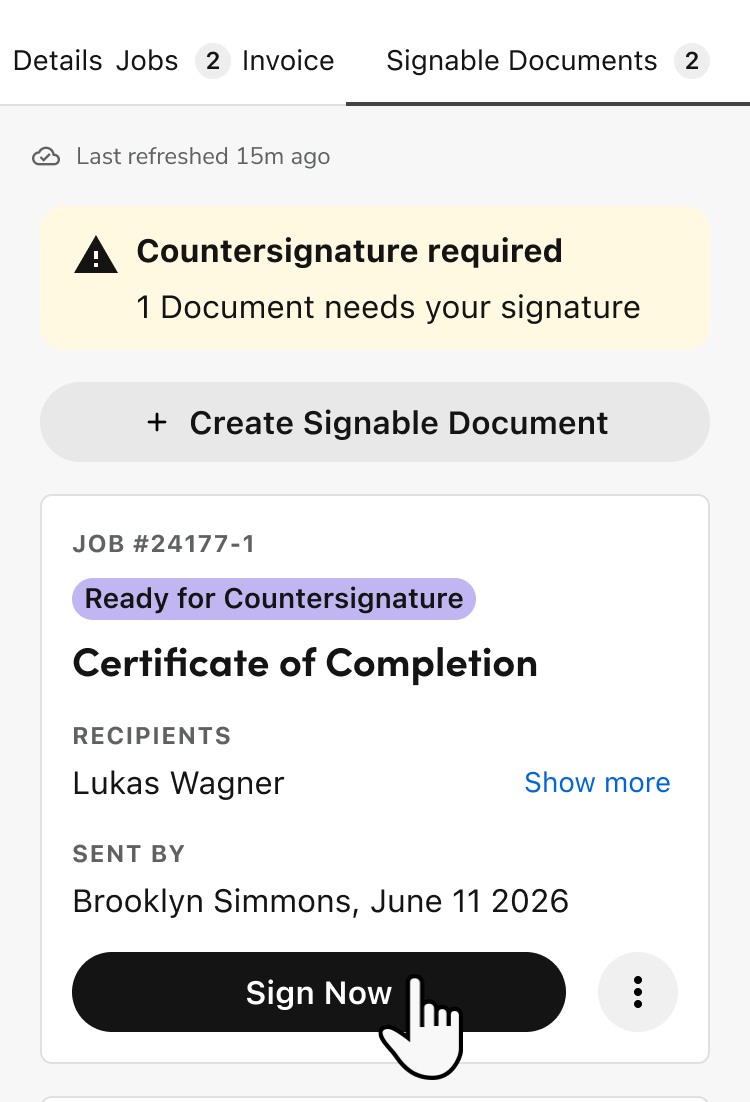
Note: Sign Now only shows if the email address on your account matches the countersigner on the document. Otherwise, you see View Document, which opens a PDF of the document.
After you sign, the banner disappears and the status changes to Signed.
Manage a Signable Document
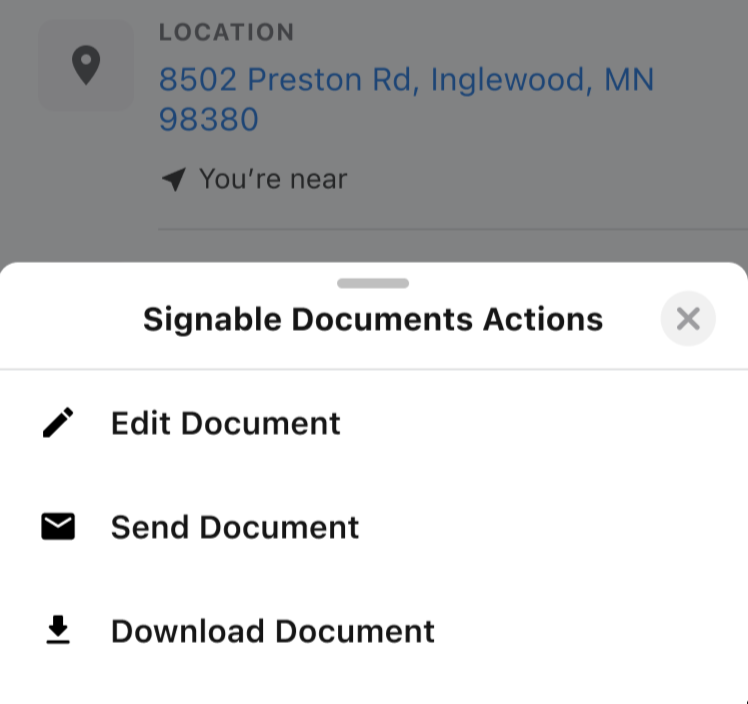
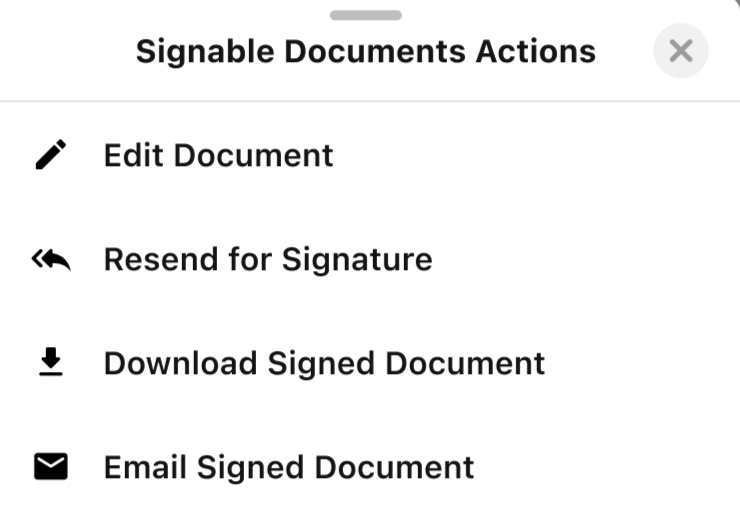
On the card for the document, tap More
 .
In the menu that opens, tap the action you want. For a document that’s still a draft, you can:
Edit Document: Change the document name, templates, and fillable fields
Send Document: Go to the recipient screen to send the document. This is only available when all required fields are complete
Download Document: Save the document as a PDF to your device
For a document that has been sent, you can:
Edit Document: Change the document name, templates, and fillable fields
Download Signed Document: Save a PDF with the current signature statuses to your device
Email Signed Document: Write an email and choose recipients. The signed PDF is attached
Resend for Signature
Note: Downloads run in the background. If a download fails, check the Notifications Hub.
Caution: These actions need an internet connection. If you’re offline, the actions are unavailable.